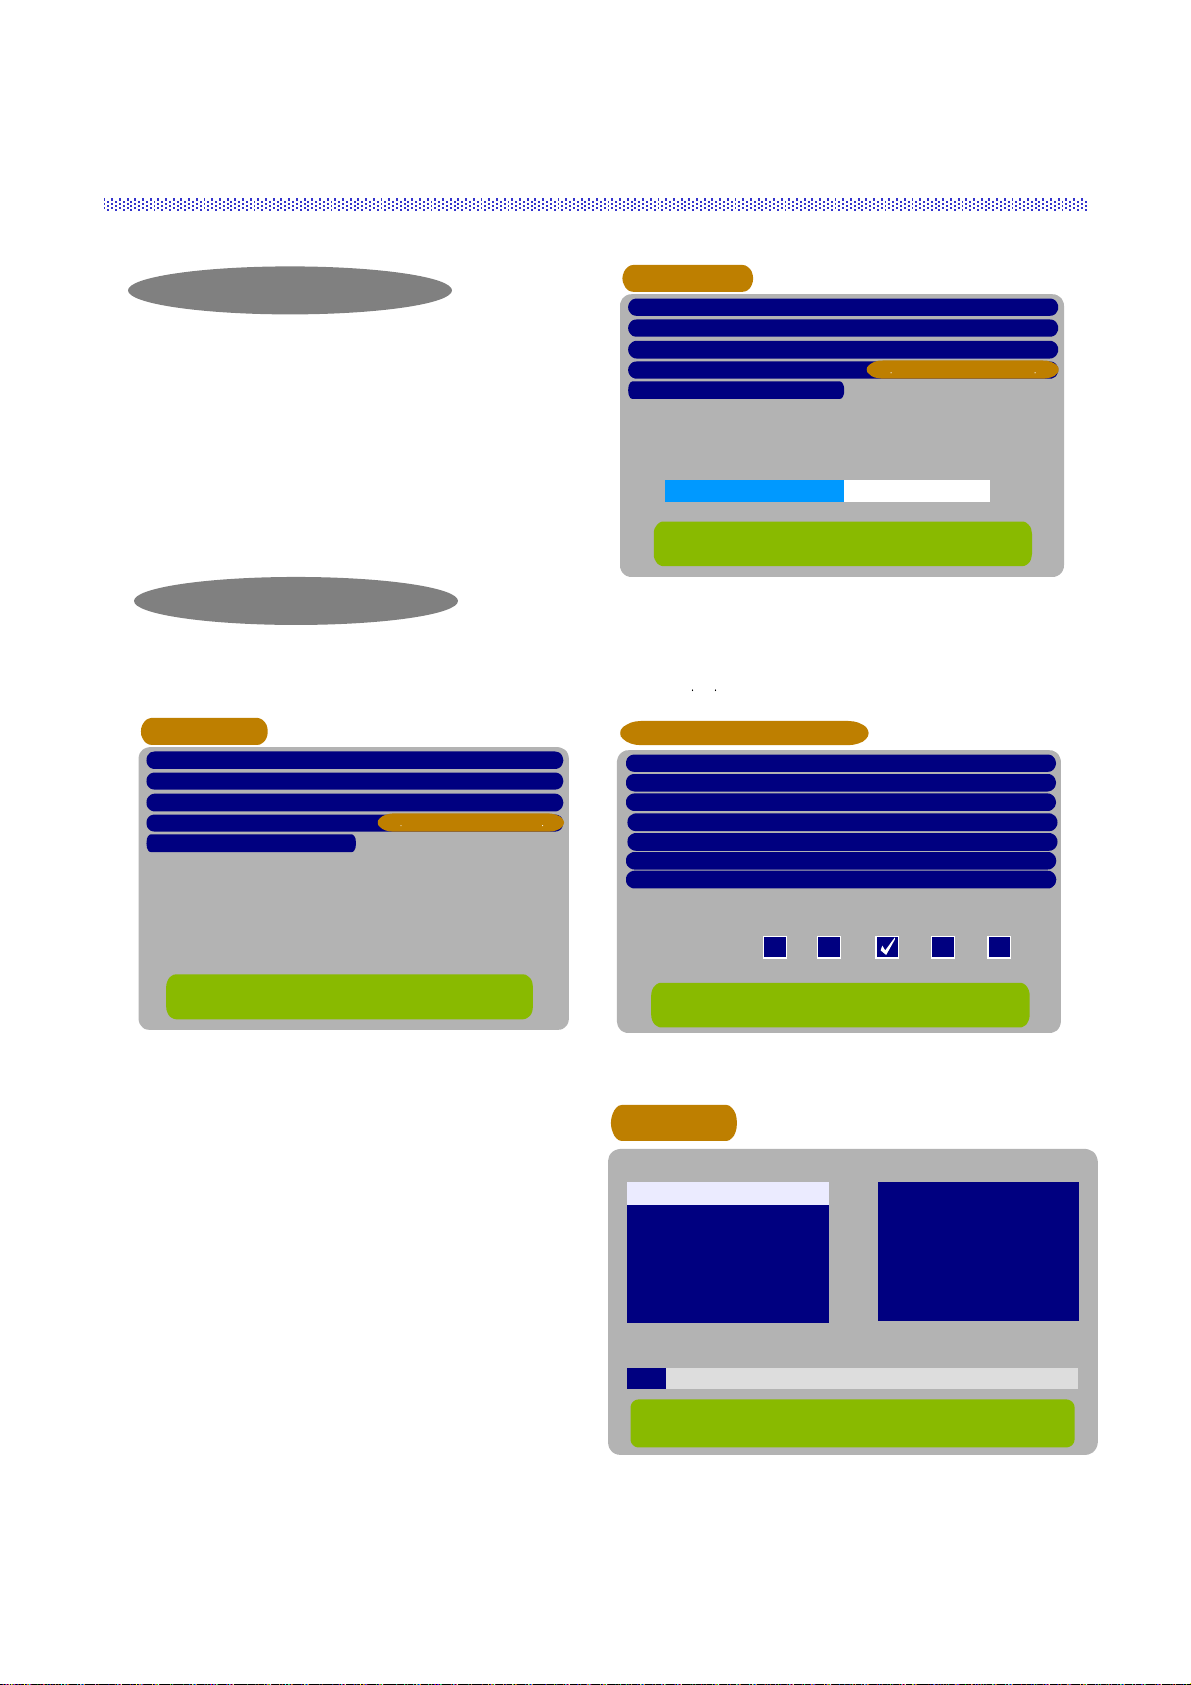
Hirschmann CSR 3402 QAM Bedienungsanleitung

User’s Manual
DIGITAL CABLE NETWORK TERMINAL
WITH COMMON INTERFACE
CSR 3402 QAM
MENU OK

CONTENTS
2.
3. Remote Control Unit (RCU) ---------------------------------------------------- 4
4. Getting Started --------------------------------------------------------------------- 5
5. Operation and Menu Program ------------------------------------------------- 7
6. Specifications ---------------------------------------------------------------------- 16
Front & Rear View ---------------------------------------------------------------- 3
1. Features ----------------------------------------------------------------------------- 2
1
Trade Mark of the DVB Digital Video Broadcasting Project (1700)
AC power switch is on the rear panel of the receiver.

1. Features
2
1. MPEG 2 Video(MP@ML)
2. MPEG 1 Audio Layer 1, Layer 2
3. MPEG-2 Digital & Fully DVB Compliant
4. Capable of Interfacing the CAMs of DVB Common Interface Standard
5. Automatic Channel Set-up for CATV network
6. Capable of Auto scanning the frequency for QPSK to QAM Conversion system
7. QAM demodulation
8. On-Screen Display with 256-Color Full Resolution
9. LD Quality Video, CD Quality Audio
10. Plug & Play Installation
11. Parental lock
12. RS232C port for additional information service and updating IRD control software
13. 4-digit 7-segment LEDs on the front panel displays channel information
14. Displays Local Time on the front panel, when it is on stand-by mode
15. Power recovery function
16. 64-Step Volume control
17. Favorite channel function
18. User friendly OSG menu with full function
19. IR remote control
20. Last channel memory function
21. Variable aspect ratio (4:3, 16:9) with Pan vector
22. EPG for on-screen channel information
23. Receiver-to-Receiver function for operating program and data transfer.

MENU OK
VIDEO
AUDIO
ANT IN
TV/VCR
FRONT PANEL
2. Front & Rear View
REAR PANEL
3
AC Power
Cord Cable Input
Loop Through
Note) All cables used for connecting the receiver should be well-shielded type cable.
2 CAM Slots
AC power switch

3. Remote Control Unit (RCU)
0
9
Switches the Receiver ON/OFF
Switches the sound ON/OFF.
Direct choice of TV / Radio channel and other commands by
numeric keys.
When you want to see the main menu or
return to the previous menu.
Return to the current video viewing at any time
Selection of program, highlighted line or parameter value.
Also, you can see TV/Radio channel list while watching TV
or listening to Radio channel.
Channel Up
Channel Down
Volume Up (Page Up )
Volume Down (Page Down)
Switches between TV/Radio mode.
Select the audio language or the sound track you want
among data to be transmitted from the satellite.
To return to current channel, press or EXIT.
4
Shows your favorite channels edited.
(Before the operation, FAV edition should be done
in “Edit TV channel” menu.)
Shows the list of available channels.
(Only available when provided by the broadcaster)
Shows program information provided by the broadcaster
Shows Subtitle menu to select the subtitle language.
Shows a thumb nail representation of the current channel in the
“Edit TV Channel”, “Parental Lock” and “TV Guide”.

VIDEO
AUDIO
ANT IN
TV/VCR
VIDEO
AUDIO
ANT IN
TV/VCR
4. Getting Started
Connect the coaxial cable from the Cable socket into ANT IN socket of the receiver.
(Connector should be adapted finger-tight.)
Please do NOT PLUG the receiver into Mains until you finish making all connections to the unit.
5
Receiver to TV with SCART
Connect the “TV” SCART on the receiver with the SCART of TV.
Receiver to VCR, TV with SCART
Connect the “TV” SCART on the receiver with the SCART of TV.
Connect the “VCR” SCART on the receiver with the SCART of VCR.
RF Connector
RF Connector RF Connector

To watch payable program channels, a CI CA Module and a smart card of specific
service provider are necessary. You may ask for these to the shop which you had
purchased the receiver.
In case you subscribed to more than one service provider, you should insert proper
CI CA Module with matching smart card to get access to each bouquet. This
receiver shall accept two CI CA Modules with two smart cards at the same time.
If any CI CA Module with smart card is not inserted in the receiver, only free
(FTA; free-to-air) programs are available.
Here’s how to get access to the pay channels after your subscription to the provider
and your purchase of the CI CA Module.
Smart Card and CI CA Module
CI CA Module (Common Interface Conditional Access Module)
Smart Card
This side into the slot of the receiver
6

5. Operation and Menu Program
Press on the remote control unit (RCU ).
(or press /I on the front panel of the receiver)
Press to display Main Menu on the screen.
The initial code is set as [0000] and you can change it (see “Change PIN code” in page 10).
Above menu for inputting the PIN code is displayed only when the Installation & Edit Lock is set as [ON].
Main Menu
Installation
Select menu using channel up/down keys or numeric keys.
Please note that is always a confirmation of your selection.
To return to the previous menu, press MENU.
7
Installation Lock
Enter PIN code
[ ? ? ? ? ]
Installation
5. A/V Output Setting
1. Channel Setup
2. QPSK-QAM Setting
3. Language Setting
4. Local Time Setting
Channel Setup
Main Menu
6. Installation
5. Edit
1. TV Channels
2. Radio Channels
3. Parental Control
4. Timer
7. Common Interface
Main Menu
6. Installation
5. Edit
1. TV Channels
2. Radio Channels
3. Parental Control
4. Timer
7. Common Interface
6. Reset(Factory Default)
Channel Setup
Symbol Rate
Modulation 64
Search Type CATV Search
Start Search(Press OK)
0/22kHz Control Off
0.000
Frequency 0.0
Recommended search for first installation,
no further entries necessary
To return to the previous Menu, press MENU
There are 3 kinds of search type.
1) CATV search
2) Manual search
3) QPSK-to-QAM search
You can select the search type by pressing ,key on
the Search Type bar.
CATV Search
By selecting this search type, the receiver will search
the TV and Radio channels digitally transmitted
from the cable network automatically .
Then, press OK button on the “Start Search” bar, the search will be started. Refer the Channel Search menu on the
page No. 8.

8
Channel Setup
Symbol Rate
Modulation 64
Search Type QPSK-to-QAM Search
Start Search(Press OK)
0/22kHz Control Off
0.000
Frequency 0.0
Free parameter configuration,
long search time possible.
To return to the previous Menu, press MENU
Channel Setup
Symbol Rate
Modulation 64
Search Type Manual Search
Start Search(Press OK)
Off
0.000
Frequency 0.0
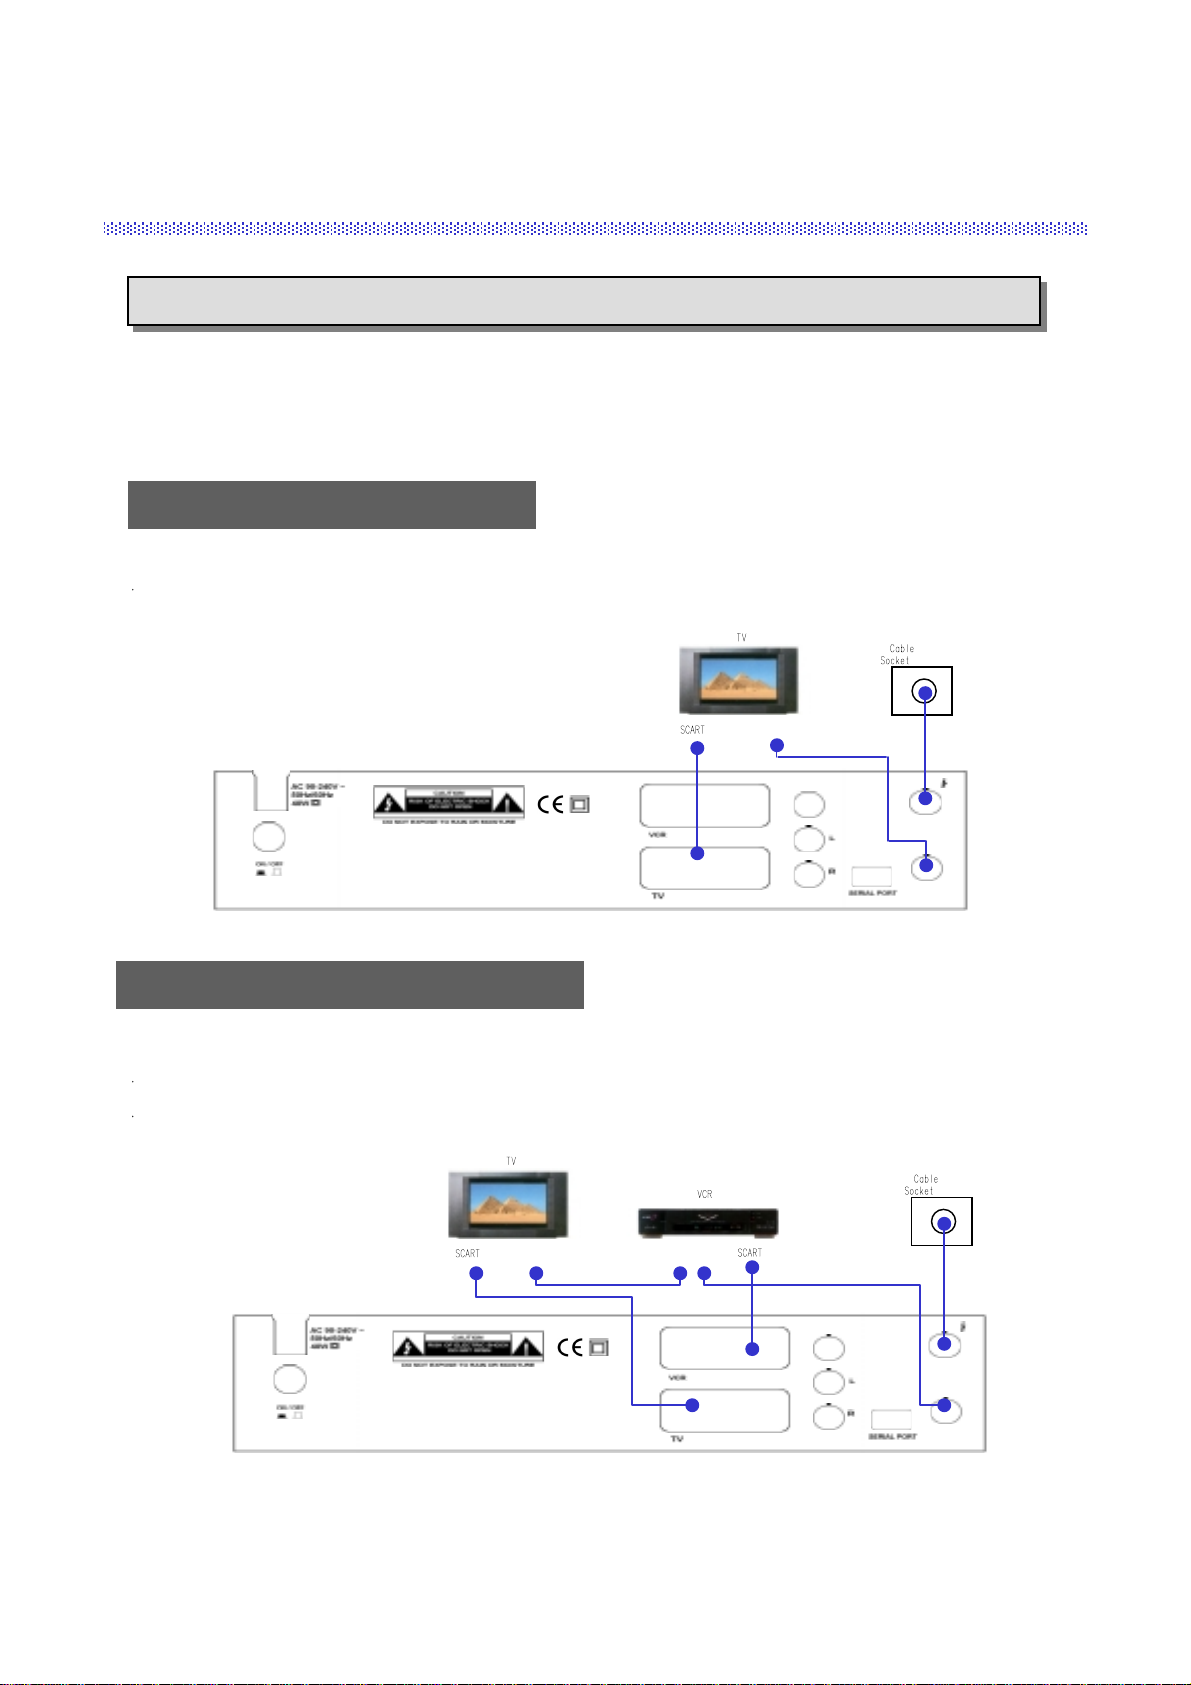
Search for Single Cable Network
Symbol Rate, QAM Modulation and Cable Network
center frequency have to be entered
To return to the previous Menu, press MENU
Signal Quality 55%
QPSK-to-QAM Setting
Stop Frequency
Symbol Rate1 6.900
Off
858.0
Start Frequency 114.0
To return to the previous Menu, press MENU
Symbol Rate2 6.875
Symbol Rate3 6.111
Symbol Rate4 0.000
Symbol Rate5 0.000
Modulation 16 32 64 128 256
Channel Search
TV Channels Radio Channels
Channel Searching Status
0% 50% 100%
154. CARSAT
155. Beta BC
156. BD1
157. TAQUILLA 6
158. TAQUILLA 7
159. TAQUILLA 8
160. ESTILO
153. ARTE 41. MUSICALS
42. REQQAE
43. COUNTRY
44. NEW CNTRY
45. LATIN
46. KL. SYMPHON
47. KLASSIK
48. OPER
Index Frequency Symbol Rate Modulation
1 410 6.900 64
Manual Search
By selecting this search type, you can search the
channels by inputting the parameter for Frequency,
Symbol Rate and Modulation type.
After inputting the parameters, press OK button on the
“Start Search” bar, the search will be started. Refer the
Channel Search menu
* In order to use this Search Type, you need the exact
information of the channels.
QPSK-to-QAM Search
To search the channels by this type, first you should input the parameters on the QPSK-to-QAM Setting menu.
Then, select QPSK-to-QAM search on the “Search Type” bar with ,keys.
After selecting the search type, and press the
OK button. Then, the Channel Search will be
started.

9
Language Setting
English
English
Main Audio Language
2nd Audio Language English
Menu Language
To return to the previous Menu, press MENU
Subtitle Language English
Language Setting
You can select the desired language for the OSG (On-
Screen Graphics) display using the , keys when
the “Menu Language” option is selected. Similarly
you can selected a different audio channel when the
“Audio Language” option is selected. This option
allows you to select a different language to listen to if
supported.
Subtitle
None
Ita
Eng
Subtitle
Select “Subtitle language” at “Select Language Setting” menu.
While watching your wanted channel, the subtitle shall be displayed only when
the selected subtitling language is provided by the broadcaster.
To check if subtitle language is available, press “ ” key on the remote control
unit, then all the available subtitle languages will be shown on the screen.
Local Time Setting
* If GMT is provided by the broadcaster, you may get the time using the GMT provided by broadcaster (or)
you may get your own time. (Please be aware that the GMT information provided by the broadcaster may
not be correct sometimes.)
A) If GMT is provided, select “Yes” for GMT usage, the area of the selected place(time zone) and
summer time On/Off. You can adjust the time from +59 to -59 minutes by using the Time offset.
B) If GMT is not provided or you want to set the time yourself, select “No” for GMT usage, the area
of the selected place(time zone) and set your local time using volume up/down keys ( , ).
Local Time Setting
[ +00 ]
Time offset
[ Off ]
GMT usage [ Yes ]
Selected time zone
[ London ]
Summer time
Local Time = 01 : 27
Local Time Setting
Minute [ 27 ]
Hour [ 01 ]
GMT usage [ No ]
Selected time zone
[ London ]
Time adjustment
Local Time = 01 : 27
Inhaltsverzeichnis
Andere Hirschmann Netzwerk-Hardware Handbücher
Beliebte Netzwerk-Hardware Handbücher anderer Marken

Matrix Switch Corporation
Matrix Switch Corporation MSC-HD161DEL Bedienungsanleitung

B&B Electronics
B&B Electronics ZXT9-IO-222R2 Bedienungsanleitung

Yudor
Yudor YDS-16 Bedienungsanleitung

D-Link
D-Link ShareCenter DNS-320L Bedienungsanleitung

Samsung
Samsung ES1642dc Gebrauchsanweisung

Honeywell Home
Honeywell Home LTEM-PV Montageanleitung


