Huepar DT03CG Bedienungsanleitung

Precision 3D Pro Laser
DT03CG/DT03CR
1~17
18~35
36~52
53~69
70~86
Español
Italiano
Français
Deutsch
English
87~99
日本語
V2

Thank you for purchasing Huepar DT03CG/DT03CR
Laser Level.
Before using the product, please read this manual
thoroughly to ensure proper use.
• Product Overview
• Function / Application
• Special Product Features
• Safety Instructions
• Battery Use & Safety
• Positioning Laser Lines
• Turn ON/OFF the Laser Tool
• Lines Switching
• Self-leveling Mode
• Slope Function ≤ 3.5°
• Tilt Function
• Pulse Mode
• Brightness Adjustment Function
• Specifications
• Warranty
-1-
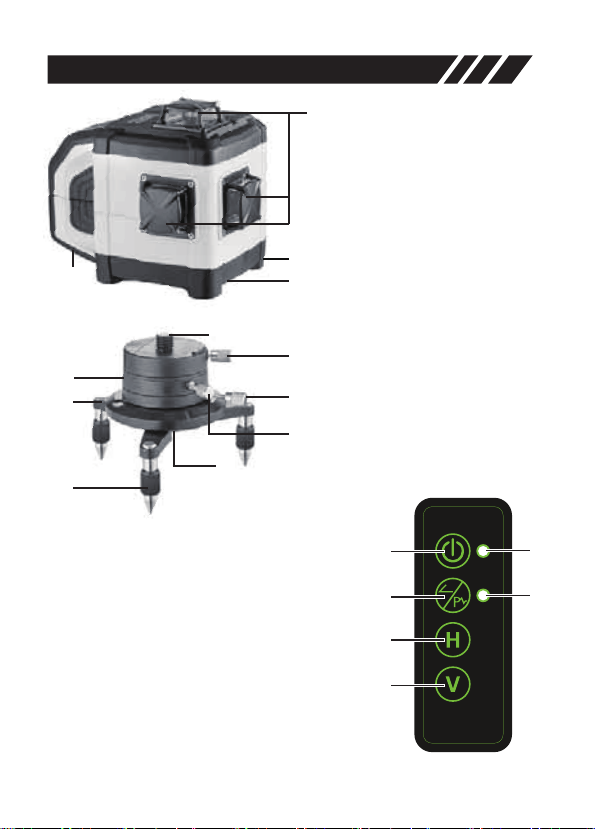
Product Overview
-2-
1. Laser Windows
2. Rechargeable Battery
Compartment
3. Connecting Port for Mains
Adapter (12V/ 2A, No Charging
Function)
4. 5/8" Tripod Thread
5. 5/8" Threaded Adapter
6. Aligning Motion Base
7. Circular Bubble Level
8. Adjustable Feet
9. 5/8" Tripod Thread
10. Lock
11. Threaded Adapter Lock
Screw
12. Vernier Adjustment
Mechanism
13. ON/OFF Button
14. Pulse Mode Button & Slope
Function Button (ON/OFF)
15. Horizontal Line Button
16. Vertical Line Button & Brightness
Adjustment Button
17. ON/OFF LED Indicator & Self-leveling
Mode LED (LED blink during set-up phase)
18. Pulse Mode LED Indicator / Slope
Function LED Indicator / Tilt
Function LED Indicator
1
4
3
2
5
6
7
8
9
12
10
11
13 17
18
14
15
16

Function / Application
-3-
• 3D laser level with 3 X 360° green laser lines and adaptable metal
base.
• Additional slope function for grade adjustment – Motorized
adjustment up to ±3.5°.
• Out-of-Level: is indicated by optical signals when the unit is out of its
self-leveling range.
• Adaptable metal base for exact laser line positioning with the rotary
casing with Vernier adjustment mechanism.
• Included LR-6RG laser receiver extends the working range up to
50m/165ft in bright-light or outdoor conditions.
• Brightness adjustment function enables users to select the line
brightness in different light conditions.
Special Product Features
• Self-leveling range ±3.5°, accuracy ±1.5 mm / 10m ( ± 1/17" at 33ft).
Electronic vials and positioning motors controlled by
temperature stable sensors for automatic alignment of
laser units. The laser unit is brought into initial position and aligns itself
autonomously.
This function is automatically enabled when the unit is
powered on. This easily enables the horizontal or vertical
leveling at a required height and angle, for instance in connection with
a crank tripod or wall mount. Also, the laser can be used on vibrating
surfaces and in windy conditions.
Transport Lock: The laser unit is protected by a special
motor brake during transport.
Special high-performance laser diodes generate even
brighter laser lines as units with Power Bright Technology
do. They remain visible over longer distances, in bright ambient lighting
conditions and on dark surfaces.

Pulse Mode enables line lasers to be used even in
unfavorable light conditions. The laser lines pulsate at a
high frequency and this can be picked up by special laser receivers
over long distances.
-4-
Safety Instructions
Please read thoroughly and comply with the Safety Instructions and
User Manual before using this product. Failure to read and follow may
void the warranty.
This document must be kept in a safe place and if the laser unit is
passed on, this document must be passed on with it.
WARNING!
CLASS ⅡLASER PRODUCT
COMPLIES WITH CFR 1040.10 AND 1040.11
Max. Power Output: <1mW
Wavelength: 505nm-660nm
LASER RADIATION:
DO NOT STARE INTO BEAM.
DO NOT DIRECT EYE EXPOSURE.
AVOID VIEW WITH OPTICAL INSTRUMENTS.
IEC/EN60825-1: 2014
Read all instructions prior to operating this laser tool. Do not remove
any labels from tool.
ATTENTION:
• While the product is in operation, be careful not to expose your eyes
to the emitting laser beam (Green/Red light source). Exposure to a
laser beam for an extended time may be hazardous to your eyes.
• Do not attempt to view the laser beam through optical tools such as
telescopes as serious eye injury may result.
• Do not disassemble or modify the laser in any way. Modifying the tool
may result in hazardous Laser Radiation Exposure.
• An exposure to the beam of a Class 2 laser is considered safe for a
maximum of 2 seconds. Eyelid reflexes will normally provide adequate
protection.

-5-
Battery Use & Safety
This product is compatible with AA batteries and lithium battery.
Depending on the dealer's choice, it can be equipped with AA
batteries or lithium battery. Please check the contents of the
package according to the dealer's description.
1. Use of Rechargeable Lithium Battery
• Fully charge the battery with the
battery charger provided before using
for the first time.
• When charge the battery, please
place it in the supplied battery charger.
• Please ensure the battery is inserted
the right way around.
• When the rechargeable battery is being charged, the LED on the
charger will light up in red. When the LED changes to green, charging
is complete.
1. 2.
• Reflective, specular or shiny surfaces must be covered whilst laser
units are in operation.
• In public areas shield off the laser beam with barriers and partitions
wherever possible and identify the laser area with warning signs.
• Do not operate the laser around children or allow children to operate
the laser. Serious eye injury may result.
• The following label /print samples are placed on the product to inform
of the laser class for your convenience and safety.

• The laser unit switches off automatically when the battery is very low.
In that case, recharge the battery.
• Each charging time is about 5 hours, but not more than 24 hours.
• The best charging temperature: 0℃to 20℃(32℉-68℉)
• If the lithium battery is not used for extended time, please charge the
lithium battery once every 3 months.
• LEDs (17) and (18) flashing together indicates that the battery level
is low.
-6-
• The battery can only be charged with the battery charger
provided instead of being charged in the laser unit directly.
• The battery can be used only in this laser unit. Any other use
may cause injury or fire.
• Make sure there are no conductive objects around the battery
contacts. Short-circuiting of these contacts can cause burn
injuries or fire.
• Do not open the rechargeable battery. This could cause
short-circuits.
Note:
!
Avoid charging the laser unit without taking out the AA
batteries.
Note:
!
2. AA Battery Safety:
• Please pay attention to the position of the positive and negative pole.
Attention:
• Keep the battery away from children, and pets.
• Do not charge unattended.
• Please upload the AA batteries in the battery holder before put into
the laser unit.
• Please use large-capacity rechargeable batteries or AA battery above
1500mAh for each when replace batteries.
• Do not mix old and new batteries. Replace all of them at the same
time with new batteries of the same brand and type.
!

-7-
To insert the rechargeable
lithium battery or AA batteries
Open the battery compartment
and insert the lithium battery or
AA batteries as illustrated.
Operation with power adapter
The laser unit can be used by
direct input charging with the
provided adapter.
Note:
!
• Avoid charging the laser unit without taking out the AA batteries
or lithium battery.
• The battery is not being charged when connected to the power
adapter.
3. Power Supply
NOT FOR CHARGING
×
• Immediately discontinue use of the battery if the battery abnormal/
deformed (emits an unusual smell, feels hot, changes color or shape,
or appears abnormal in any other way). Please contact the
manufacturer to replace it.
• Always dispose of batteries per local code.
• Please recycle in line with local provisions for the collection and
disposal of electrical and electronic waste under the WEEE Directive.
• Never charge or store the batteries inside your car. Do not leave the
battery near a heat source (such as a stove). Extreme temperatures
(low or high) might ignite the battery, and cause a fire.
• On (battery electrolytes) exposure to skin, flush with water
immediately. If eye exposure occurs, flush with water for 15 minutes,
and seek emergency care immediately.
• If the laser unit is not used for a long period of time, please fully charge
and remove the battery. Please store the battery in a dry and room
temperature environment.

• Short press to turn ON/OFF the laser unit.
The power indicator LED (17) will light up in red.
• Horizontal line and self-leveling mode turned on in default after
power on.
Positioning Laser Lines
Turn ON/OFF the Laser Tool
The adaptable metal base allows precise positioning of the laser
lines.
Alignment with motion base Alignment with vernier adjustment
A. Undo threaded adapter lock screw (11).
B. Remove 5/8" threaded adapter(5) and
screw it into the 5/8" tripod thread(4) of the
laser unit.
C. Place the laser unit with 5/8" threaded
adapter(5) on the metal base and tighten
the lock screw (11).
5
11
-8-
D
Note:
!
To secure the laser unit correctly, the fixing screw(D) must be
snapped into the groove in the laser unit.
2.
1. 3.
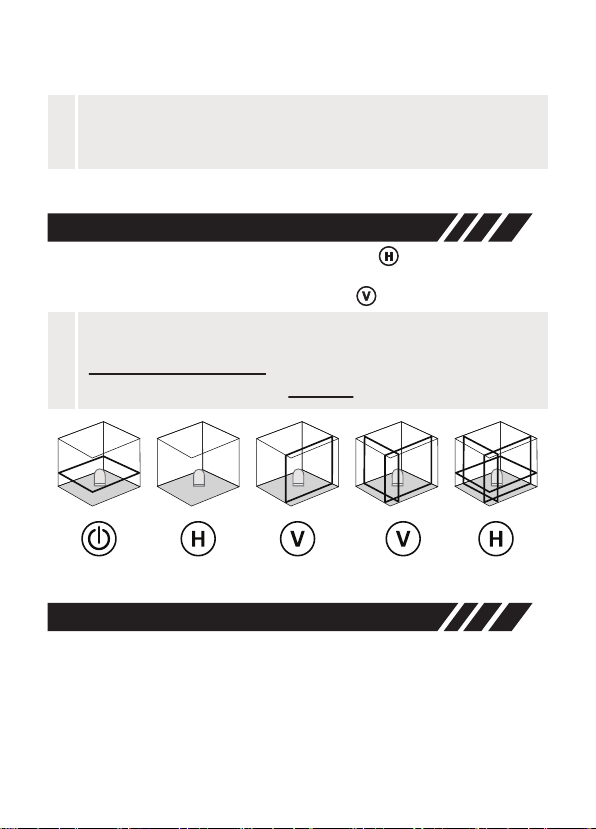
• Horizontal Line: After power on, short press to switch ON/OFF
the horizontal line.
• Vertical Line: After power on, short press to switch vertical lines.
• The indicator LED (17) flashes rapidly during the leveling adjustment;
• Once the leveling adjustment is completed, the indicator LED (17) will
be on constantly .
• Maximum accuracy is attained when self-leveling is completed.
Lines Switching
Self-leveling Mode
Turn on the laser unit, the automatic sensor is now activated and
the laser unit will level automatically.
• When the battery is low, The LEDs (17) and (18) will blink together
rapidly.
-9-
Note:
!
Users need to charge the battery immediately if LEDs (17) and
(18) flash together.
Note:
!
• The line mode switches every time you press the V/H button in
self-leveling mode only.
• Lines switching function is disabled in slope function mode.
Dieses Handbuch passt für folgende Modelle
1
Inhaltsverzeichnis
Sprachen:
Andere Huepar Laser-Nivelliergerät Handbücher


Beliebte Laser-Nivelliergerät Handbücher anderer Marken

Nedo
Nedo ET-5 Bedienungsanleitung

geo-FENNEL
geo-FENNEL Maxi-Liner FL 65 HP Bedienungsanleitung

LaserLiner
LaserLiner X2-Laser Bedienungsanleitung

Spectra
Spectra LL300N Bedienungsanleitung

geo-FENNEL
geo-FENNEL Selection PRO FLG 40-PowerCross GREEN SP Bedienungsanleitung

Nedo
Nedo Crossliner 4 Bedienungsanleitung


