
hykolity WH-T28 Bedienungsanleitung

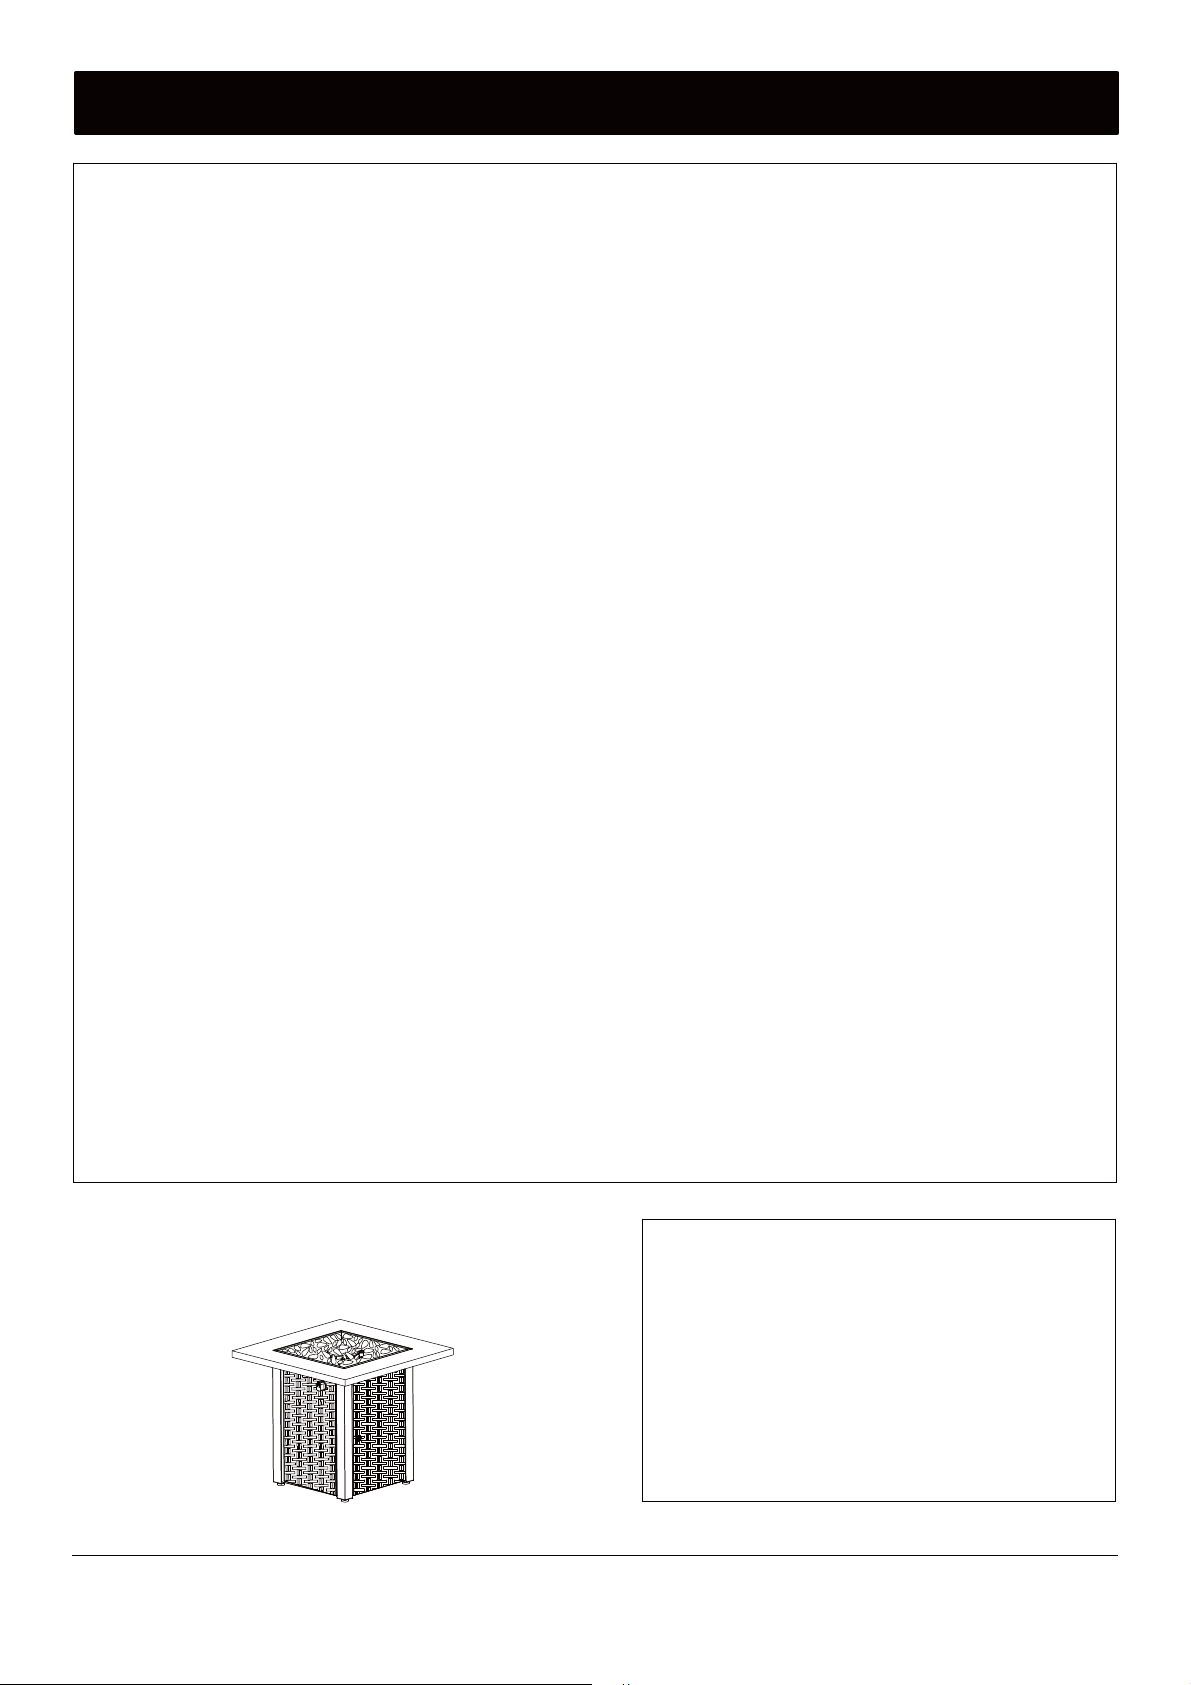
OWNER’SMANNUAL
SKU: WH-T28 DANGER
If you smell gas:
1.Shut off gas to the appliance.
2.Extinguish any open flame.
3. If odor continues, keep away from
the appliance and immediately call
your gas supplier or fire department.
WARNING
Do not store or use gasoline or other
flammable vapors and liquids in the
vicinity of this or any other
appliance. An LP-cylinder not
connected for use shall not be
stored in the vicinity of this or any
other appliance.
WARNING
For outdoor use only! Propane
burning can produce carbon
monoxide which is odorless
but can cause poisoning death
if used in an enclosed space
such as a camper, tent, car or
home indoor.
WARNING
Improper installation, adjustment, alteration, service or maintenance can cause injury or property
damage. Read the owner’s manual thoroughly before installing or servicing this equipment. If the
information in this manual is not followed exactly, a fire or explosion may result causing property
damage, personal injury or loss of life.
Save these instructions for future use. If
you are assembling this unit for someone
else, give this manual to him or her and
read and save for future.
1
SAFTYINFORMATION
WARNING
Before you assemble or operate this unit, please carefully read this entire manual. Failure to do so may
result in a fire, explosion, injury or death.
zThe installation of this unit must adhere to local codes or either the National Fuel Gas Code, ANSI
Z223. 1/NFPA54, OR CAN/CGA-8149.1, National Gas and Propane Installation Code.
z
THIS UNIT IS INTENDED FOR OUTDOOR USE ONLY!
This product shall be used outdoors, in a
ventilated space and shall not be used in any enclosed area.
z
USE PROPANE GAS ONLY!
Converting this unit to natural gas is dangerous and not
recommended. The conversion of this unit will void the manufacturer warranty.
zDO NOT attach a remote gas supply to this unit.
zIf the propane gas tank is leaking gas, you may hear, see, or smell a hiss. Do the following:
1. Disconnect the propane gas tank. 2. Do not attempt to fix the problem yourself. 3. Contact your gas
supplier or fire department for help.
zApplying too much propane may result in gas pooling and will not burn. Allow fresh air into the unit
so that the remaining gas may escape.
zCheck for leaks after not using the unit for long periods of time. BUT DO NOT check leaking with a
match or open flame.
zThe max. inlet supply pressure: max. Gas supply 11 in w.c. (2.74kPa)
zUse LP propane tanks with the following dimensions: diameter 12 in, height 18 in.
zIt’s a must to use a propane tank that has a collar to protect the gas valve.
zDO NOT fill tank over 80 percent full.
zThe tank system must be set up for vapor withdrawal.
zDiscontinue use if any part of the propane tank is damaged. Rust and dents may be hazardous and
should be inspected by a gas supplier.
zDO NOT burn anything other than the provided materials for this patio heater.
zDO NOT operate unit until all parts are fully assembled.
zDO NOT paint or color any part of this heating unit.
zDO NOT attempt to move the heater while in use or before it thoroughly cool down.
zNever leave this heating unit unattended while in use.
zThis unit is not intended for cooking.
zKeep any flammable items away.
zKeep a safe distance to avoid burning skin or clothing.
zDo not sit or rest hands or feet on this heating unit.
zNever place hands or fingers on upper portion of this unit while in use.
zKeep all electrical cords and fuel supply hose away from heated surfaces.
zCombustible material should not be within 48 inches of the top of the unit, or within 48 inches
around the entire unit.
zKeep the appliance area clear and free from combustible material, gasoline and other flammable
vapors and liquids.
zIf the flame goes out while burning, turn the gas valve off. Wait 5 minutes before repeating the initial
lighting procedure. Once you have a flame started, hold down the control knob for 1 minute.
2
SAFTYINFORMATION
zDO NOT operate unit if any part has been under water. Call a service technician to replace any
damaged parts should this occur.
zDO NOT disconnect any part while unit is in use.
zDO NOT store a spare propane tank on or near this unit.
zIf store the heating unit indoor, detach the propane tank and leave it outdoor.
zDO NOT operate on a boat or vehicle. This unit must be used on a flat surface and outdoors ONLY.
zAlways remove protective cover before operating (if applicable).
zChildren should never operate this unit, and must be supervised while near this unit.
zKeep gas tank at least 5 feet away from unit when lit. (if external tank)
zThe maximum gas supply pressure is 250psi.
zAll installation and repair should be done by a qualified professional. This unit should be inspected
annually and cleaned regularly. It is imperative to keep the control compartment, burners and circulating
airways of the appliance clean.
zInspect all elements of this heating unit before each use. If there is damage, the burner must be
replaced.
zBe aware of the hazards of high temperatures and stay away from the unit to avoid any burns or
injury.
zThe gas supply tank should be constructed and marked with the specifications for the LP gas tanks
of the U.S. Department of Transportation or the National Standard of Canada CAN/CSA-B339, LP gas
tanks, spheres and tubes for Transportation of Dangerous Goods; and Commission.
zThe LP gas tank must have a listed overfilling prevention device and a QCCI or Type I, (CGA810) LP
gas tank connection.
zThis heating appliance should not be used on plastic or artificial wood decks.
zBe alerted to the hazards of high surface temperatures and should stay away to avoid burns or
clothing ignition.
zClothing or other flammable materials should not be hung from the appliance or placed on or near
the appliance.
zAny guard or other protective device removed for servicing the appliance shall be replaced prior to
operating the appliance.
NOTE: You must follow all steps to properly assemble this heating item. Make sure the gas valve is
turned "OFF" before assembling. Do NOT attempt to assemble without proper tools.
BE CAREFUL: WHEN CERTAIN MATERIALS
OR ITEMS ARE STORED ABOVE, BESIDE OR
UNDER THIS HEATER WHILE IN USE, THEY
WILL BE SUBJECT TO RADIANT HEAT AND
COULD BE SERIOUSLY DAMAGED.
Combustible materials should not be within
24 inches of the top of the unit, or within 36
inches around the entire unit.
3
PARTLIST
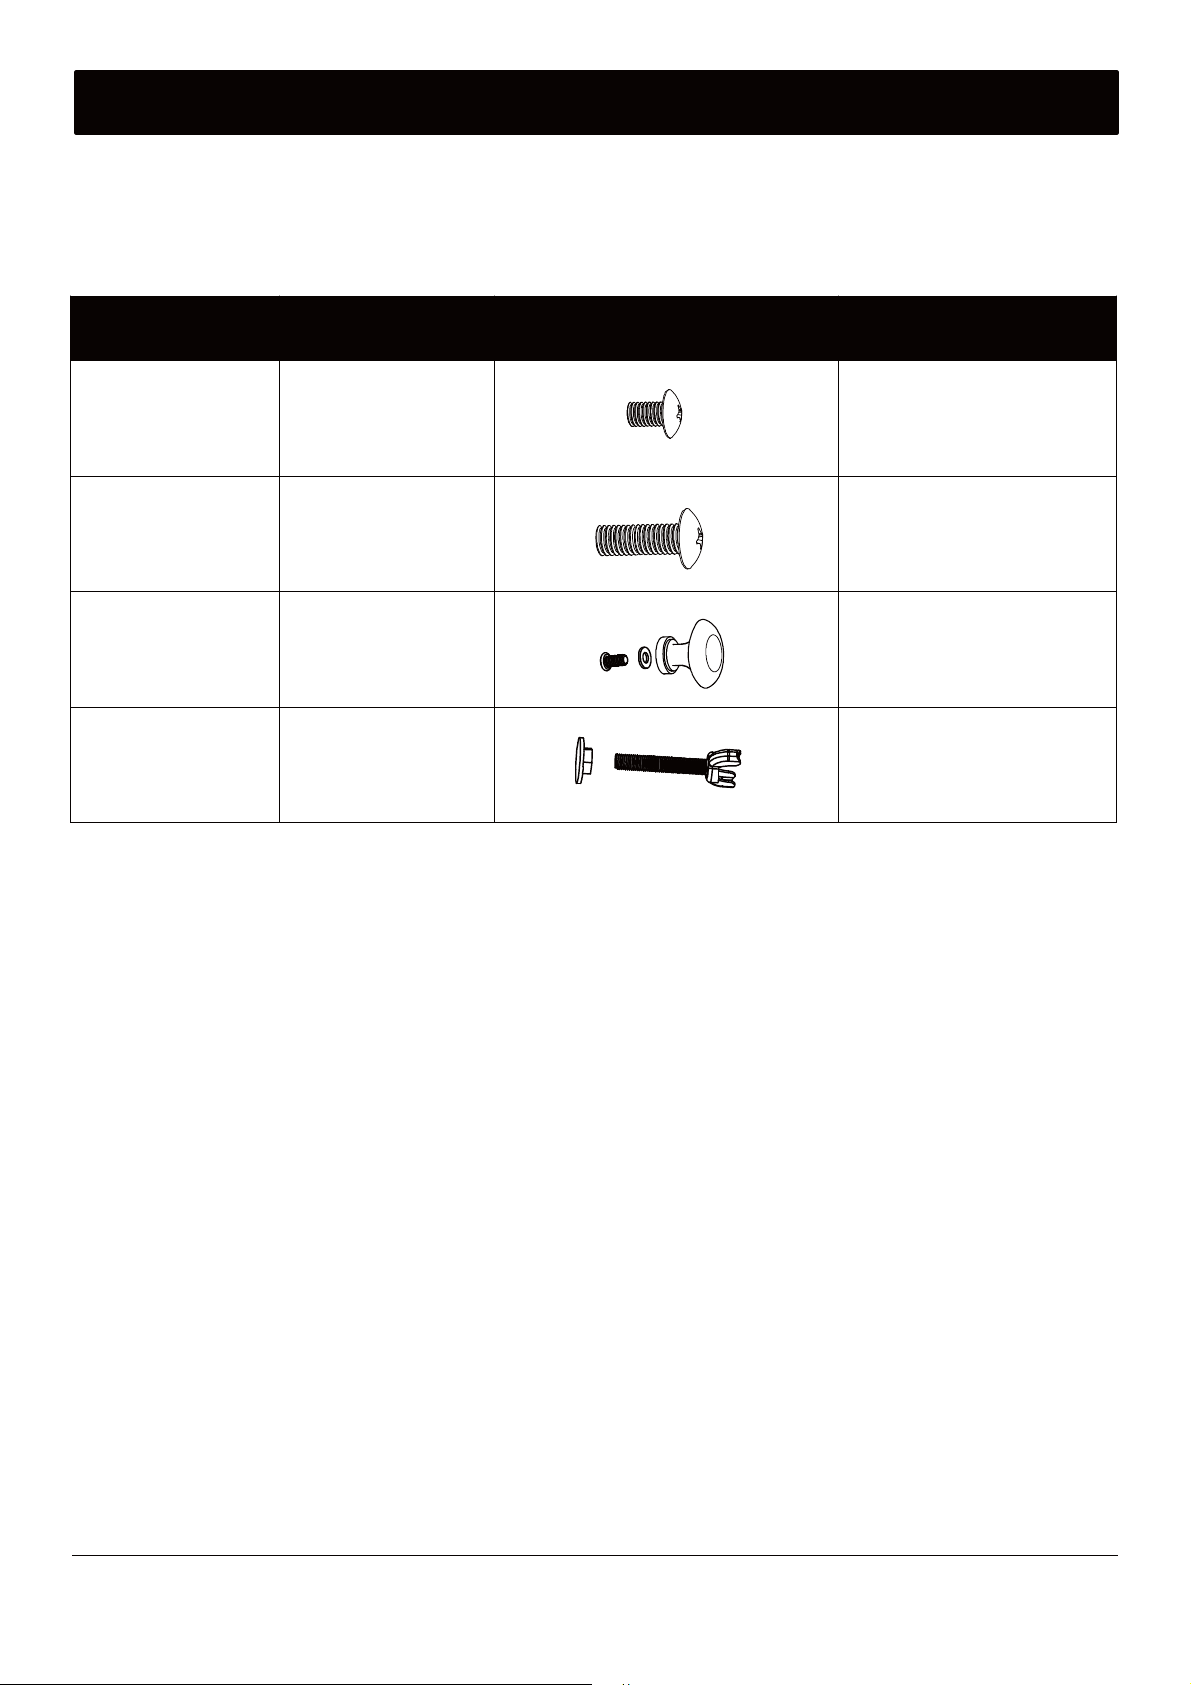
HARDWARES LIST
Item Description QTY
A Screw M6x12 20 PCS
B Screw M6x25 6 PCS
C Door Handle 1 SET
DWingNut 1SET
NOTE:
Before beginning assembly of product, make sure all parts are present. Compare parts with
package contents list and hardware contents list. If any parts are missing or damaged, do not attempt to
assemble the product.
Estimated Assembly Time: 30 minutes
Tools Required for Assembly (not included): Phillips Screwdriver
4
PARTLIST
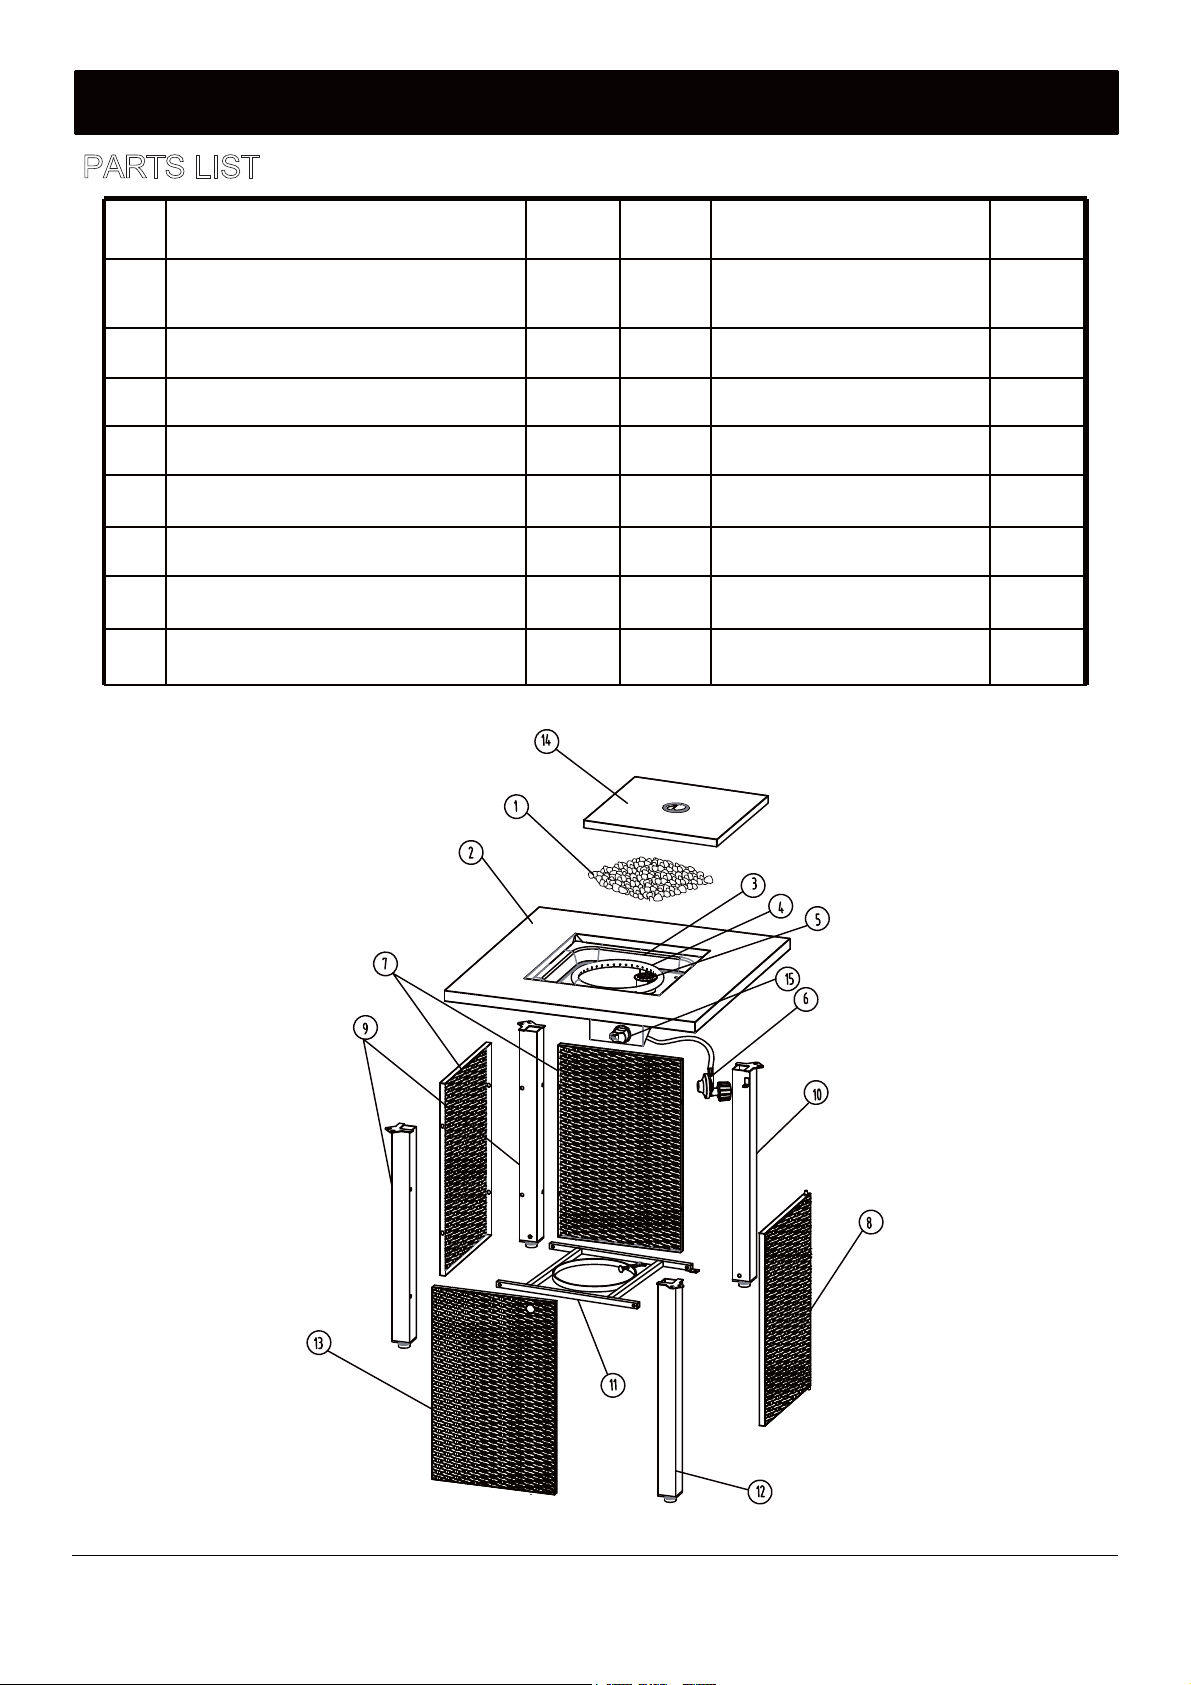
PARTS LIST
Leg with Tab01
kcoRavaL11
1
1
1
1
1
2
1
1
1
1
1
1
1
2
11
2
21
*
lwoBmottoB3
Side panel with hole31
*renruB4
5 Igniter Housing*
14 Lid
51
6
7
Regulator/Hose Assembly*
8
S
Door Panel
ide Panel
geL9
S/N Description
Quantity
S/N Description
Quantity
Table
Base
Leg with Magnet
Knob

5
ASSEMBLYINSTRUCTIONS
Remove the knob(15) from table(2).
STEP 1.
STEP 2.
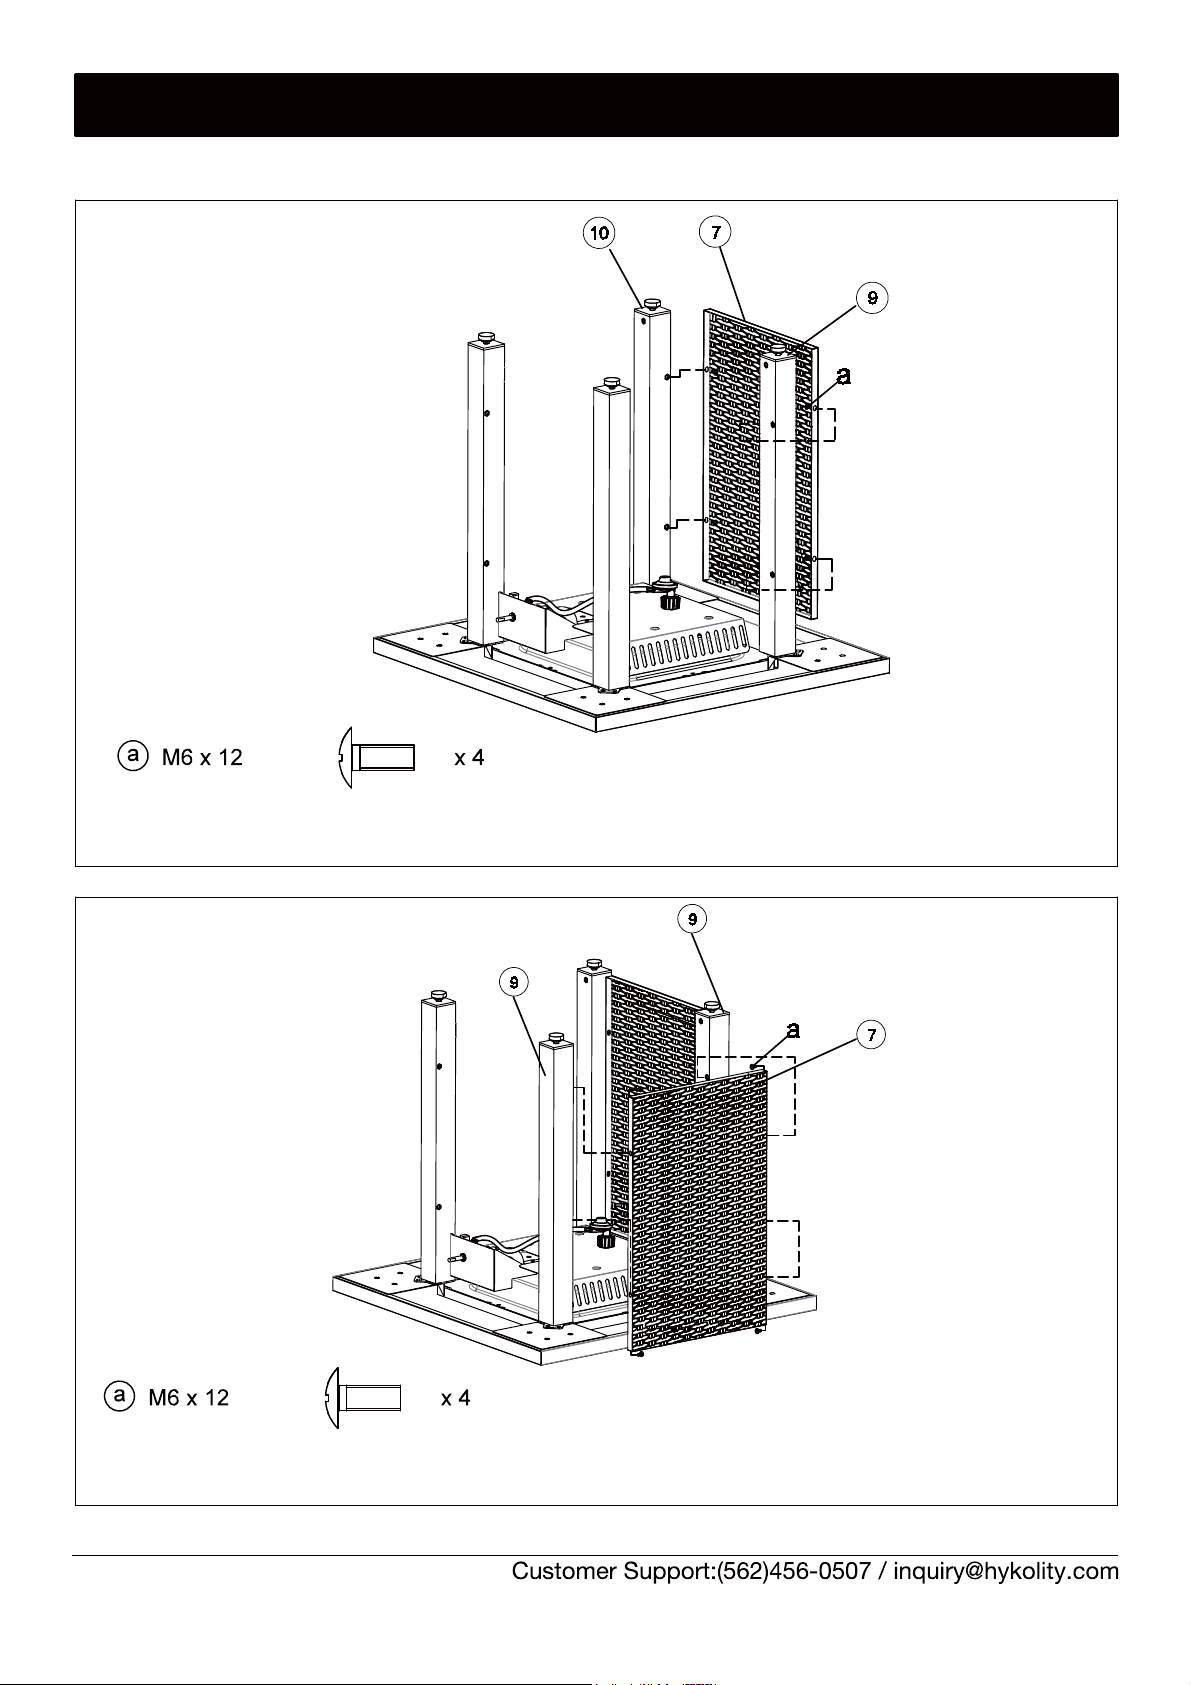
Attach 2pcs Leg(9),1pc leg with tab(10) and 1pc leg with magnet(12) into table(2) with 8pcs
screw M6x12(a).
Note:1.Pay attention to direction of panel.
2.Do not fasten the screws.
Screw
6
ASSEMBLYINSTRUCTIONS
STEP 3.
STEP 4.
Attach side panel(7) to leg with tab(10) and leg(9) with 4pcs screw M6x12(a).
Note: Do not fasten the screws.
Screw
Assemble side panel(7) between leg(9) with 4pcs screw M6x12(a).
Note: Do not fasten the screws.
Screw

7
ASSEMBLYINSTRUCTIONS
STEP 5.
STEP 6.
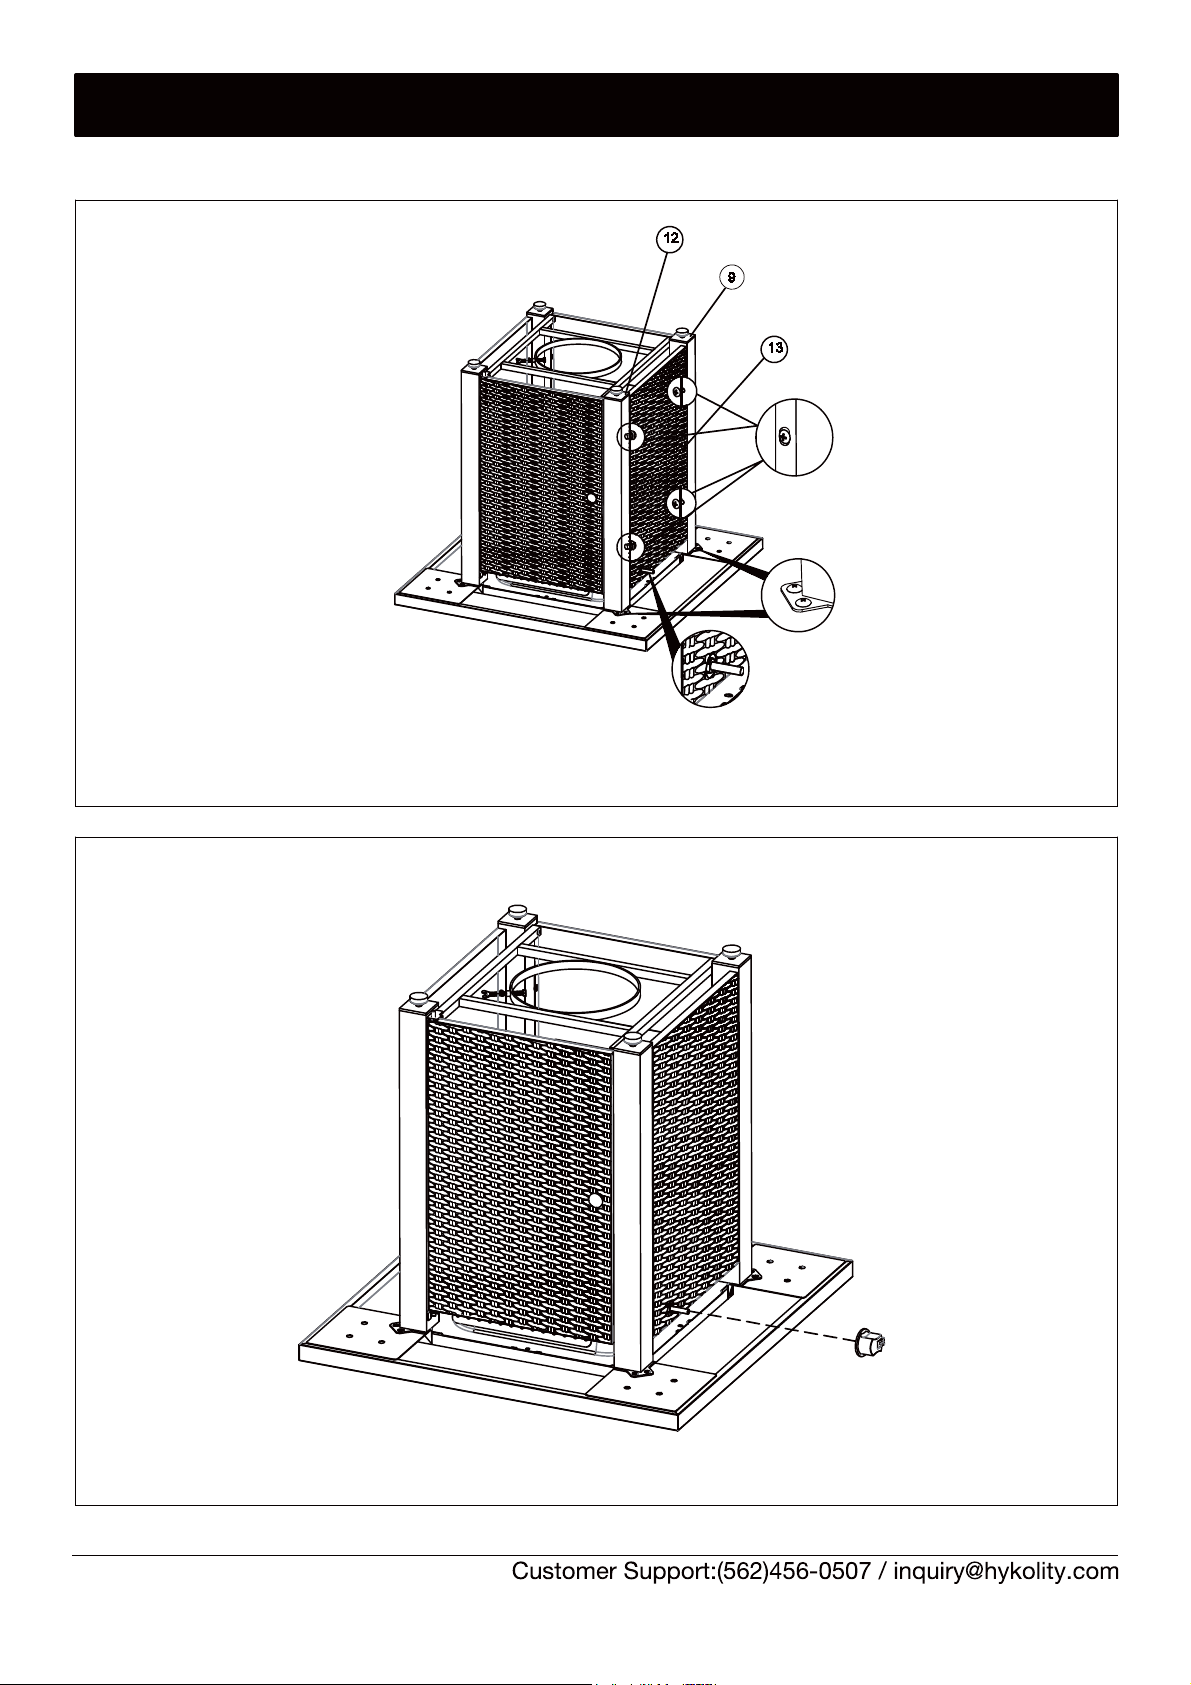
Attach side panel with hole(13) to leg(9) and leg with magnet(12) with 4pcs screw M6x12(a).
Note: Do not fasten the screws.
Screw
Remove the screw and washer from the door handle(c). Attach it to door panel(8).

8
ASSEMBLYINSTRUCTIONS
.8PETS.7PETS
STEP 9.
Attach door panel(8) to leg with tab(10). Assemble wing nut (d) to the base(11).
Note: Assemble 2pcs screw M6x25(b) in 2pcs legs(9) first, then assemble other 2pcs screw.
Align the hole of the base(11) to the rivet of the door panel(8) and assemble 4 pcs screw M6x25(b).
Screw x 4
first assemble
After assemble
9
ASSEMBLYINSTRUCTIONS
STEP 10.
STEP 11.
Adjust 4pcs M6X12 screw assemble leg(9) and leg(12) to the table(2) first.
Make sure igniter and valve pole in the middle of the hole,then fasten all screw in Step 2,3,4,5,8,9.
Assemble the knob(15).
Inhaltsverzeichnis
Andere hykolity Scheinwerfer Handbücher

Beliebte Scheinwerfer Handbücher anderer Marken

VIZULO
VIZULO Micro Martin Benutzerhandbuch

EuroLite
EuroLite LED IP FL-100 SMD Bedienungsanleitung

Cooper Wheelock
Cooper Wheelock XB12 Bedienungsanleitung

Allen + Roth
Allen + Roth 17624-000 Bedienungsanleitung

ADJ
ADJ 4 STAGE PAK Bedienungsanleitung

Cooper Lighting
Cooper Lighting EGL91SW233 Bedienungsanleitung


