I.Trek TR-1 Bedienungsanleitung

1
Personal Tracking System
User Manual
Copyright 2007
www.itrekgps.com

2
List of Contents
Introduction 3
Package Contents 3
GPS / GSM Tracker 4
Bluetooth Decoder 5
Setting up GPS / GSM Tracker 6
Tracking with Bluetooth Decoder 8
Tracking without Bluetooth Decoder 10
FAQs and Troubleshooting 11
Support and Warranty 11
Appendix 1: Technical Information 12
Appendix 2: Setting up SOS Dial Back Number 13
Appendix 3: Pairing Bluetooth Decoder to a Computer 14
Appendix 4: Pairing Bluetooth Decoder to a PDA 15
Appendix 5: Pairing Bluetooth Decoder to a Smart Phone 16

3
Introduction
Thank you for purchasing i.Trek TR-1, a real time tracking system based on GPS and GSM
technology. Unlike traditional tracker, TR-1 does not rely on call center or Internet to
operate. There is no monthly fee to pay and your privacy is completely protected. With
i.Trek TR-1, user can track any object globally in real time as long as the tracking object is
within cell phone network and has line of sight with sky.
Application Examples
Vehicle Tracking – Locate important vehicles and assist in stolen vehicle recovery.
Personal Tracking –Locate lost children or senior citizens.
Requirements for using i.Trek TR-1:
1. A SIM card with a valid phone number associated for the tracker.
2. Any phone (home phone or mobile phone) for data communication.
3. A PDA, smart phone or laptop with Bluetooth capability and mapping software installed.
How i.Trek TR-1 works
1. The user calls Tracker from any phone to establish a connection.
2. The Tracker receives signal from the satellite and encodes position data into voice data.
3. The encoded voice data travels through phone network as voice.
4. The phone receives the voice and passes to the decoder.
5. The decoder converts the voice back to position data and sends out via Bluetooth.
6. The display unit receives the position data and shows the tracker location on a map.
Package Contents
Tracker with Li-Ion battery
Decoder with Secure Strap
USB Charging Cable with USB Car Charger
Manual and Tracking Software CD with serial number
(1)
(2)
(4)
(3)
(5)
(6)

4
GPS/GSM Tracker
Power Button
Press the power button to turn on / off the GPS tracker
Battery LED
Red – Battery low and requires charge
Green – The battery is fully charged
Orange – The battery is charging
GSM LED
Flashing Quickly – GSM stand-by
Flashing Slowly – No SIM card or searching for network
Solid –Network connected
Charging port (mini1394)
Connects to car charger or home charger to charge the battery
GPS LED
Flashing – The GPS is searching for satellites
Solid –The GPS position has fixed
SOS Button
Press the button to report current position to pre-set phone numbers.
Alarm Release Button (Applicable only with optional car control unit)
Not used in default setting. When connecting to the optional car control unit, press the
button to disable the alarm.
External Antenna Jack (MMCX)
Recommended if user plans to mount the GPS tracker inside the trunk or locations without
direct view of the sky.
SOS Button
Alarm Release Button
MMCX External Antenna Jack
GPS LED
GSM LED
Battery LED
Power Button
Charging Port
Expansion Port
5
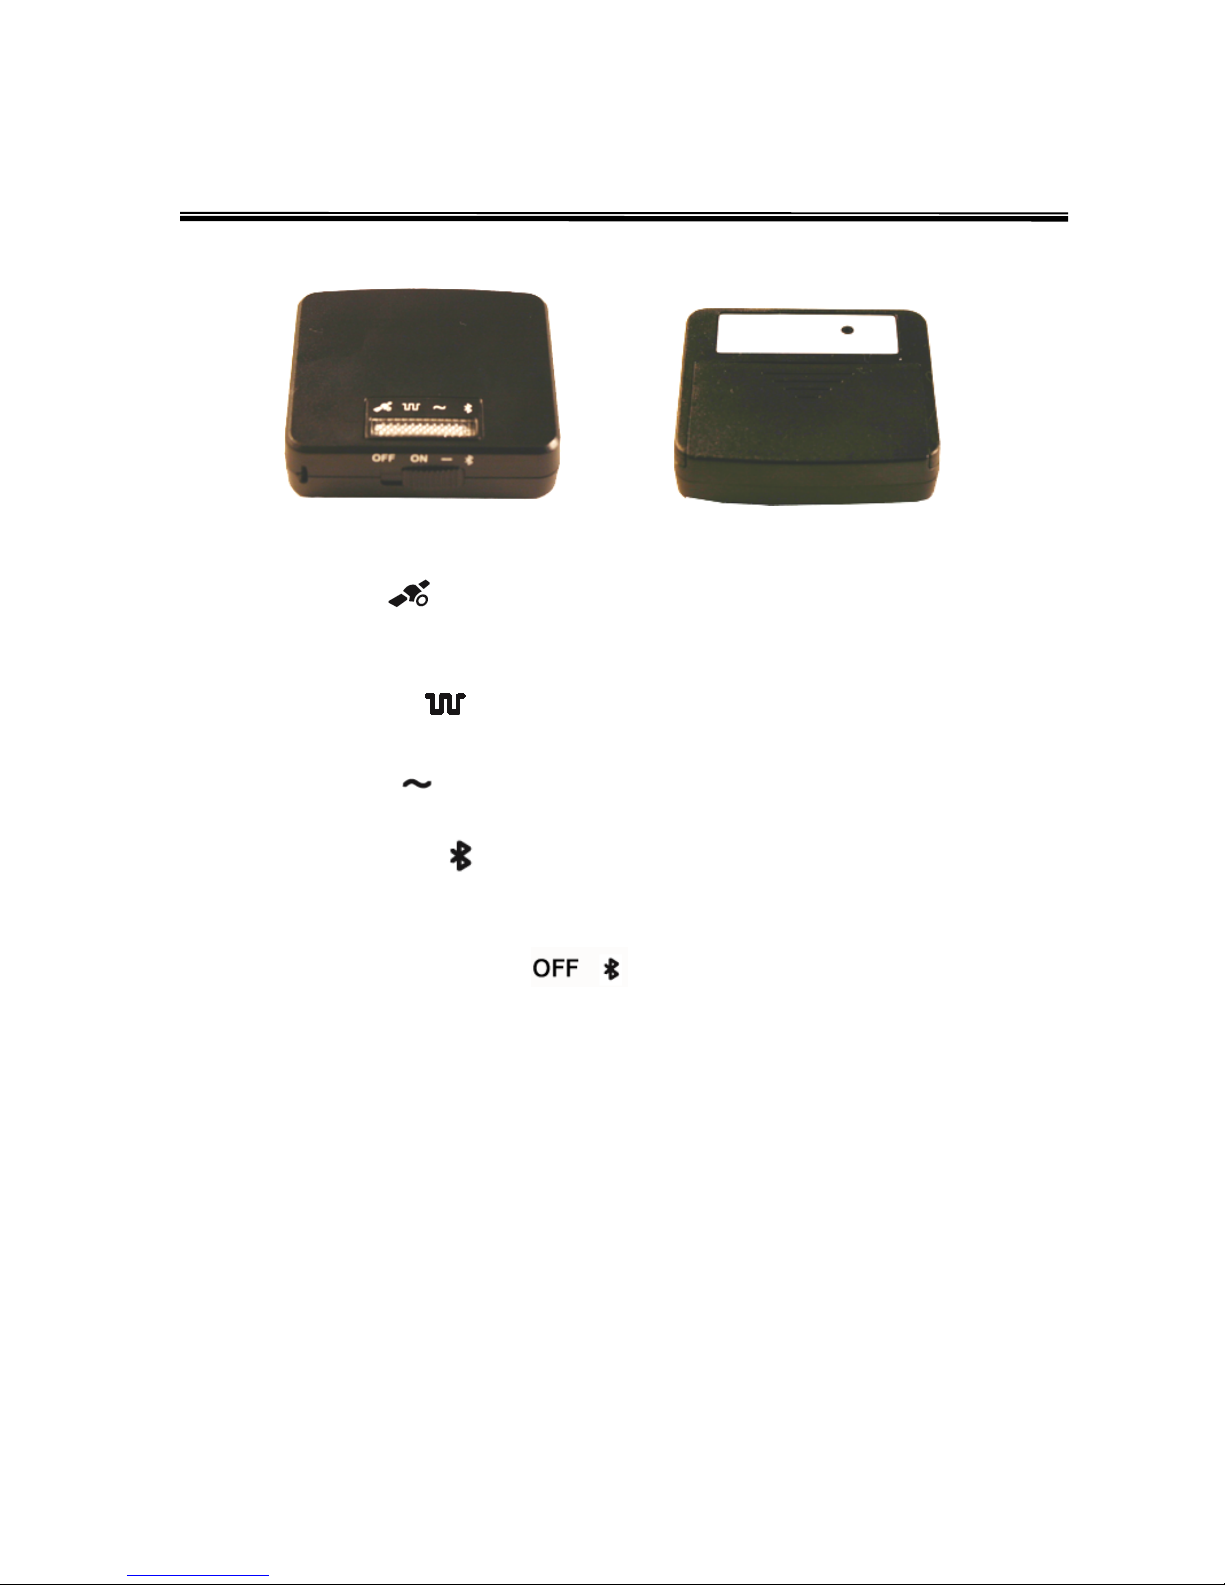
Bluetooth Decoder
(1) GPS LED
Flashing orange – The GPS is searching for satellites
Solid orange – The GPS position has fixed
(2) Decoder LED
Flashing red (4 sec. interval) – The decoder is decoding input data
(3) Input LED
Solid green – The decoder is receiving input data from phone
(4) Bluetooth LED
Flashing blue – Bluetooth not connected
Solid blue – Bluetooth connected
(5) Power / Output Switch
Left – Decoder is off
Middle – Decoder is on and the data is sent via wired connection (optional cable required)
Right –The coder is on and the data is sent via Bluetooth connection
(6) Built-in Microphone
Built-in microphone to receive the voice input data from the phone
(1) (2) (3)
(4)
(5)
(6)

6
Setting up GPS / GSM Tracker
1. SIM Card Installation
SIM card slot is located inside the battery cabinet. Please open the battery cover
underneath the tracker to locate SIM card slot. If the battery is already installed, please
remove the battery to reveal the SIM card slot. Follow the figures below to install the SIM
card.
2. Charging Battery
It is recommended to charge the battery for overnight when you use the tracker for the
very first time. When the power is full, the battery LED will turn green. With subsequent
use, the battery will take about 3 –4 hours to fully charge.

7
Setting up GPS / GSM Tracker (Cont.)
3. Switch On
Press the power button to switch on TR-1 tracker. Please make sure the GPS LED is
flashing indicating it is getting a fix from the satellites. This may take 1 –2 minutes when
you use the tracker for the first time. Also, the GSM LED also needs to be flashing
indicating SIM card is inserted and GSM network is stand by.
4. Installation
The high sensitivity of TR-1 tracker enables it to operate in challenging environments. TR-
1 tracker will work inside a vehicle, in glove box, under seats, or even inside the trunk.
However, it is always recommended to install TR-1 in places with best view of the sky
whenever possible.
Green – Recommended
Red – Not recommended
?– Experimentation required

8
Tracking with Bluetooth Decoder
1. Establish connection between Tracker and Bluetooth Decoder
From a telephone or mobile phone, dial the phone number of the SIM card inside the
tracker. Connect your phone to the decoder by placing the decoder microphone on the
phone speaker. The Bluetooth decoder will then convert the analog voice data back to
real-time GPS digital NEMA messages. Please set power switch to the right position
(Bluetooth) to use Blueooth connection.
2. Checking Decoder status
Solid orange LED ( ) followed by blinking red LED ( ) means that the data is valid
and you have a real time position data. If the orange LED is blinking, then it means the
tracker is not able to get enough satellite to provide real time position. The report position
will be at location where the tracker has the last fix. Solid green LED ( ) means the
voice from the phone is valid. If the green LED is not available, please check the cables
and make sure they are connected. Also, please turn up the volume if you are using the
included microphone cable.
3. Pairing Bluetooth Decoder to PDA, SmartPhone, or laptop
Bluetooth decoder can be connected to a Bluetooth enabled PDA, SmarPhone or laptop
through serial port profile (SPP). Please refer to the Bluetooth setup section (appendix) for
detail setup instruction for different devices. Solid blue LED ( ) means you have a
Bluetooth connection with the host device. With optional PDA or USB cable, it is also
possible to connect Bluetooth decoder to a PDA or Computer via direct wire connection.
4. Locate Tracker with any NMEA compatible mapping software
Using any NMEA compliant software such as Microsoft Street and Trips, iGuidance, or
TomTom Navigator, you can select the com port assigned by the Bluetooth manager as
outgoing comport and the tracker location will be displayed on the screen.
5. Installaing i.Trek Real Time Tracker software
i.Trek real time tracker software for Windows (2000, XP, Vista) is included on CD. Since
the tracker software is based on Google Map technology, it has the same coverage as
Google Map. From Windows Explorer, locate setup.exe on CD and double click on the
setup.exe to install the program to your computer. You will need a Gmail account and
software serial number (on CD) to complete the setup. After you install the software
successfully, the program icon will be available in the program file menu. Just click on the
icon to launch the program.

9
Tracking with Bluetooth Decoder (Cont.)
6. Using i.Trek Real Time Tracking software
(1) Current Location – Display current location of the tracker
(2) Starting Location – Display starting location of the tracker
(3) Map View – Display streets and street names
(4) Satellite View – Display satellite image
(5) Hybrid View – Display streets and street names on top of satellite image
(6) Moving Arrow – Scroll the map in the direction of the arrow
(7) Zoom –Move the slider up or down to zoom in or zoom out
(8) Date – Display the current date
(9) Position – Display longitude and latitude of the tracker
(10) Speed – Display the speed of the tracker
(11) Com Port –Select the com port which communicates with the Bluetooth decoder
(12) Connection –Connect or disconnect Bluetooth decoder from the program
(3) (4) (5)
(6)
(7)
(8) (9) (10) (11) (12)
(1)
(2)

10
Tracking without Bluetooth Decoder
It is also possible to locate the tracker without Bluetooth decoder. In this case, the data
will be sent to your mobile phone as short text message.
From a mobile phone, dial the phone number of the SIM card inside TR-1 tracker to
establish a connection. Press “71” and hang up the phone. In few seconds, the phone will
receive a short text message with coordinate information. You can visualize the position
by entering the coordinates into mapping software such as Google Earth.
Short Text Message Example
*SOS*V, N, 23”51’15.6, E, 120”38’09.6, 202.3, 359.9*
(1) Message Type
SMS = Short message dial back
SOS = SOS button dial back
ALARM = Anti-thief trigger dial back (only available with optional car control unit)
SENSOR = Moving sensor trigger dial back (only available with optional motion sensor)
(2) Position Information
V = GPS last location (Tracker has no fix and reports last fix position)
A = GPS current location (Tracker has fix and reports current location)
(3) Longitude
Longitude = North 23”51’ 15.6
(4) Latitude
Latitude = East 120”38’ 09.6
(5) Speed
Speed = 020.3 (Sea Mile)
(6) Direction
Direction = 359.9 (degrees)
1 2 3 4 5 6
Inhaltsverzeichnis
Andere I.Trek GPS Handbücher


