Innoband 250-C-CM00-00 Bedienungsanleitung

Version 0.1
Innoband 250-C-CM00-00
Pan-and Tilt IP Camera
User Manual
Visit www.innobandsense.com/help for the most updated
User Manual and other product information and tips!

Version 0.1
User Manual
Innoband 250-C-CM00-00
Information in this document is subject to change without notice and does not represent a commitment on the
part of Innoband Technologies, Inc. The software described in this document is furnished under a license
agreement and may be used or copied only in accordance with the terms of the license agreement. It is against
the law to copy the software on any other medium except as specifically allowed in the license agreement. The
licensee may make one copy of the software for backup purposes. No part of this manual may be reproduced or
transmitted in any form or by any means, electronic or mechanical, including photocopying and recording, for any
purpose without the written permission of Innoband Technologies, Inc.
All contents are Copyright © 2013 Innoband, Inc. All rights reserved.
Manual Version 0.1
June 2013
Innoband is a trademark of Innoband Technologies, Inc. The trademarks, logos and service marks (“Marks”)
displayed on this manual are the property of Innoband or other third parties. Users are not permitted to use these
Marks without the prior written consent of Innoband or such third party that may own the Mark. IBM is a
registered trademark of International Business Machines Corporation. Intel and Pentium are registered
trademarks of Intel Corporation. Microsoft, MS-DOS, Windows, and the Windows logo are registered trademarks
of Microsoft Corporation. All other products are trademarks or registered trademarks of their respective owners.

Table Content
Pan-and Tilt IP Camera .......................................................................................... 1
Getting started...................................................................................................... 4
Unpacking.......................................................................................................... 4
Install the Hardware............................................................................................ 4
Using the Setup Wizard ....................................................................................... 4
Configuring the Camera.......................................................................................... 5
Log Into IP Camera............................................................................................. 5
Configure the Camera for Wireless Connection ....................................................... 7
Integration with Innoband SENSE.......................................................................... 10
Configuring the Camera in Innoband SENSE......................................................... 10
Configuring Camera Snapshots........................................................................... 15
Certifications....................................................................................................... 18
FCC................................................................................................................. 18
Warning .......................................................................................................... 18
Warranty............................................................................................................ 19
Contact information ............................................................................................. 21

4
Getting started
Unpacking
Check the contents of the package against the pack contents checklist below. If any of the
items is missing, then contact the dealer from whom the equipment was purchased.
•Main IP Camera Unit
•Antenna
•Mounting bracket
•Quick Start Guide
•AD/DC Power Adapter
•Ethernet Cable
Install the Hardware
1. Unpack IP Camera from the package.
2. Install the antenna on the camera.
3. Use the supplied Ethernet cable and connect the Camera’s Network port to an
available port on the home network’s Ethernet Router.
4. Power on the camera using the supplied power adapter.
5. Wait about 60 seconds until the camera stops panning. The network LED will blink in
green, while the power LED will be lit solid in red.
Using the Setup Wizard
1. Unpack the Innoband SENSE Installation CD from the package.
2. Insert the CD into a PC that’s wired or wirelessly connected to the home network’s
Ethernet Router.
3. Install the software by running SetupWizard.exe.
4. Launch the software by clicking on the option at the conclusion of the software
installation or the newly created desktop shortcut.
5. Follow the on-screen instructions and configure the camera with the SENSE
Commander.

5
Configuring the Camera
Log Into IP Camera
1. If applicable, turn on a computer that is wire or wirelessly connected to the same
Ethernet router.
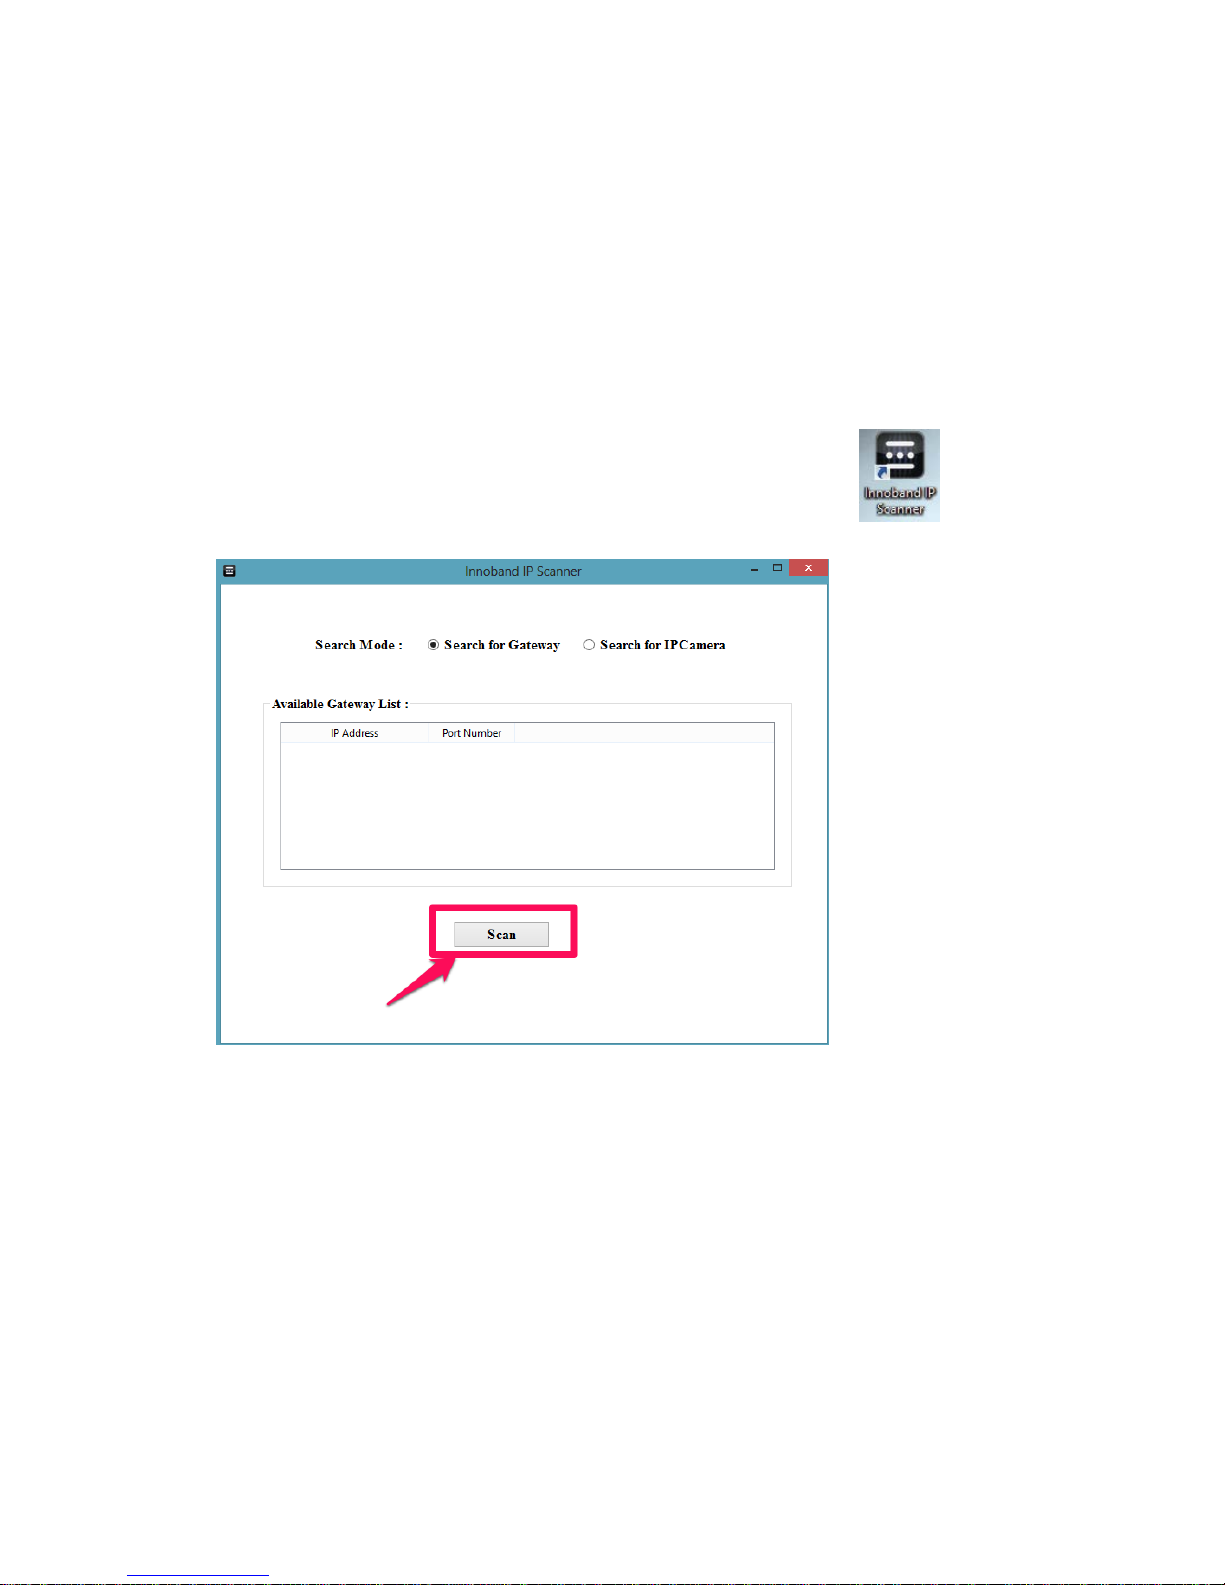
2. Look for the “Innoband IP Scanner” program shortcut (created by installing the
Setup Wizard from the Installation CD earlier) on the computer’s desktop.
3. Launch the application by double clicking the desktop shortcut.
4. Select Search for IP Camera.
5. Click on the “Scan” button.
6. An IP address will be shown. Make a note of the IP address.
7. Double click on the Gateway IP address.
8. A browser session will automatically be launched. (Alternatively, launch a web
browser (such as Internet Explorer, Google Chrome, Apple Safari, FireFox) on the
computer. In the URL field, enter the Gateway IP address found using the utility
above.)
9. When prompted, enter ‘admin’ as the User Name and leave the Password field blank,
and click on ‘Log In”.
10.You’re now accessing the web server inside the camera’s flash memory.

6
11.Based on the browser used, select the appropriate mode.
12.Live video should be shown similar to the screen below. Use the control dial to
change the camera’s angle, resolution, brightness, and contrast level.
7
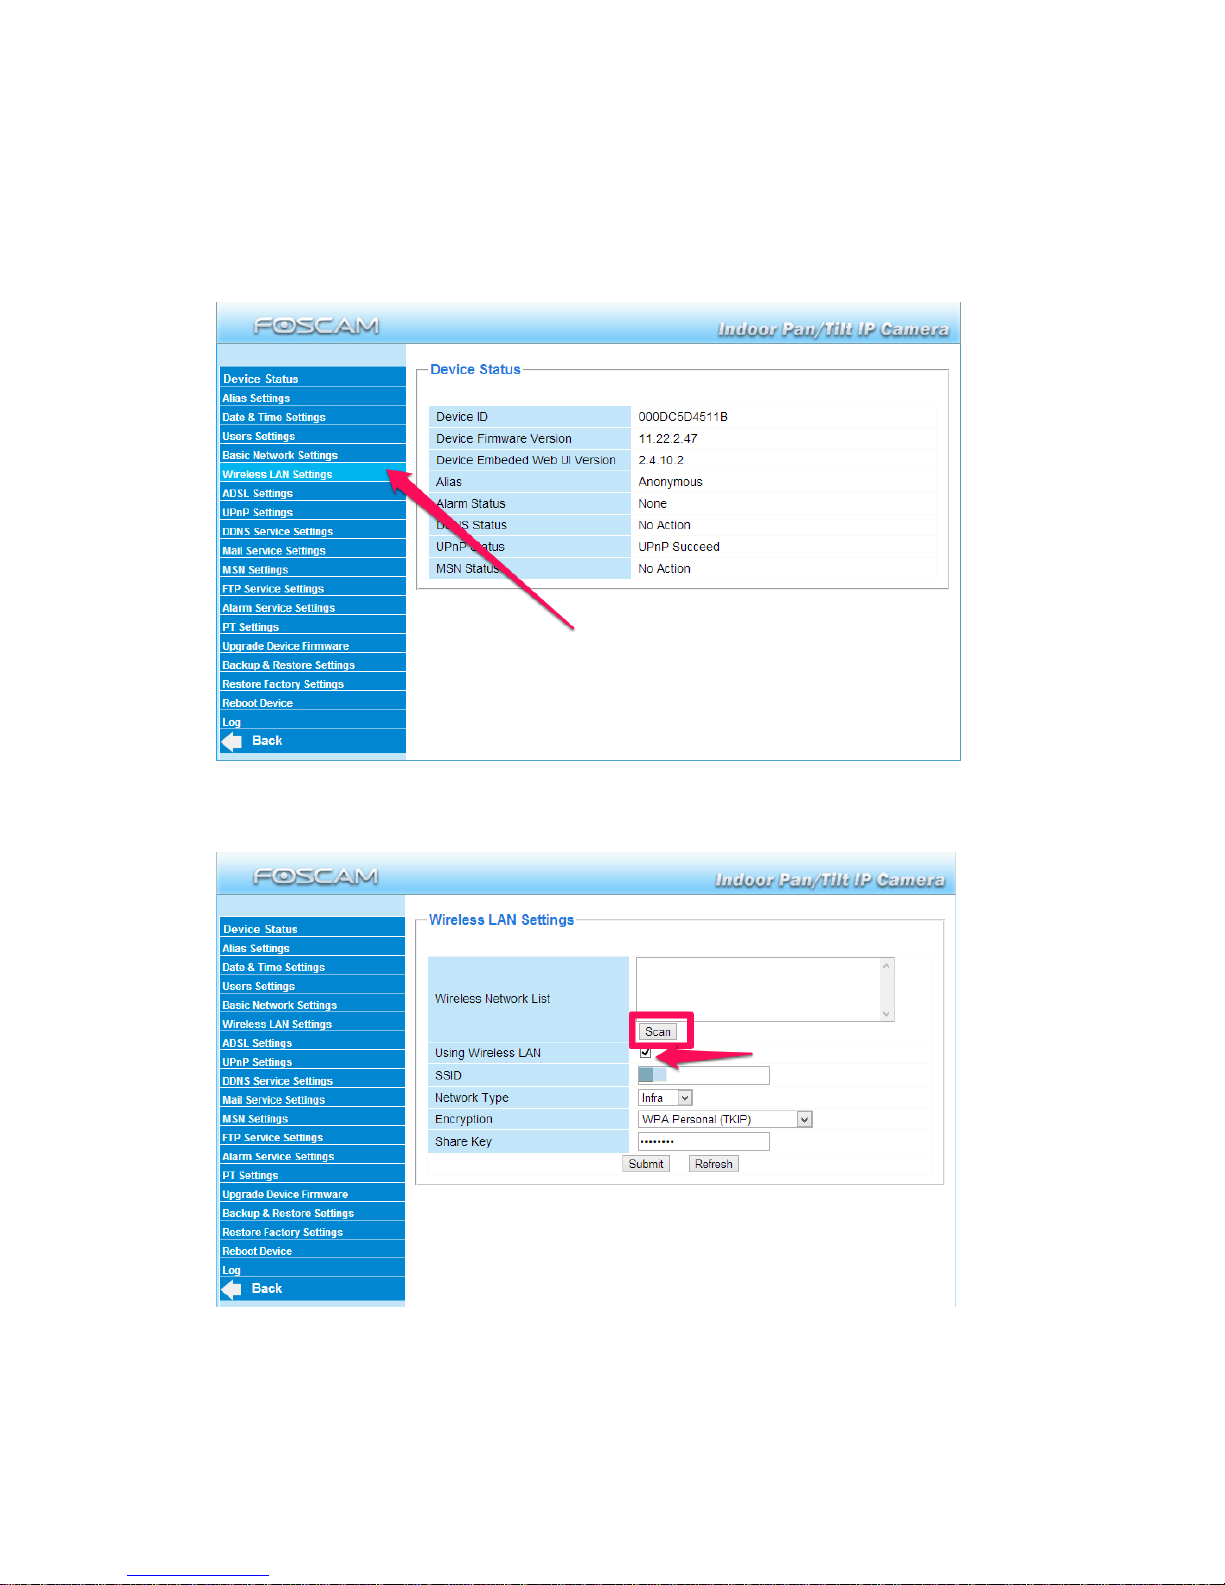
Configure the Camera for Wireless Connection
1. Log into the camera using the steps in the Section above.
2. Click on ‘Device Management’ on the lower left of the screen
3. Select “Wireless LAN Settings” from the left column.
4. Make sure the “Using Wireless LAN” check box is checked.
5. Make sure the wireless router that the camera is to be connected is turned on. Click
the ‘Scan’ button.
6. Select the desired network connection from the list.
7. Select the Network Type, and Encryption Method that matches the wireless network
from the drop down box. Type in the password to the wireless network in the ‘Share
Key’ field, and click ‘Submit’.

8
8. The camera will now reboot itself with the new settings.
9. After the camera finishes the reboot process (about 20 seconds after the camera
stops panning), disconnect the network cable from the camera.
10.Disconnect the power adapter from the camera.
11.Place the camera at the desired location and power on the camera.
12.Look for the “Innoband IP Scanner” program shortcut (created by installing the
Setup Wizard from the Installation CD earlier) on the computer’s desktop.
13.Launch the application by double clicking the desktop shortcut.
14.Select Search for IP Camera.
15.Click on the “Scan” button.

9
16.An IP address will be shown. Make a note of the IP address.
17.Double click on the Gateway IP address.
18.A browser session will automatically be launched. (Alternatively, launch a web
browser (such as Internet Explorer, Google Chrome, Apple Safari, FireFox) on the
computer. In the URL field, enter the Gateway IP address found using the utility
above.)
19.When prompted, enter ‘admin’ as the User Name and leave the Password field blank,
and click on ‘Log In”.
20.You’re now accessing the web server inside the camera’s flash memory.
21.Based on the browser used, select the appropriate mode.
22.Live video should be shown similar to the screen below. Use the control dial to
change the camera’s angle, resolution, brightness, and contrast level.
10
Integration with Innoband SENSE
Configuring the Camera in Innoband SENSE
1. If applicable, turn on a computer that is wire or wirelessly connected to the same
Ethernet router.
2. Look for the “Innoband IP Scanner” program shortcut (created by installing the
Setup Wizard from the Installation CD earlier) on the computer’s desktop.
3. Launch the application by double clicking the desktop shortcut.
4. Click on the “Scan” button.
5. An IP address will be shown under “Gateway IP”. Make a note of the Gateway IP
address shown in the “Available Gateway List”.
6. Double click on the Gateway IP address.
Inhaltsverzeichnis
Andere Innoband IP-Kamera Handbücher


