IPX DDK-1800BC Bedienungsanleitung

INSTALLATION &
OPERATION MANUAL
DDK-1800BC
Fixed Indoor/Outdoor IP Bullet Camera

Table of Contents
SAFETY PRECAUTIONS .............................................................................4
1. DESCRIPTION..........................................................................................6
1.1 PHYSICAL DESCRIPTION...............................................................6
1.2 THE RESET BUTTON ............................................................................8
1.3 ALARM WIRING DIAGRAM ......................................................................9
1.4 THE USB FUNCTION ..........................................................................10
2. INSTALLATION ......................................................................................11
2.1 HARDWARE INSTALLATION ..................................................................11
2.2 PLACING A DESICCANT PACK INSIDE THE DDK-1800BC......................11
2.3 UPDATING SYSTEM SOFTWARE ..........................................................12
3. Network Configuration..........................................................................13
3.1 CABLE CONNECTIONS........................................................................13
3.1.1 DDK-1800BC to Computer connection..........................................................................13
3.1.2 DDK-1800BC to Network Switch (INTRANET)...........................................................13
3.2 NETWORK SETTINGS CONFIGURATION ................................................14
3.2.1 Enabling DHCP Function................................................................................................14
3.2.2 Setting an IPAddress.......................................................................................................14
3.3 TCP/IP COMMUNICATION SOFTWARE .................................................15
3.4 TCP/IP INSTALLATION .......................................................................17
3.5 TCP/IP CONFIGURATION SETTING ......................................................18
3.6 CONNECTION TESTING.......................................................................19
4. Operating Instructions for Software and Network Connection ........21
4.1 WEB BROWSER .................................................................................22
2

4.1.1 Connecting the DDK-1800BC ........................................................................................22
4.1.2 Live Video........................................................................................................................23
4.1.3 Setup ................................................................................................................................26
5. ADVANCED OPERATION......................................................................75
6. SPECIFICATIONS...................................................................................78
7. Client System Requirements................................................................80
APPENDIX 1. –How to run DDK-1800BC UPnP ......................................81
APPENDIX 2. –Register as a DDNS member ..........................................91
3

SAFETY PRECAUTIONS
Please read the following safety and operational instructions carefully to prevent harm or injury to
the operator.
Do not use liquid cleaners or aerosols for cleaning.
WARNING
To prevent fire or shock, avoid exposing this unit to moisture.
Do not block ventilation openings.
Never spill liquid of any kind on the camera
Do not attempt to service the DDK-1800BC yourself. Opening the DDK-1800BC’s
enclosure may expose the user to electrical shock. Please refer all servicing to
your reseller.
4

5

1. DESCRIPTION
1.1 PHYSICAL DESCRIPTION
Internal View SCREWS
SUN SHIELD
SD PCB
LENS FAN
FRONT CASE
IR PCB
SENSOR PCB
PCB PLATE
POWER PCB
MIDDLE CASE
WATERPROOF RUBBER
REAR CASE
External View
NOTE: Use the 2 provided screws to attach the sun shield (above) into the 2 extreme holes
shown in the picture below to get an unobstructed viewing angle.
Do not use the middle hole in the camera as that will block the view.
6

The PCB board:
123 4 5
6 7 8 9 10
1. Power Input: AC 24V input that connects to an external power supply.
2. ETHERNET 10/100 Connector: Standard RJ-45 connector for 10/100 Mbps Ethernet
networks. PoE (Power over Ethernet) function: Provides power to the device via the same
cable as used for the network connection.
3. Plug Input: DC 12V input that connects to an external power supply.
4. GPIO: 6-PIN connector including Digital output/input, DC output and GROUND for
connecting with external devices.
5. VIDEO OUT Connector: Connector providing composite video output.
6. AUDIO IN: Connector to receive audio input from external devices.
7. USB port: Connects DDK-1800BC to a USB port on a computer.
8. AUDIO OUT: Provides audio to an external device.
9. SD/ SDHC CARD slot: Used for updating system software and archiving video.
10. RESET: Reset to factory default. (Refer to section 2.4 The Reset Button.)
7

1.2 The Reset Button
The Reset Button will bring the DDK-1800BC back to its factory default settings. Press the Reset
Button for about 10 seconds. A Blue screen will be displayed and a text that says “RESETTING…”
will appear. The device will then auto reboot. All settings will then be back to default. The following
items will return back to default.
[SETUP]
Network Setup
a. LAN Settings (You can manually reset this function.)
b. PPPOE Settings (You can manually reset this function.)
Dynamic DNS
a. DYNAMIC DNS SETTING (You can manually reset this function.)
IMAGE SETUP
a. Privacy Mask Setting
b. IMAGE SETTINGS
AUDIO AND VIDEO
a. VIDEO PROFILE 1
b. VIDEO PROFILE 2
c. AUDIO SETTINGS
MOTION DECTION
a. Video Motion setting
TIME AND DATE
a. TIME CONFIGURATION
b. AUTOMATIC TIME CONFIGURATION
c. SET DATE AND TIME MANUALLY
Event Setup
a. Server
b. Media
c. Event
d. Recording
[ADVANCED]
DI and DO
a. DI and DO
b. LED
c. VIDEO OUTPUT
ICR
a. ICR
HTTPS
a. HTTPS
Access List
a. Allow List
b. Deny List
8
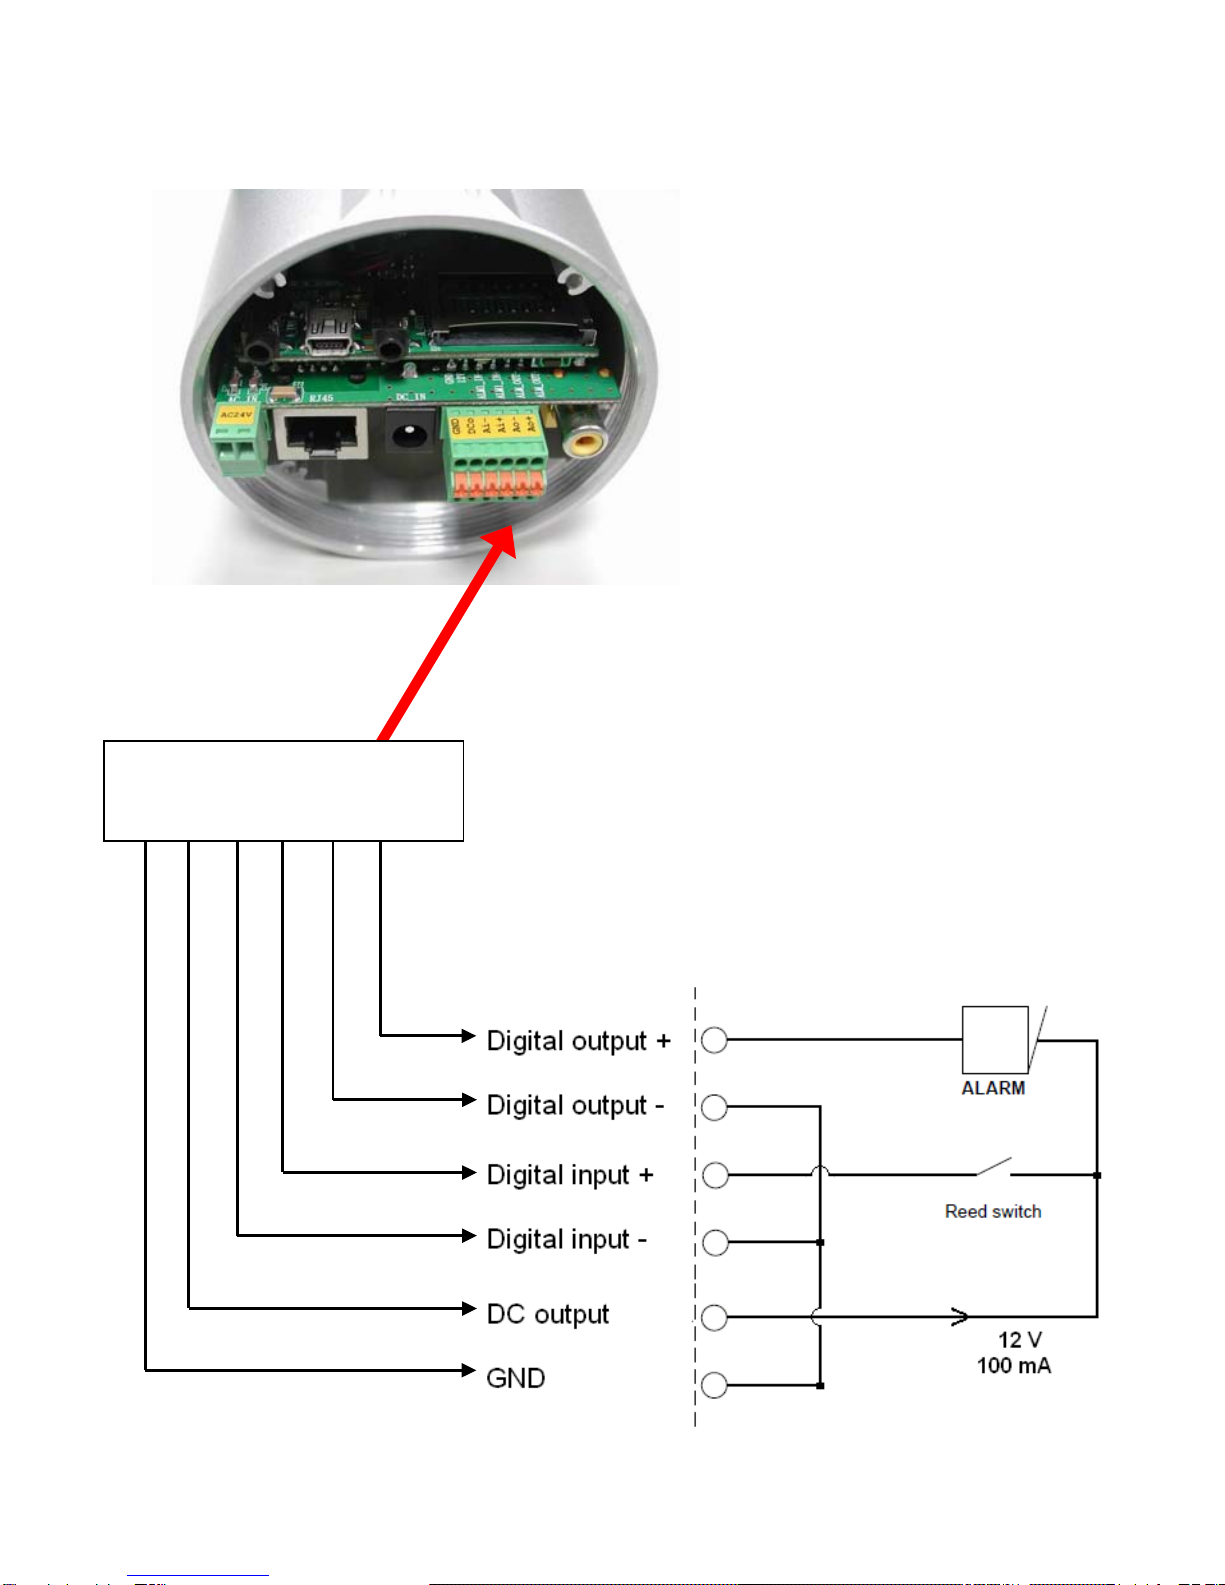
1.3 Alarm wiring diagram
DDK-1800BC
GND
12
V
+
Di -
Di +
Do -
Do +
+12V
+12V
9

1.4 The USB function
The DDK-1800BC can provide two separate functions by connecting the DDK-1800BC with a PC
via the USB connector
1. Using an SD card as a card reader.
Insert an SD card into the DDK-1800BC and then connect to the PC. You may then transfer files
between the SD card and the PC. Once you've connected your DDK-1800BC to your computer
Windows will detect the connection and ask you what you want to do with the SD card.
2. Using an SD card as a configuration tool.
Before using the USB configuration setting page remember to remove the SD card or the PC
won’t show this window.
DHCP ON
DHCP OFF
(default)
Network
Setting
NOTE: After changing the settings, click the “Apply” button. All changes will be effective
after removing the USB connector.
NOTE: After the IP address has been changed or reset, unplug the network cable and
then plug it in again to make sure the network connection is in normal mode.
10
Inhaltsverzeichnis
Andere IPX IP-Kamera Handbücher


