Jimi LL301 Bedienungsanleitung

LL301
Wireless Tracker
for Asset Vehicles
User Manual
Version:V1.2
Read this manual carefully prior to use to ensure
fast and correct operation of the product. No prior
notice will be given for any changes made to the
appearance, color, or accessories of the product.

Introduction
Features
Multi-GNSS positioningPower saving
Remote listening
Cover removal alert
Large-capacity battery
Tamper alert
Humidity and temperature detection and alert
IPx4 protection
Specification
LTE FDD : B1//B3/B7/B8/
B20/B28
GSM: 900/1800MHz
LTE FDD : B1/B2/B3/B4/B5
/B7/B8/B28/B66
GSM: 850/900/1800/1900MHz
<10m
≤5m
<30mA
LL301E
LL301L
GNSS accuracy
Listening range: ≤5m
Operating current: <30mA
Communication system:
Specification
LTE FDD : B1//B3/B7/B8/
B20/B28
GSM: 900/1800MHz
LTE FDD : B1/B2/B3/B4/B5
/B7/B8/B28/B66
GSM: 850/900/1800/1900MHz
<10m
≤5m
<30mA
25 days (where the tracker
runs in workmode for 2
hours per day)
1*Red (work status) and
4*Blue (battery level)
–20℃to +70℃
108x61x30mm
LL301E
LL301L
GNSS accuracy
Listening range: ≤5m
Operating current: <30mA
Operating duration
LEDs
Operating temperature
Dimensions (LxWxH)
Communication system:

Packing List
Note: Please check the received package against the packing list. The contents are
subject to actual items. As the product is in constant upgrade, no prior notice will be sent
to you for any update in this User Manual.
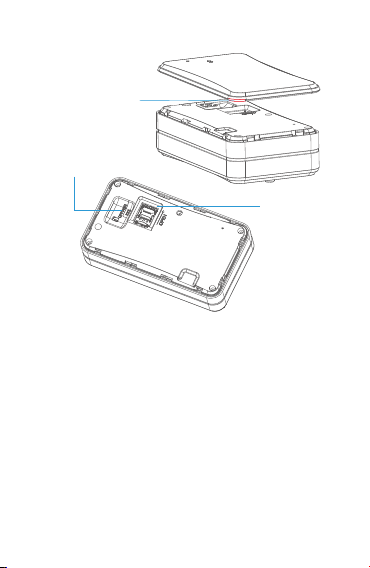
Appearance
GSM LED
Notch
LTE FDD : B1//B3/B7/B8/
B20/B28
GSM: 900/1800MHz
LTE FDD : B1/B2/B3/B4/B5
/B7/B8/B28/B66
GSM: 850/900/1800/1900MHz
<10m
≤5m
<30mA
25 days (where the tracker
runs in workmode for 2
hours per day)
1*Red (work status) and
4*Blue (battery level)
–20℃to +70℃
108x61x30mm
LL301E
LL301L
GNSS accuracy
Listening range: ≤5m
Operating current: <30mA
Operating duration
LEDs
Operating temperature
Dimensions (LxWxH)
Standard
Name
Tracker
User Manual
Charging cable
3M Tape
Bracket
Unit
PCS
PCS
PCS
PCS
PCS
Qty
1
1
1
1
1
Remarks
/
/
/
/
/
MIC

Battery switch
Cover removal
detection switch
SIM card holder
Anti-tamper button
Plug for power button
and USB port
Power LED
Note:
Once the anti-tamper
button is released, a
tamper alert will be
triggered.
MIC
emperature and
Humidity sensor

Status
Fast blink
Slow blink
Solid on
Meaning
GSM initializing/No GSM signal/
No SIM card
Logging in to platform
Device in a call
GSM LED
Note: The GSM LED goes off 3 minutes later after the device is turned on. The
GSM LED will light up by short pressing the power button of the device in the
power-on state and go off after 60 seconds.
Power LED
If the device is charging, then:
Strength
0–25%
25–50%
50–75%
75–96%
Charging
complete
LED1
1s–1s
(on–off)
On
On
On
On
LED2
Off
1s–1s
(on–off)
On
On
On
LED3
Off
Off
1s–1s
(on–off)
On
On
LED4
Off
Off
Off
On
On

Notes on Work Modes
①Timed mode: In this mode, the device uploads position fixes at a
fixed interval, which is configured via the location service platform or
mobile app specified by your dealer.
②Smart mode (default): In this mode, the device tracks the vehicle in
real-time, records the trips of the vehicle, and can differentiate moving
state from parking state. If the vehicle moves, the GPRS connection is
persistent and the device will upload a position fix every 20 seconds. If
the vehicle stops, the device will enter the sleep mode and no position
fix will be uploaded.
③Long standby mode: The device will wake up at a certain configured
interval to upload position fixes. After each upload is complete, the device
will enter deep sleep and will not execute any remote query or set
actions.
Tamper Alert
When the device is attached to a vehicle, the anti-tamper button will
remain press-down. If the device is detached, the anti-tamper button will
Strength
Undervoltage
0–25%
25–50%
50–75%
75–100%
LED1
Off
On
On
On
On
LED2
Off
Off
On
On
On
LED3
Off
Off
Off
On
On
LED4
Off
Off
Off
Off
On
If the device is not charging, then:
Note: The power LED goes off 3 minutes later after the device is turned on. The
power LED will light up by short pressing the power button of the device in the
power-on state and go off after 20 seconds.
spring back, which will trigger the device to send out a tamper alert. In
the long standby mode, the device will enable tracking for 20 minutes
after the alert message is sent out. The tamper alert feature can be
disabled by command.
Cover Removal Alert
When the front cover of the device is in place, the cover removal
detection switch will remain press-down. If the cover is opened, the
switch will spring back, which will trigger the device to send out a
removal alert. In the long standby mode, the device will enable the
smart mode for 20 minutes after the alert message is sent out. The
removal alert can be disabled by command.
Attaching SIM and Description
about Power-On and -Off
Tips:
1. Activate GPRS and SMS services of the SIM card.
2. Power off the device (battery switch to OFF) before attaching or
detaching the SIM card.
Attaching the SIM Card
Remove the back cover by the notch, slide the battery switch to OFF,
and insert the SIM.
Power-On and -Off
Power-on: Press the power button for 3 seconds (prerequisite: the
battery switch is ON).
Power-off: Press the power button for 3 seconds.
Installing the Device
The device has a strong magnet built inside. It can attach to any
ferromagnetic material. The magnet makes the installation easy.
Or you can stick the 3M tapes on one side of the device bracket, and
attach the bracket to the target object, then put the device on the
bracket.
②Confirm thatthe battery
switch is off
③Insert the SIM
①Notch

Platform Operations
After binding the device on the location service platform or mobile app
designated by the dealer, you can monitor it, configure it, and do more
to it via the platform or app.
Logging In to Service Platform
You can configure and control the device via the designated location
service platform.
Downloading Mobile App
You can download the mobile app via the URL provided by your dealer.
Precautions
Please use batteries and accessories specified by the manufacturer of
the device; otherwise, the warranty will become void.
The manufacturer of the device shall bear no warranty liabilities for any
damage resulted from the use of non-original accessories.
Do not soak the battery in water or expose it to fire. Do not bend or
forcibly open the battery.
Do not disassemble the battery as the device may be damaged if the
disassembly is done improperly by a non-professional.
3M Tape
Bracket

Troubleshootintg
When a problem arises, you can troubleshoot it by the following
solution. If the problem persists, please don't hesitate to contact your
dealer or service provider.
Possible Causes
The device is used in an
area where radio waves is
hard to reach, such as near
high-rise buildings or in a
basement.
No SIM
Battery switch is not set to
ON.
The battery is exhausted.
The SIM card may be
attached improperly.
The metal side of the SIM
card is stained.
The SIM is invalid.
The device is out of service
areas.
The signal is extremely
weak.
The SIM is not activated
with data service.
The device keeps replying
with "No data found, please
try again".
Solutions
Try it in a place where
satellite signals can be well
received.
Insert a SIM.
Slide the battery switch to
ON.
Charge the device.
Check the SIM.
Wipe it with a clean cloth.
Please contact your
network service provider.
Try it in a service area.
Try it in an area with strong
signals.
Please contact your
network service provider
and activate the data
service.
Please contact your dealer.
Common
Issues
Poor signal
Power-on
failure
Failed to
access the
network
Failed to
query a
location
Dieses Handbuch passt für folgende Modelle
2
Inhaltsverzeichnis
Andere Jimi GPS Handbücher

Jimi
Jimi VL502 Bedienungsanleitung

Jimi
Jimi LL306 Bedienungsanleitung

Jimi
Jimi VL04 Bedienungsanleitung

Jimi
Jimi VL512 Installationsanleitung

Jimi
Jimi LL701 Bedienungsanleitung

Jimi
Jimi JM01 Bedienungsanleitung

Jimi
Jimi LL02 Bedienungsanleitung

Jimi
Jimi JV200 Bedienungsanleitung

Jimi
Jimi QBIT Bedienungsanleitung

Jimi
Jimi JM01 Bedienungsanleitung


