jobmate YT7552 Bedienungsanleitung


3
Know Your Product................................................................................................. 4
Technical Specications......................................................................................... 4
Description of Symbols...........................................................................................5
Contents of Li-ion Hedge Trimmer .........................................................................6
General Safety Instructions.................................................................................... 7
Additional Safety Instructions..................................................................................9
Assembly Instructions............................................................................................ 9
Operation............................................................................................................... 10
Charging........................................................................................................... 10
Switching on/off................................................................................................ 10
Tips for Using Your Li-ion Hedge Trimmer........................................................ 11
Maintenance...........................................................................................................12
Warranty ................................................................................................................13
CONTENTS
4
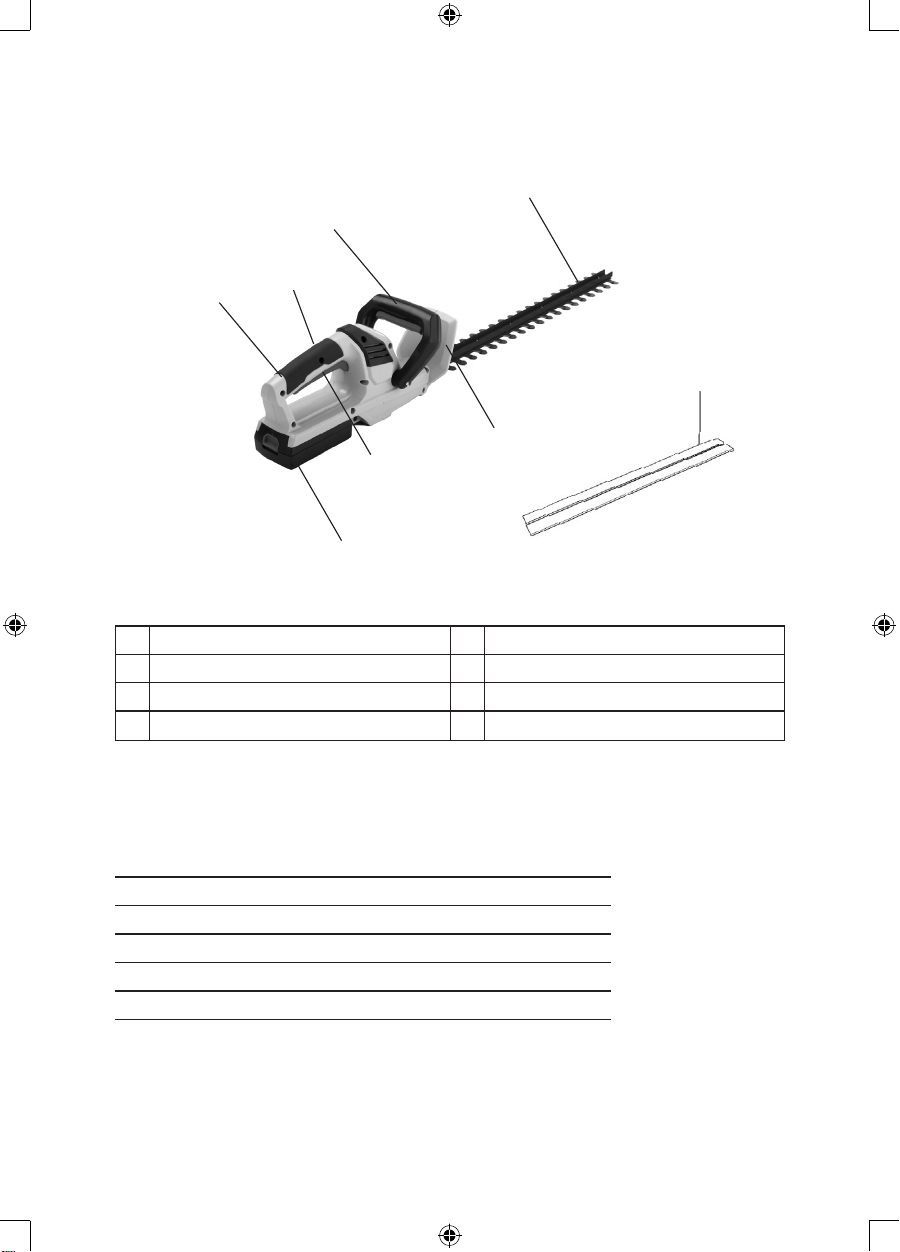
1 Blade 2 Front handle
3Lock-off button 4 Rear handle
5 Battery pack 6 Trigger
7 Safety guard 8 Blade cover
Input: 18V Li-ion /1500mAh
Working time: 20-25min
Cutting length: 450mm
Tooth space: 26mm
Cutting capacity: 12mm
KNOW YOUR PRODUCT
TECHNICAL SPECIFICATIONS
1
2
3
4
5
7
8
6

5
The rating plate on your tool may show symbols. These represent important
information about the product instruction on its use.
Conforms to all relevant European Directives.
Double insulated for additional protection.
DESCRIPTION OF SYMBOLS
Use eye protection.
Use ear protection.
Wear sturdy, non-slip footwear.
Read the user manual.
Do not expose to rain.
Use protective gloves.
Denotes risk of personal injury, loss of life, or damage to the tool in case
of nonobservance.

6
This symbol is known as the ’Crossed-out Wheelie Bin Symbol’ .
When this symbol is marked on a product or battery, it means that
it should not be disposed of with your general household waste.
Some chemicals contained within electrical/electronic products or
batteries can be harmful to health and the environment. Only dispose
of electrical/electronic/battery items in separate collection schemes,
which cater for the recovery and recycling of materials contained within.
Your co-operation is vital to ensure the success of these schemes and
for the protection of the environment.
1* Unit
1* Battery and charger
1* Instruction manual
Conforms to relevant standards for electromagnetic compatibility.
DESCRIPTION OF SYMBOLS (CONT.)
CONTENTS OF Li-Ion HEDGE TRIMMER
Disconnect from mains power immediately if the power cord becomes
damaged.
Keep children at a distance of no less than 5m from the work area.
Disconnect from power supply if repairs are required.
7
WARNING! Read all instructions. Failure to follow all the instructions listed
in all of the warnings listed below refers to your mains operated (corded) power tool
or battery operated (cordless) power tool.
SAVE THESE INSTRUCTIONS
1) Work area
• Keep work area clean and well lit. Cluttered or dark areas can lead to accidents.
• Do not operate power tools in explosive atmospheres, such as in the presence of
dust or fumes.
• Keep children and bystanders away while operating a power tool. Distractions can
cause a loss of control.
2) Electrical safety
• Power tool plugs must match the outlet. Never modify the plug in any way. Do not
matching outlets will reduce risk of electric shock.
• Avoid body contact with earthed or grounded surfaces, such as pipes, radiators,
ranges and refrigerators. There is an increased risk of electric shock if your body
is earthed or grounded.
• Do not expose power tools to rain or wet conditions. Water entering a power tool
will increase the risk of electric shock.
• Do not abuse the cord. Never use the cord for carrying, pulling or unplugging the
power tool. Keep cord awayfrom heat, oil, sharp edgesor moving parts. Damaged
or entangled cords increase the risk of electric shock.
• Replacement of the supply cord. If the supply cord is damaged, it must be replaced by
an electrician or a power tool repairer.
• When operating a power tool outdoors, use an extension cord suitable for outdoor
use. Use of a cord suitable for outdoor use reduces the risk of electric shock.
• If operating a power tool in a damp location is unavoidable, use a residual current
device (RCD) protected supply. Use of an RCD reduces the risk of electric shock.
• Have your tool repaired by an electrician or a power tool repairer. This power tool
complies with relevant safety requirements. To avoid danger, electrical appliances
this may result in considerable damage to the user.
3)Personal safety
• Stay alert, watch what you are doing and use common sense when operating a
drugs, alcohol or medication. A moment of inattention while operating power tools
may result in serious personal injury.
• Use safety equipment. Always wear eye protection. Safety equipment such as a
dust mask, non-skid safety shoes, hard hat, or hearing protection used whenever
conditions require will reduce personal injuries.
• Avoid accidental starting. Ensure the switch is in the ‘off’ position before plugging
GENERAL SAFETY INSTRUCTIONS

8
GENERAL SAFETY INSTRUCTIONS (Cont.)
that have the switch on may cause an accident.
• Remove any adjusting key or wrench before turning the power tool on. A wrench
or key left attached to a rotating part of the power tool may result in personal
injury.
• Do not overreach. Keep proper footing and balance at all times. This enables
better control of the power tool in unexpected situations.
• Dress properly. Do not wear loose clothing or jewellery. Keep your hair, clothing
and gloves away from moving parts. Loose clothes, jewellery or long hair can be
caught in moving parts.
• If devices are provided for the connection of dust extraction and collection
facilities, ensure these are connected and properly used. Use of these devices
can reduce dust related hazards.
4)Power Tool Use and Care
• Do not force the power tool. Use the correct power tool for your application.
The correct power tool will do the job better and safer at the rate for which it was
designed.
• Do not use the power tool if the switch does not turn it on and off. Any power tool
that cannot be controlled with the switch is dangerous and must be repaired.
• Disconnect the plug from the power source before making any adjustments,
changing accessories or storing power tools. Such preventive safety measures
reduce the risk of starting the power tool accidentally.
• Store idle power tools out of the reach of children and do not allow persons
unfamiliar with the power tool or these instructions to operate the power tool.
Power tools are dangerous in the hands of untrained users.
• Maintain power tools. Check for misalignment or sticking of moving parts,
breakage of parts and any other condition that may affect the power tool’s
operation. If damaged, have the power tool repaired before use. Many accidents
are caused by poorly maintained power tools.
• Keep cutting tools sharp and clean. Properly maintained cutting tools with sharp
cutting edges are less likely to stick and are easier to control.
• Use the power tool, accessories and tool bits etc. in accordance with these
instructions, and in the manner intended for the particular type of power tool,
taking into account the working conditions of the work to be performed. Use of the
power tool for operations different from intended use could lead to a hazardous
situation.
5)Service
replacement parts. This will ensure that the safety of the power tool is maintained.

9
• Keep all parts of the body away from the cutter blade. Do not remove cut material
or hold material to be cut when blades are moving. Make sure the switch is off
when clearing jammed material. A moment of inattention while operating the
hedge trimmer may result in serious personal injury.
• Carry the hedge trimmer by the handle with the cutter blade stopped. When
transporting or storing the hedge trimmer, please keep the cutting device cover
covered. Proper handling of the hedge trimmer will reduce possible personal injury
from the cutter blades.
• Keep cable away from cutting area. During operation the cable may be hidden in
shrubs and can be accidentally cut by the blade.
• Hold the power tool by insulated gripping surfaces only, because the cutter blade
may contact hidden wiring or its own cord. Cutter blades contacting a "live" wire
may make exposed metal parts of the power tool "live" and could give the operator
an electric shock.
• Remove any sand, stone, nails, wire, etc. found within the working area. Foreign
objects may damage the cutting blades. Pay special attention when cutting
hedges which are laid out along a wire fence and have grown through the fence.
The blade must not contact the fence; otherwise the blades may be destroyed.
. Use
This product requiresno assembly. Carefully remove the product and any
accessories from the box.Make sure thatall items listed in the packing list are
included.
Inspect the product carefully to make sure no breakage or damage occurred during
shipping. Do not discard the packing material until you have carefully inspected and
satisfactorily operated the product.
ADDITIONAL SAFETY INSTRUCTIONS FOR
LI-ION HEDGE TRIMMER
ASSEMBLY INSTRUCTIONS
10
OPERATION
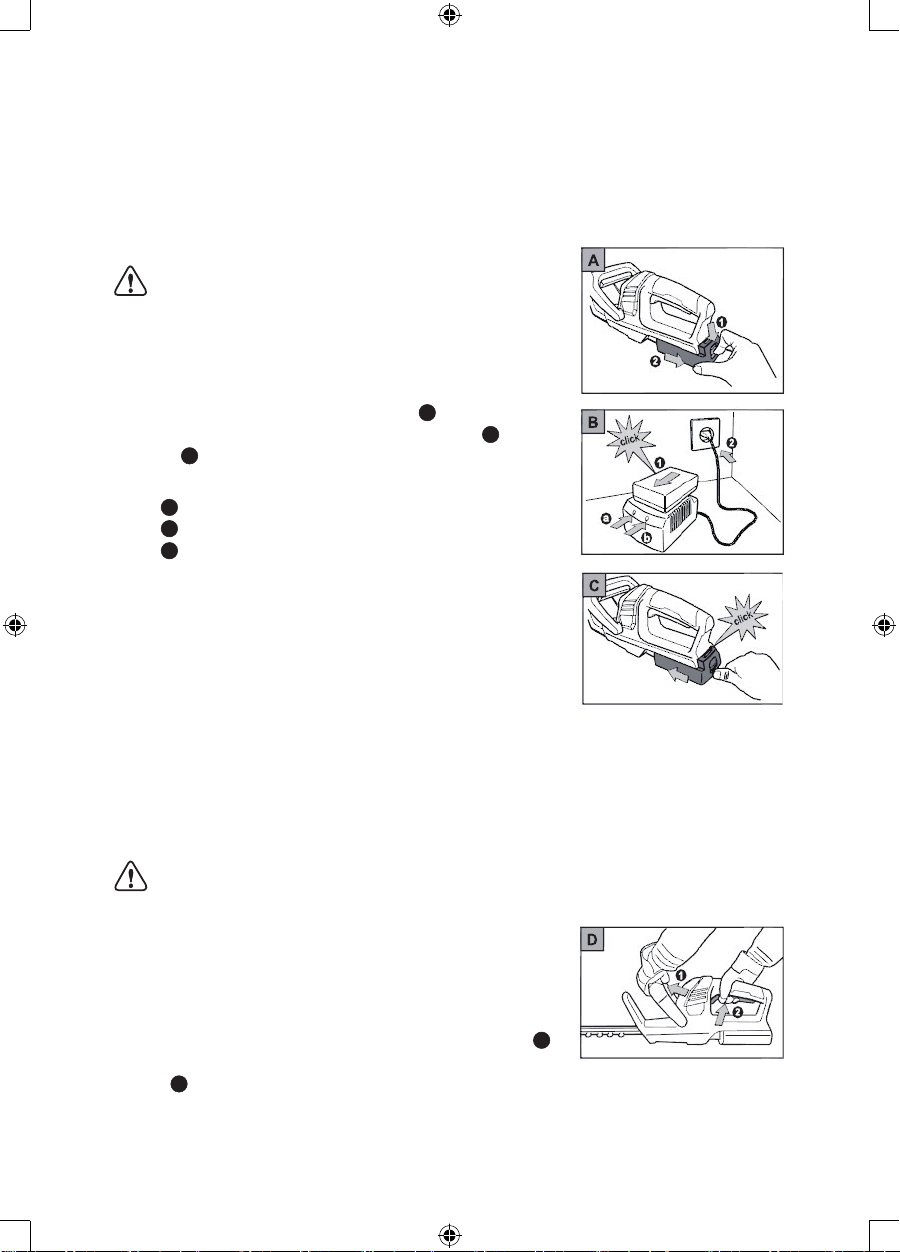
Charging A B C
Attention! Only use battery charger in dry places.
Before first use, the battery needs to be charged for
about 1-2 hours.
Use only the original charger.
1. Remove the battery from the device A.
2. Insert the battery into the charger B.
3. Connect the charger to the mains voltage B
(LED lights up red).
Notes on charger B
• LED lights up red: Battery is charging.
• LED lights up green: Charging completed.
• LED blinks red: Fault (e.g. battery is too hot).
In order to maintain the long service life of the battery,
always follow the instructions below:
ffodehctiwsyllacitamotuasiremmirtegdehehT•
when the battery voltage is low. The battery must
then be recharged before the hedge trimmer can be
used again.
• Always recharge the lithium-ion battery prior to any prolonged period of non-use,
i.e. before storing the hedge trimmer away in autumn.
• The charging time is 1 - 2 hours for a battery that is completely empty.
• The lithium-ion rechargeable battery can be charged at any charge level and
charging can be interrupted at any time without damaging the battery (no memory
effect).
Self-discharge of batteries! Remove the battery from the charger once it is fully
charged.
Switching the hedge trimmers on/off
gnihctiwsnehwydaetserasdnahruoytahterusekaM•
on/off the hedge trimmer.
• Hold the blade away from your body.
Motor on D
1. Hold down the safety switch on the bowed handle .
2. Press the on/off button on the hand grip at the same
time .
Motor off D
Release one of the two buttons.
Times of operation
• Please consult regional/local regulations.
• Inquire about the operating times at your local regulatory agency.
1
2
a
b
b
b
1
2

11
OPERATION (Cont.)
Tips for Using Your Li-ion Hedge Trimmer ( E F)
• Please observe the breeding season of the birds!
• The ideal hedge cutting form is the trapezoid E which provides for adequate light
and ventilation for all parts of the hedge.
• In order to promote thick growth of young hedges, only half of new shoots should
be cut.
• If the hedge has already reached the desired height, new shoots can be
completely removed.
• In order to achieve a steady hedge height you can string up a guide wire at the
desired height and cut along this wire.
Dieses Handbuch passt für folgende Modelle
1
Inhaltsverzeichnis
Andere jobmate Trimmer Handbücher


