Joovy Tricycoo Bedienungsanleitung

Table of Contents
English
Safety and Warnings ........................................................................................................................ 2
Parts List .......................................................................................................................................... 3
Assembly.......................................................................................................................................... 4
Operation.......................................................................................................................................... 5
Care and Maintenance ..................................................................................................................... 6
Team 432.......................................................................................................................................... 7
Instructional Photos.......................................................................................................................36
Francais
Sécurité et Mise en Gardes.............................................................................................................. 8
Liste des Pièces ............................................................................................................................... 9
Assemblé........................................................................................................................................ 10
Opération........................................................................................................................................ 11
Entretien et Maintenance................................................................................................................ 12
Équipe 432 ..................................................................................................................................... 13
Photos Pédagogiques...................................................................................................................36
Español
Seguridad y Advertencias .............................................................................................................. 14
Lista de Partes................................................................................................................................ 15
Montaje........................................................................................................................................... 16
Operación....................................................................................................................................... 17
Cuidado y Mantenimiento .............................................................................................................. 18
Equipo 432 ..................................................................................................................................... 19
Fotos Instructivas..........................................................................................................................36
日本語
安全と警告 ...................................................................................................................................... 20
部 品リスト ....................................................................................................................................... 21
アセンブリ ....................................................................................................................................... 22
操作 ................................................................................................................................................ 23
保存取り扱い................................................................................................................................... 24
チーム432 ....................................................................................................................................... 25
教育写真......................................................................................................................................... 36
한국어
안전및경고 ...................................................................................................................................... 26
부품목록 .......................................................................................................................................... 27
어셈블리 ........................................................................................................................................... 28
조작 ................................................................................................................................................. 29
관리및유지방법 ............................................................................................................................... 30
팀432.............................................................................................................................................. 30
교육사진......................................................................................................................................... 36
中文版
安全和警告...................................................................................................................................... 31
零件清单 ......................................................................................................................................... 32
装配 ................................................................................................................................................ 33
操作 ................................................................................................................................................ 34
保养与维护...................................................................................................................................... 35
432团队 ........................................................................................................................................ 35
指導性照片.....................................................................................................................................36

2
Safety and Warnings
IWARNING
TO AVOID SERIOUS INJURY
• Continuousadultsupervisionisrequired.
•Neverusenearmotorvehicles.
•Neverusenearstreets,swimmingpools,hills,steps,orsloped
driveways.
•Alwayswearshoeswhenusingthetricycle.
•Allowonlyonerider.
•Minimumageofridershallbe2years.
•Maximumageofridershallbe5years.
•Maximumweightofridershallbe55lbs.(25kg).
•Ridershouldalwayswearaproperlyttedhelmetthatcomplieswith
Federalhelmet(16CFR1203)requirements.
•Donotloadthebasketwithmorethan4.4lbs.(2kg).Excessiveweight
may cause a hazardous or unstable condition.
•Adultassemblyrequired.Packagecontainssmallparts.Keepchildren
awayfromproductwhileassembling.
•Toolsrequired(included):Allenwrenchandopenendwrench.
Please do not return this product to the store.
Ifyouexperienceanydicultywiththeassemblyoruseofthisproduct,orifyouhaveaquestion
regardingtheseinstructions,pleasecontactTeam432(page7).
Please note: Styles and colors may vary.
IWARNING
Please read these instructions carefully before use
and keep them for future reference.
3
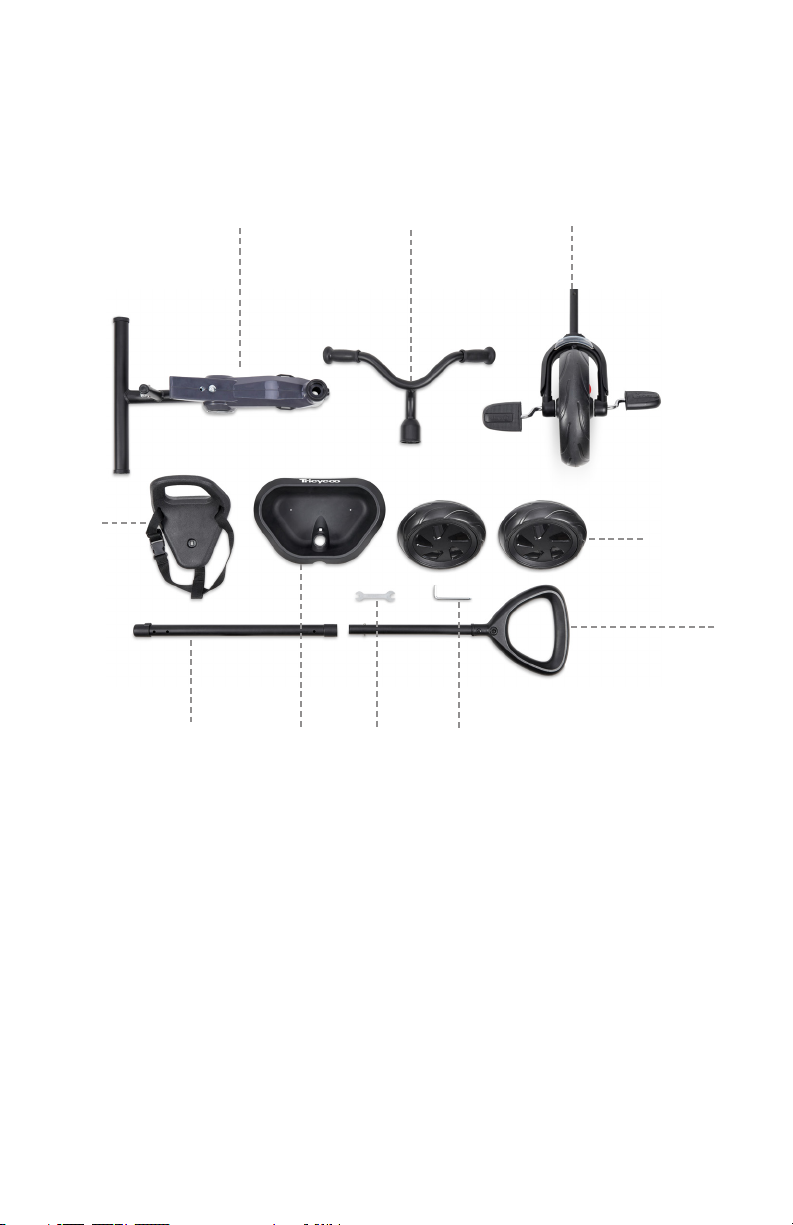
Parts List
Front Wheel
Handlebar
Basket
Push Handle
Bottom
Push
Handle Top
RearWheels(2)
Frame
Seatwith
Restraint
System
8mm/10mm
Open end Wrench
6mm Allen
Wrench

4
Unpacking the Product
• Removeeverythingfromthebox–Frame,Handlebar,FrontWheel,Basket,SeatwithRestraint
System,PushHandle(2parts),RearWheels(2),6mmAllenwrenchand8mm/10mmopenend
wrench.
•Discardallpackagingmaterialsproperlyincludingplasticcoverings.
•DONOTallowchildrentoplaywithanypackagingmaterials.
IWARNING:
Adultassemblyrequired.ChokingHazardtochildrenunderthe
ageof3years–containssmallpartspriortoassembly.Keepall
small parts out of reach of children at all times.
Unfolding the Product
•Locatethepushbuttonontherightsideoftheframe.(1)
•Pressthepushbuttonandpullthebasketandrearwheelsoutwardtounfoldtheproduct. (2)
•Ensuretheunfoldedproductlocksintoplacesecurely.
Front Wheel Assembly
•Keepchildrenawayfromproductwhileassembling.
•Insertthefrontwheeltubeintothefrontofthetricycleframeuntilitclicksintoplace.(3)
Handlebar Assembly
•Unfastenandremovethenutandboltonthehandlebar.(4)
•Orientthehandlebarasshownandslideitdownontothetopofthefrontwheeltube,liningupthe
holesinthehandlebarwiththeholesinthetube.(5)
•Fromthefrontoftheproduct,holdthecapupoutofthewayandpushtheboltthroughthe
handlebar and tube holes. (6)
•Whilestillholdingthecapoutoftheway,attachthenuttothebolt.(7)
•Whileholdingthebolt,usethelargerendoftheopenendwrenchtotightenthenutsecurely. (8)
•Ensurethehandlebarissecurebyslightlywigglingit.
•Pushthecapdownintoplace.(9)
Rear Wheel Assembly/Disassembly
•Insertonerearwheelintooneendoftherearaxletubeoftheframeuntilitclicksintoplace.(10)
•Repeatontheotherside.
•Pulloneachwheeltoensureitissecurelyattached.
•Toremoveeachrearwheel,pushthereleasetabontherearaxleandpullthewheelawayfromthe
tricycle. (11)
Seat Assembly
•Removetheseatscrewfromtheframe.(12)
•Inserttheseatscrewthroughtheholeintheseat.(13)
•Pulltherestraintsystemcrotchstraptowardandaroundthefrontoftheseatandthenunderneath
theseat.Thenpushtheseatscrewthroughtheholeinthisstrap.(14)
Note:Besurethecrotchstrapisnottwisted.
Theseatcanbeinstalledintwodierentpositions.
•Placetheseatatthedesiredpositionontheframetoaccommodatethesizeofyourchildand
aligntheseatscrewwiththeappropriateholeintheframe.(15)
•UsetheAllenwrenchtotightenthescrewsecurely.(16)
Assembly

5
•Pullupontheseattoensureitissecurelyattached.
Basket Assembly
•Unfastenandremovethenut,washerandboltfromtheframebarjustbehindthepushhandle
tube. (17)
•Orientthebasketasshownandplaceitoverthepushhandletube.(18)
•Squeezethespringclipsandthenpushthebasketdownonthistubepasttheseclips.(19)
•Inserttheboltdownthroughtheholeinthebasketandthenallthewaythroughtheholeinthe
tube. (20)
•Attachthewasherandthenthenuttotheboltandtightenthenutusingthelargerendoftheopen
endwrench.(21)
Note: It may be easier to do this if you turn the product on its side.
•Pulluponthebaskettoensureitissecurelyattached.
IWARNING:
Donotloadthebasketwithmorethan4.4lbs.(2kg).Excessiveweightmay
cause a hazardous or unstable condition.
Push Handle Assembly
•Orientthetopandbottomsectionsofthepushhandleasshown.(22)
•Squeezethespringclipsandinsertthetopsectionintothebottomsectionuntilitclicksintoplace
and the spring clips pop through the holes. (23)
•Orientthepushhandleasshownontothepushhandletubeoftheframe.(24)
•Squeezethespringclipsonthepushhandleandloweritontothepushhandletubeuntilitclicks
into place and the spring clips pop through the holes. (25)
•Pullupthepushhandletoensureitissecurelyattached.
Operation
Securing a Child in the Seat
• Pressthebuttononthecenterbuckleoftheharnessassemblytoreleasethewaiststrapsand
crotch strap. (26)
•Placeyourchildontheseatandpositiontheirlegsthroughbothwaiststrapsandcrotchstrap.
•Reinsertbothwaiststrapconnectorsintothecenterbuckle.(27)
•Thewaiststrapsmaybeadjustedusingtheslidingplasticrings.Makesurethewaiststrapst
snugly around the child.
Unlocking the Front Wheel Pedals
• Tounlockthefrontwheelpedals,turntheswitchonthesideofthefrontwheelCLOCKWISEuntila
clickisheard.(28)
•Checktoensurethatthefrontwheeldoesnotrotatewhenpedalsarerotated.
Locking the Front Wheel Pedals
• Tolockthefrontwheelpedals,turntheswitchonthesideofthefrontwheelCOUNTERCLOCKWISE
untilaclickisheard.(29)
•Checktoensurethepedalsrotatethefrontwheel.
Removing the Push Handle
• Squeezethespringclipsonthepushhandletubeandpullthepushhandleupwardsoofthe
tube. (30)
SAVE THE PUSH HANDLE FOR FUTURE USE.

6
Folding the Product for Storage or Travel
• Removethechildfromtheproduct.
•Alsoremovethepushhandle.
•Locatethepushbuttonontherightsideoftheframe. (31)
•Pressthebuttonwhilepushingthebasketandrearwheelsinwardtowardthefrontwheeltofold
the product. (32)
Care & Maintenance
Maintenance
Allofthettings,locks,rivets,otherhardwareandplasticpartsontheproductshouldbeinspected
periodically to ensure that they are properly secured and not damaged or malfunctioning. All moving
partsshouldalsobecheckedperiodicallytoensurethattheyareoperatingproperly.
Anymissing,broken,ordamagedcomponentsshouldbereplacedimmediately,andtheproduct
should not be used until they are replaced. Only the manufacturer’s original components should be
used.Ifneeded,pleasecontactJoovy(USA)orElfe(Canada)atourtoll-freephonenumber.
Color fading may occur if the product is left in direct sunlight for long periods of time. When not in
use,storetheproductoutofdirectsunlight.
Cleaning
The plastic parts and fabric straps on this product can be cleaned using mild household soap and
warmwateronaspongeorcleancloth.Alwaysallowtheproducttoairdrycompletelybeforeusing
it.
Theframeandwheelsshouldalwaysbekeptcleanandfreeofdirtandforeignmatter,especially
afteroperatingtheproductinrain,snow,orotherharshenvironments.Useaspongeorcloth
dampenedwithwarmwaterandamildhouseholdsoap.
Storage
Directsunlightmaydryoutwheels.Storeproductindoorstoprolongitsoriginalappearance.DO
NOTstoreoutdoors.Ensurethattheproductisdrybeforestoringforprolongedperiods.Always
storetheproductinadry,safeenvironment.DONOTplaceheavyobjectsontopoftheproduct.DO
NOTstoretheproductnearadirectheatsourcesuchasaradiatororopenre.

7
Team 432
Please do not return this product to the store.
Ifyouexperienceanyofdicultywiththeassemblyoruseofthisproduct,orifyouhaveaquestion
regardingtheseinstructions,pleasecontactTeam432:
United States
Joovy
(877)456-5049,8:30am–5:00pmCentralTime
joovy.comLiveChat,8:30am–9:00pmCentralTime
customerservice@joovy.com
Canada
Elfe Juvenile Products
(800)667-8184,8:30am–5:00pmEasternTime
Korea
JoyPartnersLimitedKorea
(822)2248-3384,9:00am–6:00pmGMT+9
@joovy

8
Sécurité et Avertissements
IMISE EN GARDE
POUR ÉVITER LES BLESSURES GRAVES
•Unesupervisioncontinueparunadulteestrequise.
•Ne jamais utiliser près de véhicules motorisés.
•Nejamaisutiliserprèsderues,piscines,collines,marchesouallésen
pente.
•Porter toujours des souliers lors de l’utilisation du tricycle.
•Ne permettre qu’un seul utilisateur.
•L’âge minimum de l’utilisateur doit être de 2 ans.
•L’âgemaximumdel’utilisateurdoitêtrede5ans.
•Lepoidsmaximumdel’utilisateurdoitêtrede25kg(55lb).
•L’utilisateur doit toujours porter un casque de taille adéquate conforme
auxexigencesfédéralessurlescasques(16CFR1203).
•Nepasplacerunechargedépassant2kg(4.4livres)dansle
porte-bagages.Toutpoidsexcessifpourraitoccasionnerune
situation dangereuse ou une instabilité.
•Montage par un adulte requis. L’emballage contient de petites pièces.
Tenir les enfants éloignés du produit lors du montage.
•Outilsrequis(inclus):CléAllenetcléàboutlibre.
Veuillez ne pas retourner ce produit au magasin.
Encasdedicultésaveclemontageoul’utilisationdeceproduit,ouencasdequestionspar
rapportàcesinstructions,veuillez contacter l'équipe 432(page13).
Veuillez prendre note : Les styles et les couleurs peuvent varier.
IMISE EN GARDE
Veuillez lire ces instructions soigneusement avant
utilisation. Conservez-les pour référence future.

9
Liste des Pièces
Roulette Avant
Guidon
Panier
Poignée-poussoir
Bas
Poignée-poussoir
Haut
Roulettes
arrières(2)
Cadre
Siège avec
système de
retenue
Cléàboutouvert
8 mm/10 mm
6 mm
Clé Allen

10
Déballage du Produit
• Toutenleverdelaboîte–cadre,guidon,rouletteavant,panier,siègeavecsystèmederetenue,
poignée-poussoir(2parties),roulettesarrières(2),cléAllen6mmetcléàboutouvertde
8 mm/10 mm.
• Jeteztoutlematérield’emballageadéquatement,ycomprislesrevêtementsenplastique.
• NEPASpermettreauxenfantsdejoueravectoutmatérield’emballage.
IMISE EN GARDE:
Montageparunadulterequis.Dangersd’étouementpourles
enfantsdemoinsde3ans-contientdepetitespiècesavantle
montage. Conserver toutes les petites pièces hors de portée des
enfants en tout temps.
Dépliage du Produit
•Localisezlebouton-poussoirsituésurlecôtédroitducadre.(1)
• Appuyezsurlebouton-poussoir,ettirezensortantlepanieretlesroulettesarrièrespourdéplierle
produit. (2)
•Assurez-vousqueleproduitdépliéseverrouillefermementenplace.
Montage des Roulettes Arrières
•Tenirlesenfantséloignésduproduitlorsdumontage.
•Insérezletubedelarouletteavantdanslapartieavantducadredutricyclejusqu’àcequ’il
s’enclenche en place. (3)
Montage du Guidon
•Desserrezetenlevezl’écrouetleboulonsituéssurleguidon. (4)
•Orientezleguidoncommeillustréetabaissez-lesurlehautdutubedelarouletteavant,en
alignant les trous situés sur le guidon avec les trous situés sur le tube. (5)
•Depuisl’avantduproduit,levezensoulevantlecapuchonhorsducheminetpoussezsurle
boulonenlefaisantsortirduguidonetdesoricesdetube.(6)
•Toutenmaintenantlecapuchonhorsduchemin,xezl’écrouetleboulon. (7)
•Toutentenantleboulon,utilisezlagrandeextrémitédelacléàboutouvertpourbienserrerl’écrou.(8)
•Assurez-vousqueleguidonestbienxéenlebougeantlégèrement.
•Appuyezsurlecapuchonpourleplacer.(9)
Montage/Démontage des Roulettes Arrières
•Insérezuneroulettearrièredansl’uneextrémitédutubed’axearrièreducadrejusqu’àcequ'elle
s’enclenche en place. (10)
•Répétezpourl’autrecôté.
•Tirezsurchaqueroulettepours’assurerqu’elleestfermementattachée.
•Pourenleverchaqueroulettearrière,poussezsurl’ongletdedégagementsituésurlemoyeu
arrière et sortez la roulette du tricycle en la tirant. (11)
Montage du Siège
•Enlevezlavisdesiègeducadre. (12)
•Insérezlavisdesiègeàtraversl’oricesituésurlesiège.(13)
•Tirezlasangled’entrejambedusystèmederetenueautourdel’avantdusiègeeten-dessous.
Puispoussezsurlavisdesiègeàtraversl’oricesituédanscettesangle. (14)
Assemblé
Andere Handbücher für Tricycoo
1
Inhaltsverzeichnis
Sprachen:
Andere Joovy Fahrrad Handbücher


