
KYK Higen1+ Premium Bedienungsanleitung

1
KYK Hydrog en Water Generator
USER MANUAL
Premium
Higen1+

2
Dear KYK HIGEN1+ Customer,
Welcome to the Higen1+ family. I hope to nd you well and healthy. Con-
gratulaons on purchasing the Higen 1+ and we appreciate your decision to
join our family.
Please read the manually fully before using the Higen1+. It contains very
useful informaon about the safe care, operaon and ease of use of the
Higen 1+.
Furthermore, with the informaon in this manual you can customize the
water to suit your needs. You can maximize your Higen1+ performance and
extend the life span of the product.
All of our KYK execuves and sta members are dedicated to achieving the
best for our customers. Our focus is on our customer benets, health and
happiness.
Please, feel free to contact us at any me. If you have any recommendaon,
we would appreciate the feedback. The feedback will help us improve our
product oering.
Again, I thank you from the boom of my hearts for your choosing the KYK
Higen1+, we know you will enjoy it. I hope it will help you be healthier and
happier and bring your precious family all the riches you deserve.
Thank you.
Sincerely
President
Thank you for being our Customer!

3
1. Major Components ………………………………………… 4
2. Parts and Features …………………………………………. 5
3. Before installaon ………………………………………….. 8
4. Installaon ……………………………...……………………… 9
5. How to measure your tap’s aerator..……..………… 10
6. Flow diverter installaon ……....……………….……… 11
7. Installaon checklist …………………………………….... 15
8. How to use the Higen 1+ ..……………...….………….. 16
9. When to change the lter ....………………………….. 18
10. How to change the lter ….…………………………….. 19
11. Summary of Operaon Noces ………………………. 22
12. Noces for Safety …………………………………………... 23
13. Product Specicaons ………………………………….... 24
Table of Contents
Note: Please read the manually fully before using the Higen1+. It contains very
useful informaon concerning the care, operaon and use of the Higen 1+.

4
Major Components
Body
[ Front ] [ Rear ]
Faucet
(Spout) Filter Lifespan Indicator Lights (Green LEDs)
Control Panel (6 buons)
Speaker Filter Cover
Boom
Tap Water IN
Water OUT
Overow (Leave open)
Power Cable
ON/OFF Valve
Water OUT Overow Drain
Tap Water IN
Flow Diverter + Hose
Tubing
Accessories
Water Pressure
Reducer Valve
Water Soener
90°
Elbow Connectors
Accessories
Adaptor Rings
1
2
3
IN
OUT

5
Parts and Features
Control Panel
Filter Lifespan Indicator Lights (Green LED’s)
Level 1 Hydrogen Water
Level 2 Hydrogen Water
Level 3 Hydrogen Water
Cleaning / Sengs
Puried Water
Water ON/OFF Valve
Cleaning / Seng
◼ Cleaning cycle starts automacally every 30 litres of connuous use to protect the
electrolysis chamber.
◼ 2 sengs available. Speaker volume and input water pH level (default 7.1).
Ozone Water
(Not for drinking)

6
Parts and Features
Clean/Set Buon - Volume Seng
◼ To access the volume seng: Press the Clean/Set buon for 3-4 secs, unl
the unit beeps.
◼ To adjust the volume: Press the Puried buon for the low volume, and
the No. 2 buon for the higher volume. The green LED indicator lights will
light up as you switch between the two.
◼ To apply the seng: Press the Clean/Set buon unl the unit beeps.
Filter Lifespan Indicator Lights (Green LEDs)
N/A
Adjust Up
N/A
Cleaning / Sengs
Adjust Down
N/A
Changing Seng - Volume

7
Clean/Set Buon — Input pH Level Seng
◼ To access the input pH level: Press the Clean/Set buon for 7-8 secs,
unl the unit beeps twice.
◼ There are 6 preset pH levels to choose from (see table below).
◼ The green LED indicator lights 1 to 4 (le to right) will light up as you
switch between them.
◼ Press the puried buon to move the green light to the le (lower pH),
and the No. 2 buon to move the green light to the right (higher pH).
◼ To apply the seng: Press the Clean/Set buon unl the unit beeps.
1st light
Blinking
1st light
On
2nd light
On
3rd light
On
4th light
On
4th light
Blinking
pH 6.5 pH 6.8 pH 7.1 pH 7.4 pH 7.7 pH 8.0
Filter Lifespan Indicator Lights (Green LEDs)
N/A
Adjust Lights Right
N/A
Cleaning / Sengs
Adjust Lights Le
N/A
Parts and Features
Changing Seng - Input pH level

8
Before Installaon
Read the recommendaons below before installing your Higen 1+ unit
Do not lt the product. Install the product at least
100mm away from any walls.
Damage can result from running
hot water through the unit and will
void any warranty.
Keep the product dry, and avoid high
moisture areas or direct sunlight.
Water OUT tube must not be (raised)
higher than the base of the product.
Water OUT tube must not be longer
than 600mm from the unit.

9
Back
Faucet / Spout
Filter Cover
Overow Power Cable
Installaon
1Installaon Connecng to the end of a tap
◼ Unscrew and remove the aerator from your tap.
◼ Screw the Adaptor Ring that ts your tap if required.
◼ Screw the Flow Diverter to the tap/adaptor.
◼ Slide the Water Soener on to the tube.
◼ Aach the tube to the Pressure Reducing Valve (PRV).
◼ Use tubing to connect to the outlet of the PRV to the
Tap Water Inlet connecon on the back of the unit.
Adaptor Ring
Flow Diverter
Connect PRV in line
Connecon to Tap Water inlet
(back of unit)
Water Soener
Tap Water IN
Water OUT
1
2
3
IN
OUT
10
Installaon
Cauon
◼ All threaded connecons to the cold water supply should be covered with Teon
tape to avoid the chance of leaks.
◼ If you need to relocate the unit, be careful not to over-stress any connecon.
Over-stressing a connecon can cause the connecons to leak aer the unit is
relocated. Over-stressing can cause the O-rings and seals to distort and not seal
or seat properly. Under mains pressure condions these over-stressed joints may
leak or break.
◼ If connecons are overghtened, then leaks are possible. And if connecons are
too loose, then leaks are also possible. For best result ensure connecons are
ght enough to not produce any leaks but not too ght to damage them. Use
Teon tape on all male thread connecons.
◼ If the tube between the inlet and water drain port is installed incorrectly, it may
mean the unit will not generate hydrogen and cause the unit to fail. Any failure
due to incorrect installaon is not covered by warranty.
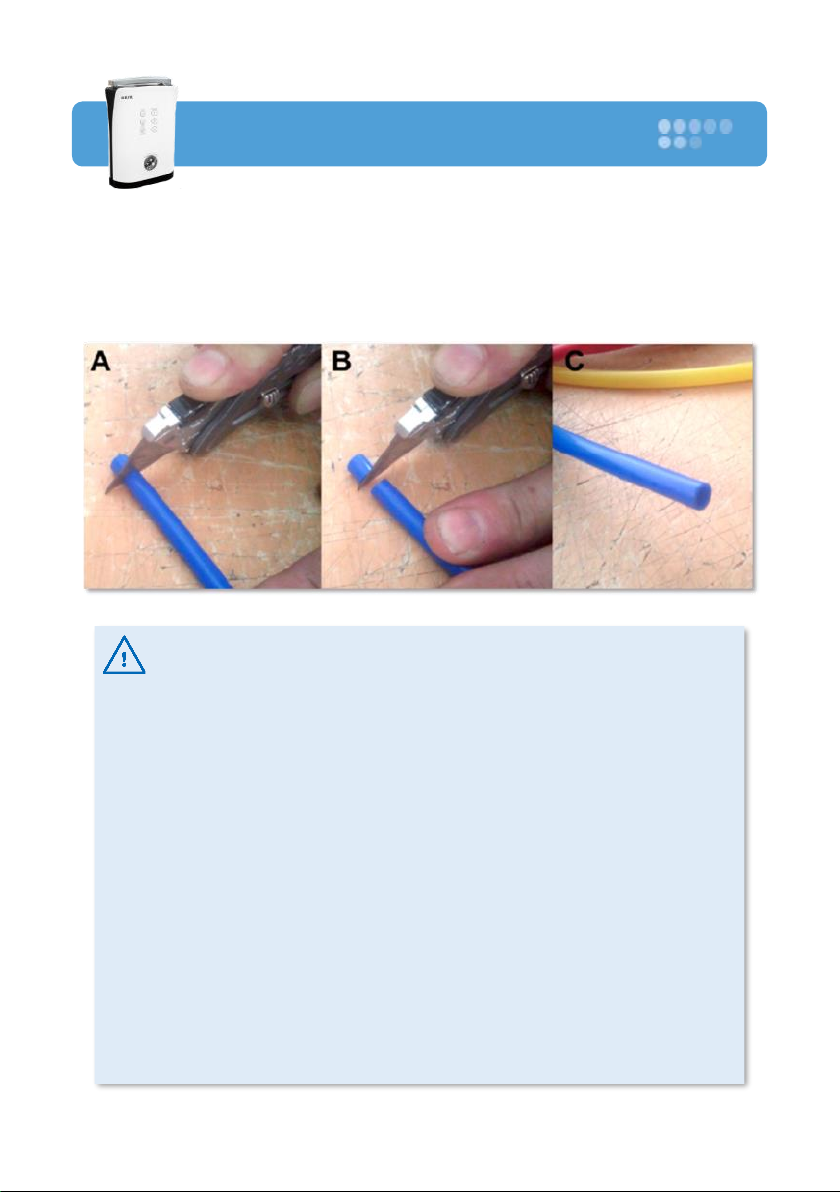
How to Cut the Tubing for Connecon
◼ Use a very sharp knife or razor blade to get a clean right angle cut.
◼ Check to make sure you have a clean and even end.
Inhaltsverzeichnis


