Luma Surveillance 500 Series Bedienungsanleitung

500 Series Fisheye
IP-Enabled HD Surveillance Camera
Installation
Manual
®
Important!
Ensure your NVR
has the latest
firmware!

2
Luma 500 Series Fisheye IP Camera
Read this page before you go to the job site!
For maximum control and convenience, install your camera with a connection to the Internet via your NVR
or through a local network router. This allows you to use OvrC, a powerful remote maintenance tool. See
OvrC.com for details. In addition, your client can use the Luma Surveillance mobile app to check on the camera
from anywhere.
For installation using this guide, you must be able to access this camera through a personal computer. If your
surveillance system is not on a network, you’ll have to use the NVR’s local interface for installation. See the NVR
user’s manual for details.
Required Equipment
}A network connection (and an NVR, if desired)
}Admin rights to a computer that can access the network
}Power source: either PoE or 12V DC
}Phillips screwdriver
Additional Resources
If desired, you can add an SD card (up to 128 GB) to the camera. An SD card or a network drive is required if you
want to keep a log of the camera’s activities.
You can acquire a PDF of the web interface manual and other materials from the product page at SnapAV.com.
3
Luma 500 Series Fisheye IP Camera
Preparation
Before you start, ensure that the device is in good condition and all the assembly parts are included. Also ensure
that your recorder has the very latest firmware. Use OvrC to update the firmware, or consult your NVR manual.
}Ensure the mounting surface is strong enough to hold three times the weight of the camera plus the mount.
}If the mounting surface is cement, use the included expansion screws to install the camera. If mounting to
a wood surface, use self-tapping wood screws (not included) to secure the camera.
}If the product does not function properly, please contact technical support. Do not disassemble the camera
for repair or maintenance.
Box Contents
}Camera
}Self-adhesive mounting template
}3 x wall anchors with screws (+1 spare)
}Hex wrench
}Weatherproofing kit for PoE cable
®
Important!
Before attaching this to
your Luma NVR, update
the recorder to the latest
firmware! If you don’t,
essential features of your
camera may not function.

4
Luma 500 Series Fisheye IP Camera
Safety Tips
}Handle this device with care.
}Do not strike or shake this device.
}Do not operate this device beyond its specified power source ratings.
}Protect the power cord from being stepped on or pinched, particularly where it connects to the device and
to the power outlet.
}Do not use this device near any heat sources such as radiators, heat registers, stoves, or other such heat-
generating equipment.
}The performance and lifespan of the SD card (if used) is affected by temperature. For best results, use this
device in temperatures ranging from -20–140 °F.
}Clean this device with a dry cloth. Do not use strong or abrasive detergents when cleaning the device,
especially the lens. If dirt is hard to remove, use a mild detergent and wipe gently.
}Make a note of the configuration settings and save them. This helps when changing the configuration,
when upgrading the device, or with recovery if unexpected failure or trouble occurs.
5
Luma 500 Series Fisheye IP Camera
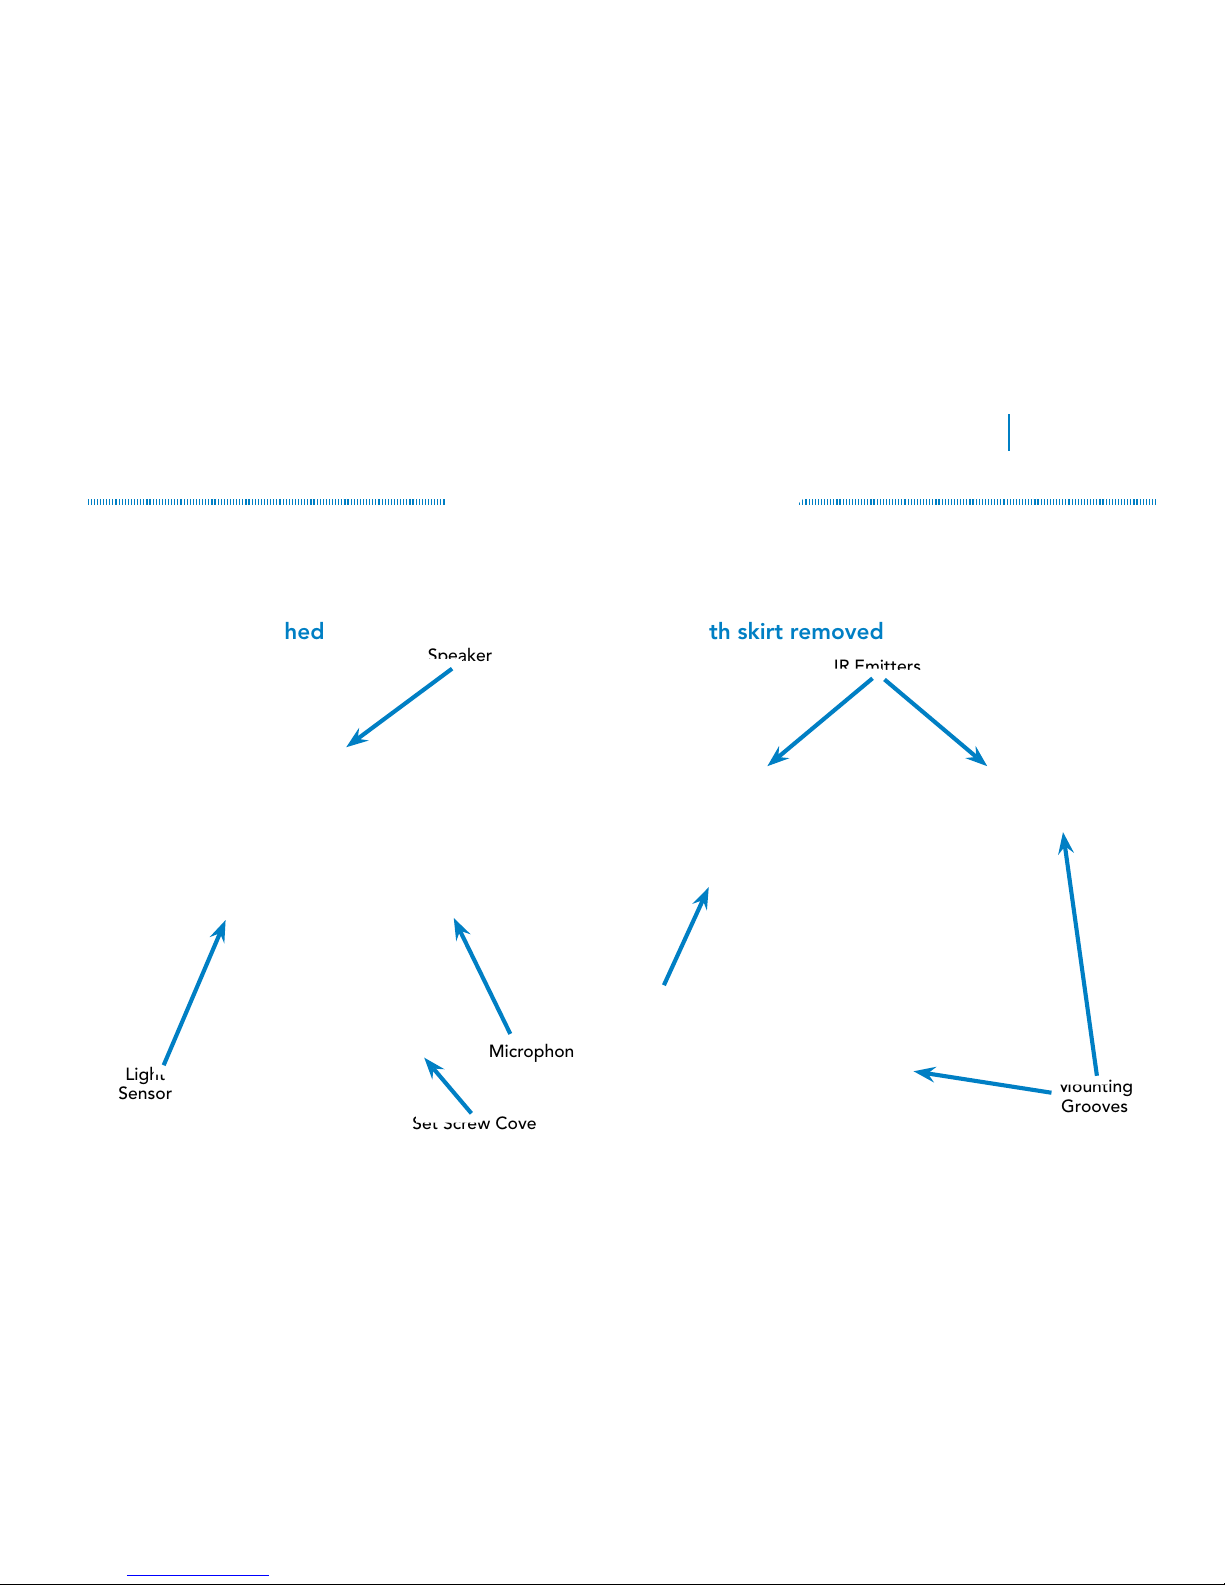
Physical Components
Before installing, familiarize yourself with the parts of your camera.
With skirt attached With skirt removed
Set Screw Cover
Light
Sensor
Speaker
Microphone
Lens
IR Emitters
Mounting
Grooves
Utility Port
(see page 6)

6
Luma 500 Series Fisheye IP Camera
The Camera Interior
To remove the camera skirt, pry open the rubber cover over the set screw. Use the included hex wrench to loosen
the set screw. Do not remove the screw completely.
The cover is held in place by a trio of friction locks. Carefully pry the case off the camera body. An internal
lanyard keeps the skirt attached to the camera body.
To replace the skirt, snap it into place, tighten the set screw, and replace the set screw cover.
The Utility Port
To access the utility port, use the included hex wrench to loosen both screws that hold the cover in place. Loosen
one screw so that it detaches from the body; leave the other one in place. It is not necessary (or recommended) to
remove either screw completely. Swing the cover to one side to expose the utility port. It has the following items:
SD Card Slot
This holds one SD card of up to 128 GB. See our website for a list
of compatible cards.
Reset Button
To perform a factory default on your camera, power off the camera,
press and hold this button, restore power, and keep the button
pressed for 30 seconds. You will have to reactivate the camera by
creating a new password.
Reset
Button
SD Card
Slot

7
Luma 500 Series Fisheye IP Camera
The Camera’s Capabilities
This fisheye camera has only one camera: the main 360° lens in the center. Every other view employed by the
fisheye is created on the fly via the camera’s software.
Persistent PTZ Views
The camera has three PTZ views that can be treated as permanent cameras. The camera tracks the settings of
these three virtual PTZs, and creates separate streams and substreams for them.
You can set how to view these under Configuration > System Settings > Hardware Settings > Display Mode.
Camera Streams
This camera has a limit of 6 outgoing video streams. Each camera (the fisheye lens and each of the three persistent
streams) has 2 streams: the main stream and substream. The NVR grid view uses the substream. If a substream is
not available, you must use the main stream (as bandwidth allows) or be resigned to a blank screen.
There are six camera modes for your fisheye camera:
Fisheye
}Stream 1 = Fisheye main stream
}Stream 2 = Fisheye substream
Panorama 180 (This splits the fisheye view into two stacked 180° panoramas)
}Stream 1 = Panorama main stream
}Stream 2 = Panorama substream

8
Luma 500 Series Fisheye IP Camera
2 PTZs
}Stream 1 = PTZ 1 main stream
}Stream 2 = PTZ 1 substream
}Stream 3 = PTZ 2 main stream
}Stream 4 = PTZ 2 substream
Fisheye + 3 PTZ (requires your NVR and network
to have the bandwidth to handle 3 main streams)
}Stream 1 = Fisheye main stream
}Stream 2 = Fisheye substream
}Stream 3 = PTZ 1 main stream
}Stream 4 = PTZ 2 main stream
}Stream 5 = PTZ 3 main stream
Fisheye + 2 PTZ (this is the default mode)
}Stream 1 = Fisheye main stream
}Stream 2 = Fisheye substream
}Stream 3 = PTZ 1 main stream
}Stream 4 = PTZ 1 substream
}Stream 5 = PTZ 2 main stream
}Stream 6 = PTZ 2 substream
Fisheye + 1 PTZ
}Stream 1 = Fisheye main stream
}Stream 2 = Fisheye substream
}Stream 3 = PTZ 1 main stream
}Stream 4 = PTZ 1 substream
Provisional PTZ Views
While the display mode sets the default view and uses the persistent PTZ cameras, you can create a new view by
using the flyout menu (see page 18). All PTZ views in the flyout menu are generated in real time; they do not use
the persistent PTZ cameras. While the angles and zooms can be adjusted in the live view, when you change the
view or leave the live page, all adjustments are immediately lost.
In the live page, to return to the default view (which uses the persistent PTZs), simply press F5.

9
Luma 500 Series Fisheye IP Camera
Controlling the Views
You can click the PTZ icon to open the PTZ control menu (see the manual for details).
Alternatively, and more efficiently, you can click and drag within the camera view to move the camera’s view.
With the persistent PTZs, you can click on the fisheye view. The persistent PTZ then tries to center its view on
the location you clicked.
Physical Components
While the fisheye camera does some amazing things, we want to be clear on its limitations.
Infrared Lamps
While the fisheye camera has infrared emitters, these are neither long-range emitters like those in bullet cameras,
nor do they have powerful and broad emitters like those in dome cameras. The infrared emitters are designed to
illuminate at close range and in the center of the fisheye’s view.
Built-In Speaker
The speaker built in to the camera is extremely limited in size, and therefore limited in output and quality. If
having high quality audio is essential to your install, we urge you to use a dedicated speaker.

10
Luma 500 Series Fisheye IP Camera
Installation via an NVR PoE Port
If you are installing with an NVR via one of its PoE ports, follow these instructions. Otherwise, follow the instructions
starting on page 13. Where possible, we recommend changing settings using your NVR.
1. Ensure your NVR has the latest firmware. If it does not, your NVR may be unable to locate and activate your
camera if you are plugging your fisheye into the PoE ports of the NVR.
2. Perform the physical installation of your camera by following the instructions that start on page 16.
3. Plug your camera into your recorder. The NVR autodetects your camera, activates it (giving it the same
admin password that it has), and assigns it an IP address. This may take a few minutes; be patient.
4. The fisheye camera has a circular view and 2 virtual PTZ cameras. By default, only the circular view shows
on the NVR channel. Each virtual camera must be added manually.
Adding the Virtual PTZs
You must configure the NVR to use the Luma Fisheye camera’s virtual PTZs.
On the Luma NVR’s web UI, navigate to Configure the Recorder > Camera Management > IP Camera.
Andere Handbücher für 500 Series
2
Inhaltsverzeichnis
Andere Luma Surveillance IP-Kamera Handbücher


