
Mark 7 1050 Series Bedienungsanleitung

MARK 7 RELOADING USER MANUAL VERSION 7.6, COPYRIGHT 2015 ALL RIGHTS
RESERVED
1
Mark 7® 1050 Autodrive User Manual
Read this manual and the Dillon Precision Manual completely. Understand all safety and
operating instructions. Failure to comply with the warnings and instructions may result in
serious injury, illness or death.

2
Mark 7 Reloading User Manual version 7.6, Copyright 2015 All rights reserved
Table of Contents
Table of Contents ..........................................................................................................................................................2
Important Safety Instructions ...................................................................................................................................3
Box Contents..................................................................................................................................................................6
Set-Up Procedures.........................................................................................................................................................7
1. Removal of equipment from the packing carton ..................................................................................................8
2. Determine mounting holes for either Super 1050 or RL 1050 ..............................................................................9
3. Mounting large sprocket .....................................................................................................................................10
4. Belt installation ...................................................................................................................................................11
5. Belt tensioning ....................................................................................................................................................12
6. Belt Guard installation.........................................................................................................................................13
7. Removing the ratchet system on the 1050 .........................................................................................................14
8. Tablet holder install.............................................................................................................................................15
9. Tablet cable outlet installation............................................................................................................................16
10. Console inputs...................................................................................................................................................17
11. Power connection input ....................................................................................................................................18
12. Low primer sensor install ..................................................................................................................................19
13. For Double Alpha or KISS bullet feeder users....................................................................................................20
Operating Instructions.................................................................................................................................................21
Waiver Screen .........................................................................................................................................................21
Before each session of use of the machine.............................................................................................................22
Control Screen.........................................................................................................................................................22
Monitors Screen ......................................................................................................................................................24
Setup Screen ...........................................................................................................................................................25
General Maintenance and Storage..............................................................................................................................25
Reloading Manual........................................................................................................................................................26
Ensuring proper system operation..........................................................................................................................26
Calibration ...............................................................................................................................................................26
Test Rounds.............................................................................................................................................................26
Digital Clutch Setting ...............................................................................................................................................27
Jams.........................................................................................................................................................................28
Settings....................................................................................................................................................................29
Communications Errors...........................................................................................................................................30
Troubleshooting……………………………………………………………………………………………………………………………………………..…30

MARK 7 RELOADING USER MANUAL VERSION 7.6, COPYRIGHT 2015 ALL RIGHTS
RESERVED
3
Important Safety Instructions
Read this manual completely prior to installation and operation. Understand all safety and operating
instructions. Failure to comply with the WARNINGS and instructions may result in serious injury or
death. WARNINGS throughout this manual will be symbolized by the yellow WARNING symbols seen
below.
WARNING –Activities using the Mark 7 1050 Autodrive are inherently dangerous and may lead to injury
and even death. Actions as a result of using the Mark 7 product are solely the responsibility of the user
–if you get injured through the reloading process or through the use of ammunition as a result of the
reloading process it is your fault.
WARNING
Mark 7 equipment should only be operated by trained personnel that follow all safety precautions.
Failure to do so could result in serious injury or death.
This product is designed to be used by reloading personnel in conjunction only with a fully functioning
and well lubricated Dillon 1050 reloading press. Its use should be limited to experienced personnel only.
All personnel using this equipment are assumed to have prior experience setting up and operating a
Dillon 1050 reloading press. This document contains basic operating and maintenance instructions only.
WARNING - Never leave your Mark 7 Autodrive unattended while it is operating.
WARNING –Never run the Mark 7 Autodrive without the belt guard fully attached to the baseplate.
WARNING –Never operate the Mark 7 Autodrive if it is out of factory specification.

4
Mark 7 Reloading User Manual version 7.6, Copyright 2015 All rights reserved
WARNING –Never operate the Mark 7 Autodrive unless it is completely within Dillon Precision factory
specifications and is operating within factory parameters. This includes the shell plate locating pins and
other machine-specific features. Read and understand the latest Dillon Precision 1050 manual for your
make and model machine and ensure that you fully understand the Dillon directions.
WARNING –Never operate the Mark 7 Autodrive with any third party accessories that substantially
change the operation of the Mark 7 Autodrive
WARNING –Never operate the Mark 7 Autodrive while impaired.
WARNING –Never operate that Mark 7 Autodrive without using high quality brass and always use
sufficient lubrication on your brass while operating the Mark 7 Autodrive.
WARNING - Mark 7 provides you with a tablet mount. Never operate the Mark 7 Autodrive without the
tablet securely fastened in the tablet mount and fixed to the case feeder post. The operator must be in a
position to operate the tablet while observing all critical operations of the press. Failure to do so can
create an inherently dangerous situation.
WARNING –the Mark 7 Autodrive is designed to help automate the process of loading and processing of
ammunition. Never operate the Mark 7 Autodrive at speeds higher than you have tested and are
comfortable with for the type of reloading or processing that you are undertaking. Run the Mark 7
Autodrive at the slowest possible setting to create quality ammunition.

MARK 7 RELOADING USER MANUAL VERSION 7.6, COPYRIGHT 2015 ALL RIGHTS
RESERVED
5
WARNING
Always wear protective clothing. Failure to do so could result in serious injury or death.
Always wear protective eyewear to protect eyes from being injured. Flying debris may result when
using this equipment.
Always wear protective clothing that covers arms, legs and neck to protect from injury.
It is the responsibility of the user to insure that appropriate protective clothing and equipment are used
to provide protection from those hazards to which personnel are exposed or could be exposed while
working with this product.
WARNING
If you remove the ratcheting system please be very careful to not over or under index the machine –
double loads and squibs can occur as a result of this situation and it is your responsibility to know when
the press has created this situation. An example is as follows: The digital clutch engages at the bottom
of the stroke. A primer is already inserted in one case and powder in another. You Jog Up to fix the jam
and then activate ‘Run’ on the press. This would create a potentially dangerous situation. The correct
resolution of this is to turn the press off, remove the power. Manually manipulate the press to fix the
impacted areas, clear the press, and start the loading process again while discarding the affected
rounds.

6
Mark 7 Reloading User Manual version 7.6, Copyright 2015 All rights reserved
Box Contents
Please review these contents and inform us right away if you appear to be missing any of these items:
Main: Mark 7 AutoDrive Assembly (1 item)
Lower Insert:
Left Side: Power Cable (1 item)
Right side: Pocket 1: Large Sprocket and Cap (2 items)
Pocket 2: Hardware (16 items)
Link Bar
¼-20 hex head bolts (4X)
¼-20 lock washers (4X)
¼-20 socket head (2X)
3/8-24 X 1.25” Set screw (1X)
3/8-24 hex nut (1X)
10-24 Thumb Screw (3X)
Middle Insert: (7 items)
Cable management (zip ties, zip tie mounts) (4X each)
Tablet holder with 4X right angle inserts and plugs (1X)
Tablet mount (1X)
Micro-USB Cable (1X)
Mr. Bulletfeeder Filter (1X)
MicroSD Card: for software updates (1X)
Low Primer Assembly (1X)
Top Insert: (5 items)
Tablet (1X)
Belt (1X)
Mark7 Belt keeper (1X)
Belt guard (1X)
Setup instructions (1X)

MARK 7 RELOADING USER MANUAL VERSION 7.6, COPYRIGHT 2015 ALL RIGHTS
RESERVED
7
Set-Up Procedures
The Mark 7 Autodrive is manufactured with superior craftsmanship and quality that is backed by a
factory warranty.
WARNING
Only use Mark 7 accessories with the Mark 7 Autodrive. Mark 7 equipment is prepared and tested by
Mark 7 prior to delivery. To place the equipment into service, please review the following instructions
carefully.
WARNING
In order to ensure proper operation and avoid damage to your press perform the pre-installation steps.
Prior to installation perform the following manual press checks and adjustments (see Dillon Precision
Super 1050 Manual for location of some of the items below):
1. Ensure that the press/autodrive combination is on a very solid surface that does not move. It is
strongly recommended that you bolt the Mark 7 1050 autodrive base into your workbench. The
baseplate is strong aluminum but you will be able to drill holes after unscrewing the baseplate
feet. You may make the holes any size that fits the bolts you are using. Small vibrations can
have an unpredictable impact on the operation of the machine. Ensure that the machine does
not move whatsoever when operating.
2. Always have your loader grounded to a high-quality, external grounding line.
3. Ensure that the press operates according to Dillon Precision specifications before you install the
autodrive. Any modifications to your machine outside of the Dillon standard configuration
and parameters will void the Mark 7® warranty. Ensure that the shell plate retaining collar is
adjusted so that the shell plate turns freely but is not too loose. Ensure that the index pawl
enables the shell plate to move completely from one index position to the next. Refer to the
press user's manual for the location of the pawl adjustment screw. Verify that the alignment
pins pass cleanly into their respective holes and are not used to complete the index motion.
4. Check that there is no powder or other debris under the shell plate. Lubricate the press as
described in the Dillon Precision user's manual. Keep the shell plate clean.
5. There will likely be three (3) cables coming from the machine: the power to the casefeeder,
bullet feeder, and autodrive. These must be connected to separate power strips and separate
circuits if at all possible.
8
Mark 7 Reloading User Manual version 7.6, Copyright 2015 All rights reserved
1. Removal of equipment from the packing carton
Upon removal carefully inspect contents for damage. Damage that occurs during shipment should be
reported immediately to the carrier.
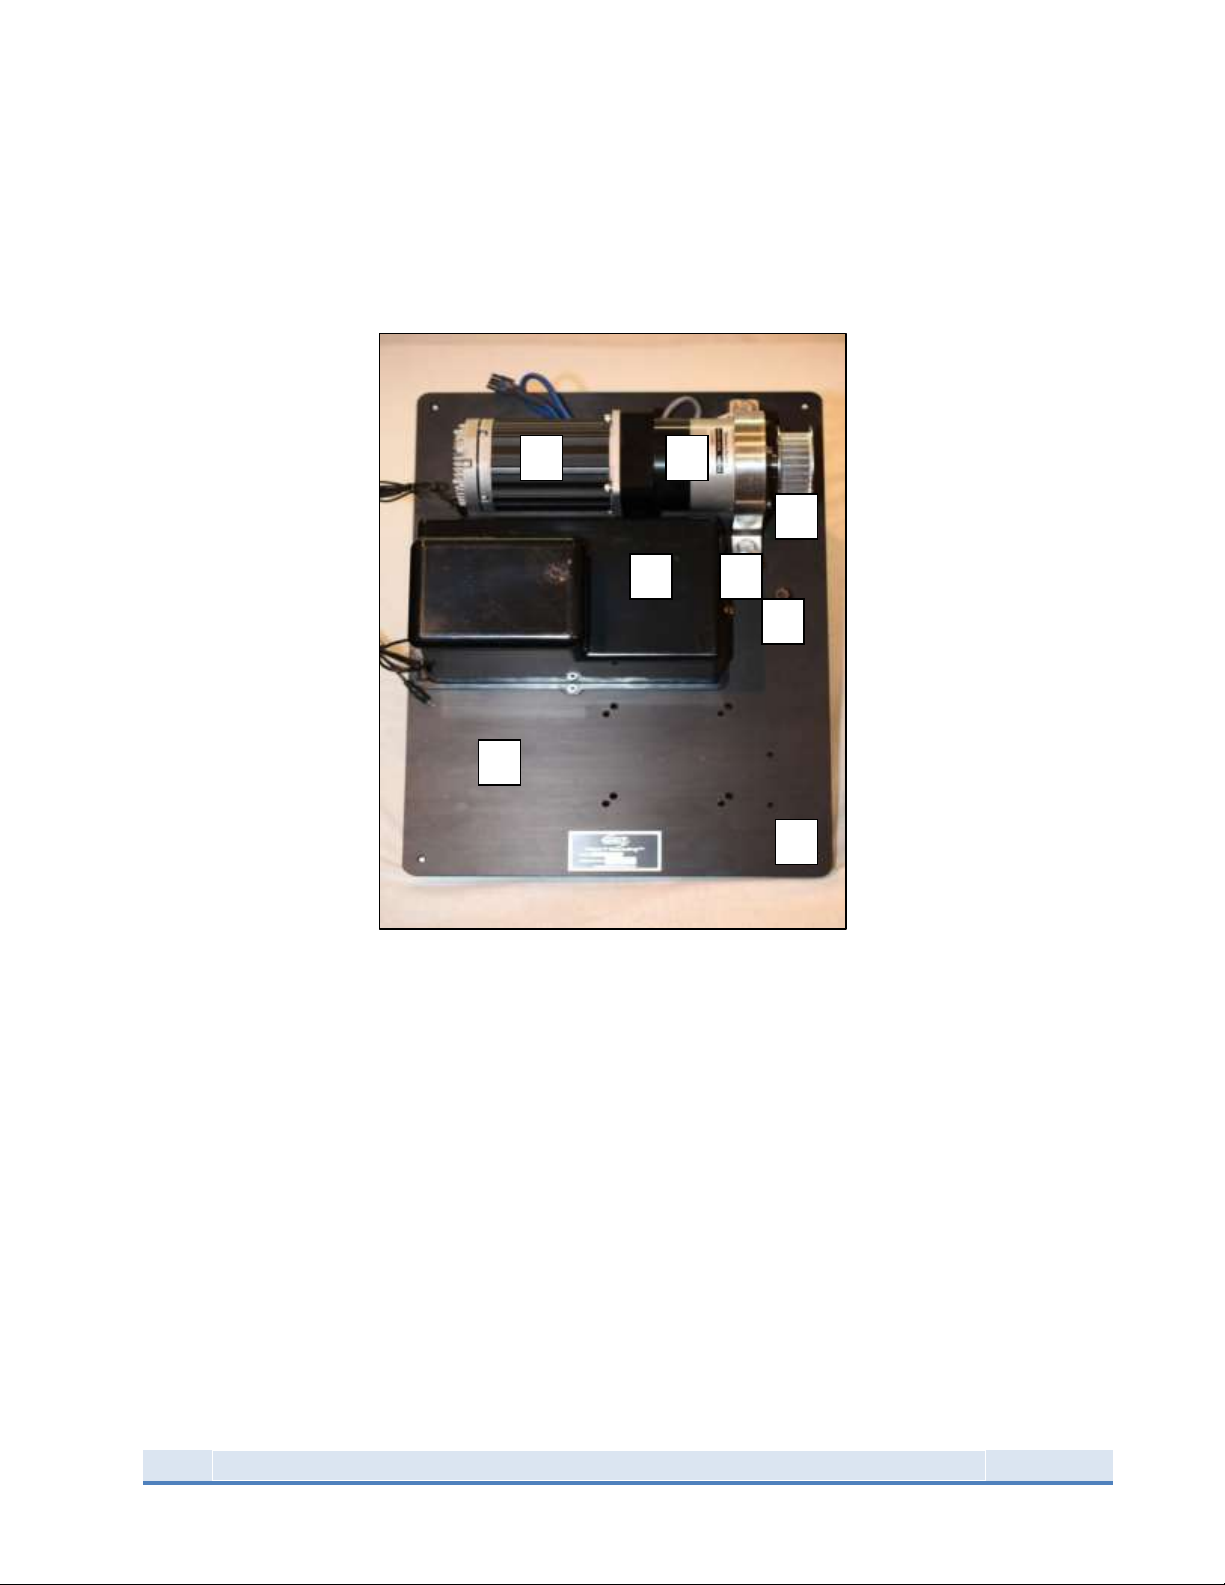
Top view of the Mark 7 Autodrive assembly as it comes out of the box
Major components:
1. Baseplate
5. Drive Sprocket
2. Electronics Console
6. Motor Mount
3. Motor
7. Tensioner Bolt
4. Gearbox
8. Rubber Feet on underside (all corners)
1
2
3
4
5
6
7
8
MARK 7 RELOADING USER MANUAL VERSION 7.6, COPYRIGHT 2015 ALL RIGHTS
RESERVED
9
2. Determine mounting holes for either Super 1050 or RL 1050
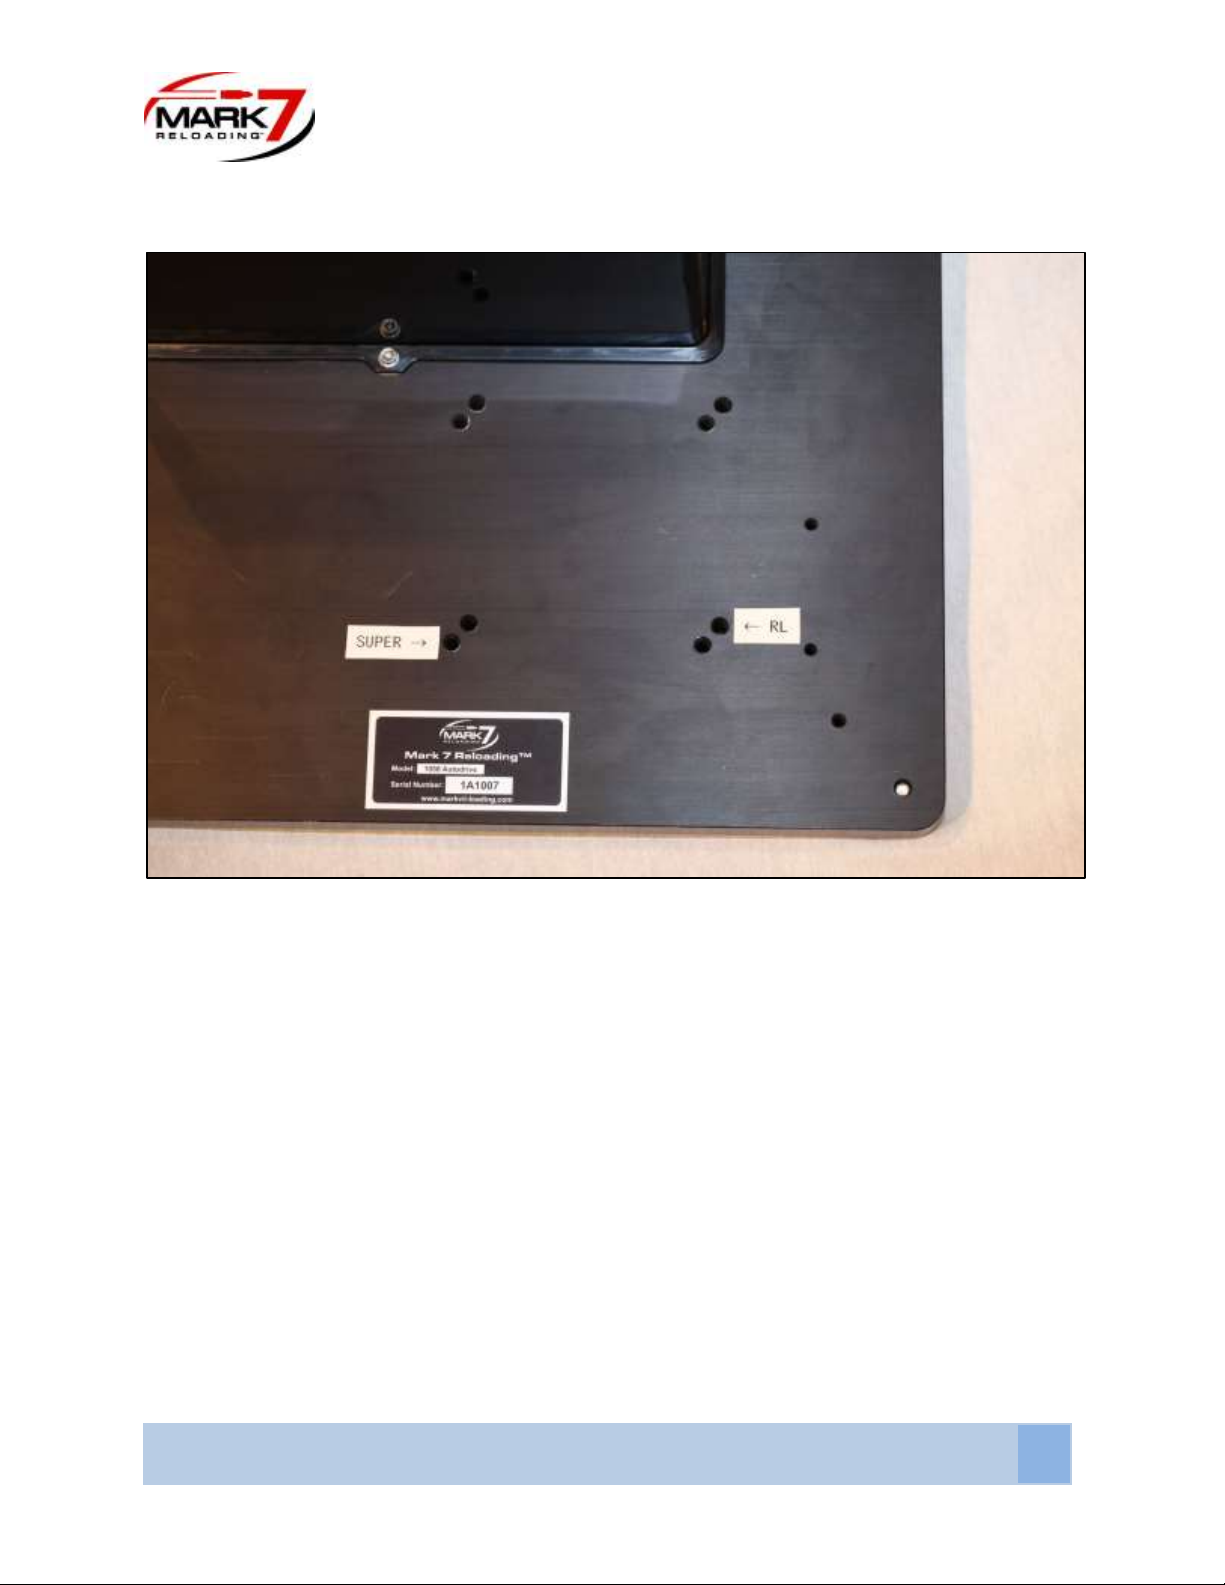
Depending on whether you have a Super 1050 or an RL 1050 there are specific mounting holes for each.
You can see in the picture above the two sets of four holes each. When mounting either 1050 to the
baseplate, thread all four bolts into the baseplate before final tightening. Torque the ¼-20 screws to 10-
12 ft lbs (14-16 Nm).
The mounting holes in the super are the closest to the front of the baseplate and the holes for the RL are
the farthest.
Be mindful not to drag the bottom of the press against the baseplate. We recommend that you place
the bottom of the press as close to the mounting holes as possible in order to avoid unnecessary
scratches to the anodized finish of the baseplate.
Once mounted articulate the handle so that the press is at the top of stoke and proceed to loosen and
remove the set screw that holds the handle in place.

10
Mark 7 Reloading User Manual version 7.6, Copyright 2015 All rights reserved
3. Mounting large sprocket
There are two sets holes in the sprocket; one set for the super and one set for the RL.
Make sure the press in in the UP position. Remove the lever and slide the large sprocket onto the 1050
input shaft. Position the sprocket so the labels are upright. Next insert the link bar and rotate the
sprocket so the correct pair of holes lines up with the link bar.
Thread in the long ⅜-24 set screw into the 1050 input shaft in order to pinch the link bar.
Then insert the sprocket cap and fasten with the ⅜ nut. Torque to 10-12 ft lb (14 - 16 Nm).
Torque both 1/4 -20 screws 10-12 ft lbs.
Inhaltsverzeichnis
Andere Mark 7 Gleichstromantrieb Handbücher

Beliebte Gleichstromantrieb Handbücher anderer Marken

Vincent Associates
Vincent Associates UNIBLITZ ED12DSS Bedienungsanleitung

EKSMA OPTICS
EKSMA OPTICS DQ-100-4 Stücklistenhandbuch

Chamberlain Garog
Chamberlain Garog D Series Bedienungsanleitung

Parker
Parker PDS Series Bedienungsanleitung

Festo
Festo DGC G Series Einrichtungshandbuch

Binks
Binks QS-5012-1-CE Bedienungsanleitung


