moov8 X Bedienungsanleitung

1
Health, Mobility, Adventure
X
TM

2
Dear Esteemed Buyer,
Thanks for purchasing the Moov8:X. This bike is an electric pedal assist bike (EPAB or Pedalecs). It is equipped with pedals and
a power-assisted electric motor, which can be driven by both manpower and with the assistance of electric power.
Travelling is an everyday necessity and adopting an active means of transportation like an electric bike goes a long way to not
only helping people get fit and healthy but also lowering their risk of illness, improving air quality and reducing congestion.
Electric bikes can help conserve our environment in a number of ways:
•A zero-emission e-bike is a pollution-free and sustainable mode of transport.
•Bikes, scooters, and personal mobility vehicles reduce the need to build, service and dispose of cars.
•Less cars means less space required for roadways, leaving more space for residential zones, parks and recreation
areas.
For your safety please ride with caution, wear a helmet and protective gear, and follow the local traffic rules.
Please read the manual carefully, check your bike before riding, and practice before riding on the road.
Have a pleasant ride!
Move out with Moov8
3
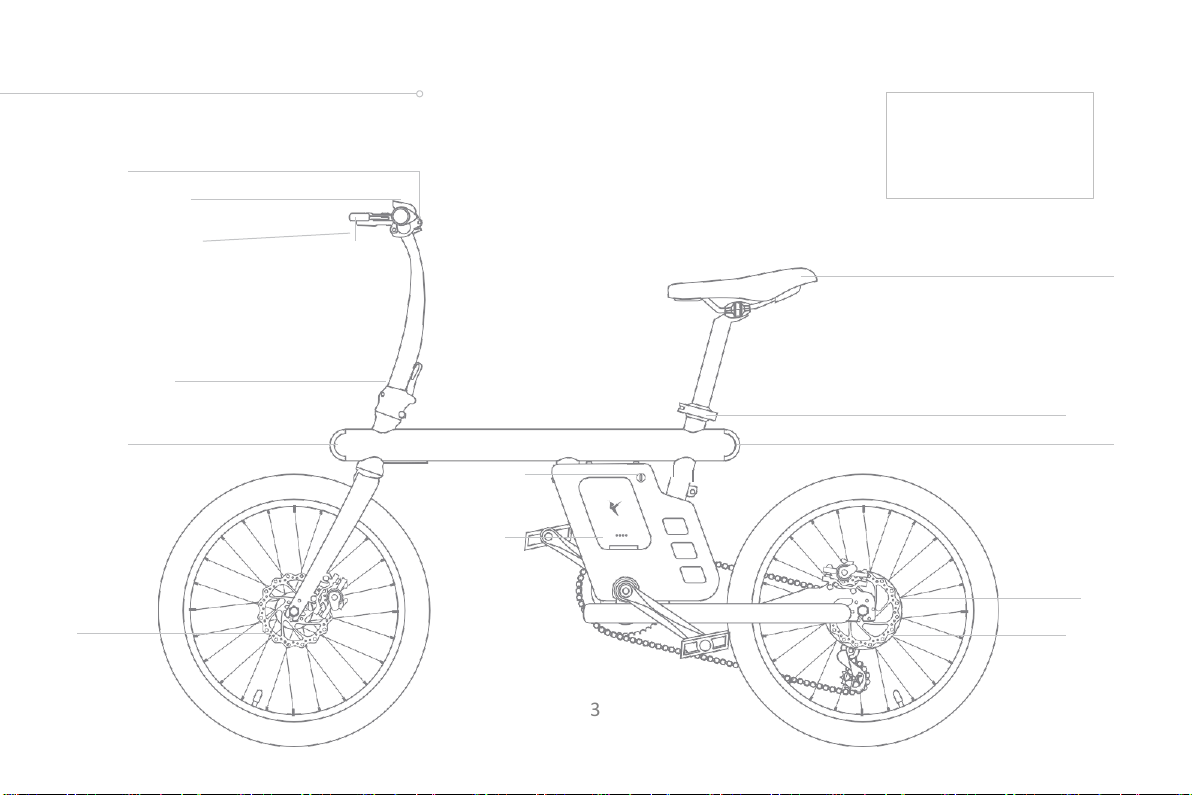
X Diagram
Derailleur shifter
Display
Brake lever x2
Stem folding lock
Headlight
saddle
Seat post buckle
Rear light
Battery lock
Battery case
Disc 1
Disc 2
Motor
Included in the box:
•Manual
•Charger
•Tool kit
4
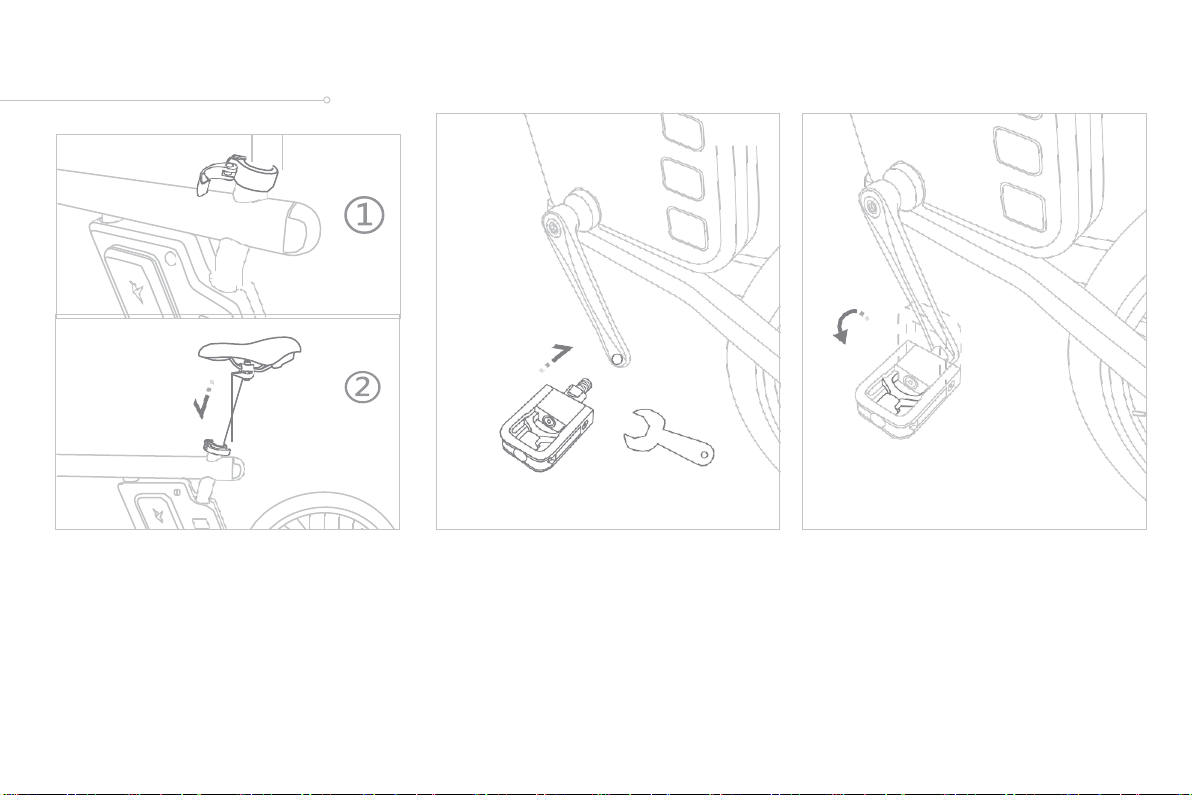
Assembly
STEP 1. Saddle assemble STEP 2. Pedal assemble Pedal folding& unfolding
Open seat post buckle picture 1 & 2 insert
seat post, adjust seat height and direction,
and lock seat post buckle 1 & 2.
Take the pedal and tools
from packing carton, tighten
pedal and lock with wrench.
Push the pedal in horizontal and turn
90° to fold or turn pedal to horizontal to
unfold.
5
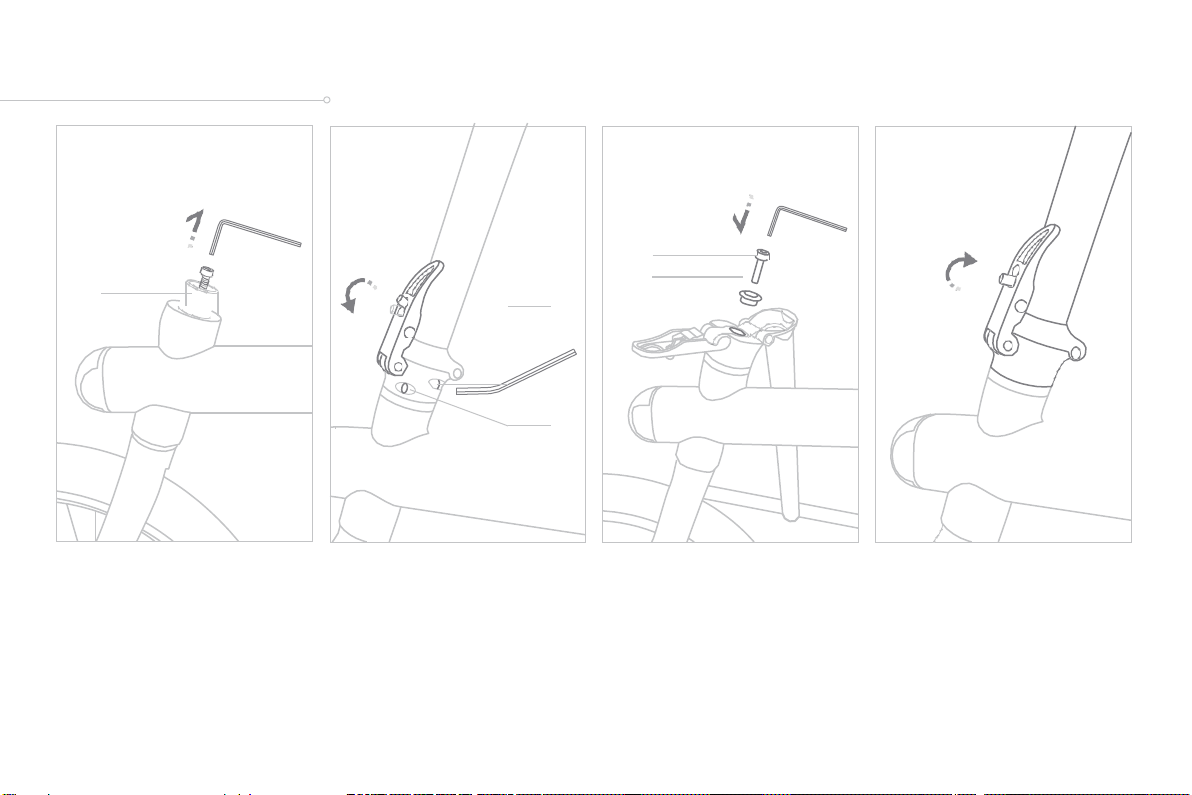
Assembly
STEP 3. Stem assemble
① Tear off sticker on
the stem and screw out
bolt with Allen wrench.
② Set head tube (unfolded)
in the frame, and lock screw
B and C, unlock the stem
folding lock and fold stem.
③ Set the Gasket and screw A
into stem, and lock by Allen
wrench.
④ Unfold the handlebars and
lock the folding lock.
Screw A
stickier
Stem fold lock
Screw B
Screw C
Screw A
Gasket
6
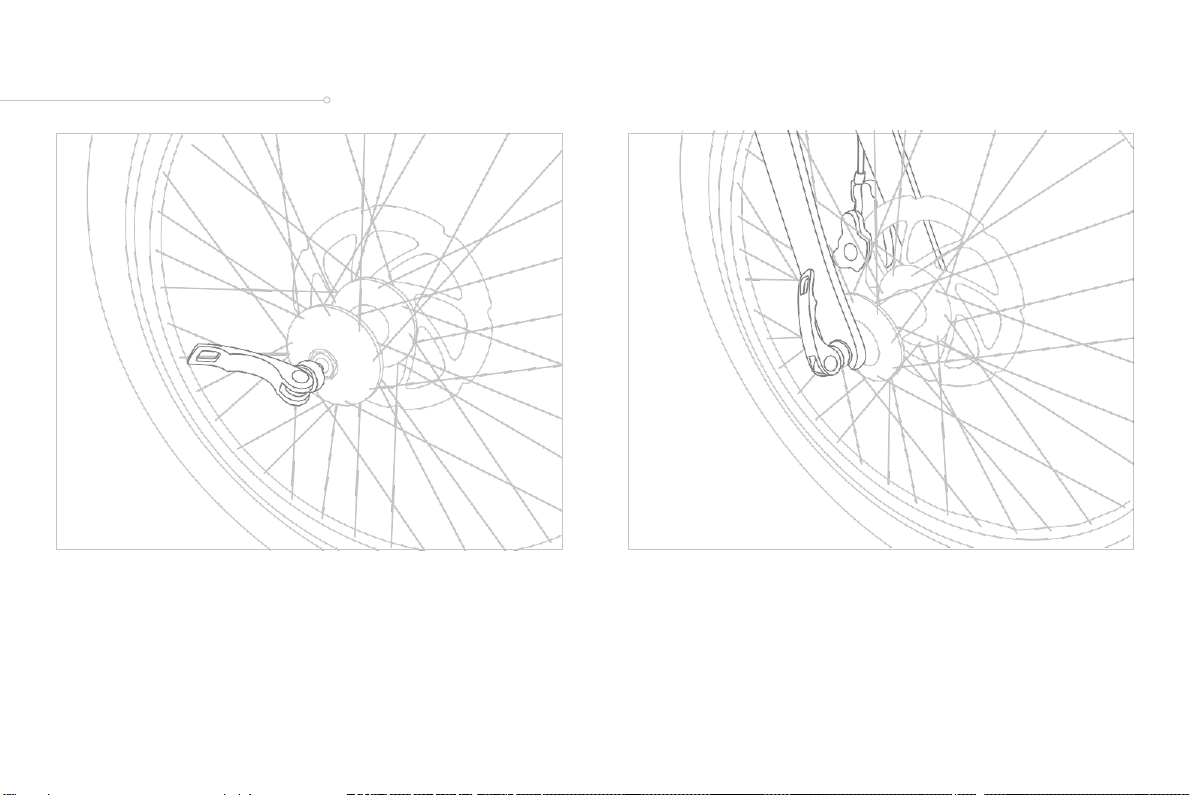
Assembly
STEP 4. installing front wheel
Loosen the quick release lever and insert into the fork dropouts and tighten the quick release level.
7
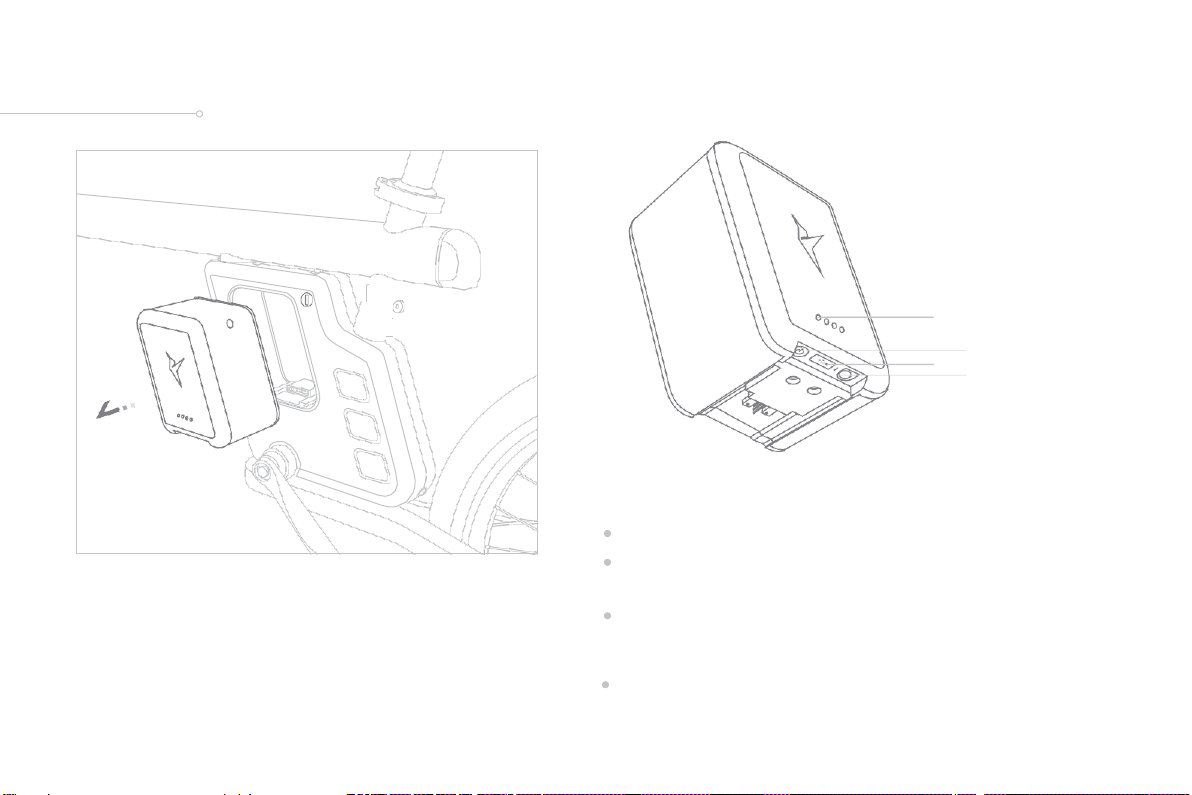
Battery
① power indicator light,each
light means about 25% power
② power button
③ USB charging port
④ battery charging port
①
②
③ ④
-Removing battery
① Turn the key switch with one hand
② pulling out the battery with your other
hand
-Assembling battery
Push the battery into slot.
Precautions for battery use
Please fully charge the battery when charging for the first time.
When the battery is not in use for a long time,
take out and charge at least once a month.
Try not to exhaust the battery completely during the ride.
Please charge the battery when one of the LED battery
indictors is left.
Waterproof note: the battery is not waterproof, please do
not use the bike in rain or water for long time.
①
②
8
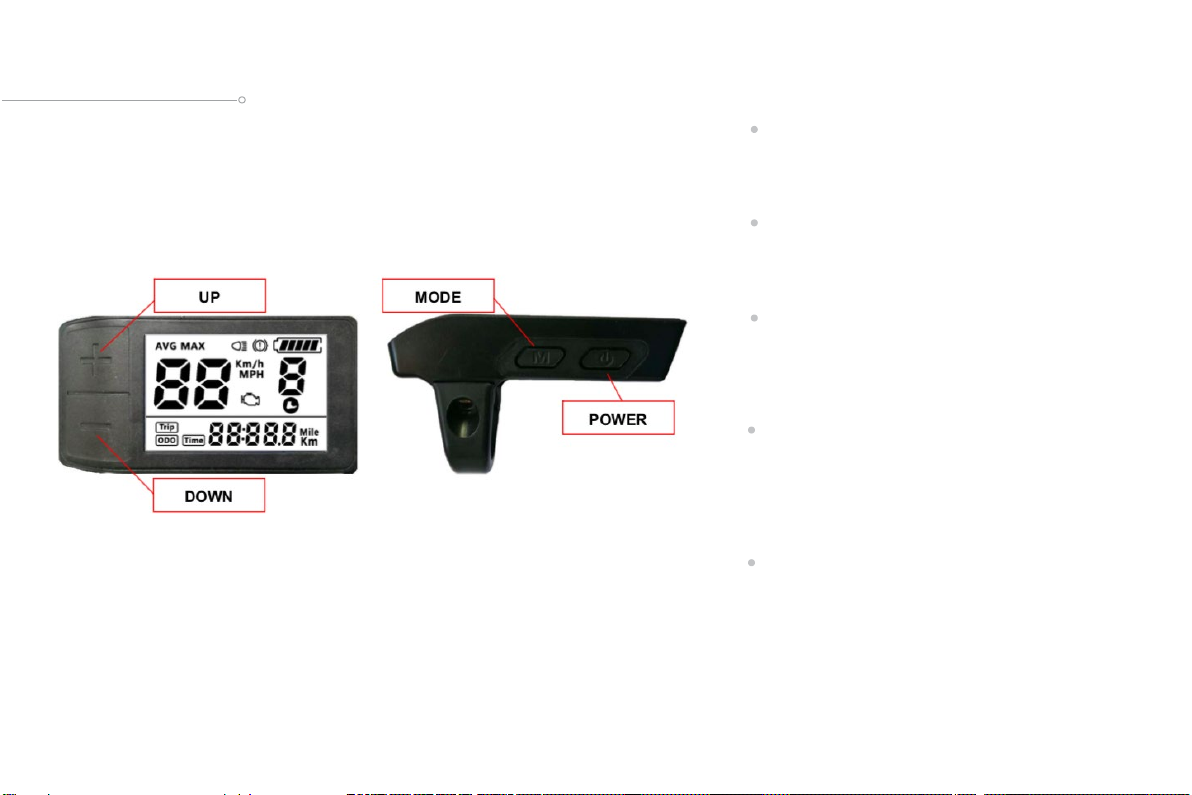
Controls
power on/off
Press and hold power button to
switch on and switch off.
up/down mode
Press “+” up or “-“down button to increase
or decrease the Peddle Assist level 1-5
light on/off
Press and hold “+” up button for
3 second can turn on/off the
light
walking assist function
Press and hold “-” down button for 3
second to activate walking assist. As
per Australian law max. 6km/hour
speed allowed.
mode
Press mode button to see various
parameters like avg. speed, max.
speed, trip time etc.

9
Routine Maintenance
Note: The frequency of maintenance should increase with use
in wet or dusty conditions. Do not over lubricate – remove
excess lubricant to prevent dirt build up. Never use a degreaser
to lubricate your chain.
Frequency
Component
Lubricant
How to Lubricate
Weekly
Chain Derailleur
Pulleys
Derailleurs
Brake Calipers
Brake Levers
Chain Lube or Light Oil
Chain Lube or Light Oil
Oil
Oil
Oil
Brush on or Squirt
Brush on or Squirt
Oil Can
3 drops from oil can
2 drops from oil can
Monthly
Shift Levers
Lithium Based Grease
Disassemble
Every Six Months
Freewheel
Brake Cables
Oil
Lithium Based Grease
2 squirts from oil can
Disassemble
Yearly
Bottom Bracket
Pedals
Derailleur Cables
Wheel Bearings
Headset
Seat Post
Lithium Based Grease
Lithium Based Grease
Lithium Based Grease
Lithium Based Grease
Lithium Based Grease
Lithium Based Grease
Disassemble
Disassemble
Disassemble
Disassemble
Disassemble
Disassemble
Service Checklist
Frequency
Task
Before every
ride
Be sure batteries are fully charged
Check tire pressure
Check brake operation
Check wheels for loose spokes
After every ride
Be sure to fully charge batteries Quick wipe down with damp
Weekly
Lubrication
Monthly
Inspect wires / Inspect connectors
Check derailleur adjustment/Check brake adjustment Check brake and gear
cable adjustment
Check tire wear and pressure / Check wheels are true and spokes tight Check
hub, head set and crank bearings for looseness
Check
pedals are tight / Check handlebars and stem are tight Check seat and
seat post are tight and comfortably adjusted Check frame and fork for
trueness
Lubrication
Perform safety check
Every six months
Lubrication
Check all points as per monthly service Ch
eck and replace brake pads, if
requir
ed
Check chain for excess play or wear
Yearly
Lubrication

10
Battery charging and maintenance:
A well-maintained battery can perform well even after many kilometers of riding.
Please keep the battery 15 ℃to 40 ℃when the condition of charging. Do not store below/above - 20 ℃~ 50 ℃. Do not
store or charge the battery at temperatures outside the stated limits.
Please turn off the power and recharge the battery when the battery power indicator shows a low battery. Avoid draining
the battery completely; it will seriously affect the battery performance and life. Please turn off the ebike before charging.
At the time of charging first connect the charger to the battery then the charger points to the power unit before turning
on the power switch. After the charge is completed; switch off the power switch; disconnect the charger plug and then
remove the charger from the battery.
Please use the original charger, pay attention to the battery type, and the applicable voltage of the charger. Do not mix
chargers between bikes. When charging, the indicator light is red, and turns green when fully charged. When the battery
is full please unplug the charging head.
Please cover the charging point with the rubber cap after charging, otherwise it may cause battery damage.
Typically, a fully charged battery should retain charge for 120-180 days in Standby Mode. Remember to charge the battery
at least once every three months. Completely draining the battery outside this range may cause permanent damage to
the battery.
It is strictly forbidden to place the battery in acid and alkaline liquid, keep away from a source of heat and do not damage
or disassemble the battery. Do not insert metal objects into the charging port to avoid short-circuit.
If the battery or charging is abnormal, please contact the customer service or sales staff immediately.
Inhaltsverzeichnis
Andere moov8 Fahrrad Handbücher


