NetComm V110 Bedienungsanleitung

User Guide
V110, V210P, V211, V220
VoIP ATA


YML881Rev1 V110, V210P, V211, V220V110, V210P, V211, V220 User Guide
www.netcomm.com.au 3
WELCOME TO THE WONDERFUL WORLD OF VOIP
Congratulations on your purchase of a NetComm VoIP ATA. Whether this is your first VoIP device or you
are upgrading from another device we’re glad to have you as part of the NetComm family. The NetComm
V110/V210P/V211/V220 ATA’s are true next generation technology and in addition to the fantastic savings
you’re going to experience you’ll also get fantastic features such as routing, T.38 Fax and 3 way conferencing.
This Quick Start Guide contains everything you need to get you up and running for everyday use but if
you need to delve into any of the more advance configuration features available on your unit you’ll find a
comprehensive User Guide on the CD that accompanies the ATA.
Should you run into any problems with your unit (and let’s face it, we all need a little help from time to time)
you can find the answers to many questions in the support section of our website
www.netcomm.com.au/Support/
So without any further delay it’s time to get you more familiar with your ATA so you can start using VoIP.
IMPORTANT NOTICE: Please ensure that the Broadband modem/router to be used with this ATA has been designed to handle VoIP traffic. Most new
broadband modem/router will be able to handle VoIP without any issues and do not need extra configuration to handle VoIP service. However, old
broadband modem/router might need to be configured correctly to support it.
Please check with the broadband modem/router manufacturers for more details.

V110, V210P, V211, V220 User Guide YML881Rev1
4 www.netcomm.com.au
VOIP ATA FEATURES
Network Protocol Tone
• SIP v1 (RFC2543), v2(RFC3261) • Ring Tone
• IP/TCP/UDP/RTP/RTCP • Ring Back Tone
• IP/ICMP/ARP/RARP/SNTP • Dial Tone
• TFTP Client/DHCP • Busy Tone
• Client/ PPPoE Client • Programming Tone
• Telnet/HTTP Server
• DNS Client
• NAT/DHCP Server
Codec Phone Function
• G.711: 64k bit/s (PCM) • Volume Adjustment
• G.723.1: 6.3k / 5.3k bit/s • Speed dial key
• G.726: 16k / 24k / 32k / 40k bit/s (ADPCM) • Phone book
• G.729A: 8k bit/s (CS-ACELP) • Flash
• G.729B: adds VAD & CNG to G.729
Voice Quality Call Function
• VAD: Voice activity detection • Call Hold
• CNG: Comfort noise generator • Call Waiting
• LEC: Line echo canceller • Call Forward
• Packet Loss Compensation • Caller ID
• Adaptive Jitter Buffer • 3-way conference
IP Assignment Auto Provisioning
• Static IP • HTTP
• DHCP • FTP
• PPPoE • TFTP
DTMF Function NAT Traversal
• In-Band DTMF • STUN
• Out-of Band DTMF
• SIP Info
SIP Server Configuration
• Registrar Server • Web Browser
• Outbound Proxy • IVR/Keypad

YML881Rev1 V110, V210P, V211, V220V110, V210P, V211, V220 User Guide
www.netcomm.com.au 5
Firmware Upgrade Security
• TFTP • HTTP 1.1 basic/digest authentication for Web setup
• HTTP • MD5 for SIP authentication (RFC2069/ RFC 2617)
Interface Modem & Fax modes
1 WAN port interface
• G.711 fax/modem pass-through with fax/modem detection
1 LAN port interface • T.38 support
1 PSTN port interface (FXO) (Optional)
1 VOIP port interface (FXS)
PACKAGE CONTENTS
Your NetComm ATA package contains the following items:
• V2xx ATA
• Quick Installation Guide
• User Guide and Software on CD
• RJ-45 Straight-through Ethernet Cable
• DC12 volts/0.6 A Power Supply Unit
• One RJ-11 telephone cable (V210P / V211 only)
MINIMUM SYSTEM REQUIREMENTS
Before continuing with the installation of your Netcomm V2xx ATA, please confirm that you comply with the
minimum system requirements:
• Broadband (ADSL or Cable ) connection
• PC with TCP/IP networking protocol installed
• Windows XP/Vista PC for Easy Setup Utility
• VoIP account with a VSP (VoIP Service Provider)

V110, V210P, V211, V220 User Guide YML881Rev1
6 www.netcomm.com.au
GETTING TO KNOW YOUR NETCOMM V2XX ATA
It is recommended that you take a moment to acquaint yourself with the indicator lights, ports and default
settings of the V2xx ATA prior to commencing with installation.
Ports and Buttons
V110 (WAN + 1 LAN + 1 FXS)
V220 (WAN + 1 LAN + 2 FXS)
V211 (WAN + 1 LAN + 1 FXO +1 FXS)
V210P (WAN + 1 LAN + 1 PSTN pass through +1 FXS)
Port / Button Description
Power Connect the supplied power adapter to the ATA. The power requirement is DC12 volts/0.6 A
Note: Using a power supply with a different voltage rating will damage this product
Power Switch Power on/off the NetComm ATA.
WAN Port Connect to Broadband devices, such as an ADSL or Cable modem.
LAN Port Connect to Ethernet network devices, such as a PC, switch, or router. Depending on the
connection, you may need a cross over cable or a straight through cable
RESET The Reset button will set the NetComm ATA to its factory default setting and reset the unit.
You may need to reset the NetComm ATA into its factory defaults if you loose the ability to
enter the NetComm ATA via the web interface, or following a software upgrade.
LINE Socket Connect a telephone cable between the NetComm ATA line jack and a wall jack.
PHONE Socket Connect a standard telephone handset to the NetComm ATA phone jack using a telephone cable.

YML881Rev1 V110, V210P, V211, V220V110, V210P, V211, V220 User Guide
www.netcomm.com.au 7
LED Indicators
LED Description
PWR This LED illuminates to indicate the system is powered.
SIP This LED illuminates when the NetComm ATA is registered successfully to the SIP server.
ETH This LED illuminates when a connection is established to WAN/LAN port and flashes when
WAN/LAN port is sending/receiving data.

V110, V210P, V211, V220 User Guide YML881Rev1
8 www.netcomm.com.au
Default Settings
LAN (Management)
Static IP Address: 192.168.22.1
Subnet Mask: 255.255.255.0
Default Gateway: blank
WAN (Internet)
WAN mode: DHCP
Modem Access
Username: admin
Password: admin
Many configuration changes made using the web interface will only become active after clicking the Save &
Reboot button on the Save Savings / Reboot page in the web configuration page.
Note: Certain voice parameters do not require a Save & Reboot to take effect. These Voice Parameters will take effect on the next voice
call after the Voice Parameter is entered and submitted. However, if Save & Reboot is not done, then these Voice Parameters will not be
saved over a power cycle. The Voice Parameters that can be changed “on the fly” are noted in the respective sections.
Restoring Factory Defaults
The reset button will reset the ATA to its factory default configuration. Occasions may present themselves
where you need to restore the factory default settings on your ATA. Typical situations are:
• You have lost your password and unable to login to the ATA;
• You have purchased the router from someone else and need to reconfigure the device.
• You are asked to perform a factory reset by a member of the excellent NetComm Support Staff.
In order to restore your router to its factory default settings, please follow these
steps:
• Ensure that the ATA is powered on (for at least 20 seconds).
• Use a paper clip or a pencil tip to depress the reset button for ten seconds and release. At this point, the
reset is in progress. Do not power off the unit at this point.
• After the ATA reboots, the default settings are now restored. This entire process takes several minutes to
complete.
• Once you have reset the ATA to its default settings you will be able to access the device’s web
configuration using http://192.168.22.1 with username “admin” and password “admin”.

YML881Rev1 V110, V210P, V211, V220V110, V210P, V211, V220 User Guide
www.netcomm.com.au 9
HARDWARE INSTALLATION
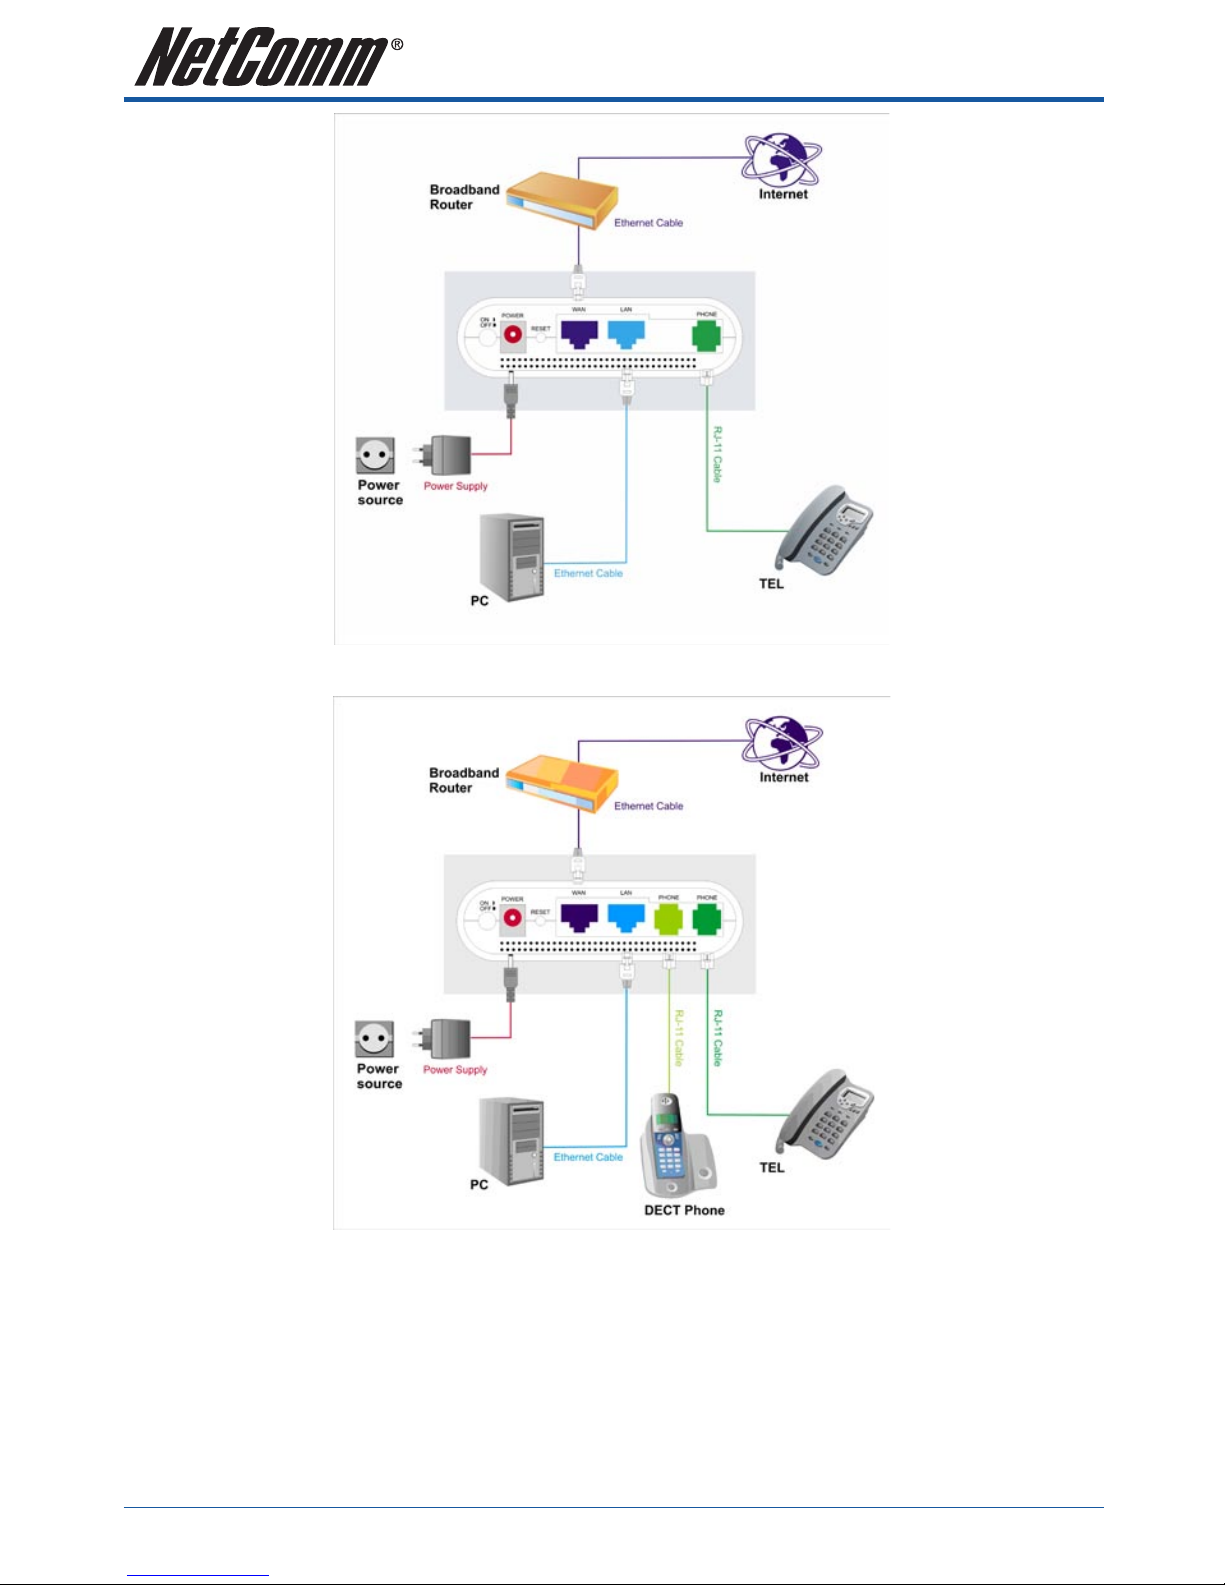
1. Connect the WAN port to your broadband router using the Ethernet cable supplied. If you would like
your PC to be connected to the network through the V100/V210P/V211/V220, you can connect another
Ethernet cable (not supplied) from your PC to the LAN Ethernet port. This enables your PC and the ATA to
share one Ethernet port on your router/switch.
V211 and V210P
2. Connect your telephone handset to the Phone port. For V220, you can connect an additional handset to
Phone 2 port.
Notes: A second VoIP account is needed unless your VoIP provider supports multiple connections from the one account and both ports
need to be configured individually (even when using one account that supports multiple connections).
3. For V210P or V211 unit, connect the Line port to your PSTN wall socket.
4. Connect the AC power adaptor and press the power button to turn the ATA on. The ATA will boot up and in
a few minutes, the Power and Ethernet Lights will light up.
Note: Only use the power adapter supplied with the NetComm ATA. A different adapter may damage the product.

V110, V210P, V211, V220 User Guide YML881Rev1
10 www.netcomm.com.au
V110
V220
Andere Handbücher für V110
1
Dieses Handbuch passt für folgende Modelle
3
Inhaltsverzeichnis
Andere NetComm VoIP Handbücher
Beliebte VoIP Handbücher anderer Marken

Minitar
Minitar MVA11A Bedienungsanleitung

3Com
3Com VCX V7122 SIP Bedienungsanleitung

Fanvil
Fanvil D800 Bedienungsanleitung

ZyXEL Communications
ZyXEL Communications FMG3024-D10A Series Bedienungsanleitung

WELLTECH
WELLTECH ATA-171 - V2.0 Bedienungsanleitung

WELLTECH
WELLTECH ATA-171 - V1.6 Bedienungsanleitung