Nissin Digital i60A Bedienungsanleitung

Canon/ Nikon digital SLR cameras
INSTRUCTION MANUAL

Thank you for purchasing a Nissin product
Before using this flash unit, please read this instruction manual and
refer your camera owner’s manual carefully to get a better
understanding of the proper operation to enjoy flash photography.
Nissin i60A type Canon or Nikon are designed for Canon or Nikon cameras,
with the latest TTL (Canon camera: ETTL / ETTL ll or Nikon camera: i-TTL)
flash control system. Please note that i60A are not usable with other branded
cameras for TTL operation.
Changes or modifications not expressly approved by the party responsible for
compliance could void the user's authority to operate the equipment.
This device complies with Part 15 of the FCC Rules. Operation is subject to the
following two conditions: (1) this device may not cause harmful interference,
and (2) this device must accept any interference received, including interference
that may cause undesired operation.
Please refer Nissin’s compatibility chart shown at its home page for details and
recent updates: http://www.nissin-japan.com or http://www.nissindigital.com
SPECIAL FEATURES
The i60A is very compact in size, it can still deliver a high power output of 60GN
(at ISO 100, 200mm zoom head position). Also, you can connect your i60A to an
external power source to reduce the flash recycle time during constant high power
output.
Combined with the Color LCD display and selector dial design, the i60A gives the
user the most convenient way to take full control of the flash.
The i60A with wireless flash shooting using Nissin Air System/ radio transmission.
Flash protection function:
When the red LED lamp starts blinking, it means that flash is overheating.
The LED turns red when charging.
When the LED lamp turns green, the flash is charged and you can start to shoot.
Compatible cameras
Remark: Nissin Air System (NAS) is designed for Nissin flash and
Nissin commander.
1

These safety instructions refer to important information on how to use this product
safely and properly. Please read the following instructions before using the product.
SAFETY INSTRUCTIONS
WARNING
The flash unit contains high voltage electric parts. Do not try to open or repair the flash unit.
Return it back to the repair service station or the store where you bought it from.
Do not touch the inside parts from the opening when the unit was dropped or broken.
Do not shoot the flash directly to the eyes at short distance. It may damage the eyes.
When taking a flash picture, especially toward a baby, it is recommended to keep the flash unit
at least 1 meter (3.3feet) away from the subject. Or use diffuser or bounce the light to the
ceiling or wall to soften its intensity.
Do not place the flash unit near any flammable gas, chemicals or such liquids. It may cause fire
or electric shock.
Do not touch the flash unit with wet hands or use in the water. The flash unit carries high
voltage inside and it may cause an electric shock.
Do not shoot the flash unit directly at the driver of automobiles or such vehicles.
Do not set the flash window close to the human body and shoot, which may get scalded.
Place the batteries correctly in position. Placing the batteries in wrong polarity may cause
leakage, exothermic heat or explosion.
CAUTIONS
Do not leave or store the flash unit in the temperature over 40ºC/ 104ºF, such as in the
automobile.
The flash unit is not water resistance. Keep the unit away from rain, snow and humidity.
Do not use benzene, thinner or other alcoholic agents to clean the unit.
Do not use this flash unit with cameras which are not recommended in the compatibility list at
official website, otherwise it may damage the camera’s circuitry.
Remove the batteries when not in use for a longer period of time.
Do not have a heavy impact to the flash unit, nor throw it onto a hard surface floor.
This symbol refers to the possibility of personal injury, death or property
damage if not followed as described.
This sign refers to conditions which may cause damage or defect.
2

Names of the Components
15
1 Fill-in reflector
2 Flash head
3 Light diffusing panel
4 Video light
5 Remote/ Slave sensor
6 AF-assist light
7 Battery pack adapter
8 Mounting foot and Hotshoe contacts
9 Color monitor
10 Pilot button (Test flash button)
11 Mode dial
12 Control wheel and button
13 Power button
14 Unlock button
15 Battery compartment door
Accessories:
Pouch
Flash stand
Soft box
3

NOTE
It is recommended to use all 4 batteries of the same brand and type, and replace
them all at the same time.
Wrong insertion of each battery would not make electric contact.
Basic Operation
Inserting batteries
1. Open the battery compartment door
and insert 4 x size AA batteries as
shown by the picture.
2. Make sure the + and - battery contacts
are correctly inserted at the battery
compartment.
3. Close the battery compartment door
and slide it back in place.
When the recycle time becomes longer than
30 seconds, replace the batteries with fresh
ones or recharge the batteries (rechargeable
batteries).
Usable batteries - Alkaline batteries, Lithium batteries or NiMH batteries.
2
1
2
1
4

i60A is automatically turned off when repeating hi power full flash continuously over 20
to 30 times to protect the flash circuitry from overheating. It will automatically recover
after 15 minutes of inactivity. The pilot button will blink in the red color every 1.5
seconds.
i60A has an energy saving power off function
Protect overheating function
To save battery energy, i60A automatically switches to stand-by mode, in A mode,
TTL mode & Manual Power mode, in about 2 minutes of idle use; in SD mode, SF
mode & Wireless TTL mode, in about 5 minutes of idle use.
While i60A is in the stand-by mode a Pilot button blinks every 2 seconds showing
the flash unit is in stand-by mode. To turn on i60A again, press the camera’s shutter
button halfway or press any button of the flash unit.
In case i60A is not in use for over 60 minutes, the unit is completely turned off.
To turn on i60A again, take the first step of turning the flash unit on.
Basic Operation
5

Mounting i60A on the camera
Removing i60A from the camera
Press the unlock button and slide the mounting
foot of i60A off the hotshoe of the camera.
Turn on the flash unit
For a test flash, press the Pilot button.
To turn off the flash unit manually, press
the On/Off switch once.
Press the On/ Off switch and Pilot button
turns red, showing the unit is turned on.
In a few seconds, the Pilot button turns
green. The i60A is ready to shoot.
Slide the mounting foot of i60A into the
hotshoe of the camera.
Make sure that the mounting foot will lock
(with a “click”) when it has been inserted
completely.
1.
2.
2
1
6
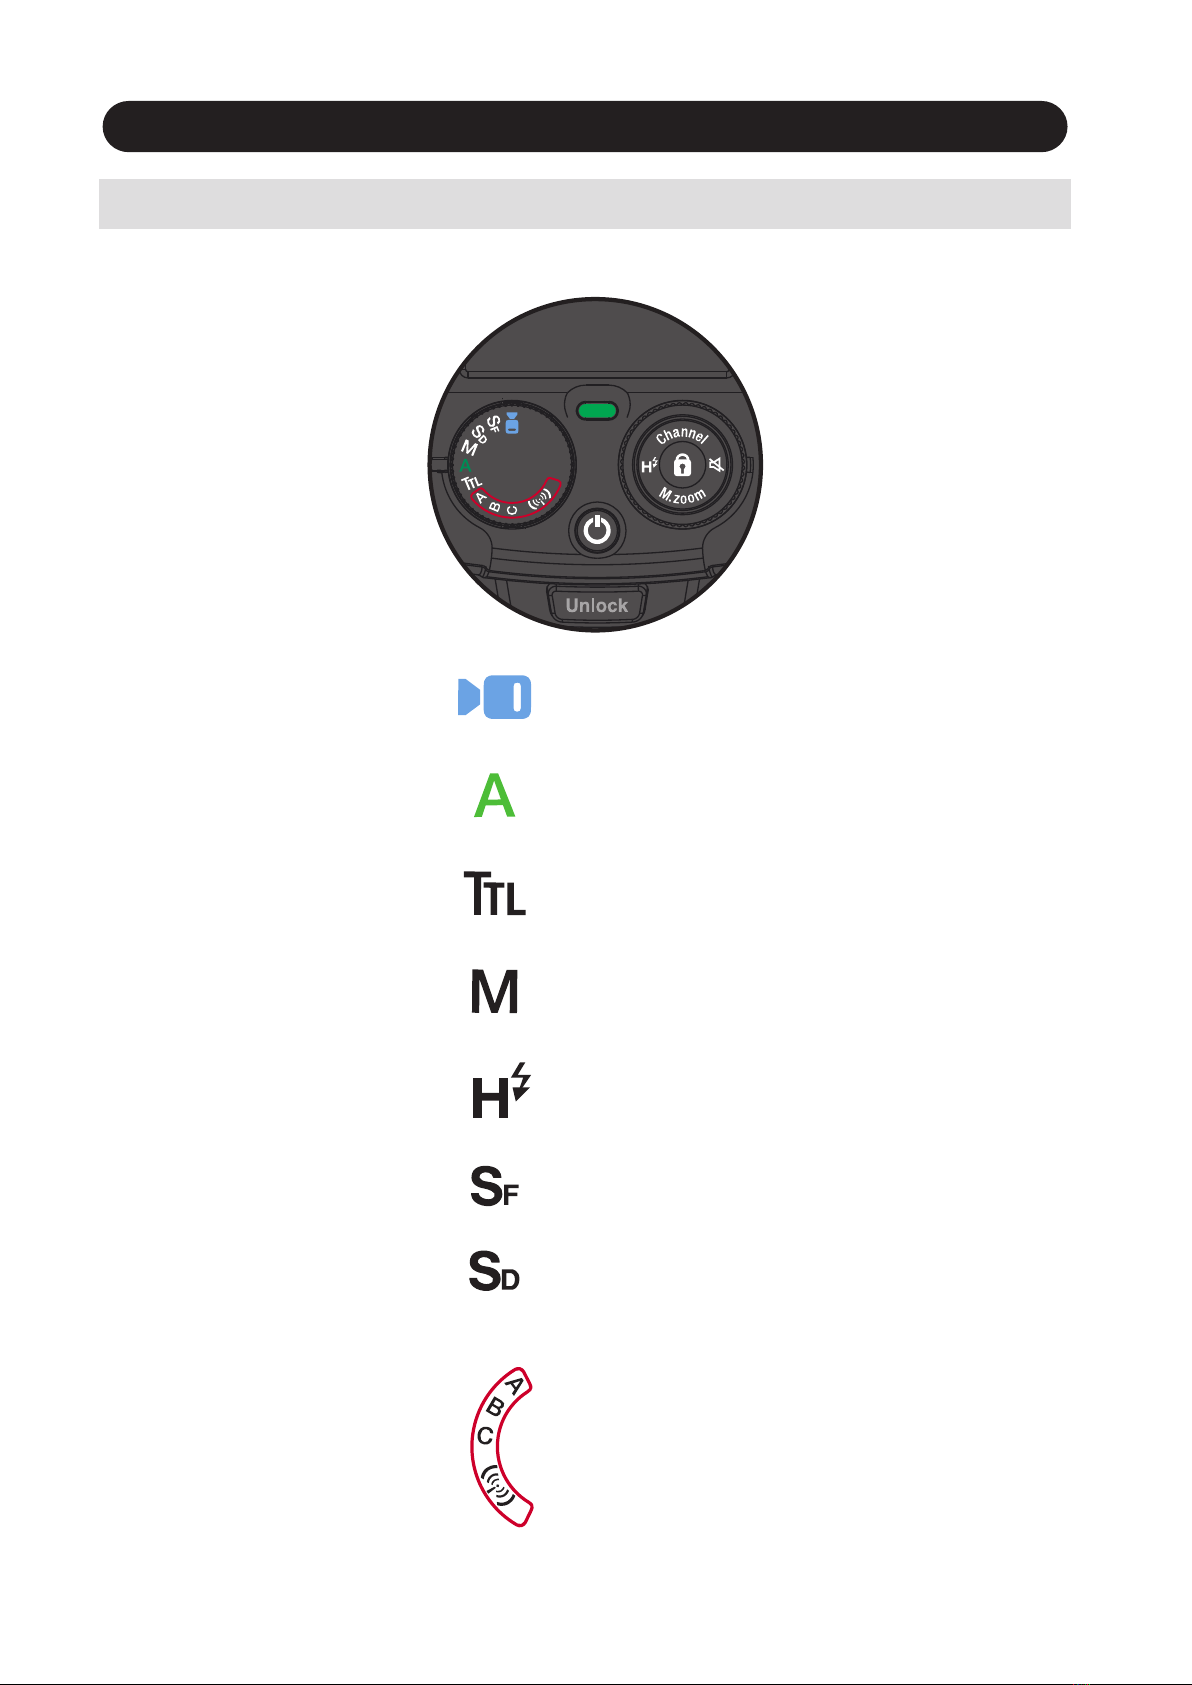
MENU DIAL
i60A Flash Mode and Functions
Rotate the dial to select a function.
TTL Program
Mode
Manual Setting
Mode
Full Automatic
Mode
Slave Film
Video light
Slave Digital
NAS mode
A: Group A B: Group B C: Group C
Optical mode
Canon & Nikon:
A: Group A B: Group B C: Group C
Built in video light with 9 steps of
output level adjustment.
Flash light is fully controlled by the camera
for the most proper exposure.
Flash light is automatically controlled
by the camera but the flash exposure value
can be compensated.
Selecting the desired manual power
on the flash unit.
Wireless TTL
Slave Mode
Optical mode will activate automatically
when no NAS signal, or 6 seconds after
disconnected from other NAS device.
7
High Speed
Synchronization
Hold the button for 1 sec to activate or
deactivate High speed synchronzation.
(Except for Nikon cameras. Nikon users may activate this function in camera menu)

Video Light
You can select the power by rotating the Power dial, 9 steps of output level
can be adjusted .
Rotate the Function dial to mode.
Set i60A to the camera’s hotshoe and press the on/ off switch to power on.
Manual zoom
Hold the Manual zoom button for 1 second to enter the changing mode.
Turn the outer dial to change the zoom head position.
Press M.zoom 1 second again to operate the camera.
Press the on/ off switch to power on.
Manual Zoom: In TTL, M, SD, SF, Wireless mode
NOTE
LED video light lighting time approx. 3.5 hours in full power batteries.
8
The zoom setting you selected is memorized and remains unchanged when you restart the flash.

(Shutter Priority), (M mode)
(Shutter Priority), (M mode)
(Mode), (Auto), (Aperture Priority)
Shooting i60A automatically
9
Set i60A to the camera’s hotshoe and press the on/ off switch to power on.
Indicator Lamp A on.
Rotate the Function dial to “A” mode.
i60A is now set for the camera’s automatic flash control system.
Press the shutter button of your camera halfway to focus the subject.
Take the picture. i60A is fired and the result is immediately shown on the camera’s
LCD display.
When you change the focal length, the power zoom flash head of i60A immediately
sets its position to match the lens focal length you selected.
The flash illumination coverage of i60A responds to the lens focal length of
24mm - 200mm.
In all of the camera's shooting modes listed above, i60A will fully work in TTL
automatic-flash system.
Shutter speed, aperture and flash mark ( ) are indicated in camera’s view finder.
Canon Carmea
Nikon Carmea
(Mode), (Auto), (Aperture Priority)
Inhaltsverzeichnis
Andere Nissin Digital Kamerablitz Handbücher

Nissin Digital
Nissin Digital i400 Bedienungsanleitung

Nissin Digital
Nissin Digital i600 Bedienungsanleitung

Nissin Digital
Nissin Digital MG60 Bedienungsanleitung

Nissin Digital
Nissin Digital MG60 Bedienungsanleitung

Nissin Digital
Nissin Digital Di700A Bedienungsanleitung

Nissin Digital
Nissin Digital NI-HI600M Bedienungsanleitung


