OCAM M2+ Bedienungsanleitung

Wi-Fi Security Camera
User Manual
(For models:OCam-M1+ / M2+ / M3+ / S1 / Apple)

Preparation Before Use
Smartphone / Tablet
(Version requirement: iOS 7.0 above / Android 4.0 above)
OCam Camera
A Wi-Fi router which can connect to the Internet.
Micro SD memory card (TF Card)
(Format memory card first before inserting to the camera, spec 16GB/Class6 above is
recommended)

Menu
1.Introduction
1.1 Hardware
1.2 軟體
2. Camera Installation
3. Camera Connecting and Setting
4. Introduce Video Screen & Function
5. Share Camera
5.1 Allow visitors join existing camera in same area
5.2 Use 3G/4G network join existing camera
6. Camera Setting
6.1 Advance setting
6.1.a Wi-Fi setting
6.1.b Wireless setting
6.1.c Clock setting
6.1.d Alarm setting
6.1.e FTP setting
6.1.f email setting
6.1.g TF card setting
6.2 Edit Delete Camera
6.3 View and Delete Camera Picture
6.4 View and Delete Camera Video
6.5 About
6.6 Alarm
7. Default Setting
8. Q&A
9. 保養與維護
1
1
1
2
3
4
5
5
5
5
5
6
6
6
6
7
7
8
8
9
9
10
10
10
11
12

1. Introduction
1.1 Hardware
1.2 Software
Download “OCam+” from Google Play/Apple App Store and install on your devices
You may also download the APP through QR Code.
If your device is Android system, please refer ( ) description.
OCam
Memory card slot
IR Light
Light Sensor
Status indicator
Microphone
Power port
Reset button
Speaker
Holder socket
Hanging Hole
AdapterMountStand Screw x3 / Plastics screw anchorx3
1
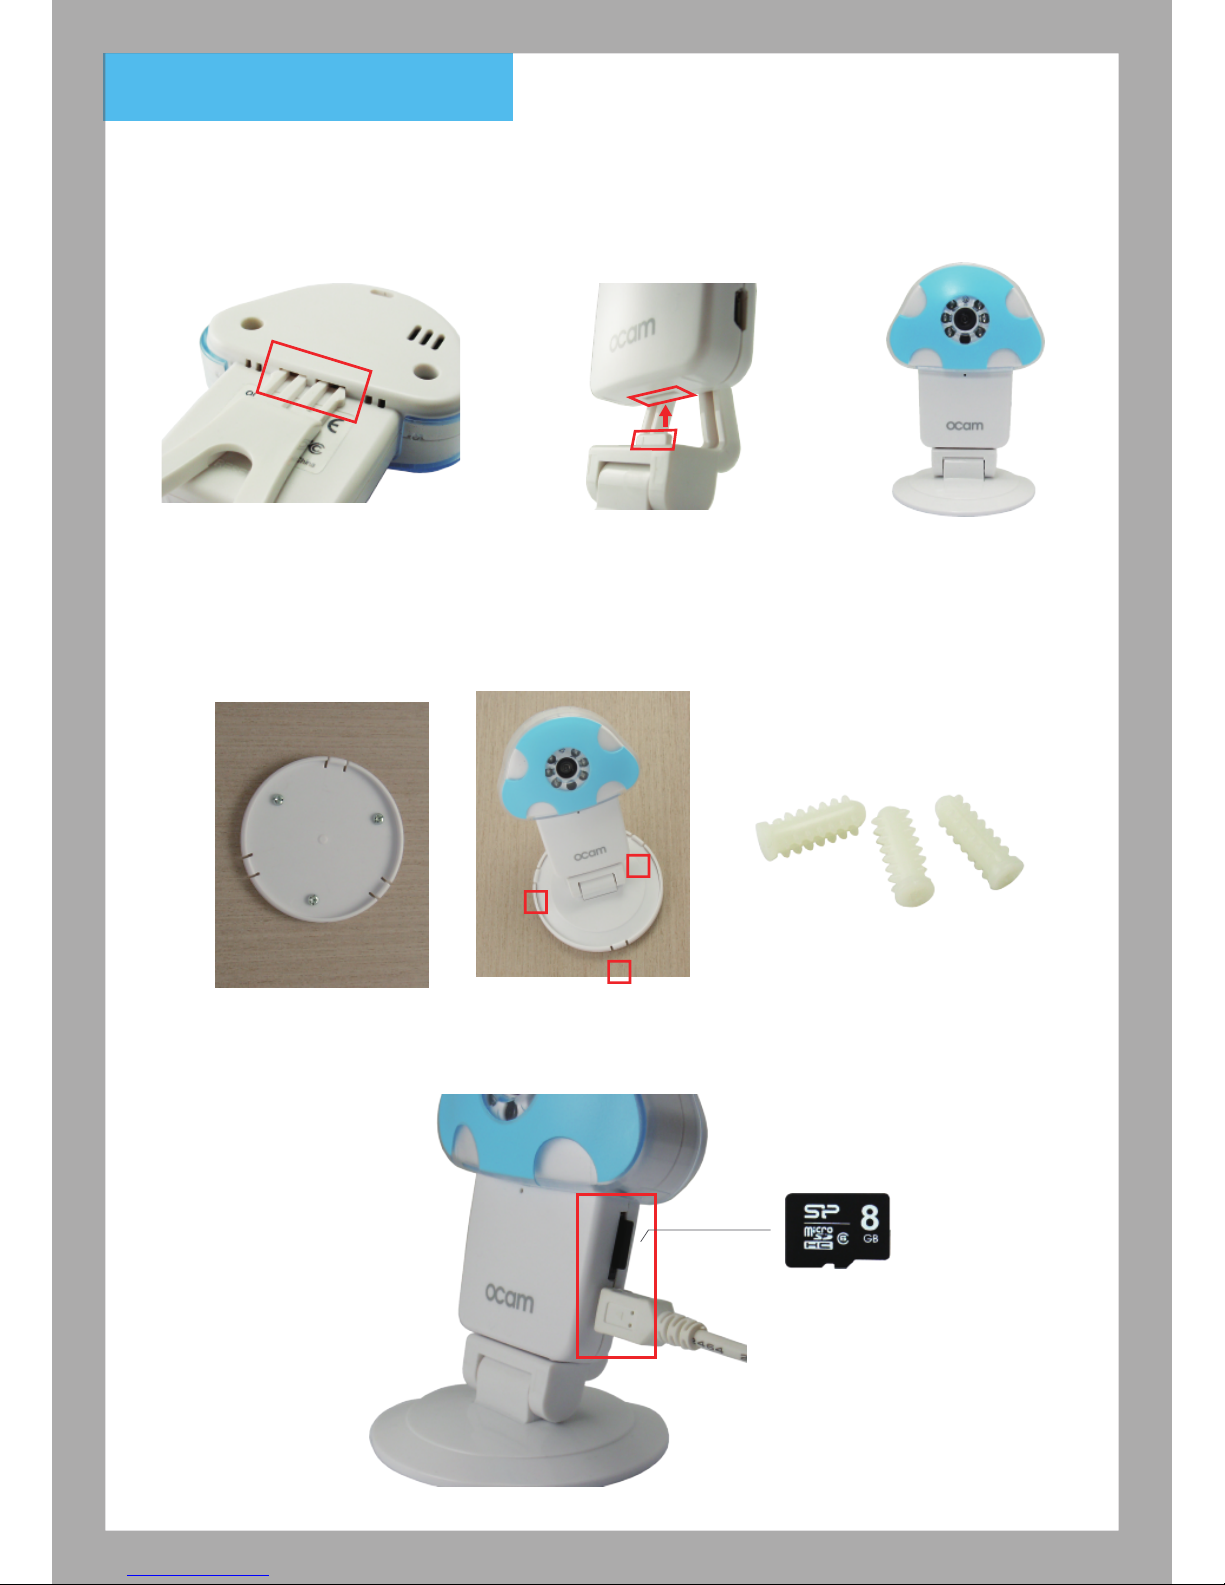
2. Camera installation
①Insert the holder into the
holder socket
Further Explanation: attach the plastic
to your mount the camera on a wall.
(only used when the wall are hard like
the cement wall)
②Make sure the bottom of
OCam into the right position
③Complete
2.2 To fix the camera on the wall, please follow the instruction below:
2.3 After following the instruction below, the indicator light goes blue.
(for recording function, please insert the Micro SD card.)
Micro SD 卡
2.1
①Attach the wall mount to
your wall or celling using
the screws included in the
box.
②Mount your camera
by fitting the base
into the wall mount.
2

3. Camera connecting and setting
3.1 Insert USB cable into the micro USB port of camera, wait for 90 seconds until the indicator
light begins to flash blue slowly. (blinking one time per second)
Note:Format your memory card before first time using (see 6.1.g), and insert a Micro SD card (TF
card) into the slot before camera power on.
Camera will automatically start recording after insert memory card.
3.2 Turn on the Wi-Fi on your devices and choose “OCAM-XXXXXX” on Wi-Fi list for connecting
(no password is required). Wait until connection is completed.
3.3 Opwn OCam+ APP
3.4 Add Camera (Add new camera)
3.4.1 Open the App and click on ‘Add Camera’ (‘Add New Camera’) icon
3.4.2 Select “Scan ID” or “Search”
If choose “Scan ID” - Scan the QR code sticker on the camera.
If choose “Search” - App will detect the connected camera and show the Camera UID in the list.
3.4.3 After complete the previous step, APP will appear Camera ID as below:
Name: User can define the Camera Name
User: Default user name is “admin”
Password: Enter “admin”
After enter the password and click “Done”, camera status will show “Online”
xxxxxx-xxxxx
3
HDXQ-xxxxxx-...
xxxxxx-xx...
HDXQ-xxxxxx-...

3.5 Connecting OCam Camera to Wi-Fi Router (For remote control)
3.5.1 Click the “ ” >
3.5.2 Select “Wi-Fi Settings”
3.5.3 Choose your home Wi-Fi network in the list and enter the password.
Wait around 60 seconds until camera connect to the home Wi-Fi Network, the blue indicator light
will turn into steady blue once connection is completed.
Camera status will show as ONLINE. Start viewing the camera through the mobile app from
anywhere!
xxxxxx-xxxxx

4. Introduce Live View Window & Function
4. iOS System
Photo VideoSpeakerRotate Quality
Mic
Brightness Contast
Android System Mirror Mirror
Mirror
Mic
Photo Video Speaker Contrast Brightness Flip
Mirror
4

5. Add additional devices
6. Camera Advanced Settings
5.1 Let additional users join to OCam camera in the same Wi-Fi.
①additional device connect to the same Wi-Fi Router as camera
②Open App, select “Add Camera”,
③Choose either “Scan ID” or “Search” to add the camera
④Enter Visitor username (Operator user) and password
⑤Click done and start the live view.
5.2 Remote Control (additional users (Operator) use 3G/4G to join OCam Camera)
①Open App, select “Add Camera”,
②Enter UID, user name and password (default user name and password are “admin”)
③Enter Visitor username (Operator user) and password
④Click done and start the live view.
Remind: When you want to let family/ friend join your OCam Camera, for the camera security, we suggest
you provide Visitor username (Operator user) and password to them, to keep your private authority
6.1Advanced Setting
Select “ ” icon in the camera list.
6.1.a WIFI Setting
Setting the Wi-Fi network for camera to connect, search your home Wi-Fi network and enter the
password, after connected, camera can be remote control.
xxxxxx-xxxxx
5

6.1.b User Setting
ADMINISTRATOR: Own all authority of camera
VISITOIR (Operator): can view /Listen/Talk/ Video replay but cannot change
the setting parameters of camera.
*For the camera security, you can change the administrator password from user setting page, after that,
need to go to the “Edit page” to change the camera password too.
For authority managing, setting visitor username and password from user setting page. The users, who
login with visitor account, can view the camera but cannot change the setting parameters of camera.
6.1.c Time Settings
Select the time zone of the camera.
Enable the “User NTP” and choose time server in “NTP server”. To let the camera fetch the exact
time from time server when connecting to the Wi-Fi network.
6.1.d Alarm Settings
Motion Detection Armed - Enable / Disable motion detection notifications
Sensitivity - Choose between High / Normal / Low
Send Email/ Alarm Mail Notification: When enable Motion Detection, APP will send snap picture to
you assign email address
(detail please reference 6.1.f)
FTP Upload: When Enable Motion Detection, APP will send snap picture to you assign FTP server
(detail please reference 6.1.e)
Note: We don’t support Input Armed/Trigger Level/Pre-set Linkage/IO Linkage/Output Level in current
camera version.
6
Dieses Handbuch passt für folgende Modelle
4
Inhaltsverzeichnis
Andere OCAM Sicherheitskamera Handbücher


