ProJet MJP 2500W Bedienungsanleitung

8/10/22, 2:55 PM
Quick Start Guide
infocenter.3dsystems.com/projetmjp2500w/print/book/export/html/861
1/26
Quick Start Guide
ProJet MJP2500W/ IC
Quick Start Guide
p/n 33-D130 Rev C
Original Instructions
Please refer back tohttp://infocenter.3dsystems.com/projetmjp2500w/quick-start-guidefor the most up-to-date quick start guide
Introduction
ProJet MJP 2500W
The ProJet®MJP2500W3D printer system is a Multi-Jet Printer (MJP) printer. The solid imaging 3D printer produces wax casting patterns
from 3D solid Computer-Aided Design (CAD) models and through the 3D printer system client software. The parts are generated in a rapid
prototype (RP) environment. The primary features of the printer are the user interface, build chamber including the print engine, and the material
delivery module (MDM), which contains the materials and waste bag.
VisiJet® Materials for ProJet®MJP 2500W
ProJet®MJP 2500W VisiJet®M2 Cast(PW - Part Wax)
VisiJet® Wax Jewel Red(PW - Part Wax)
NOTE:The ProJet® MJP 2500W is a wax printer and thus has no UV lamps installed.
®

8/10/22, 2:55 PM
Quick Start Guide
infocenter.3dsystems.com/projetmjp2500w/print/book/export/html/861
2/26
ProJet MJP 2500 IC
The ProJet®MJP2500 IC3D printer system is a Multi-Jet Printer (MJP) printer. The solid imaging 3D printer produces wax casting patterns
from 3D solid Computer-Aided Design (CAD) models and through the 3D printer system client software. The parts are generated in a rapid
prototype (RP) environment. The primary features of the printer are the user interface, build chamber including the print engine, and the material
delivery module (MDM), which contains the materials and waste bag.
VisiJet® Materials for ProJet®MJP 2500 IC
ProJet®MJP 2500 IC VisiJet®M2 ICast
(PW - Part Wax)
NOTE:The ProJet® MJP 2500 ICis a wax printer and thus has no UV lamps installed.

8/10/22, 2:55 PM
Quick Start Guide
infocenter.3dsystems.com/projetmjp2500w/print/book/export/html/861
3/26
Safety Information
Safety Symbols and Denitions
ELECTRICAL SHOCK HAZARD: High voltage electricity is accessible in the vicinity of this sign or behind the access panel. High voltage
can cause severe burns or death, as well as res. Access panels are for service only and should be opened only by certied service
personnel or trained maintenance personnel.
HOT SURFACE HAZARD: A hot surface is accessible in the vicinity of this sign or behind the access panel. Avoid contact. Hot surfaces
can cause burn injury or re. Allow surface to cool before touching. Access panels are for service only and should be opened only by
certied service personnel or trained maintenance personnel.
KEEP FINGERS AWAY FROM FAN: Putting ngers in way of moving fan can cause serious injury.
KEEP FINGERS AWAY FROM SHARP OBJECTS: Putting ngers in way of sharp objectscan cause serious injury.
HARMFUL IRRITANT WARNING: Indicates that skin or eye irritation could result while exposed to a chemical composition.
CAUTION: Indicates the possibility of loss of data or damage to equipment.
WARNING: INDICATES THE POSSIBILITY OF INJURY OR DEATH TO PERSONNEL.
HAND ENTANGLEMENT WARNING:GEARS OR MOVING PARTS HAZARD IN THE VICINITY OF THIS SIGN OR BEHIND THE ACCESS
PANEL. ACCESS PANELS ARE FOR SERVICE ONLY AND SHOULD BE OPENED ONLY BYAUTHORIZED SERVICEPERSONNEL.
WEAR GLOVES: Wear the appropriate gloves when required. For example, when touching surfaces that may contain or have been
exposed to materials, wear nitrile gloves. Heat gloves are necessary when touching surfaces that may be hot to ensure burns don’t occur.
NOTE: A note signies important information but not information of a critical content.
Safety Guidelines
General
The 3D printer system is designed with built in safety features, improper use can cause injury to personnel.
Follow these safety guidelines when operating the printer:
Read and follow all 3D printer system instructions. Printer should only be operated by trained personnel.
Follow all safety rules and heed all cautions and warnings in this guide.
Do not attempt to open top door while printing.
Do not use any material without reviewing the Global Harmonized Standards/Safety Data Sheet (GHS/SDS).
Dress power and communication cables behind printer to prevent tripping.
Do not attempt to access, service, or adjust printer components or perform procedures without reviewing the documentation for user
accessible maintenance routines unless specically trained to do so.
Only certied service personnel that have completed the 3D Systems service trainingmay perform tasks they are authorized and certied to
complete.
Do not ignore warning signs posted during 3D printer system service operations.If an error message appears on the 3D printer system’s User
Interfacerefer to “Troubleshooting Section” within this guidedepending on the error, before resuming operation.
To prevent potential skin irritation and sensitization due to contact with waste material or uncured Part Material, follow all guidelines in the
following sections.
Protective Equipment/First Aid
Follow recommendations for protective equipment and general rst aid procedures to minimize the risks from part material exposure. If
professional medical attention is necessary, take the Global Harmonized Standards/Safety Data Sheet (GHS/SDS) for the exact material
involved to the attending physician.
Always wear 100% nitrilegloves and lab coats when handling any part or waste material. Latex gloves are not chemical-resistant and
are not recommended.

8/10/22, 2:55 PM
Quick Start Guide
infocenter.3dsystems.com/projetmjp2500w/print/book/export/html/861
4/26
In the event of a leak or spill of uncured part material, wear safety glasses with side shields to provide eye protection.
Because of the 3D printer system’s built-in engineering controls, respiratory protection is not necessary during normal operation. A
NIOSH-approved (or equivalent) dust mask is recommended when dry sanding cured material parts.
Always wear protective sleeves or a lab coat when doing anything around the materials. When skin comes in contact with materials
they can cause an allergic reaction that can be harmful to skin.
Skin Contact
Uncured part material is a sensitizer, and can cause allergic reactions if skin comes into contact. When handling any part or waste material,
always wear 100% nitrile gloves and lab coats.
Should skin come into contact with uncured part material, wash thoroughly with soap and cold water and immediately remove contaminated
clothing and shoes. Do not use hot water or solvents to wash hands, as it will result in absorption through the skin. If skin is irritated, seek
medical attention. Dry-clean contaminated clothing and discard contaminated shoes and leather products in accordance with applicable
regulations.
Eye Contact
Safety goggles with side shields should be worn to prevent accidental splashes into the eyes. If material comes in contact with the eye, ush
immediately with large amounts of cold water for 15 minutes, avoid sunlight, uorescent light, and other ultraviolet light, and obtain immediate
medical attention. Eye wash facilities and a rst aid kit should be readily available and close to the 3D printer system.
Contact Lenses
Wearing contact lenses is not recommended if handling liquid materials. If material splashes into eyes when contact lenses are worn, ush eyes
immediately with water. Verify that ushing has removed the contact lens from the eye(s). Protect eyes from light and obtain immediate medical
attention. Discard contact lenses that come into contact with liquid material.
Fume Inhalation
Under normal operation, inhalation is not an expected route of entry. Always work in a well ventilated area when using materials and avoid
breathing vapors. If inhaled, remove the personalto fresh air. Give articial respiration or cardiopulmonary resuscitation (CPR) if required. If
breathing is dicult, give oxygen. Obtain immediate medical attention.
Ingestion
Uncured part material is toxic if ingested. Obtain immediate medical attention.
Hygienic Practices
Because uncured material is toxic if ingested, it must not be present where food and drink are stored, prepared, or consumed. After handling
materials, wash hands with soap and cold water before consuming meals, breaks, smoking, applying cosmetics, using toilet facilities, and after
work.
Employees should be alerted of the need to clean and rinse off any contacted surface promptly in order to prevent further contamination. Ensure
a convenient washroom location is provided with access to soap, water, and disposable paper towels.
Tools contaminated with part material should be cleaned prior to reuse. Solvents such as denatured alcohol or Isopropyl Alcohol (IPA), are
normally required to clean equipment and tools. Wash with soap and water to remove any traces of excess part material or solvent.
Material Handling and Safety
Prior to using the ProJet® MJP 2500 and 2500
Plus
, users should be aware of potential hazards which may result in exposure to uncured part
material, such as removal of the material waste bag and handling part material cartridges.
Emergency (GHS/SDS)
Chemtrec USA (800) 424-9300; Europe +1-703-527-3887
Consult the materials Global Harmonized Standards/Safety Data Sheets (GHS/SDS) for information on specic materials. For further
information on this and related topics, consult the 3D Systems - Materials website at http://www.3dsystems.com/support/materials/msds.
Packaging Inspection
The material cartridges are packaged in shipping cartons. Upon receipt of materialshipments, inspect cardboard carton exterior for signs of
damage and leakage. Ifleakage is observed, DO NOT open carton, and contact 3D Systems’s TechnicalSupport Hotline.

8/10/22, 2:55 PM
Quick Start Guide
infocenter.3dsystems.com/projetmjp2500w/print/book/export/html/861
5/26
ProJet® MJP 2500W ProJet® MJP 2500 IC ProJet® MJP 2500W
ProJet® MJP 2500W ProJet® MJP 2500 IC
Material
(Part/Support)
VisiJet®
M2
Cast(Part)
VisiJet® M2 SUW(Support) VisiJet®
M2 IC
(Part)
VisiJet® M2 IC SUW(Support)
VisiJet®
Wax Jewel
Red(Part)
Shelf Life 2 Years 2 Years 2 Years 2 Years
Climate Cool, dry area with adequate ventilation
Temperature Range 60°F (16°C) to 80°F (27°C)
Maximum Storage
Temp
95°F (35°C)
Environmental
Conditions
No direct sunlight, heat, ames, or UV energy. Do not expose materials to heat at or above 230°F (110°C) , ames,
sparks, or any source of ignition.
Storing a Partially Used Material Cartridge
It is important not to lay material cartridges that are partially used on their side. Doing so will cause material to seep through the vent cap and
clog cap. This will cause damage to the material cartridge if used for a later print.To store a partially used Material Cartridge, place it upright in
a ProJet® 2500 Cartridge Holder and tighten the vent cap.
Recertication Date
Always check material "Recertication Date" before use. If the cartridge has reached its Recertication Date, your 3D Systems certied Partners
or 3D Systems Technical Support can assist with questions on materialrequiringrecertication.

8/10/22, 2:55 PM
Quick Start Guide
infocenter.3dsystems.com/projetmjp2500w/print/book/export/html/861
6/26
Disposal
Support Material
Support material has no known regulatory requirements and may be disposed of in ordinary oce waste.
Spilled Material
Spills of material are unlikely, and should NOT occur in normal operation of the 3D printer system.
Spills of support material can be cleaned without the use of protective gear, and disposed of as oce waste.
Promptly remove spilled materials, dispose of waste materials, and clean up materials per local regulatory requirements.Small spills of uncured
liquid part material can be cleaned up using disposable towels, non-reusable rags, or absorbent materials to clean spills outside of the
printersuch as sawdust, clay, diatomaceous earth, or activated charcoal and placed into containers for transfer to an approved waste disposal
site.
Caution: Never put sawdust, clay, diatomaceous earth, or activated charcoal inside the printer, doing so will damage the printer.
If spilled material is hot (liquid), wait until it cools before wiping up. Use of heat above 65° (149°F) may prove helpful in removing spilled support
material from carpet. After wiping up the spill, wipe surface with denatured or isopropyl alcohol and clean thoroughly with soap and water.
Some cleaning solvents are highly ammable such as denatured alcohol and isopropyl alcohol. Before using solvents to clean and remove
uncured part material, be sure read and follow thesolvent suppliersafety precautions and recommended usage.
Flammability Hazards
Though the U.S. Department of Transportation does not consider VisiJet materials a "ammability hazard," they do classify them "combustible"
based on ash points. Material containers may rupture when exposed to extreme heat. Use National Fire Protection Association Class B
extinguishers such as carbon dioxide, dry chemical, or foam.

8/10/22, 2:55 PM
Quick Start Guide
infocenter.3dsystems.com/projetmjp2500w/print/book/export/html/861
7/26
At A Glance
The three dimensional solid partsconsist of two materials (support material and part material). The support material is a wax based material
providing adhesion to print platform, as well as, providing material used to produce supports required to build the your part.
The part material is a wax material. After a layer of material is deposited onthe build plate, the part is immediately solidied by cooling of the
molten wax. When the build is complete, the part (consisting of the two materials) is adhered to the print platformby means of the support
material).
The material delivery module consist of four material cartridge holders; the two left side holders are for the support material (white) cartridges.
The right side of the module are for two part material (grey) cartridges. Once materials are heated, they are fed to the printhead. Material waste
is generated by two processes; cleaning the printhead array plate and planarization. The cleaning process involves purging jets and wiping the
printhead array plate. The planarizer removes excess material during the print process.The combined waste materials are then periodically
emptied into the waste bag. The printhead cleaning process is invoked automatically prior to starting a build.
.
After the build is complete, the print platformand the part arethen removed from the printer. A secondary operation, known as post processing,
is required to provide anished/cleaned part. Refer to yourPost Processing Guide for more information.
ProJet® MJP 2500W/IC Printer System
Print Engine : The Print Engine contains major systems such as the Printhead, andPlanarizer.
Build Chamber: TheBuild Chamber is the area where the print platform can be found. All print jobs are built on the print platform. For more
information see Printing Area.
User Interface (UI): This is the built-in touchscreen which allows the user to interface with the printer. The touchscreen allows the user to check
printing status, material levels, as well as power printer off. For more information on what user can access through the UI go to the User Interface
section of this manual.
Power Cord and Power Switch:The electrical power cord is plugged into the printer here. There is also a Power Switch located next to the power
outlet.
Material Drawer Module (MDM): The MDM drawer is a push/push type mechanism. To open the drawer push in, drawer should pop open allowing
you to pull it open the rest of the way. The MDM contains the part and support materials and the waste bag.
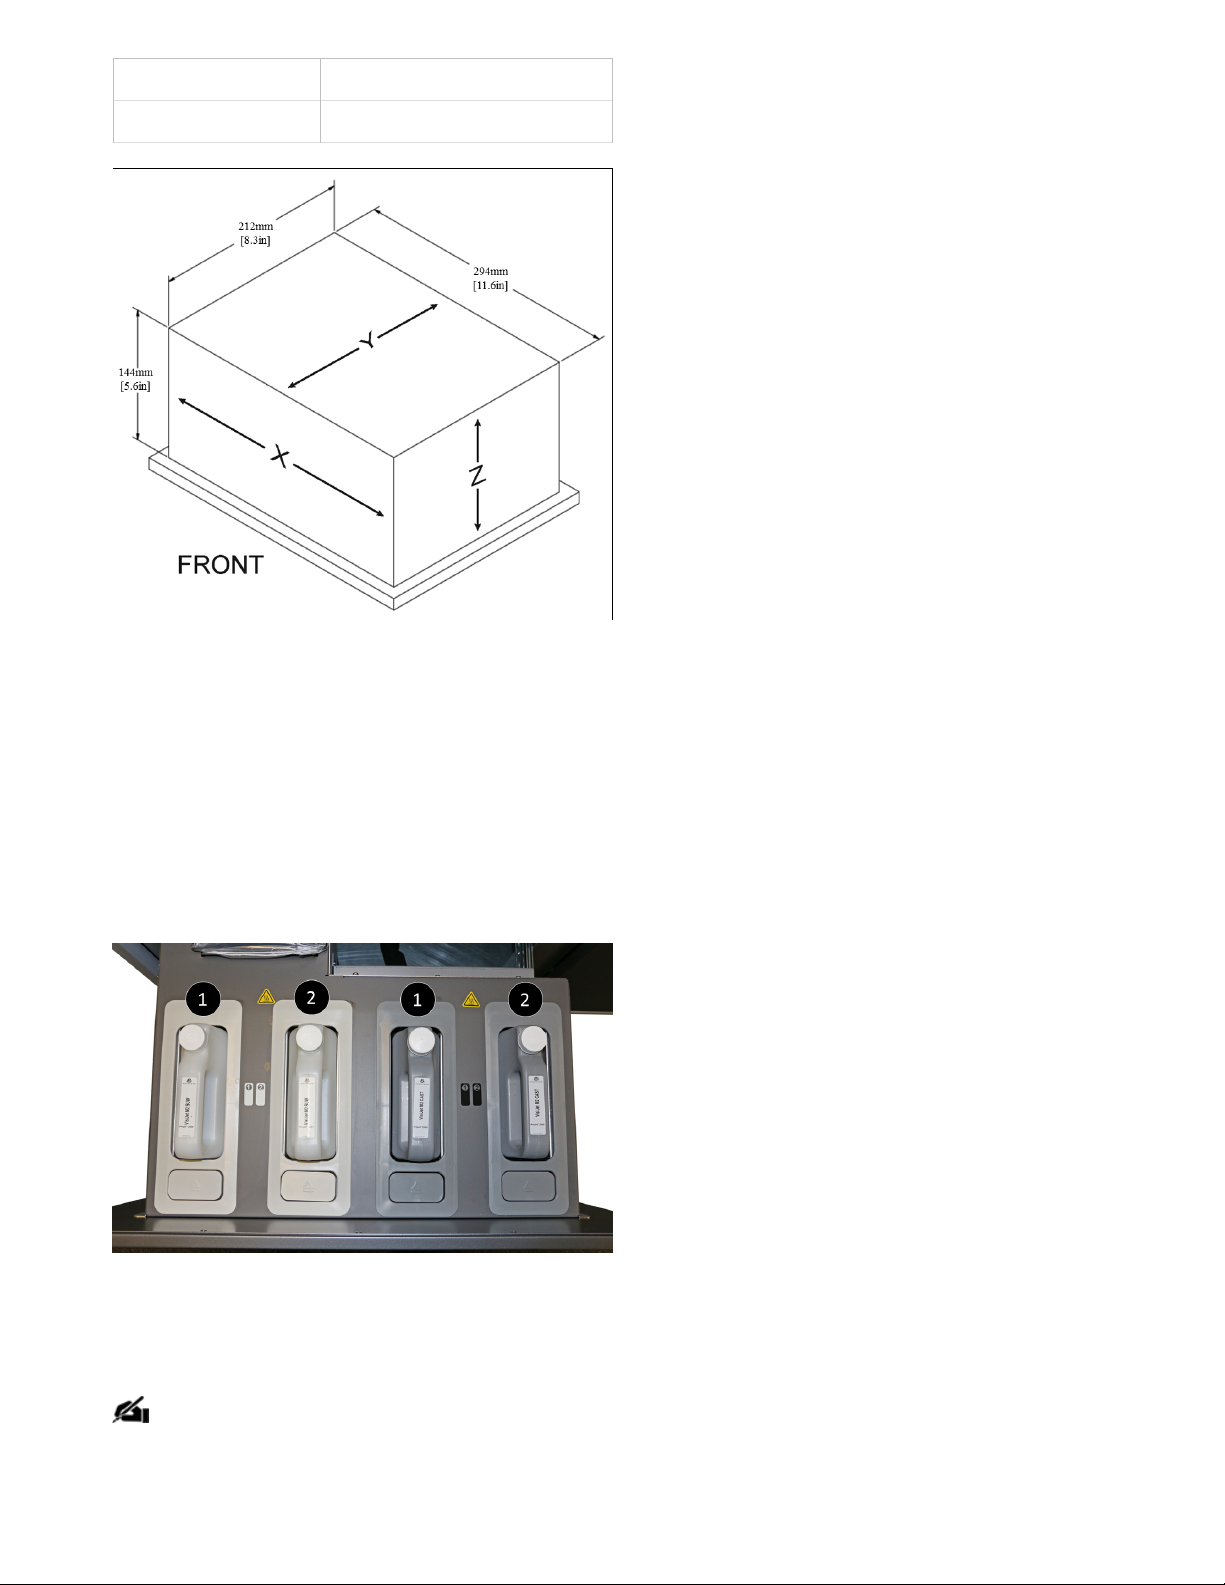
Printing Area
The actual area that you can print a job consists of the x-axis (left-to-right)times (x) the y-axis (front-to-back) times (x) the z-axis (max height).
8/10/22, 2:55 PM
Quick Start Guide
infocenter.3dsystems.com/projetmjp2500w/print/book/export/html/861
8/26
English (X x Y x Z) Metric(X x Y x Z)
11.6" x 8.3" x 5.6" 294mm x 212mm x 144mm
3D Printer System Components
Material Delivery Module (MDM)
ProJet® MJP 2500W/ IC
Support Material Containers 1 and 2: These containers hold the VisiJet® M2 SUW or VisiJet® M2 IC SUW (Printer specic)support material
that is used for the build. The support material is housed on the left side of the MDM in the white receptacles.
Part Material Containers 1 and 2: These containers hold the cartridges of the VisiJet® part material, which are used to build parts on the 3D
printer system. The part material is housed on the right side of the MDM in the black receptacles.
Smart Cartridge Technology:All cartridges incorporate smart cartridge technology that enables the ProJet® MJP 2500W/ IC to verify that the
user does not use the wrong material, use material incorrectly, or use empty or expired containers, ensuring the material is safe to use.
Waste Bag Receptacle
Behind the Support Material cartridges there is a waste bag receptacle area containing a disposable bag and rigid liner. The waste bag and liner
will need to be changed periodically. See Changing Waste BagSection of this manual to change waste bag.
NOTE: With every material cartridge delivered, two waste bags will be supplied. If more waste bags are required, they can be ordered
separately.
Power

8/10/22, 2:55 PM
Quick Start Guide
infocenter.3dsystems.com/projetmjp2500w/print/book/export/html/861
9/26
Power Supply: In the rear of the printer there is an outlet to plug in the power supply cord and a switch to turn the system on. This is the only
way to power the printer on from a complete shutdown state. Do not use this switch to shutdown printer. Printer should be shutdown through
the UI and brought back up by toggling the power switch on the back. (A)
CAUTION: It is advised to never pull the plug or use the switch as a means to power down the printer, always power off through the
Shutdown process on the UI.
NOTE: Unless the printer will not be used for a substantial period of time (>60 days), it is best to leave it powered on, as a result, the
printer will automatically go into a Standby state.
Additional Documentation
The following documents will help you to achieve maximum prociency with your ProJet® 2500W/ IC Series printer.
ProJet® MJP 2500W/ IC Facility Requirements Guide
The Facility Requirements Guide details the requirements necessary to install the ProJet® MJP 2500W/ IC 3D Printer. Details include the
necessary facility dimensions, electrical and pneumatic resources, and any equipment that may be needed for installation. An electronic version
of this document is available at http://infocenter.3dsystems.com/projetmjp2500w/facility-requirements-guide.
ProJet® MJP 2500 Series Installation Guide
The Installation Guide details the procedures required to properly install and set up the ProJet® MJP 2500 Series3D Printer at the customer’s
site. Only a 3D Systems Certied Field Service Engineer or a Certied Reseller is allowed to install the 3D printer system. An electronic version of
this document is available at http://infocenter.3dsystems.com/product-library/projetmjp2500-service.
ProJet® MJP 2500W/ IC Material and Post Processing Guide
The Material Guides detail the use of materials that have been certied for use in the ProJet® 2500W/ IC. Each material has its own Material
Guide. Information specic to each material is included in these guides. An electronic version of this document is available at
http://infocenter.3dsystems.com/projetmjp2500w/post-processing-guide.
ProJet® MJP 2500W/ ICQuick Start Guide
The Quick Start Guide gives the user a quick overview of the 3D printer system and the procedure for printing a part with theProJet® MJP
2500W/ IC. An electronic version of this document is available at http://infocenter.3dsystems.com/projetmjp2500w/quick-start-guide.
ProJet® MJP 2500W/ IC Global Harmonized Standards/Safety Data Sheets (GHS/SDS)
Each material has its own GHS/SDS. The user must be familiar with all information contained in these documents before handling the materials.
Every material shipment includes a paper copy of its GHS/SDS.
Electronic versions of the GHS/SDSs are available on our website at http://infocenter.3dsystems.com/materials/
NOTE: All of the documentation listed here is available by following links listed in the descriptions above.
Electronic Documentation
3D SPRINT Help
The 3D SPRINT printer application provides a complete on-line help guide for understanding how to utilize and manage the client software used
for part layout and job submission to your new printer.
User Interface
User Interface
The User Interface is located on the top of the printerto the right. There are ve main screens that contain sub menus that allow the user to
perform a variety of functions to control the printer. These vescreens and their menus are:
8/10/22, 2:55 PM
Quick Start Guide
infocenter.3dsystems.com/projetmjp2500w/print/book/export/html/861
10/26
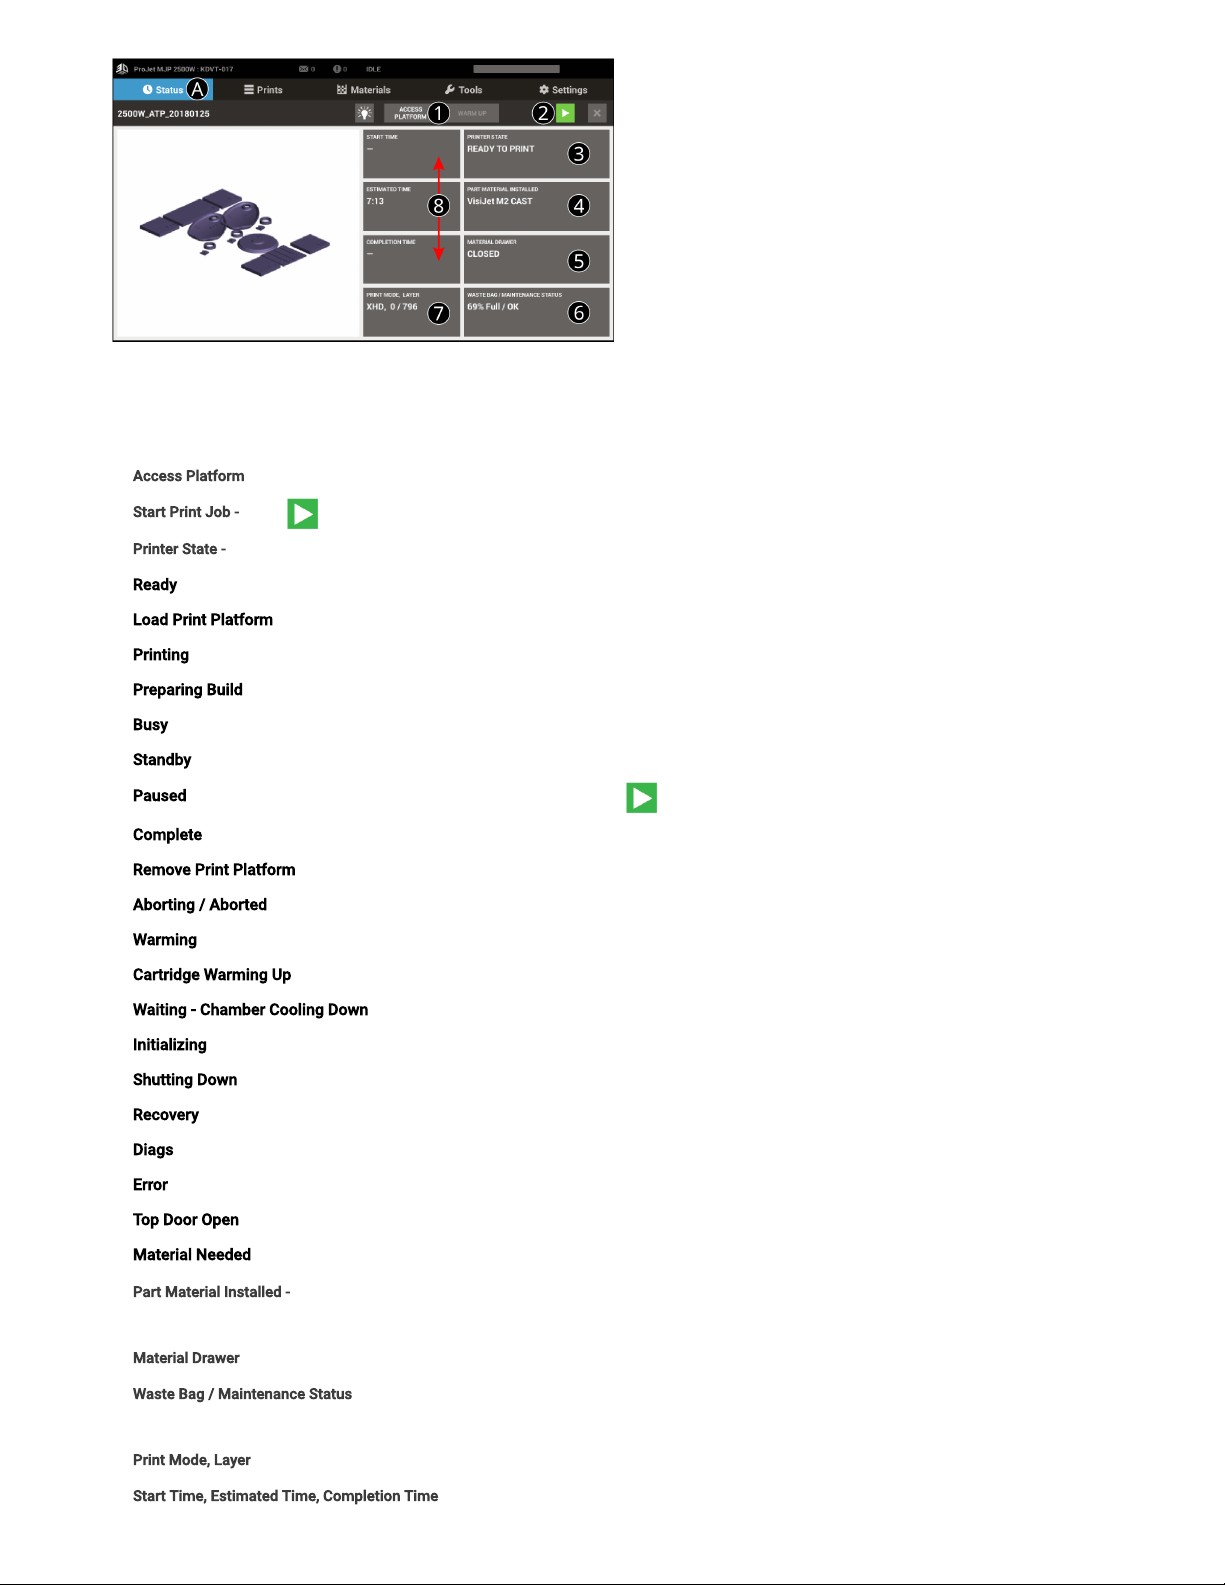
Status Tab (A)
The rst tab on the UI. The following features are accessed under the Status Tab (A). Refer to 1-7 for information that appears on this
screen.The left side tiles describe job status, the right side tiles describe printer status.
1. Access Platform - Pressing this button provides access to the print platform.
2. Start Print Job - Select to start the next print job in the print queue.
3. Printer State - This area identies what state the printer is in at any given time. See below for the various Printer States.
Ready - Printer ready toaccept print jobs.
Load Print Platform - Printer is ready for a clean print platform to be installed
Printing - Printer is printing a job
Preparing Build - Printer is setting up to begin printing
Busy - Printer is performing maintenance
Standby - Printer is in a low power state
Paused - Current print is paused and can be resumed by selecting the button
Complete - Current print is completed and the part can be removed from the printer
Remove Print Platform – Job is complete; access the print platform to remove the part
Aborting / Aborted- Current print isaborting / aborted
Warming- Printer is warming up to a Ready state
Cartridge Warming Up - Printer cartridge(s) warming up to a Ready state
Waiting - Chamber Cooling Down - Printer is waiting for the build chamber to cool down before continuing printing
Initializing - Printer is powering on and going through initialization
Shutting Down - Printer is powering down and will notify the user when it is safe to power off the printer
Recovery - Printer has a fault and is attempting recovery
Diags - Printer is in Diags mode and may require a service call
Error - Printer is in an Error state and may require a service call
Top Door Open - Close the top door in order for maintenance or printing to occur
Material Needed -the printer needs more material in order to print
4. Part Material Installed- Displays material type installed and status (tile changes color if material needs attention). Click on the tile to bring up the
Materials tab.
5. Material Drawer - Displays the state of the Material Drawer - Closed, Locked, Open to help user quickly identify when it is accessible.
. Waste Bag / Maintenance Status- Displays thepercentage and statusof the waste bag and other maintenance items. Click on the tile to bring up the
Operator Maintenance tab.
7. Print Mode, Layer - This area displays the current layer and print mode information.
. Start Time, Estimated Time, Completion Time - Displays the print job printing time information.
Inhaltsverzeichnis
Andere ProJet 3D-Drucker Handbücher

ProJet
ProJet PJ 5000 Bedienungsanleitung

ProJet
ProJet MJP 5600 Bedienungsanleitung

ProJet
ProJet MJP 5600 Installationshandbuch

ProJet
ProJet 160 Leitfaden

ProJet
ProJet MJP 5600 Bedienungsanleitung

ProJet
ProJet 5500X Bedienungsanleitung

ProJet
ProJet MJP 2500 Bedienungsanleitung

ProJet
ProJet 1000 Bedienungsanleitung

ProJet
ProJet 3-D Modelers Bedienungsanleitung

ProJet
ProJet HD3000 Bedienungsanleitung


