QRP Labs U4B Ultimate4 Bedienungsanleitung
U4B
U4B – Ultimate4 Balloon tracker
Operating manual
Important information
This is the operating manual for the U4B and should be read in conjunction with the relevant
hardware manual. On the U4B page http://qrp labs.com/u4b there are other helpful documents
and video links.
This operating manual contains a comprehensive description of everything in the firmware. It might
be a little overwhelming. However, remember that U4B is both extremely simple, extremely
complex, and everywhere in between – whatever you want it to be.
For the simplest possible flight, a basic tracking application program is already installed. The
following steps will get your U4B tracker ready and tracking set up:
1. Connect a micro USB cable between U4B and your PC; run a terminal emulator on the PC
(see section 2 of this manual) and connect to U4B
2. Enter your callsign in the U4B configuration screen (see section 3.1 of this manual) and
make a note of the channel number
3. Set up your flight tracking in the QRP Labs shop account (see section 5 of this manual),
which will give you a tracking map page at http://qrp labs.com/tracking
4. Assemble your system hardware (refer to the hardware manual) – consisting of U4B, GPS
antenna (twisted #28 wire), HF (e.g. 20m) antenna, solar cells and small LiPo battery
5. Test thoroughly on the ground, before snapping off the USB connector tab along the line of
holes (refer to hardware manual)
6. Remember: SAFETY first (refer to hardware manual), then select your launch site, launch
day (good weather!), inflate your balloons (refer to documentation at
http://qrp labs.com/u4b) and fly!
Contents
1. Introducon.................................................................................................................................................................3
2. Terminal connecon....................................................................................................................................................4
2.1 Drivers and PC setup..............................................................................................................................................4
2.2 PC terminal emulator............................................................................................................................................4
3. Terminal applicaons..................................................................................................................................................6
U4B operang manual ev 1.00 1

3.1 Con"guraon.........................................................................................................................................................6
3.2 un program..........................................................................................................................................................7
3.3 Text editor.............................................................................................................................................................8
3.4 File manager........................................................................................................................................................13
3.5 Command line.....................................................................................................................................................15
3.6 Hardware test......................................................................................................................................................17
3.7 Factory eset.......................................................................................................................................................18
3.8 Update F/W (Firmware).......................................................................................................................................18
4. U4B BASIC.................................................................................................................................................................. 22
4.1 QDOS BASIC programs.........................................................................................................................................22
4.2 Variables..............................................................................................................................................................24
4.3 Tags in strings......................................................................................................................................................25
4.4 Operators............................................................................................................................................................27
4.5 LET statement (assignment)................................................................................................................................28
4.6 Expressions..........................................................................................................................................................28
4.7 Funcons.............................................................................................................................................................28
4.7.1 IN funcon....................................................................................................................................................28
4.7.2 INA funcon..................................................................................................................................................29
4.7.3 AND funcon..............................................................................................................................................29
4.7.4 VAL funcon.................................................................................................................................................30
4.7.5 INST funcon..............................................................................................................................................31
4.7.6 LEN funcon.................................................................................................................................................31
4.7.7 I2C funcon and I2C 16 funcons..............................................................................................................32
4.7.8 FILEEOF funcon...........................................................................................................................................32
4.8 Loops, Condionals and Program Flow................................................................................................................33
4.8.1 FO ..NEXT loop structures............................................................................................................................33
4.8.2 IF..ELSE..ENDIF structures.............................................................................................................................34
4.8.3 GOTO............................................................................................................................................................35
4.8.4 Subrounes: GOSUB and ETU N................................................................................................................35
4.8.5 END...............................................................................................................................................................36
4.8.6 UN statement.............................................................................................................................................37
4.9 Statements..........................................................................................................................................................37
4.9.1 P INT statement...........................................................................................................................................37
4.9.2 DELAY statement..........................................................................................................................................38
4.9.3 SLEEP statement...........................................................................................................................................38
4.9.4 GPS statement..............................................................................................................................................39
4.9.5 Transmit statements: CW, HELL, JT9, JT65, WSP , TELE...............................................................................40
4.9.6 OUT statement.............................................................................................................................................44
4.9.7 I2CW, I2CW16 statements............................................................................................................................45
4.9.8 File handling statements: FILE, FILEW , FILE D, FILEDEL.............................................................................46
FILEW statement.................................................................................................................................................47
FILE D statement..................................................................................................................................................47
FILEDEL statement.................................................................................................................................................48
5. Q P Labs tracking......................................................................................................................................................50
6. esources..................................................................................................................................................................55
7. Document evision History.......................................................................................................................................55
U4B operang manual ev 1.00 2

1. Introduction
The U4B tracker was developed over a period of 7 years from 2015 to 2022, in collaboration with
Dave VE3KCL who has launched 83 test flights from Toronto, Canada. With flight duration from 2
hours to 305 days (10 months, almost 17 laps around planet Earth), they all taught us something
and were great fun.
U4B is designed to be an easy to use, lightweight, low cost module that can be configured as
simply as entering your callsign, yet for more advanced owners can be flexibly extended with more
sensors and as much complexity as you like. Automated tracking maps and utilities are available
on the QRP Labs website, both for simple tracking purposes and downloading your own telemetry.
The U4B PCB contains:
•33.0 x 12.7mm PCB (plus removable protrusion with micro USB connector)
•Weight: 1.8g (with micro USB protrusion removed)
•32 bit ARM microcontroller running QDOS (QRP Labs Disk Operating System)
•128K disk (implemented on EEPROM chip)
•27mW (approximately) transmitter using Si5351A synthesizer
•TCXO referenced frequency stability
•Band coverage 2200m to 2m
•LM75 temperature sensor
•Status LED
•USB interface for configuration, programming and easy firmware update (just copy the new
firmware file into the apparent USB Flash drive).
Simplest possible operation
Just connect to U4B with a PC terminal emulator, and configure it with your callsign. Register the
flight name, details and channel on the QRP Labs website. Fly!
More flexible and advanced features
U4B contains a wealth of flexibility and hardware expansion options which you can use to
customize your flight:
•19 GPIO pins – of which 9 can be configured as analog inputs and 8 are easily accessible
via PCB edge pads; all 19 can be used as digital input or output control pins
•I2C bus for connecting additional sensors e.g. pressure, humidity
•BASIC programming language with full screen text editor, compiler and debugger
•128K Disk storage for your programs and data; BASIC can read/write data files
•Command line utility
•Telemetry over WSPR for relaying your additional sensor data
The U4B radio transmitter can transmit the following modes:
•QRP Labs tracking and telemetry over WSPR
•WSPR (including extended mode and slow 15 minute WSPR)
•JT9 (1, 2, 5, 10, 30 minutes)
•JT65 (modes A, B, C)
•Hellshreiber (standard, DX, and slow multi tone FSK)
•CW (standard speed, QRSS, FSKCW and DFCW)
•Customized “Glyph” patterns can produce a unique idenfier on QRSS
U4B operang manual ev 1.00 3

2. Terminal connection
The U4B tracker contains a Virtual COM Serial port USB device, for accessing QDOS (QRP Labs
Disk Operating System) via a terminal emulator program running on your PC. This connection is
used for initial configuration, and all BASIC programming, development and testing that you may
wish to do, if you are pursuing more advanced flight goals. A common USB A to USB micro cable
is required. Any OS may be used (Windows, Linux, Mac etc).
2.1 Drivers and PC setup
No additional drivers are required for operation with most Linux distributions, Apple Mac, MS
Windows 10 or 11.
For older versions of MS Windows, it may be necessary to install a driver for the serial port
because this driver is not on your computer already by default. This driver is available from the ST
Semiconductor website at https://www.st.com/en/development tools/stsw stm32102.html and is
applicable to 98SE, 2000, XP, Vista®, 7, and 8.x Operating Systems. There is a description for
installation on Windows 7/8 on the QRP Labs QLG2 page http://qrp labs.com/qlg2 so if in doubt,
please check this.
Linux special note
On Linux systems, a particular problem can occur. When the QDX Virtual COM (Serial) connection
is detected, the PC thinks that a modem has been connected and starts trying to send it Hayes
AT commands dating back to 1981, implemented on Hayes’ 300 baud modem. Yes! 40 years
ago…
The Operating System attempting to send AT commands to your QDX will certainly mess
everything up. Not least because when QDX receives a carriage return character, it will enter
Terminal Applications mode; this will send all sorts of characters back to the PC (as QDX thinks it
is now talking to a terminal emulator) and it will disable CAT command processing, so your PC digi
modes software will not be able to talk to QDX. Disaster.
To fix this you need to issue the following commands to disable ModemManager:
sudo systemctl stop ModemManager
sudo systemctl disable ModemManager
sudo systemctl mask ModemManager
This will permanently stop ModemManager. If for some reason, you actually DO need
ModemManager operational, for some other reason… well there IS a way to stop it just for QDX…
but Google will be your elmer on this!
2.2 PC terminal emulator
I use Linux (XUbuntu 18.04) and I’m using the PuTTY terminal emulator. There are numerous
other terminal applications which will work fine. You may have your own favourite. They are all
capable of correct operation with U4B.
I start PuTTY using command line “sudo putty” then connect to U4B on /dev/ttyACM0 (or ACM1,
ACM2 etc if ACM0 is already in use by another device). On Windows operating system it will be a
COM port numbered for example, COM1. It is necessary to know which serial port is being used
U4B operang manual ev 1.00 4

by U4B. There is also a guide to identifying the serial port at http://qrp labs.com/qlg2 (scroll down
the page).
Set the size of the terminal window to 80 columns and 24 rows.
Set the PutTTY configuration as per the above, then click “Open” to start the connection. You will
see a blank screen. Now press the Enter key and you should see the U4B applications menu.
For the purposes of this manual, to conserve printer ink for those who choose to print a paper
version of the manual, inverse colouring will be used.
Note the firmware version number is shown at the top of the screen. Use the up/down arrow keys
then press Enter to select the desired application.
U4B operang manual ev 1.00 5

3. Terminal applications
All terminal applications are activated by using the up/down arrow keys to highlight the desired
option, then pressing Enter. To quit an application, use the Control Q keyboard combination.
3.1 Configuration
The U4B Configuration screen is where the basic configuration of the U4B tracker and the QRP
Labs WSPR tracking system is specified.
Callsign Here you enter the callsign for the flight. This must conform with WSPR protocol callsign
rules! Specifically:
•Must be 4 6 characters (longer callsigns cannot be sent using WSPR)
•One or two characters which must consist of A Z or 0 9
•Next character must be a number, 0 9
•Two or three more characters which must be A Z
Select the callsign field and type your callsign in. There is no need to add blank spaces at the end;
you cannot use the arrow keys to fix a mistake, just use the backspace key and re enter the
callsign.
Band the amateur band for WSPR tracking telemetry. 20m is most popular for balloon tracking
and is recommended. With the left and right arrows you can choose the operating band.
Channel The QRP Labs tracking system uses 600 channels numbered 0 to 599. Each U4B
tracker is uniquely assigned three possible channels to use. You can choose which of the three
possible channels to use.
Autostart program The name of the program, which must be in the root directory, to run
automatically at power up when there is no USB connection. When the USB cable to the PC
U4B operang manual ev 1.00 6

terminal emulator is connected, autostart is disabled. This is the main program which your U4B will
run during flight, whenever it powers up with sufficient power from the solar cells.
Frequency This is an information only, non editable field showing the center frequency of your
WSPR tracking transmissions. There will be a few Hz variation around this due to temperature
fluctuations – a TCXO such as the 25MHz TCXO synthesizer referenced used, is good – but does
not completely eliminate drift down to zero.
Telemetry format An information only field indicating what format to expect the telemetry
transmissions (second WSPR packet) to be in; the first character will be one of 0, 1 or Q and the
third character will be numeric (0 9). All other characters of the WSPR callsign, locator and power
will be substituted by the QRP Labs telemetry.
Start minute the minute past the hour, repeating every 10 minutes, at which the first WSPR
transmission will be sent. In the example shown, the first (standard) WSPR transmissions will
occur at :06 :16 :26 etc past the hour. The telemetry transmissions are sent immediately after the
standard WSPR transmission.
3.2 Run program
This application simply runs the default program of the U4B, as defined in the Configuration
screen. By default, this program is called “TRACKER”. Any output printed from the program is
shown on the screen. The Run program application is useful for final testing of your flight program.
It can be useful to include debug PRINT statements that will help you to know that everything is
operating properly. During flight when there is no host PC terminal emulator connected, the PRINT
statements are harmless, they simply do nothing.
Each output line is prefixed by a timestamp in HH:MM:SS format indicating the system time.
U4B operang manual ev 1.00 7

In this example, I set up a very simple program called TRACKER that just uses a FOR NEXT loop
to iterate a variable from 1 to 10 and prints the variable value at each step:
FOR I = 1 TO 10
PRINT I
NEXT
Any errors that occur during the program execution will also be displayed on screen. Finally if and
when the program completes, “End.” will be shown. Remember that an actual flight program
should contain an infinite loop that never completes. Once a program completes, the U4B system
will sit and do nothing more until told to do so, or until the power is cycled. At 12km altitude there’s
nobody with a PC terminal emulator and USB connection to tell it what to do…
3.3 Text editor
The Text editor application is used to enter and edit your programs or other files on the disk.
It is also a full IDE (Integrated Development Environment). U4B programs are written in a simple
type of BASIC programming language, which is compiled to check for errors and compact the
program so it uses less disk space. The IDE allows compilation of the program, shows errors, and
contains a debugger that may be used to step through the program one line at a time.
Note that the editor always uses UPPERCASE characters – you don’t need to press Shift or
CapsLock on your keyboard, everything will automatically be converted to UPPERCASE for you.
The upper part of the screens shows the text file contents; the lower lines provide information
about the number of lines, percentage memory used, and state of the file (modified or not);
together with a helpful list of available keyboard operations.
•Ctrl O: Open a file from disk
•Ctrl S: Save a file to disk
U4B operang manual ev 1.00 8
•Ctrl A: Save As: saves a copy of the file to a new filename on disk
•Ctrl C: Compile the BASIC program filename
•Ctrl D: Switch to debugging mode
•Ctrl Q: Quit the text editor application.
Control keys supported by the editor:
•Home: Moves the cursor to the start of the current line
•End: Moves the cursor to the end of the current line
•Backspace: deletes the character before the current cursor positione
•Delete: deletes the character at the current cursor position
•Page Up: scroll up one screen full
•Page Down: scroll down one screen full
•Arrow up/down/left/right: move the cursor one character in the specified direction
Other keystrokes are interpreted as normal text entered into the editor.
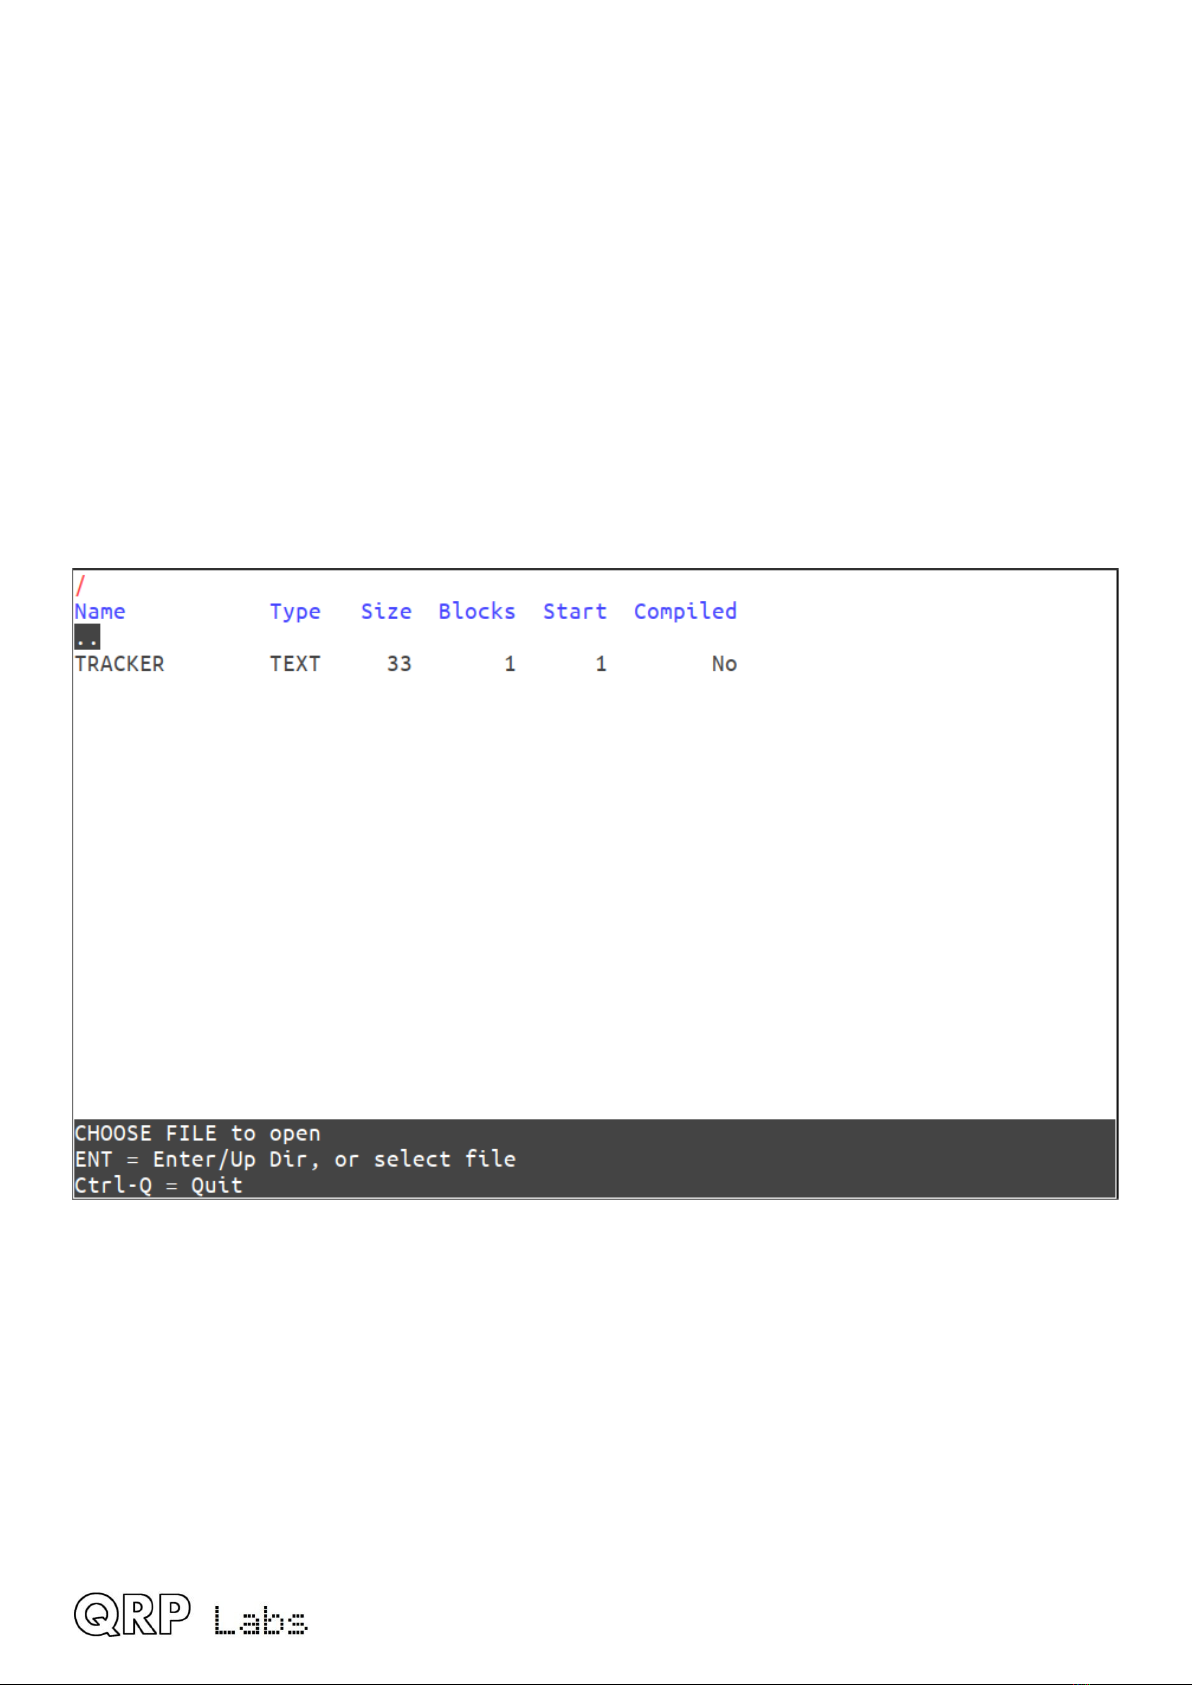
Pressing Ctrl O opens a file selector screen showing the files on disk:
Here we have a single program, TRACKER, which is the default program specified in the
Configuration screen. Normally it would, by default, contain a simple example tracking program;
here I have replaced it with a very simple program for example purposes.
Use the cursor keys to select the desired file to open, then press Enter. Pressing Enter on the ..
line moves the directory listing to the parent directory, if there is one; if there are sub directories,
pressing Enter when a sub directory is listed, moves the directory listing into the sub directory. Or
you can press Ctrl Q to quit the File Open operation.
Here’s the example program:
U4B operang manual ev 1.00 9

The full BASIC syntax is described in a different section of this manual.
Pressing Ctrl S will save the file if there are any changes; if it is a new file which does not yet have
a file name, then Ctrl S is equivalent to pressing Ctrl A and will show you a similar screen to the
above, to choose what directory to use and to enter the new file name.
U4B operang manual ev 1.00 10
Inhaltsverzeichnis
Andere QRP Labs GPS Handbücher


