
Recon Outdoors Viper IR 6.0 Bedienungsanleitung


iii
INTRODUCTION
Congratulations on the purchase of your new Recon Outdoors
Digital Scouting and Security Camera. The Recon Viper IR™’s
unique picture storage capabilities, along with its nearly invisible
infrared ash and small size, make it one of the best Scouting/
Security cameras available. For best results, please read the
entire user’s manual to gain an understanding of all the available
benets and features of the Recon VIPER IR™.
Trademarks Used
All parts of the Recon documentation are protected by copyright
law and all rights are reserved. This documentation may not, in
whole or in part, be copied, photocopied, reproduced, translated,
or reduced to any electronic medium or machine readable form
without prior consent, in writing, from Recon Outdoors.
Viper IR is a trademark of Recon Outdoors.
Product names mentioned herein are for identication purposes
only and may be trademarks and/or registered trademarks of
their respective
companies.
Recommended Brands
SD Cards: Recon, Delkin Devices/ eFilm, Sandisk.
Batteries: Energizer Ultimate Lithium, Duracell.
NOTE: Energizer Ultimate Lithium batteries last three times
longer than regular batteries and are far superior in cold weather.
WARNING: All SD cards New or Used MUST be formatted FAT
32 before being used or the Viper Camera will not function
correctly!!!!! When deleting images for a SD card you must delete
ALL of the images!!!!
Formatting instructions for Windows OS are on page 13.

Table of Contents
1. Viper IR™ Introduction.............................................1
2. Mount Base & Camera Core View .............................2
3. SD Memory Card & AA Battery View ...........................3
4. Installing Batteries & Set Date ...................................4
5. Set Time ................................................................5
6. Set Delay ...............................................................6
7. Set Burst ................................................................7
8. Set H/S ..................................................................8
9. Pic Count ...............................................................9
10. Aim Mode & Walk Test ........................................10
11. Camera Mode ......................................................11
12. Memory Card & Battery Voltage Bar Graphs ...........12
13. File Name Information ........................................13
14. Recon Warranty Information ................................14
iii
21
21
Viper IR™Introduction
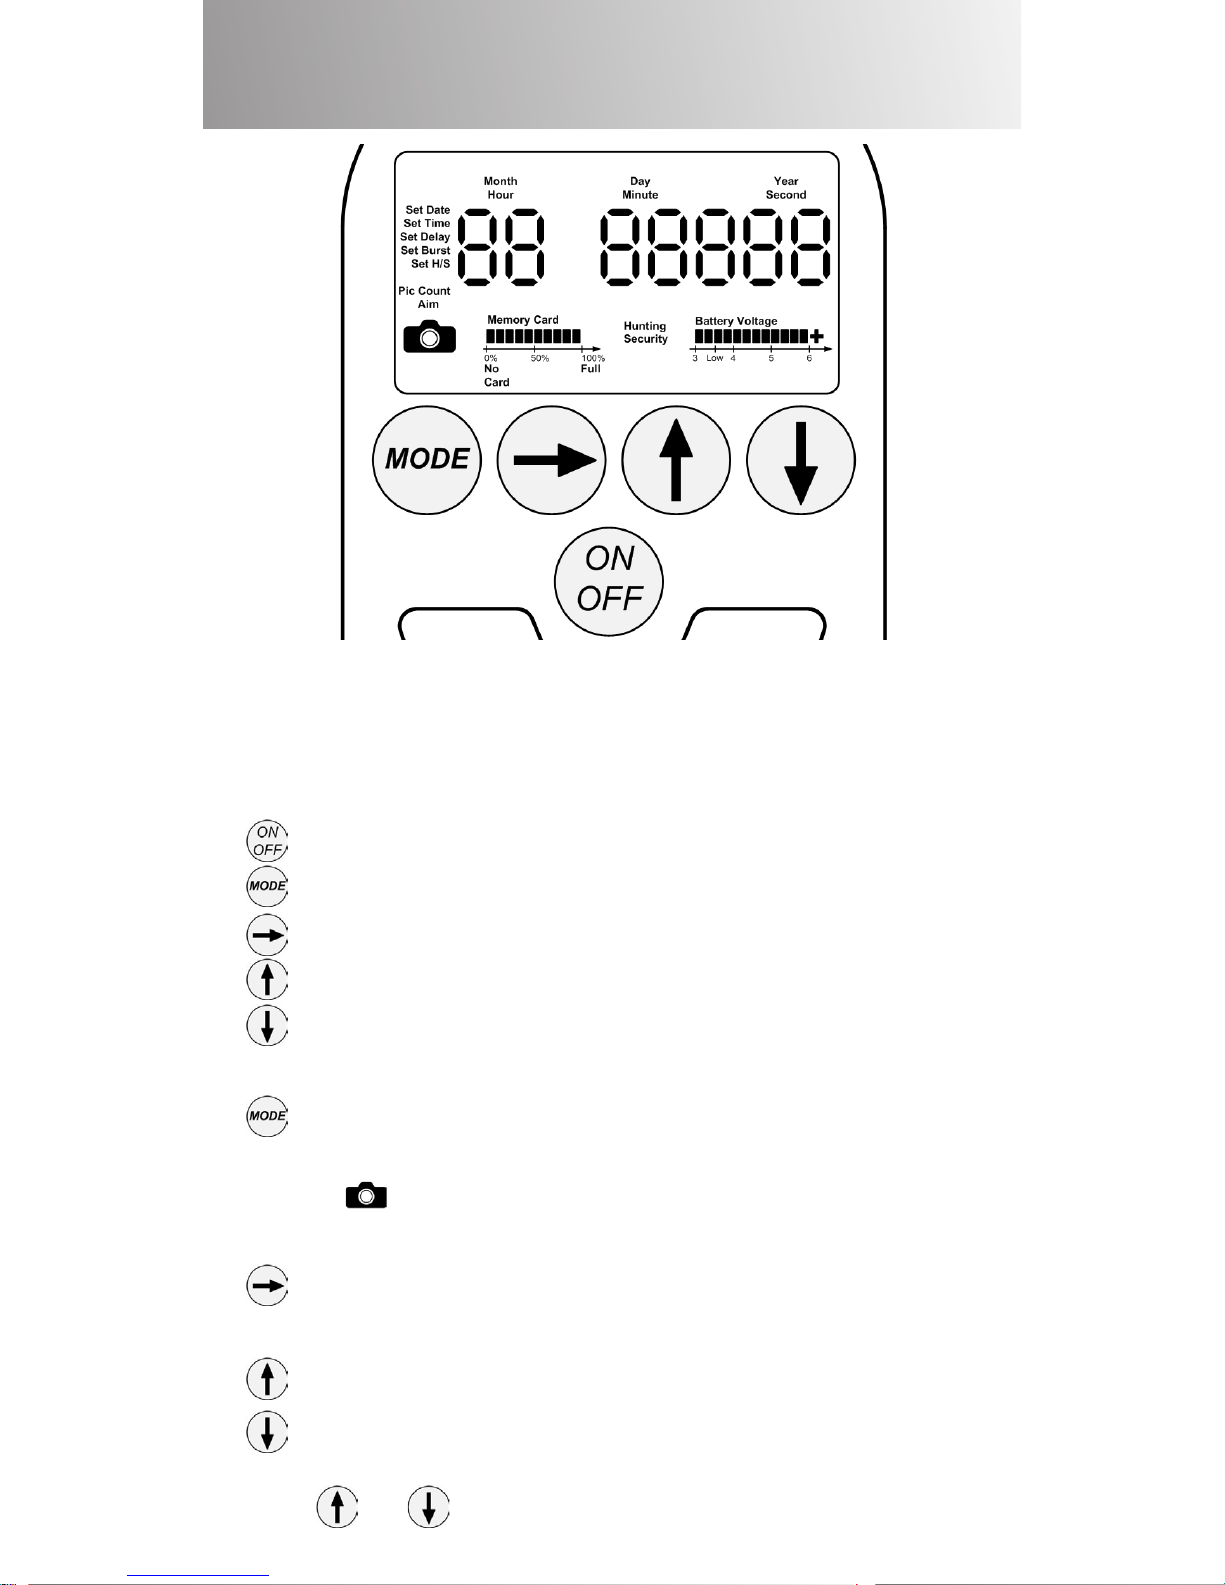
LCD With All Icons Turned On
Viper IRTM, with its unique size, shape and mounting capabilities, is the
leader in next generation Digital Infrared Cameras. Viper IRTM uses a
custom LCD and 5 pushbutton switches that aid in the ease of setup and
operation. The pushbuttons are as follows:
On/Off
Mode
Select
Increase
Decrease
Pushbutton Denition:
The Mode pushbutton scrolls, from top to bottom, through the
8 Mode settings located on the left side of the LCD. The Modes
are Set Date, Set Time, Set Delay, Set Burst, Set H/S, Pic Count,
Aim, (Camera Mode).
NOTE: All “Set Modes” can be used to view or change information.
The Select button scrolls, from left to right, through the headers
above the digits in the 4 settable Modes. Select has no function in
Set H/S Mode
The Increase pushbutton ONLY increases the numbers selected to
be set.
The Decrease pushbutton ONLY decreases the numbers selected
to be set.
NOTE: and will auto advance by simply holding the button down.
1
21
21
2
Mount Base & Camera Core View
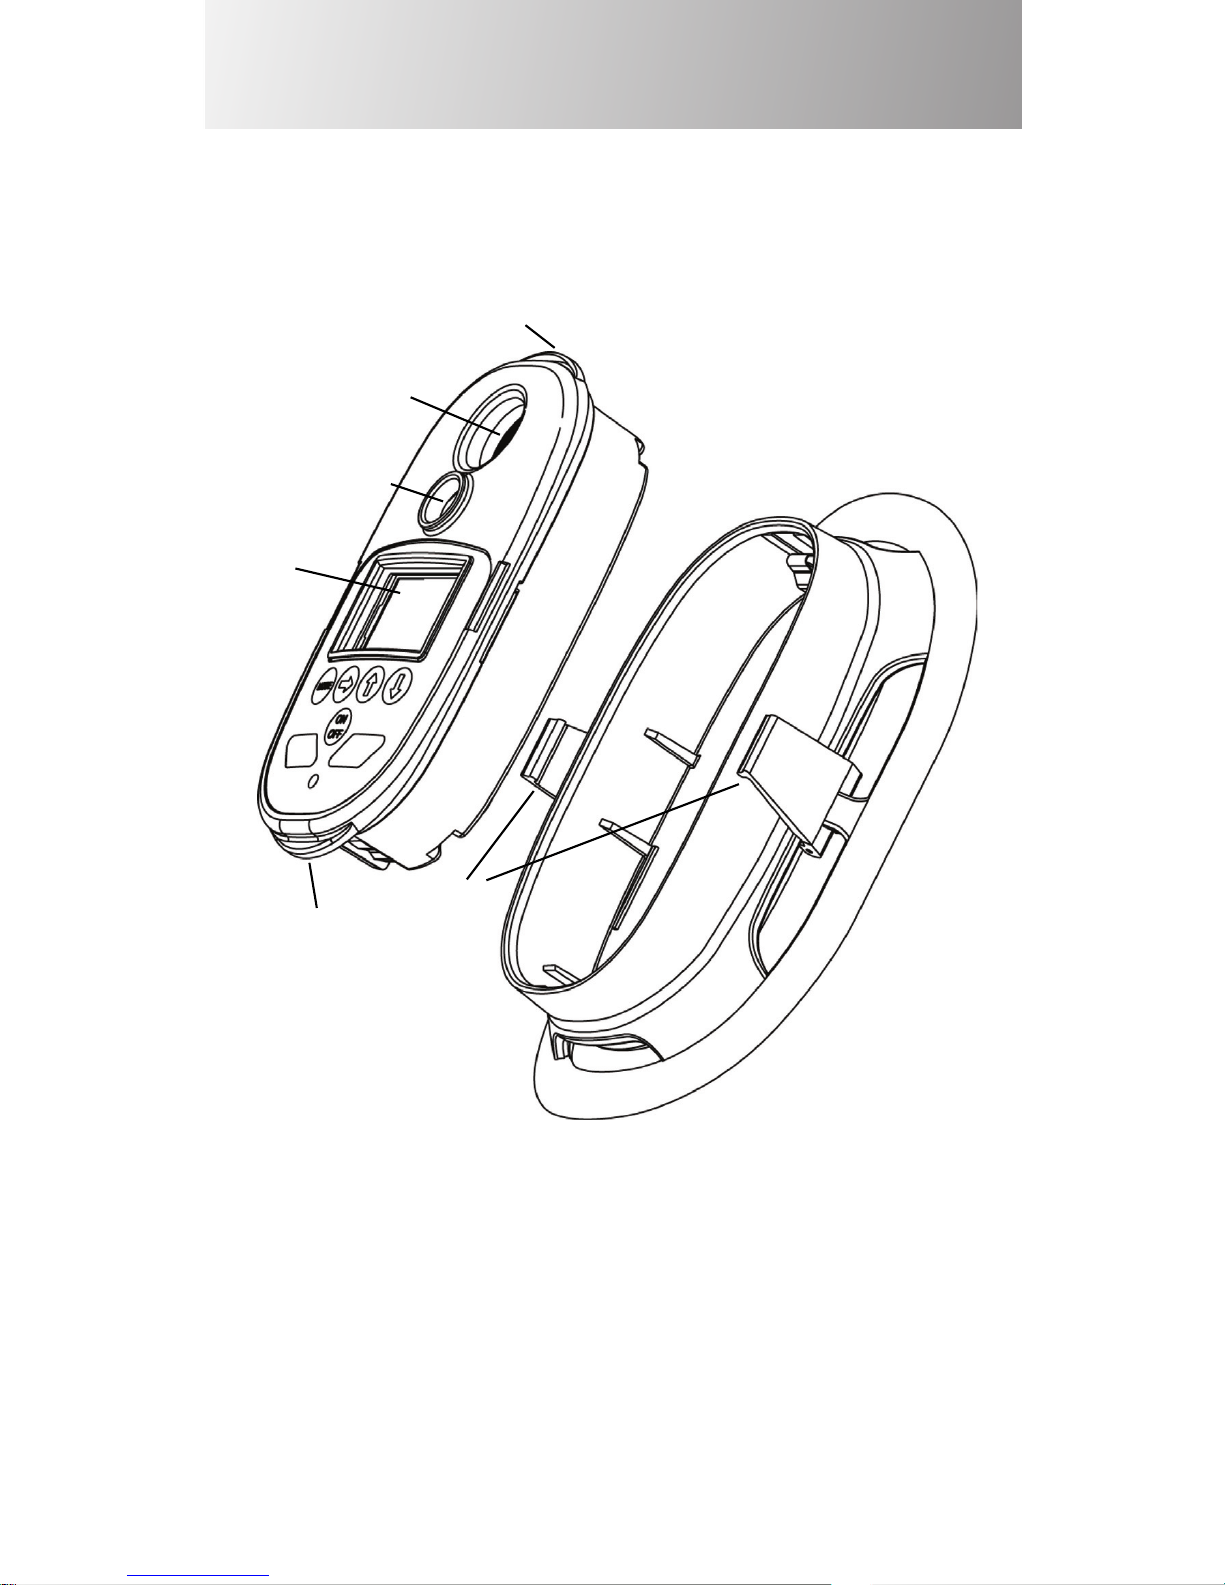
CAMERA CORE MOUNT BASE
Pull Tab
Motion PIR
Camera Lens
Custom
LCD
Pull Tab
Figure 1
Sealing Latches

43
43
3
SD Memory & AA Battery View
Figure 2
CAUTION: NEVER INSERT OR REMOVE SD CARD WITH THE
POWER ON
4 AA
Batteries
SD Memory Card
Perimeter Seal
NOTE: Clean Perimeter Seal
before assembly to mount base.
43
43
4
Installing Batteries & Set Date
Start by removing the Camera Core from the Mount Base. Place
the Mount Base in one hand and rmly pull the pull tab on the
Camera Core with the other hand separating the two parts. See
Figure 1
Install 4 AA batteries in the battery tray on the back side of the
Camera Core. Once batteries are installed correctly insert a
recommended SD Memory Card into the slot provided on the
side of the Camera core. See Figure 2
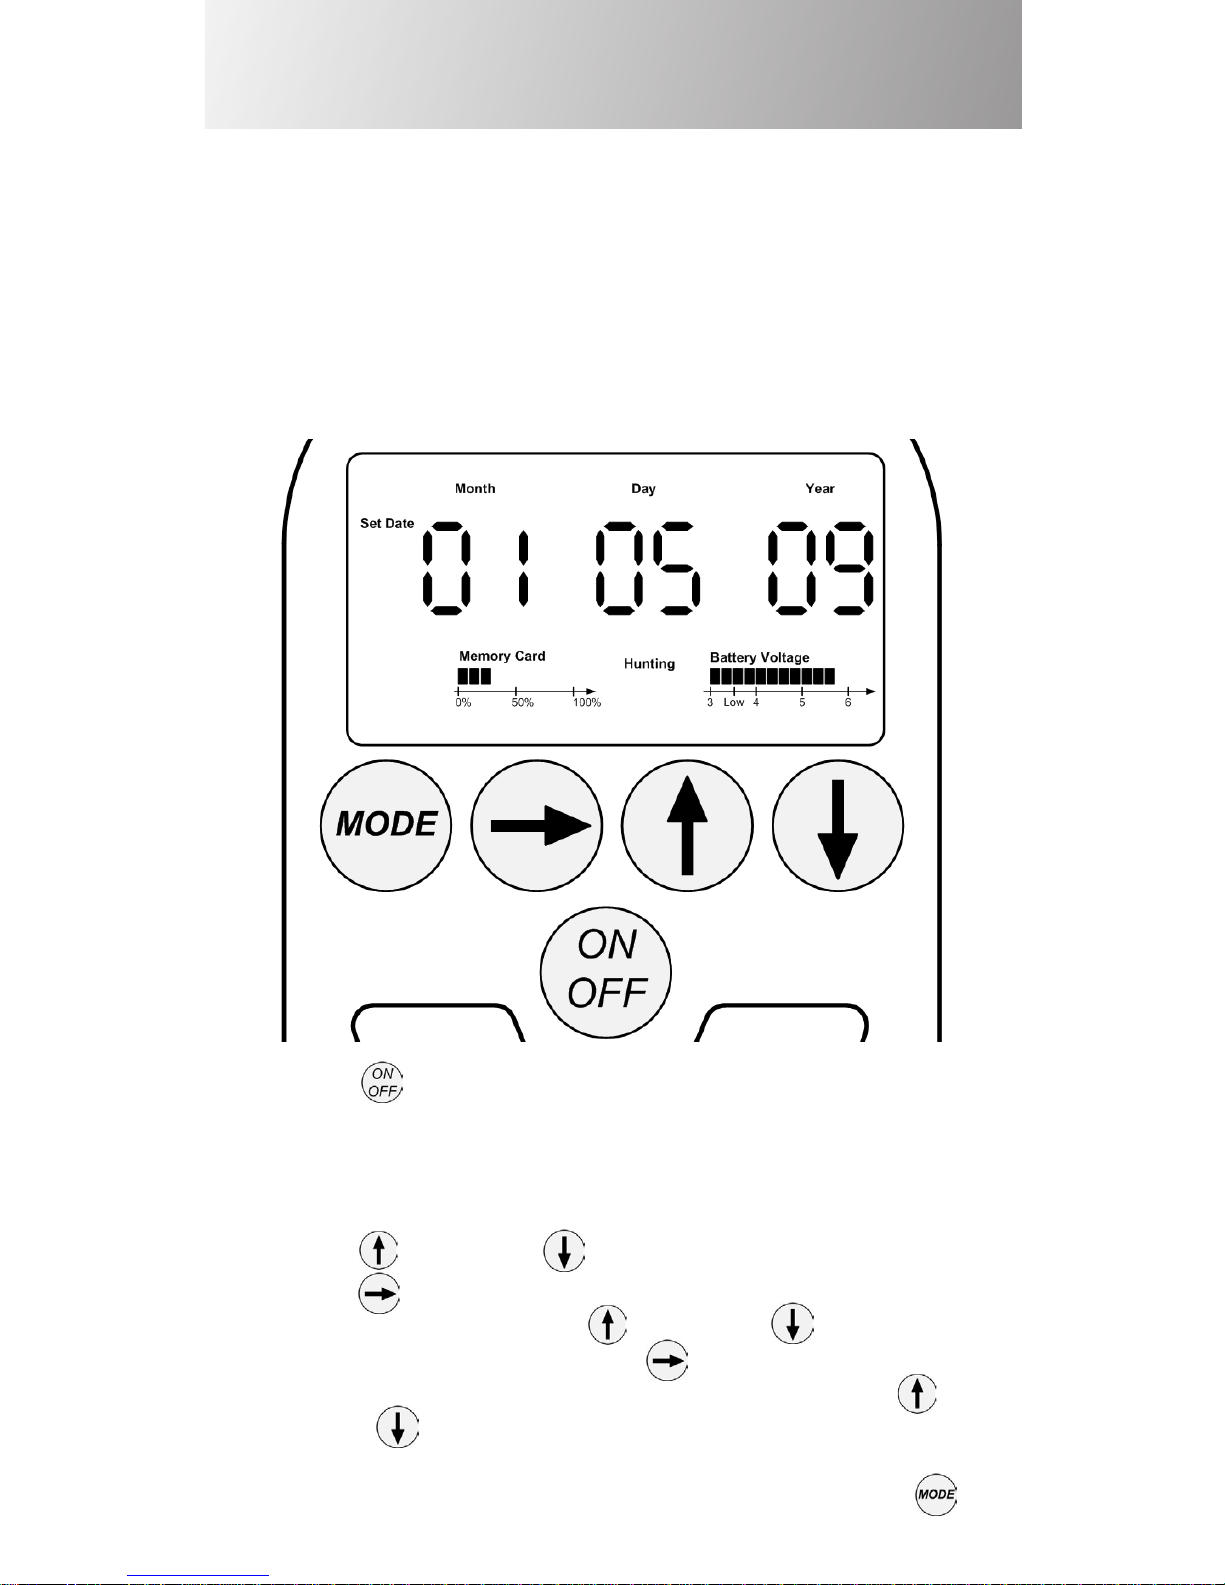
Press the On/Off button and the camera will come on in the
Set Date Mode with the Month header ashing. Note: The Month,
Day and Year use 2 numbers each.
Example: 01 05 12 means January 5,2012.
Press the Increase or Decrease button to set Months.
Press the Select button to move from Month to Day. With the
Day header ashing press the Increase or Decrease
button to set Days. Again press the Select button to move
from Day to Year. With the Year header ashing press the
Increase or Decrease button to set Years.
Example 2009 would be 09. Once the Date is set press the
Mode button to move to the next Mode: Set Time
65
65
5
Set Time
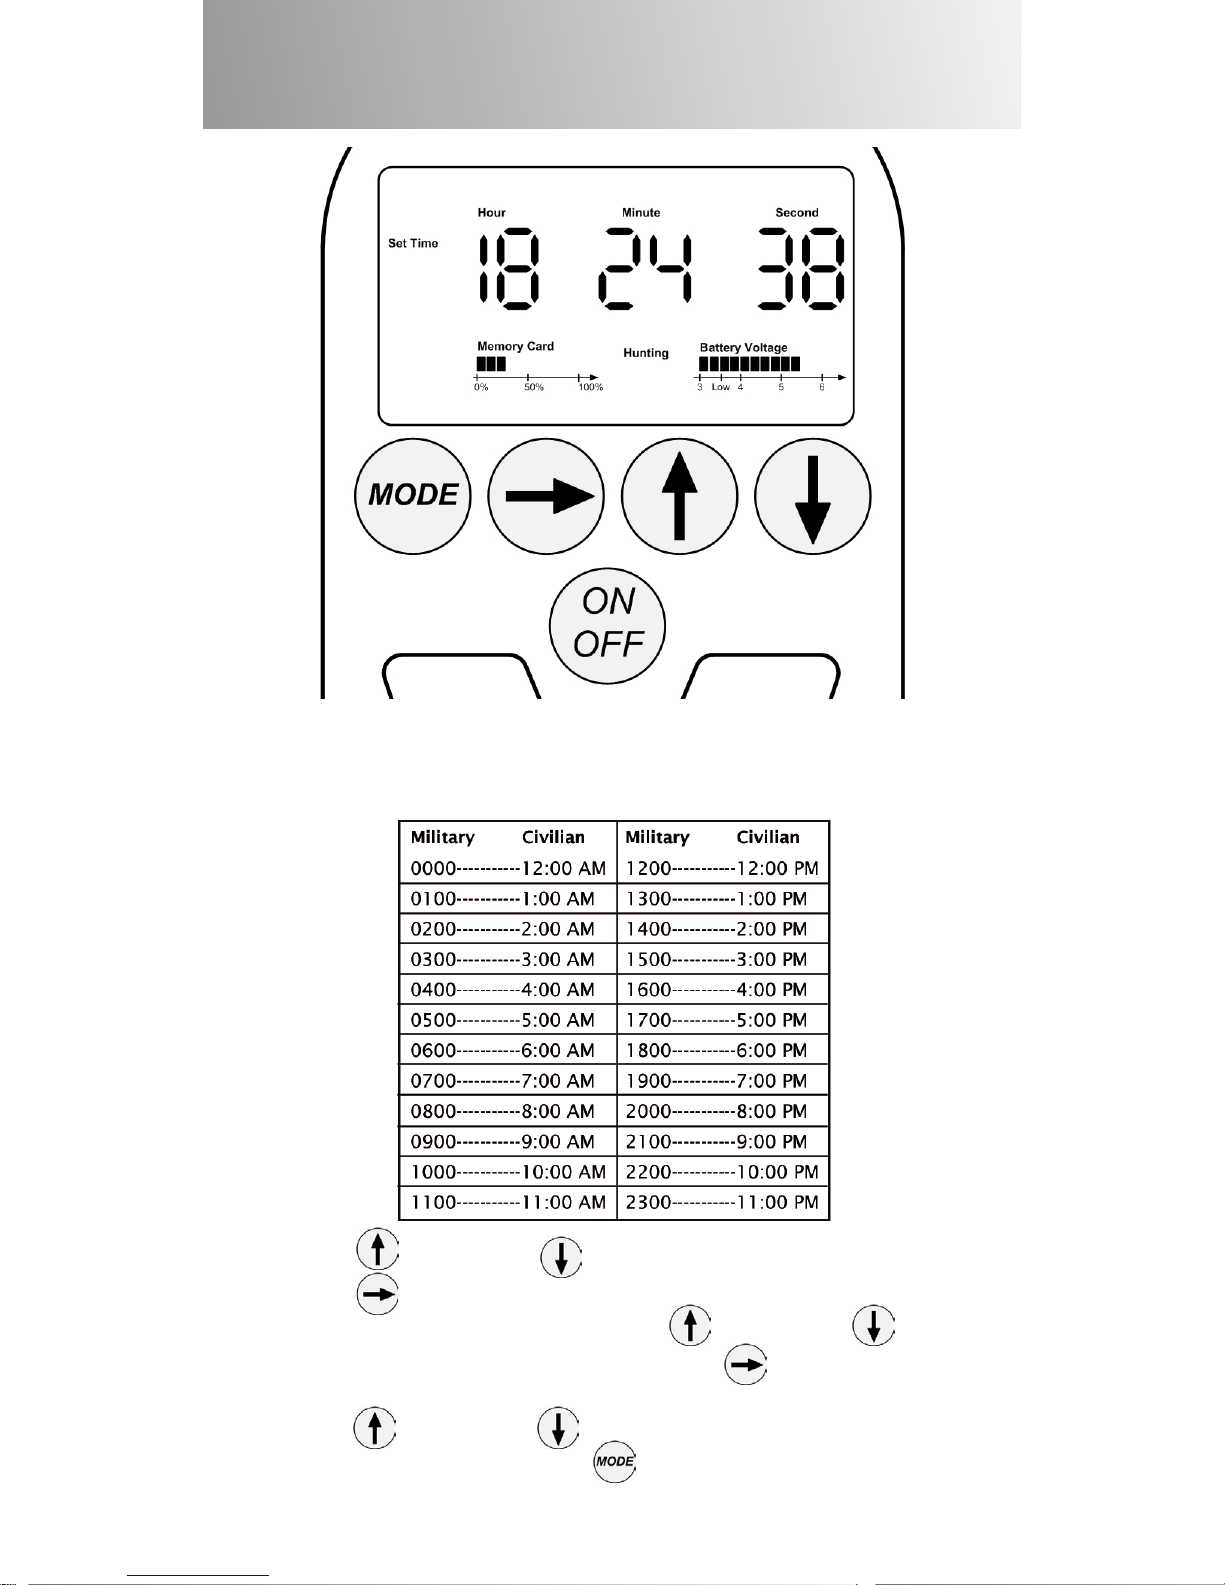
Now, in the Set Time Mode, the Hour header will be ashing.
Note: the Hour, Minute and Second use 2
numbers each. Time is in Military Time. See Chart below.
Press the Increase or Decrease button to set Hours.
Press the Select button to move from Hour to Minute. With
the Minute header ashing, press the Increase or
Decrease button to set Minutes. Press the Select button to
move from Minute to Second. With the Second header ashing,
press the Increase or Decrease button to set Seconds.
Once the Time is set press the Mode button to move to the
next Mode: Set Delay.
65
65
6
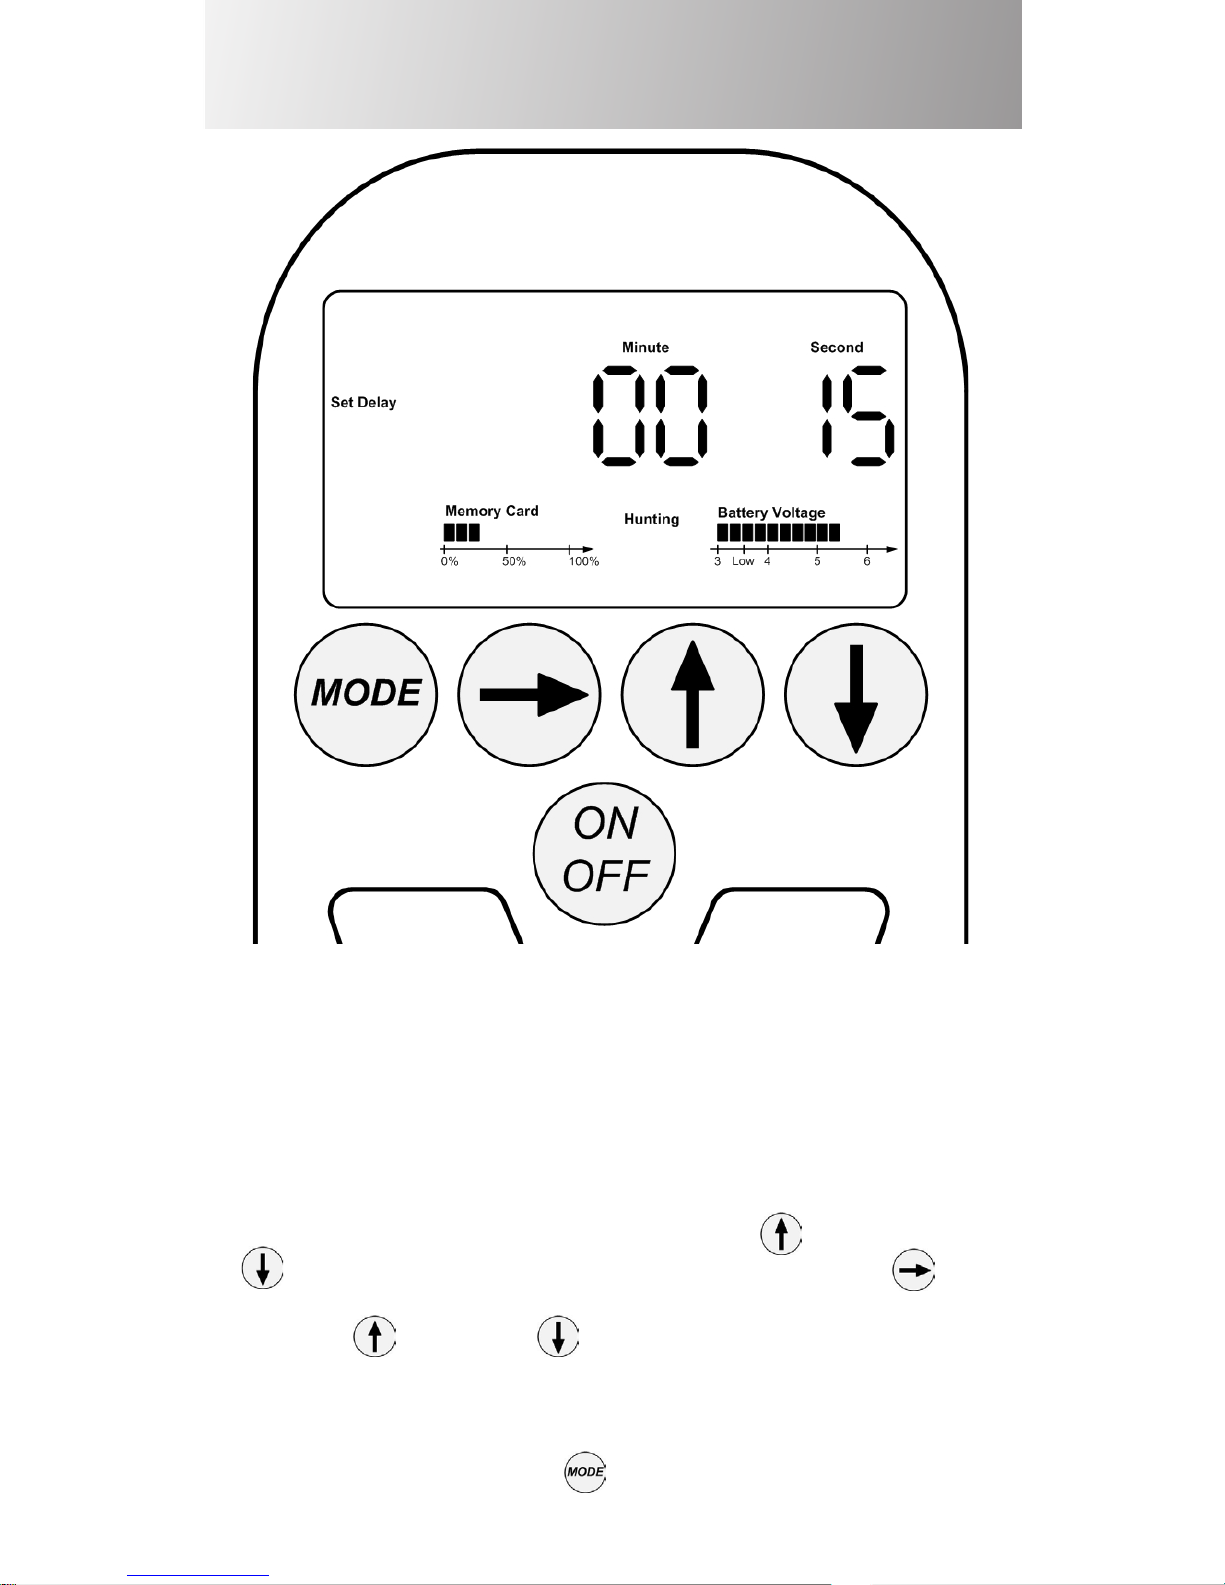
Set Delay
NOTE: Delay is the amount of time between each activated
picture. In single picture mode, Delay is the minimum time
between each picture. In Burst mode, Delay is the minimum
time between each Bust sequence. The Factory set Delay is 30
seconds.
Now, in the Delay Mode, the Minute header will be ashing.
The factory setting for Minute is 00, press the Increase or
Decrease button to set Delay in minutes or press the
Select button to move to Second. To change the Second Delay
press the Increase or Decrease button to set Delay in
Seconds.
NOTE: The MINIMUM Delay in Seconds is 3 seconds. Once the
Delay Mode is set press the Mode button to move to the next
Mode: Set Burst.
87
87
7
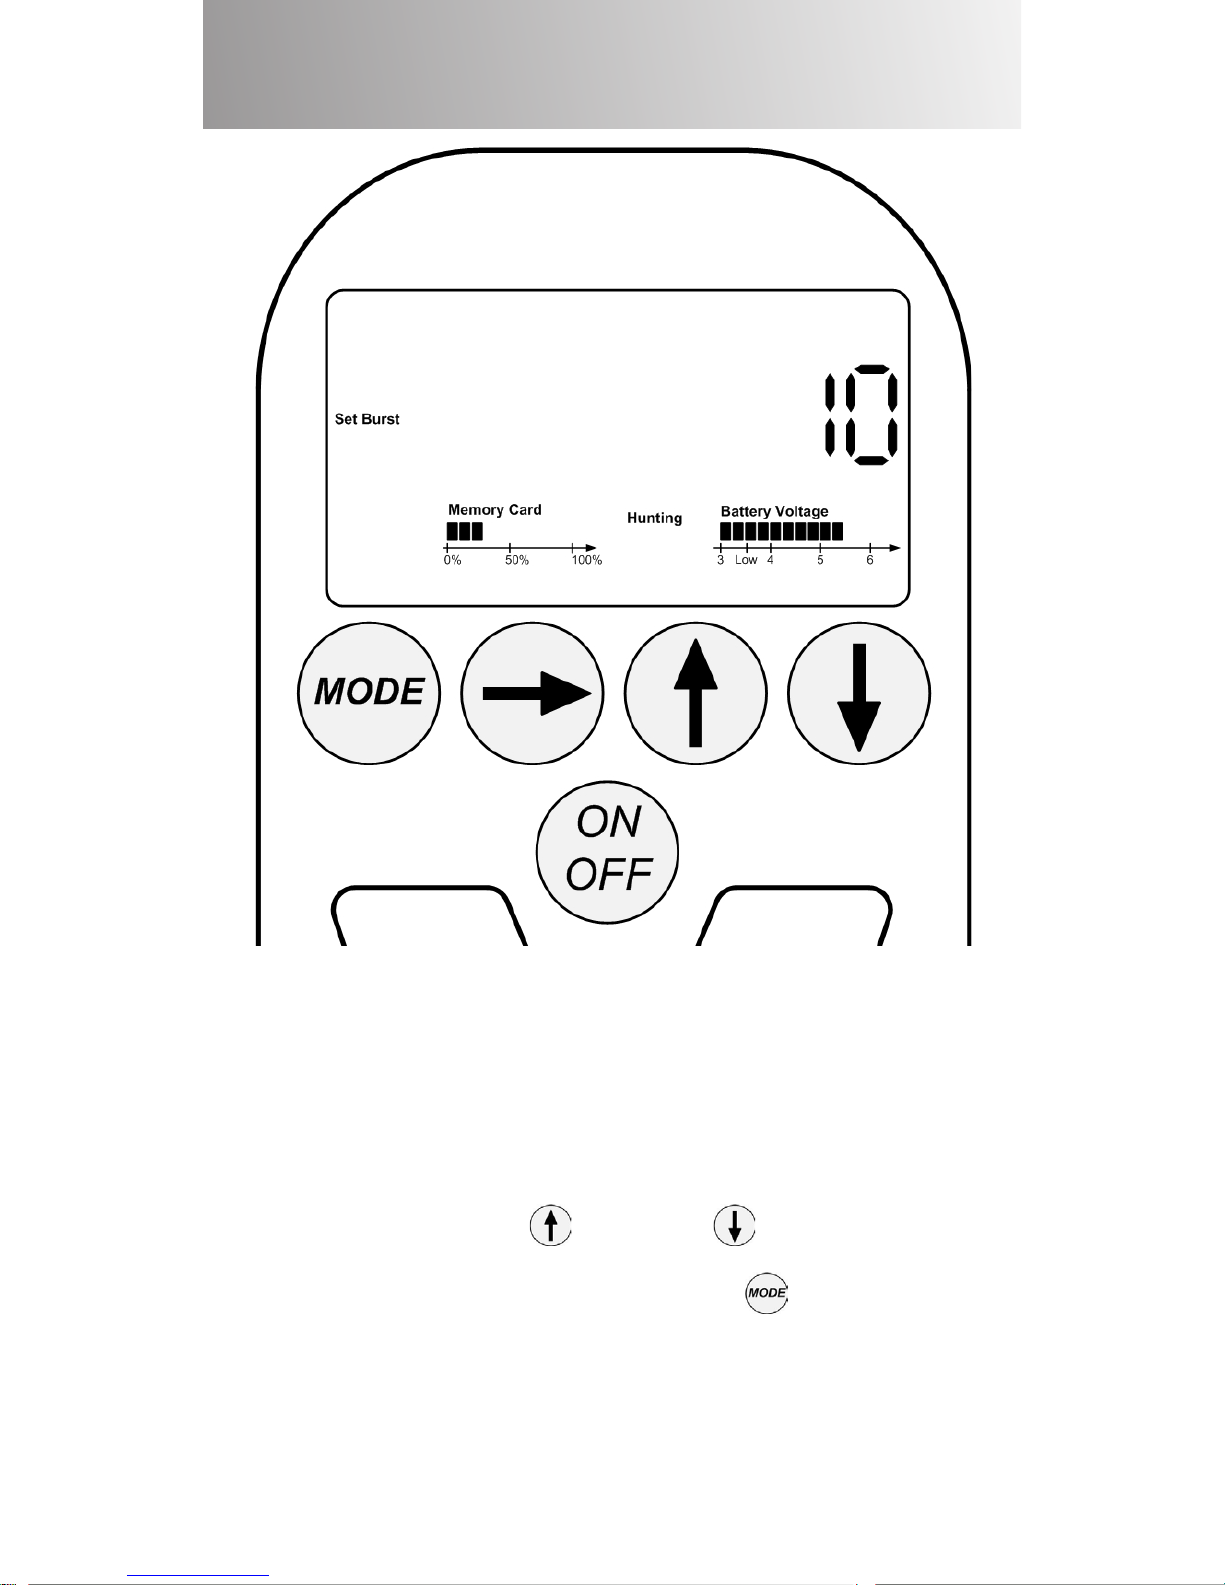
Set Burst
Burst Mode allows the camera to take from 1 to 15 pictures per
activation.
NOTE: Burst Mode is factory set at one picture per activation.
In Burst Mode, press the Increase or Decrease button to
set the number of pictures to be taken each time the camera is
activated. Once Burst Mode is set press the Mode button to
move from Burst Mode to the next Mode: Set H/S.
Inhaltsverzeichnis
Andere Recon Outdoors Scouting-Kamera Handbücher


