Robin Actor 6 ST Bedienungsanleitung

1
Version1.2

2
Table of contents
1. Safety instructions ......................................................................................................... 3
2. Fixture exterior view ...................................................................................................... 5
3. Installation....................................................................................................................... 6
3.1 Connection to the mains ............................................................................................ 6
3.2 Installing the top hat and barndoors........................................................................... 7
3.3 Rigging the xture ...................................................................................................... 9
3.4 DMX-512 connection................................................................................................ 11
4. Control menu map........................................................................................................ 12
5. Robin Actor 6 ST - DMX chart ..................................................................................... 14
5.1 Virtual colour wheel - colour mixing chart ................................................................ 18
5.2 LED zone order ........................................................................................................ 22
6. Control menu ............................................................................................................... 23
6.1 Addressing (DMXA) ................................................................................................. 23
6.2 Zoom (Zoom) ........................................................................................................... 23
6.3 Virtual colour wheel (Vir C) ...................................................................................... 23
6.4 Dimmer (Dimm)........................................................................................................ 23
6.5 Fixture information (Info) .......................................................................................... 23
6.6 Personality (Pers)..................................................................................................... 24
6.7 Manual Control (Manual).......................................................................................... 24
6.8 Test program (Test Prg)........................................................................................... 25
6.9 Stand-alone (St Alone)............................................................................................. 25
6.10 Reset...................................................................................................................... 25
6.11 Special functions (Special)..................................................................................... 25
7. RDM ............................................................................................................................... 27
8. Wireless DMX operation .............................................................................................. 27
9. Error and information messages ................................................................................ 28
10. Technical Specications............................................................................................ 28
11. Maintenance and cleaning......................................................................................... 30
11.1 Replacing fuse ....................................................................................................... 31
12. ChangeLog.................................................................................................................. 32
13. Photometric diagrams................................................................................................ 32
Robin Actor 6 ST

3
FOR YOUR OWN SAFETY, PLEASE READ THIS USER MANUAL CAREFULLY
BEFORE POWERING OR INSTALLING YOUR ROBIN Actor 6 ST !
Save it for future reference.
This device has left our premises in absolutely perfect condition. In order to maintain this condition and to
ensure a safe operation, it is absolutely necessary for the user to follow the safety instructions and warning
notes written in this manual.
The manufacturer will not accept liability for any resulting damages caused by the non-observance of this
manual or any unauthorized modication to the device.
Please consider that damages caused by manual modications to the device are not subject to warranty.
The Robin Actor 6 ST was designed for indoor use and it is intended for
professional application only. It is not for household use.
1. Safety instructions
DANGEROUS VOLTAGE CONSTITUTING A RISK OF ELECTRIC SHOCK IS PRESENT WITHIN THIS
UNIT!
Make sure that the available voltage is not higher than stated on the xture.
This xture should be operated only from the type of power source indicated on the marking label. If you are
not sure of the type of power supplied, consult your authorized distributor or local power company.
Always disconnect the xture from AC power before cleaning, removing or installing the fuses, or any part.
The power plug has to be accessible after installing the xture. Do not overload wall outlets and extension cords
as this canresult in re or electric shock.
Do not allow anything to rest on the power cord. Do not locate this xture where the cord may be damaged by
persons walking on it.
Make sure that the power cord is never crimped or damaged by sharp edges. Check the xture and the power
cord from time to time.
Refer servicing to qualied service personnel.
This xture falls under protection class I. Therefore this xture has to be connected to
a mains socket outlet with a protective earthing connection.
Do not connect this xture to a dimmer pack.
LED light emission. Risk of eye injury. Do not look into the beam at a distance of less
than 2 meters from the front surface of the product. Do not view the light output with
optical instruments or any device that may conncentrate the beam
If the xture has been exposed to drastic temperature uctuation (e.g. after transportation), do not switch it on
immediately. The arising condensation water might damage your device. Leave the device switched off until
it has reached room temperature.
Do not shake the xture. Avoid brute force when installing or operating the xture.
This xture was designed for indoor use only, do not expose this unit to rain or use near water.
When choosing the installation spot, please make sure that the xture is not exposed to extreme heat, moisture

4
or dust.
Air vents and slots in the xture´s head and base are provided for ventilation, to ensure reliable operation of
the device and to protect it from overheating.
Do not block the LEDs array with any object when the xture is under operation.
The openings should never be covered with cloth or other materials, and never must be blocked.
This xture should not be placed in a built-in installation unless proper ventilation is provided.
Only operate the xture after having checked that the housing is rmly closed and all screws are tightly faste-
ned.
Always use a secondary safety cable when mounting this xture.
Make sure that the area below the installation place is blocked when rigging, derigging or servicing the xtu-
re.
Do not block the front objective LEDs with any object when the xture is under operation.
The xture becomes very hot during operation. Allow the xture to cool approximately 20 minutes prior to
manipulate with it.
Operate the xture only after having familiarized with its functions. Do not permit operation by persons not
qualied for operating the xture. Most damages are the result of unprofessional operation!
Please use the original packaging if the xture is to be transported.
Please consider that unauthorized modications on the xture are forbidden due to safety reasons!
If this device will be operated in any way different to the one described in this manual, the product may suffer
damages and the guarantee becomes void. Furthermore, any other operation may lead to dangers like short-
circuit, burns, electric shock, crash etc.

5
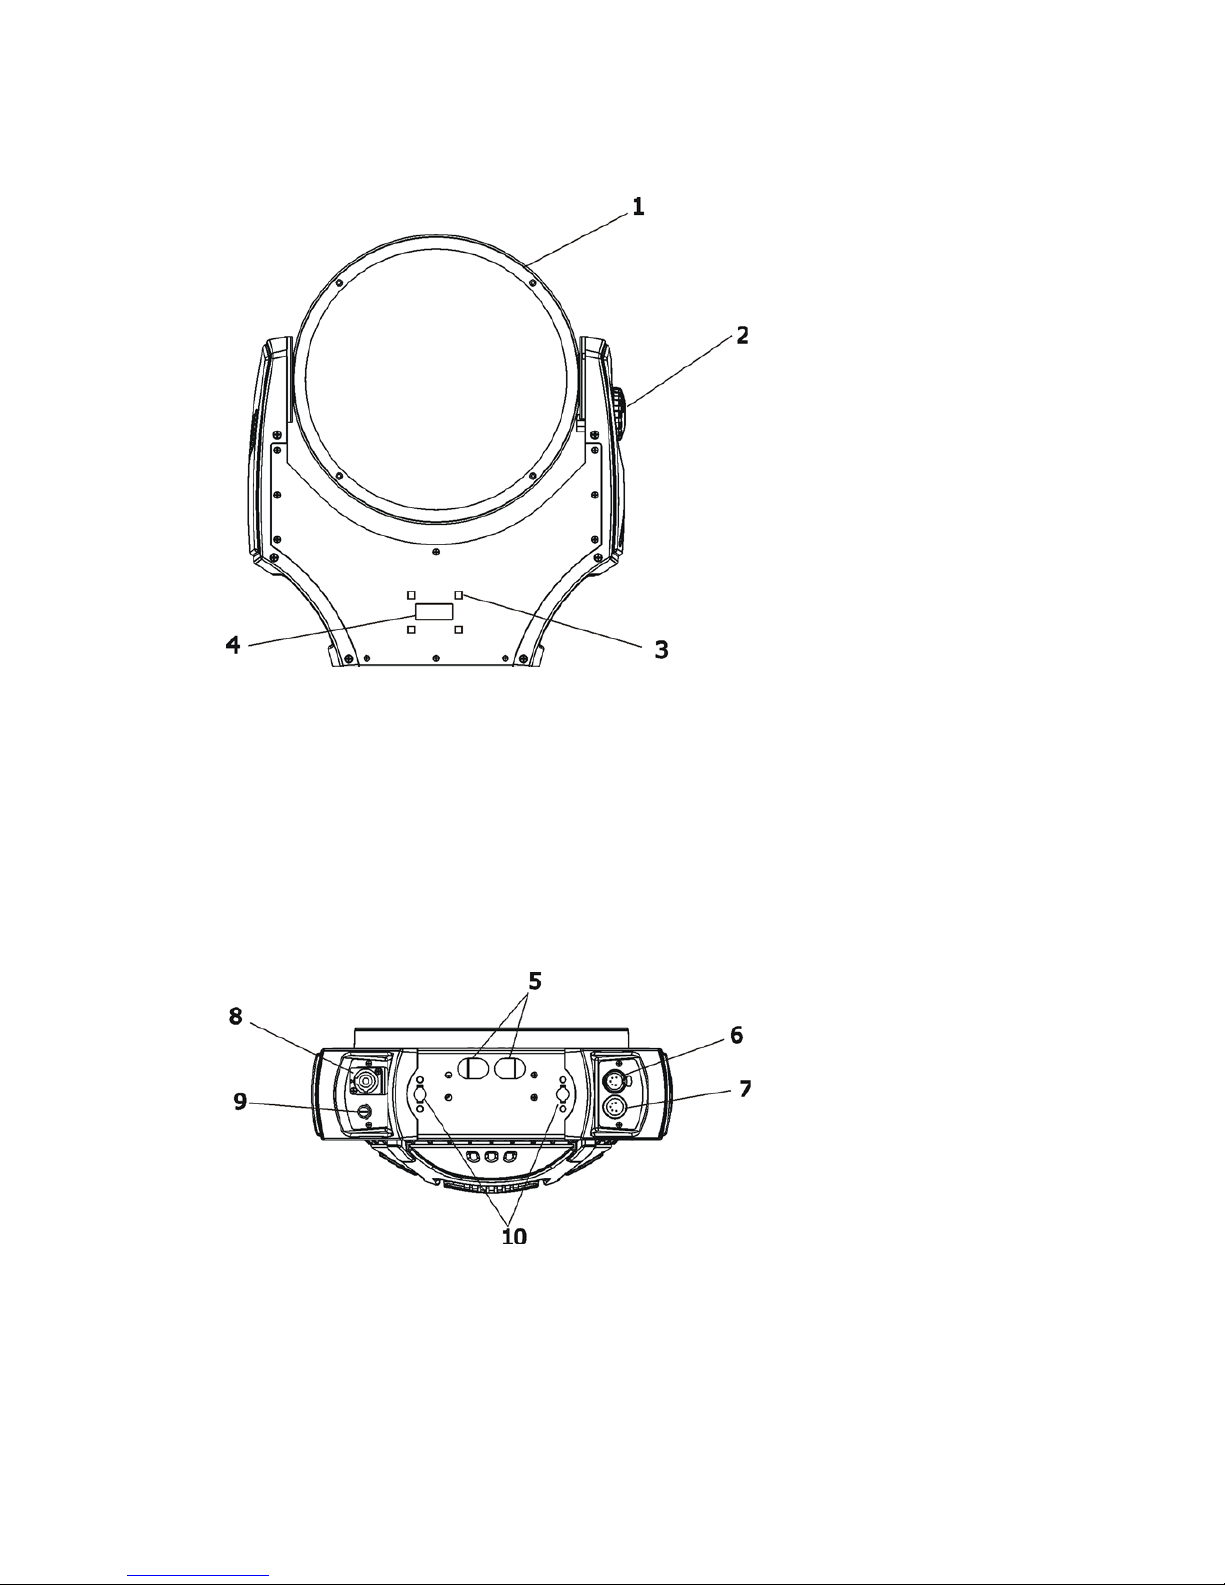
2. Fixture exterior view
5 - Apertures for safety chain
6 - DMX out
7- DMX in
8 - PowerCon socket
9 - Fuse holder
10 - Apertures for quick-turn
fasteners
1- Moving head
2 - Tilt lock
3 - Control buttons
4- Display

6
3. Installation
Fixtures must be installed by a Qualied electrician in accordance with all
national and local electrical and construction codes and regulation.
3.1 Connection to the mains
For protection from electric shock, the xture must be earthed!
The Robin Actor 6 ST is equipped with auto-switching power supply that automatically adjusts to any 50-60Hz
AC power source from 100-240 Volts.
Install a suitable plug on the power cord, note that the cores in the power cord are coloured according to the
following table. The earth has to be connected!
If you have any doubts about proper installation, consult a qualied electrician.
Core (EU) Core (US) Connection Plug Terminal Marking
Brown Black Live L
Light blue White Neutral N
Yellow/Green Green Earth
This device falls under class one and must be earthed (grounded)!

7
3.2 Installing the top hat and barndoors
Switch off the xture before top hat or barndoors installation
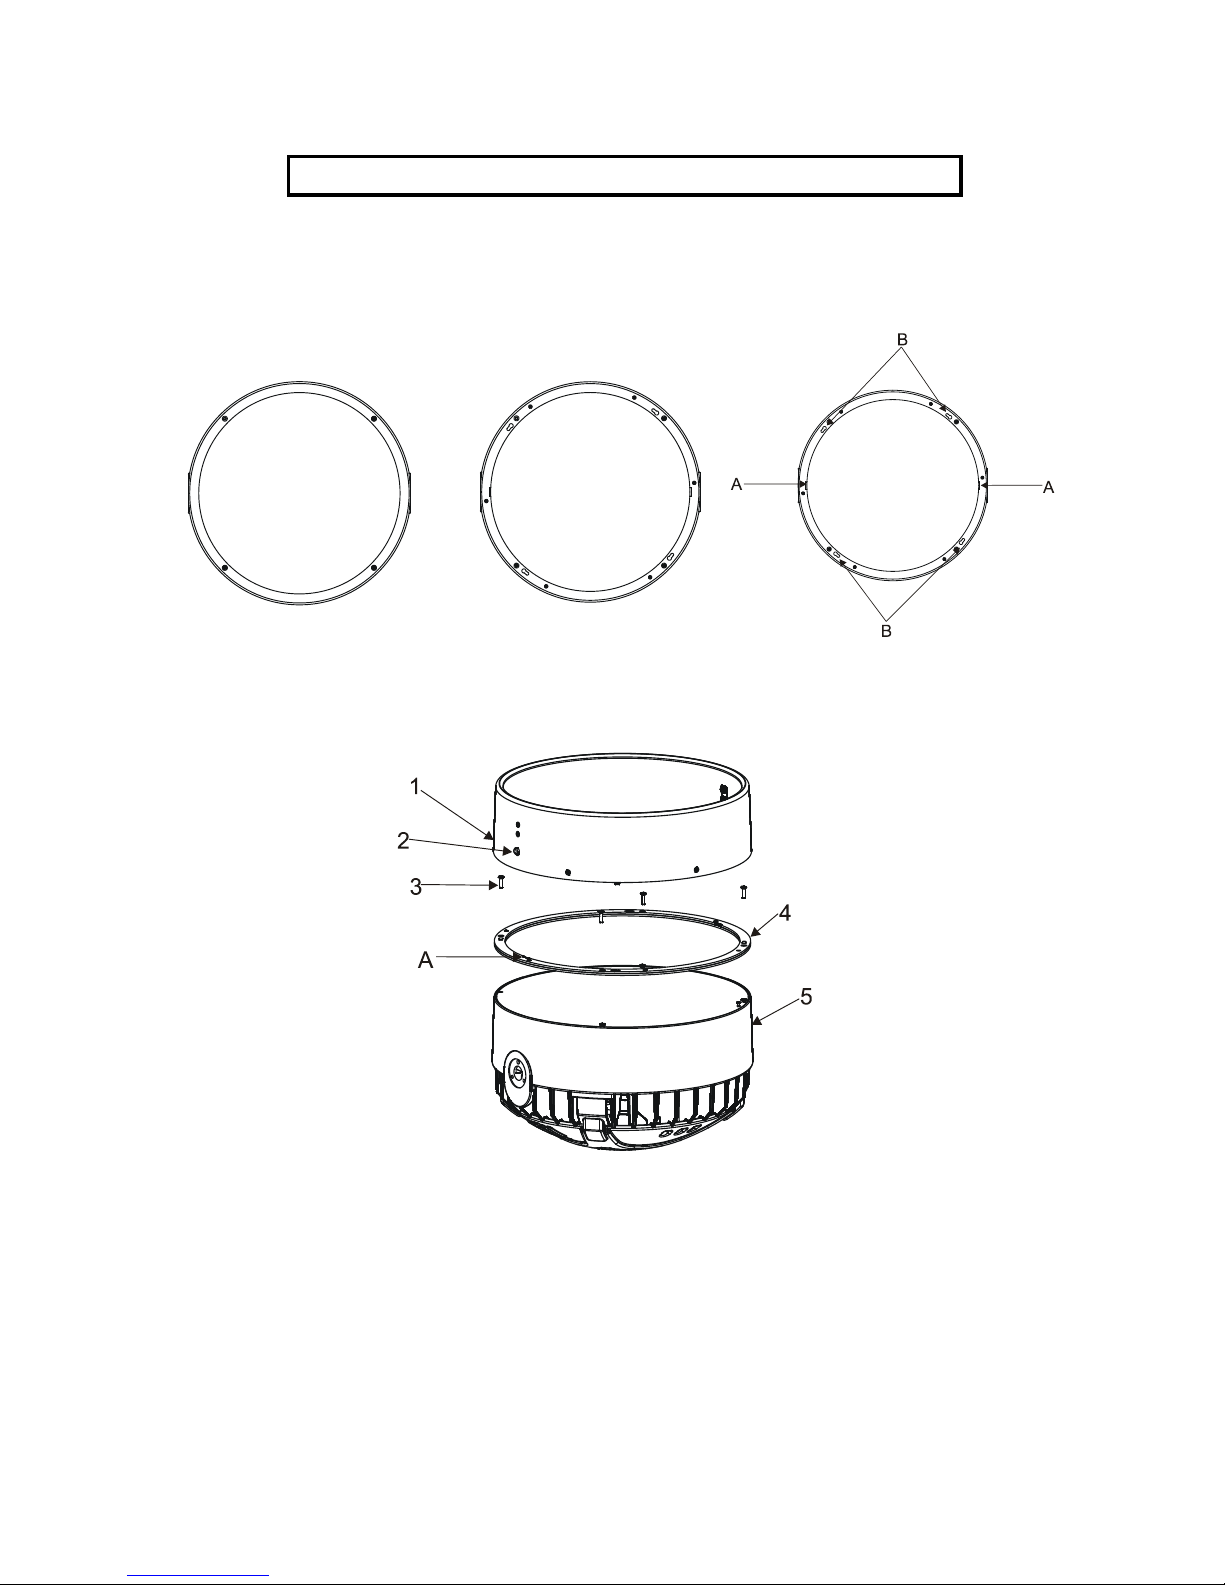
To install the top hat
1.Unscrew the four fastening screws (3) which securing flange (4) to the head (5) and install new flange. Keep
its right position- the cutouts (A) in the flange must look towards the arms.
Original flange New flange
2.Place the top hat (1) on the head (5), press locks (2) and turn the top hat counter-clockwise until it snap into
slots (B) in the flange.

8
To install the barndoors
1. Unscrew the four fastening screws (2) which securing ange (1) to the head and screw the new ange (3).
Keep its right position- the cutouts (A) in the ange have to look towards the xture arms.
2. Put the barndoors holder (4) on the head in this way that pins (D) have to be in slots (B) in the ange (3) , press
locks (5) and turn the top hat counter-clockwise until it snap into slots (B) in the ange and release locks (5).
3. Insert the barndoors (8) into the second slot in the barndoors holder (4) and secure it by means of the lock
(6). The rst slot serves for diffuser (9), which has to be secured by means of the lock (7).
4. On each side of the xture, pull the snap hook (11) on the wire (10) through the aperture (12) to make the
secondary security of installed barndoors. Do not operate xture with unsecured barndoors.
To avoid damage of the xture´s optic system, do not operate the xture with closed
barndoors! No barndoor can cover light output!

9
3.3 Rigging the xture
The overhead installation must always be secured with a secondary safety attachment, e.g. an appropriate
safety rope. This secondary safety attachment must be constructed in a way that no part of the installation can
fall down if the main attachment fails.
When rigging, derigging or servicing the xture staying in the area below the installation place, on bridges,
under high working places and other endangered areas is forbidden.
The operator has to make sure that safety-relating and machine-technical installations are approved by an expert
before taking into operation for the rst time and after changes before taking into operation another time.
The operator has to make sure that safety-relating and machine-technical installations are approved by an
expert after every four year in the course of an acceptance test.
The operator has to make sure that safety-relating and machine-technical installations are approved by a skilled
person once a year.
The xture should be installed outside areas where persons may walk by or be seated.
IMPORTANT! OVERHEAD RIGGING REQUIRES EXTENSIVE EXPERIENCE, including (but not limited to)
calculating working load limits, installation material being used, and periodic safety inspection of all installation
material and the projector. If you lack these qualications, do not attempt the installation yourself, but instead
use a professional structural rigger. Improper installation can result in bodily injury or damage to property.
The xture has to be installed out of the reach of people.
If the xture shall be lowered from the ceiling or high joists, professional trussing systems have to be used. The
xture must never be xed swinging freely in the room.
Caution: Fixture may cause severe injuries when crashing down! If you have doubts concerning the safety of
a possible installation, do not install the moving head!
Before rigging make sure that the installation area can hold a minimum point load of 10 times the xture’s
weight.
When installing the device, make sure there is no highly inammable
material (decoration articles, etc.) in a distance of min. 0.4 m.
CAUTION!
Use an appropriate clamp to rig the xture on the truss.
Follow the instructions mentioned at the bottom of the base.
Make sure that the device is xed properly! Ensure that the
structure (truss) to which you are attaching the xtures is secure.
The xture can be placed directly on the stage oor by means of the removable stand (4) or rigged on a truss
by means of the omega holder (1) and clamp (2) without altering its operation characteristics. Both removable
stand and omega holder can be fastened with two 1/4-turn locks to the bottom of the xture. Adjust xture´s
head to desired position and tighten tilt lock (5) to secure the head position.
.

10
For securing the xture to the truss install a safety wire that can hold at least 10 times the weight of the xture.
Use only a safety wire with screw-on snap-hook. Thread the snap-hook through two apertures in the xture
base and the wire around the truss as shown on the picture below.
1-Safety wire
2-Apertures for safety wire
3-Trust
When installing xtures side-by-side, avoid illuminating one xture with
another!
Inhaltsverzeichnis
Beliebte Scheinwerfer Handbücher anderer Marken

VIZULO
VIZULO Micro Martin Benutzerhandbuch

EuroLite
EuroLite LED IP FL-100 SMD Bedienungsanleitung

Cooper Wheelock
Cooper Wheelock XB12 Bedienungsanleitung

Allen + Roth
Allen + Roth 17624-000 Bedienungsanleitung

ADJ
ADJ 4 STAGE PAK Bedienungsanleitung

Cooper Lighting
Cooper Lighting EGL91SW233 Bedienungsanleitung