
Samsung Wisenet SDH-B73023BF Bedienungsanleitung

FULL HD VIDEO SECURITY SYSTEM
Quick Start Guide
2_ English
If you are experiencing video loss, verify that all cables are properly and securely connected to the DVR.
•Check your Network Connection
•Check your Username and Password
•Restart the DVR if you have trouble connecting.
Main Menu > Shutdown > Enter Username & Password > Click “Reboot”
To reset your DVR to factory settings, refer to the User manual.
For more information about your product, please download the User Manual from "wisenetlife.com".
Troubleshooting
Need Help?
Contact our Technical Supprt Team
844-WISENET
(844-947-3638)
Open 7 days a week, 9AM - 9PM EST
English _3
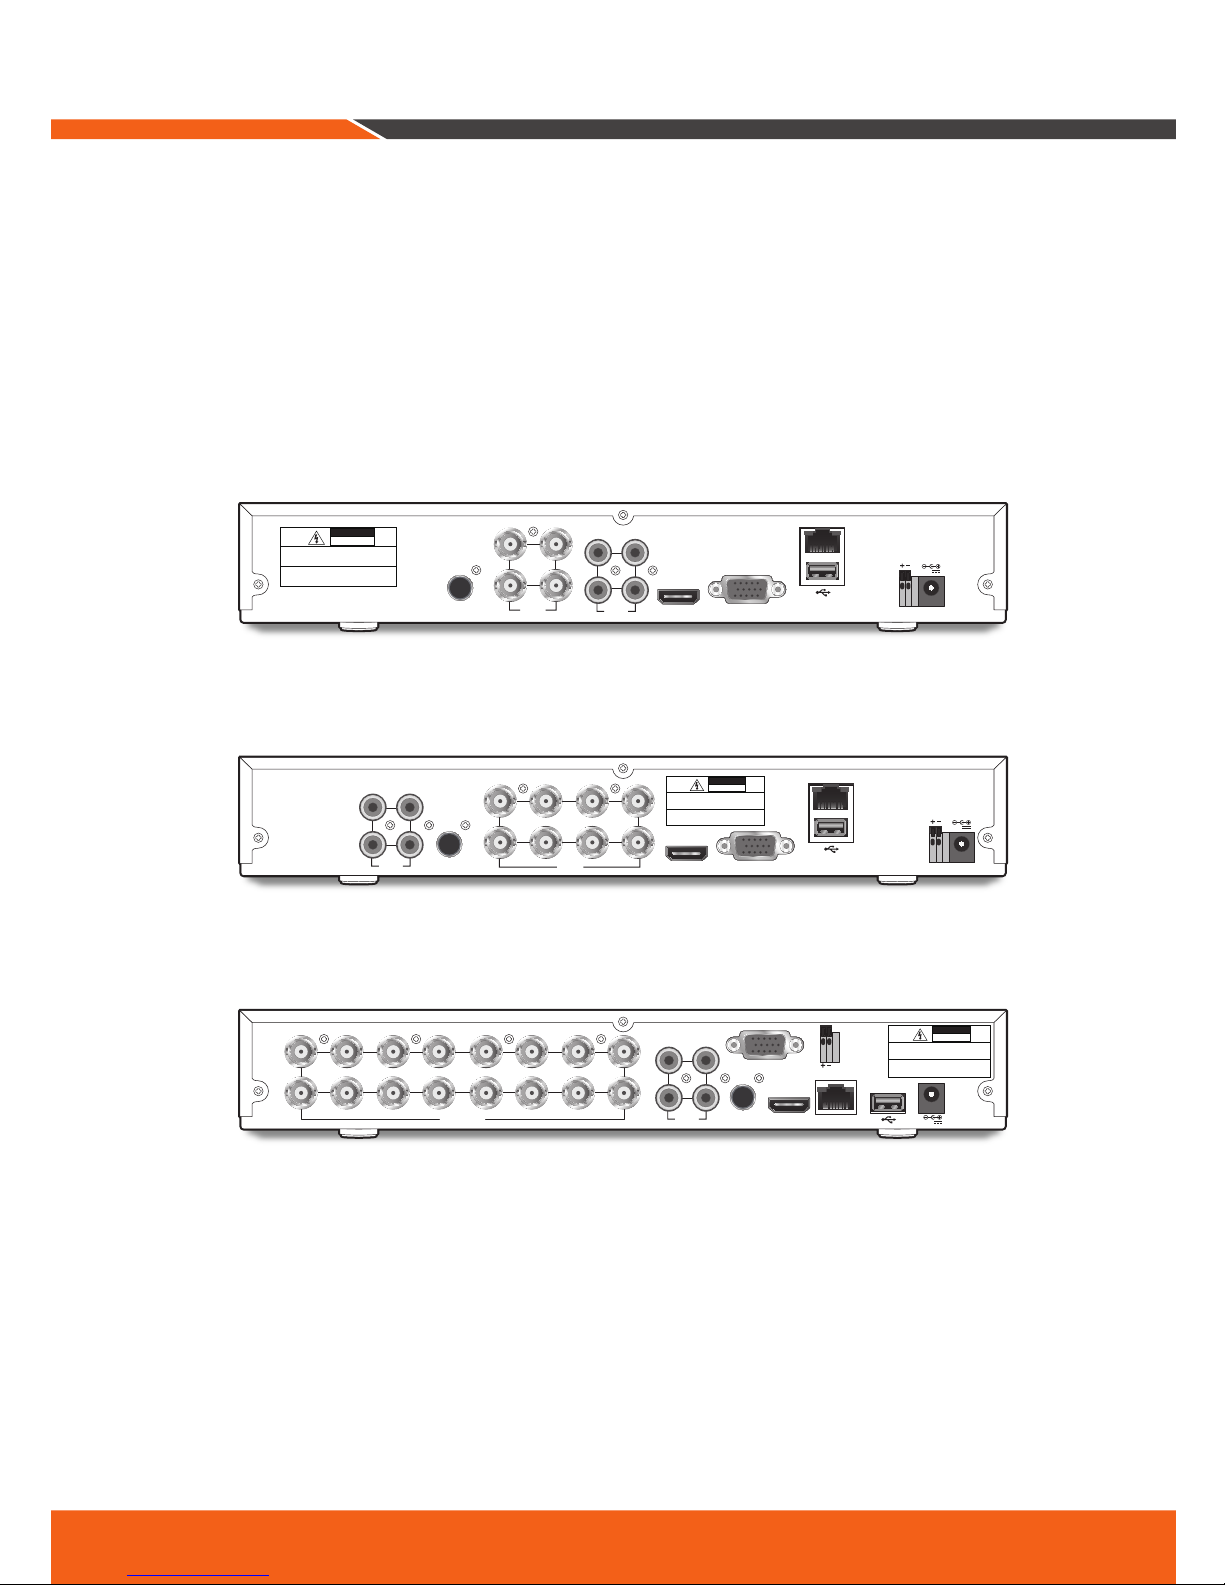
DVR Setup
KIT Model
SDH-B73023BF/SDH-B73043BF/SDH-B74043BV/SDH-B74043DF/SDH-C74083HF/SDH-C75083BF/
SDH-C75123BF/SDH-ST341/SDH-ST581
DVR Model
SDR-B73303/SDR-B74303/SDR-B75303
•4CH DVR
•8CH DVR
•16CH DVR
3 1
4 2
AUDIO
INPUT
3 1
4 2
VIDEO
INPUT
AUDIO
OUTPUT HDMI VGA
RS-485
LAN
12V
CAUTION
RISK OF ELECTRI SHOCK
DO NOT OPEN
CAUTION : TO REDUCE THE RISK OF ELECTRICAL SHOCK
DO NOT OPEN COVERS. NO USER SERVICEABLE
PARTS INSIDE. REFER SERVICING TO QUALIFIED
SERVICE PERSONNEL.
WARNING : TO PREVENT FIRE OR SHOCK HAZARD. DO NOT
EXPOSE UNITS NOT SPECIFICALLY DESIGNED
FOR OUTDOOR USE TO RAIN OR MOISTURE.
HDMI VGA
LAN
7 5 3 1
8 6 4 2
VIDEO
INPUT
RS-485
12V
3 1
4 2
AUDIO
INPUT AUDIO
OUTPUT
CAUTION
RISK OF ELECTRI SHOCK
DO NOT OPEN
CAUTION : TO REDUCE THE RISK OF ELECTRICAL SHOCK
DO NOT OPEN COVERS. NO USER SERVICEABLE
PARTS INSIDE. REFER SERVICING TO QUALIFIED
SERVICE PERSONNEL.
WARNING : TO PREVENT FIRE OR SHOCK HAZARD. DO NOT
EXPOSE UNITS NOT SPECIFICALLY DESIGNED
FOR OUTDOOR USE TO RAIN OR MOISTURE.
HDMI
VGA
LAN
15
16
13
14
11
12 10
3 1
4 2
AUDIO
INPUT
AUDIO
OUTPUT
9
8
7
6
5
4
3
2
1
VIDEO INPUT
RS-485
12V
CAUTION
RISK OF ELECTRI SHOCK
DO NOT OPEN
CAUTION : TO REDUCE THE RISK OF ELECTRICAL SHOCK
DO NOT OPEN COVERS. NO USER SERVICEABLE
PARTSINSIDE. REFER SERVICING TO QUALIFIED
SERVICE PERSONNEL.
WARNING : TO PREVENT FIRE OR SHOCK HAZARD. DO NOT
EXPOSE UNITS NOT SPECIFICALLY DESIGNED
FOR OUTDOOR USE TO RAIN OR MOISTURE.
4_ English
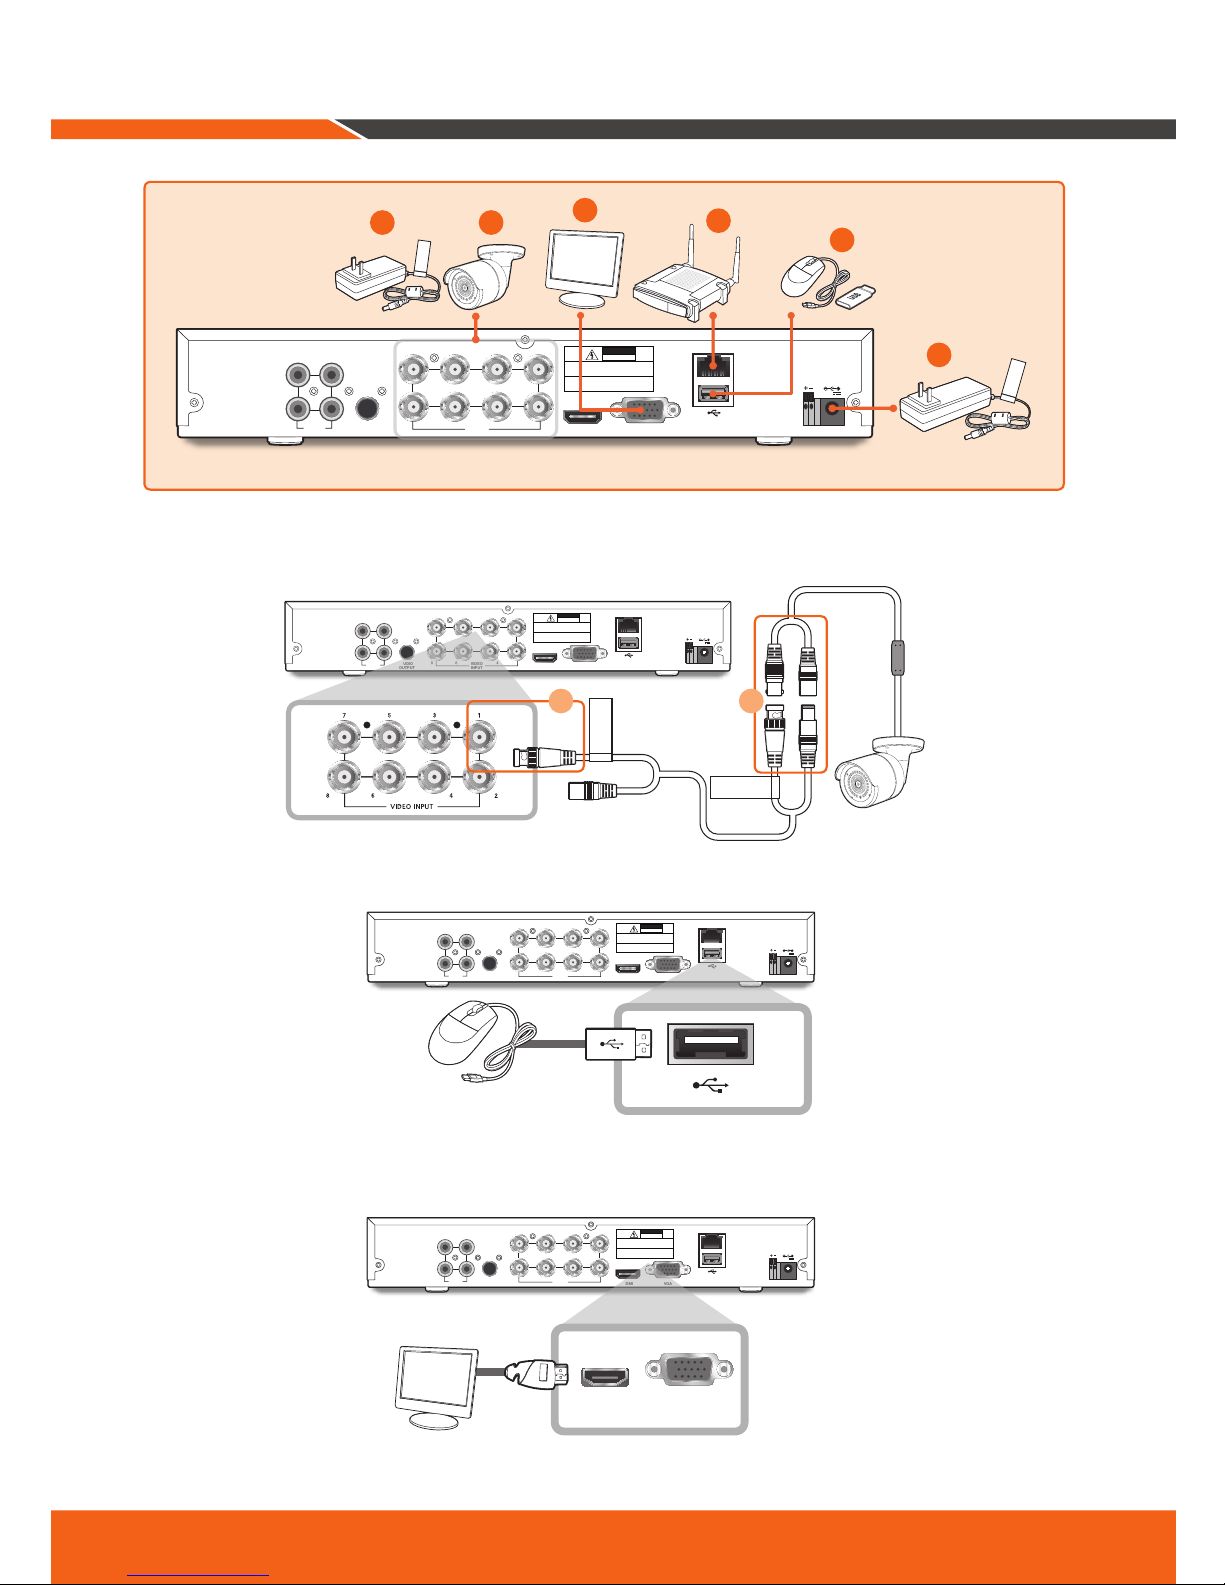
1.
Connect the camera's video input and power supply connectors to the BNC extension cables. Then connect
the BNC video input to the video input port on the rear panel. (Repeat Step 1 for the remaining cameras.)
2.
Connect the mouse to the USB Port on the front or back panel of the DVR.
3.
Depending on the monitor port, connect the HDMI or VGA cable from your monitor to the HDMI or VGA
Port on the rear panel.
HDMI VGA
LAN
7 5 3 1
8 6 4 2
VIDEO
INPUT
RS-485
12V
3 1
4 2
AUDIO
INPUT AUDIO
OUTPUT
CAUTION
RISKOF ELECTRI SHOCK
DONOT OPEN
CAUTION : TO REDUCE THE RISK OF ELECTRICAL SHOCK
DO NOT OPEN COVERS. NO USER SERVICEABLE
PARTSINSIDE. REFER SERVICING TO QUALIFIED
SERVICE PERSONNEL.
WARNING: TO PREVENT FIRE OR SHOCK HAZARD. DO NOT
EXPOSE UNITS NOT SPECIFICALLYDESIGNED
FOR OUTDOOR USE TO RAIN OR MOISTURE.
HDMI VGA
LAN
7 5 3 1
8 6 4 2
VIDEO
INPUT
RS-485
12V
3 1
4 2
AUDIO
INPUT AUDIO
OUTPUT
CAUTION
RISKOF ELECTRI SHOCK
DONOT OPEN
CAUTION : TO REDUCE THE RISK OF ELECTRICAL SHOCK
DO NOT OPEN COVERS. NO USER SERVICEABLE
PARTSINSIDE. REFER SERVICING TO QUALIFIED
SERVICE PERSONNEL.
WARNING: TO PREVENT FIRE OR SHOCK HAZARD. DO NOT
EXPOSE UNITS NOT SPECIFICALLYDESIGNED
FOR OUTDOOR USE TO RAIN OR MOISTURE.
HDMI VGA
DVR Setup
HDMI VGA
LAN
7 5 3 1
8 6 4 2
VIDEO
INPUT
RS-485
12V
3 1
4 2
AUDIO
INPUT AUDIO
OUTPUT
CAUTION
RISK OF ELECTRI SHOCK
DO NOT OPEN
CAUTION : TO REDUCE THE RISK OF ELECTRICAL SHOCK
DO NOT OPEN COVERS. NO USER SERVICEABLE
PARTS INSIDE. REFER SERVICING TO QUALIFIED
SERVICE PERSONNEL.
WARNING : TO PREVENT FIRE OR SHOCK HAZARD. DO NOT
EXPOSE UNITS NOT SPECIFICALLYDESIGNED
FOR OUTDOOR USE TO RAIN OR MOISTURE.
For
Cameras
For
DVR
5 1 4
3
2
6
HDMI VGA
LAN
7 5 3 1
8 6 4 2
VIDEO
INPUT
RS-485
12V
3 1
4 2
AUDIO
INPUT AUDIO
OUTPUT
CAUTION
RISKOF ELECTRI SHOCK
DONOT OPEN
CAUTION : TO REDUCE THE RISK OF ELECTRICAL SHOCK
DONOT OPEN COVERS. NO USER SER VICEABLE
PARTSINSIDE. REFER SERVICING TO QUALIFIED
SERVICE PERSONNEL.
WARNING: TO PREVENT FIRE OR SHOCK HAZARD. DO NOT
EXPOSE UNITS NOT SPECIFICALLY DESIGNED
FOR OUTDOOR USE TO RAIN OR MOISTURE.
TO DVR
TO CAMERA
2 1
English _5
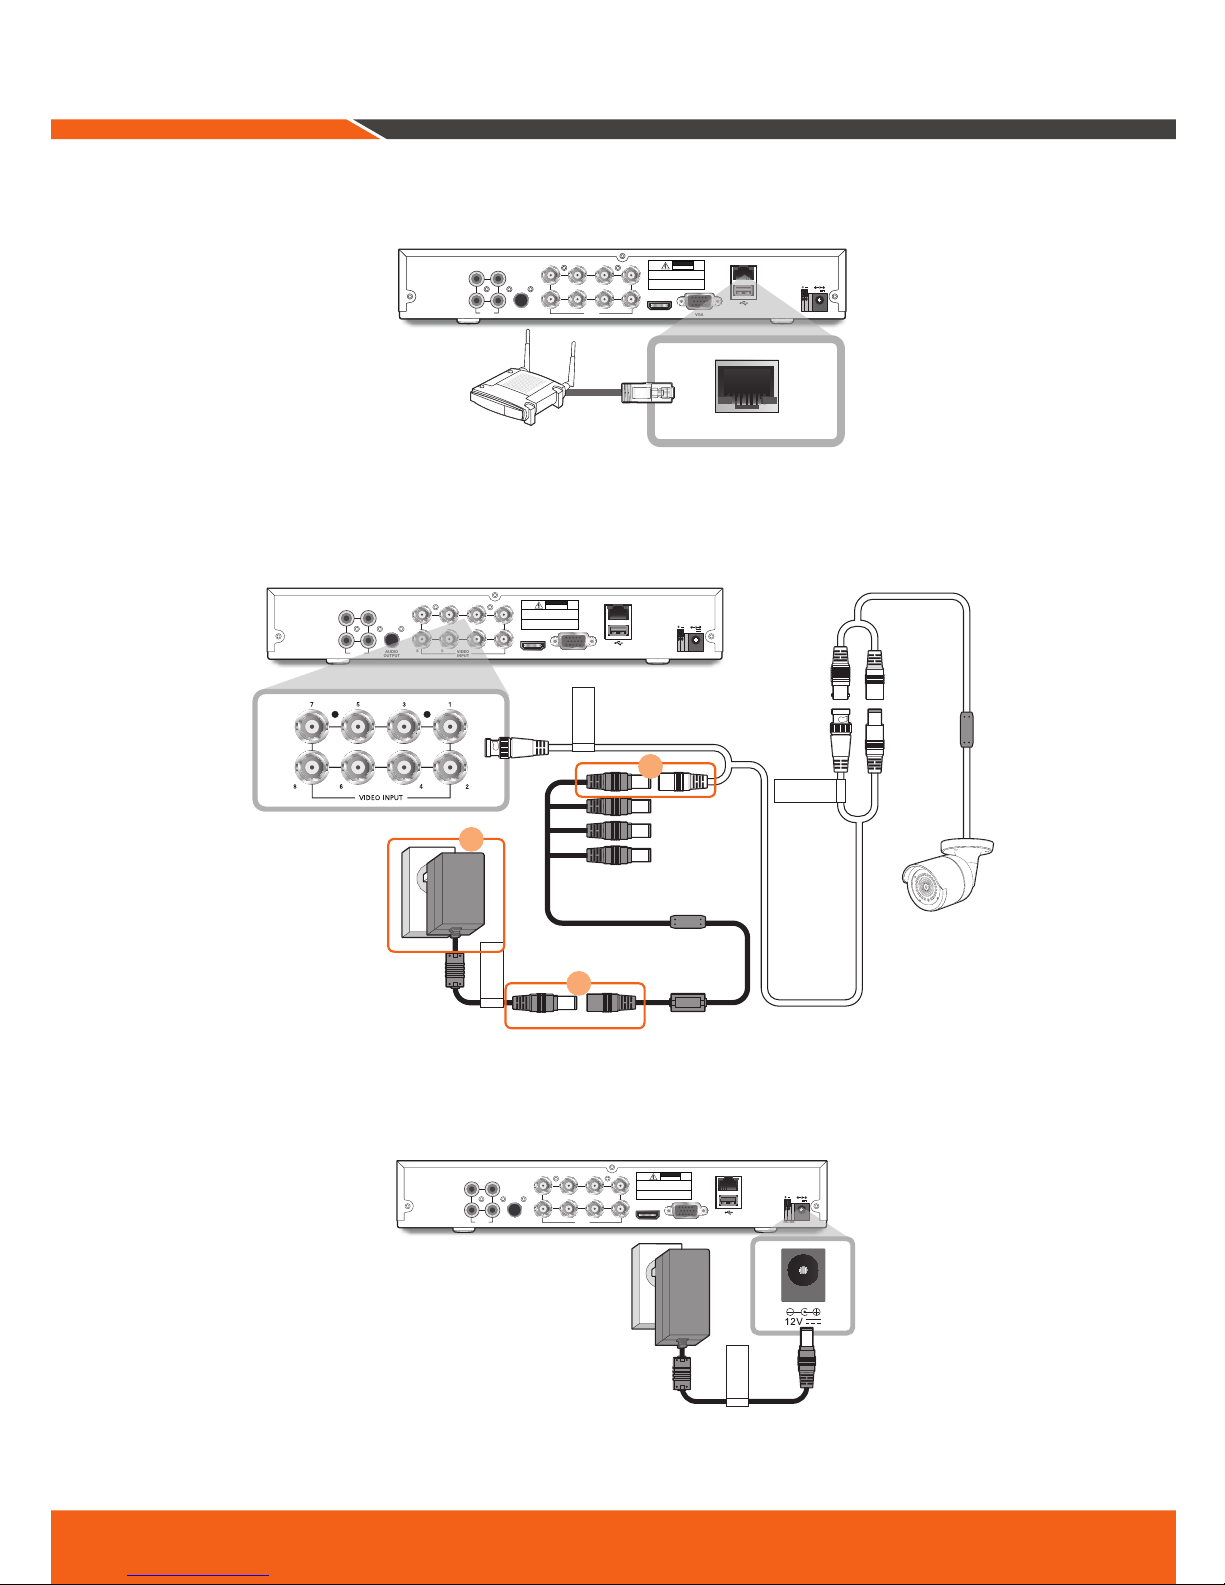
4.
Connect one end of the Ethernet cable into your router’s LAN port, and the other end of the cable to the
Ethernet port on the rear panel.
5.
Connect the camera's power supply to the power splitter. Then connect the other end of the power splitter
to the power adapter for Cameras and plug in the adapter to a wall outlet. (Repeat Step 5 to connect the
cameras to the second set of power splitter and power adapter.)
6.
Connect the power adapter for DVR to the DC 12V port on the rear panel and the power plug into a wall
outlet. The DVR will automatically power on and the startup wizard will appear on your monitor.
HDMI VGA
LAN
7 5 3 1
8 6 4 2
VIDEO
INPUT
RS-485
12V
3 1
4 2
AUDIO
INPUT AUDIO
OUTPUT
CAUTION
RISKOF ELECTRI SHOCK
DONOT OPEN
CAUTION : TO REDUCE THE RISK OF ELECTRICAL SHOCK
DO NOT OPEN COVERS. NO USER SERVICEABLE
PARTS INSIDE. REFER SERVICING TO QUALIFIED
SERVICE PERSONNEL.
WARNING: TO PREVENT FIRE OR SHOCK HAZARD. DO NOT
EXPOSE UNITS NOT SPECIFICALLYDESIGNED
FOR OUTDOOR USE TO RAIN OR MOISTURE.
For
DVR
HDMI VGA
LAN
7 5 3 1
8 6 4 2
VIDEO
INPUT
RS-485
12V
3 1
4 2
AUDIO
INPUT AUDIO
OUTPUT
CAUTION
RISKOF ELECTRI SHOCK
DONOT OPEN
CAUTION : TO REDUCE THE RISK OF ELECTRICAL SHOCK
DO NOT OPEN COVERS. NO USER SERVICEABLE
PARTSINSIDE. REFER SERVICING TO QUALIFIED
SERVICE PERSONNEL.
WARNING: TO PREVENT FIRE OR SHOCK HAZARD. DO NOT
EXPOSE UNITS NOT SPECIFICALLYDESIGNED
FOR OUTDOOR USE TO RAIN OR MOISTURE.
LAN
HDMI VGA
LAN
7 5 3 1
8 6 4 2
VIDEO
INPUT
RS-485
12V
3 1
4 2
AUDIO
INPUT AUDIO
OUTPUT
CAUTION
RISKOF ELECTRI SHOCK
DONOT OPEN
CAUTION : TO REDUCE THE RISK OF ELECTRICAL SHOCK
DO NOT OPEN COVERS. NO USER SERVICEABLE
PARTS INSIDE. REFER SERVICING TO QUALIFIED
SERVICE PERSONNEL.
WARNING : TO PREVENT FIRE OR SHOCK HAZARD. DO NOT
EXPOSE UNITS NOT SPECIFICALLY DESIGNED
FOR OUTDOOR USE TO RAIN OR MOISTURE.
TO DVR
TO CAMERA
For
Cameras
3
2
1
6_ English
1.
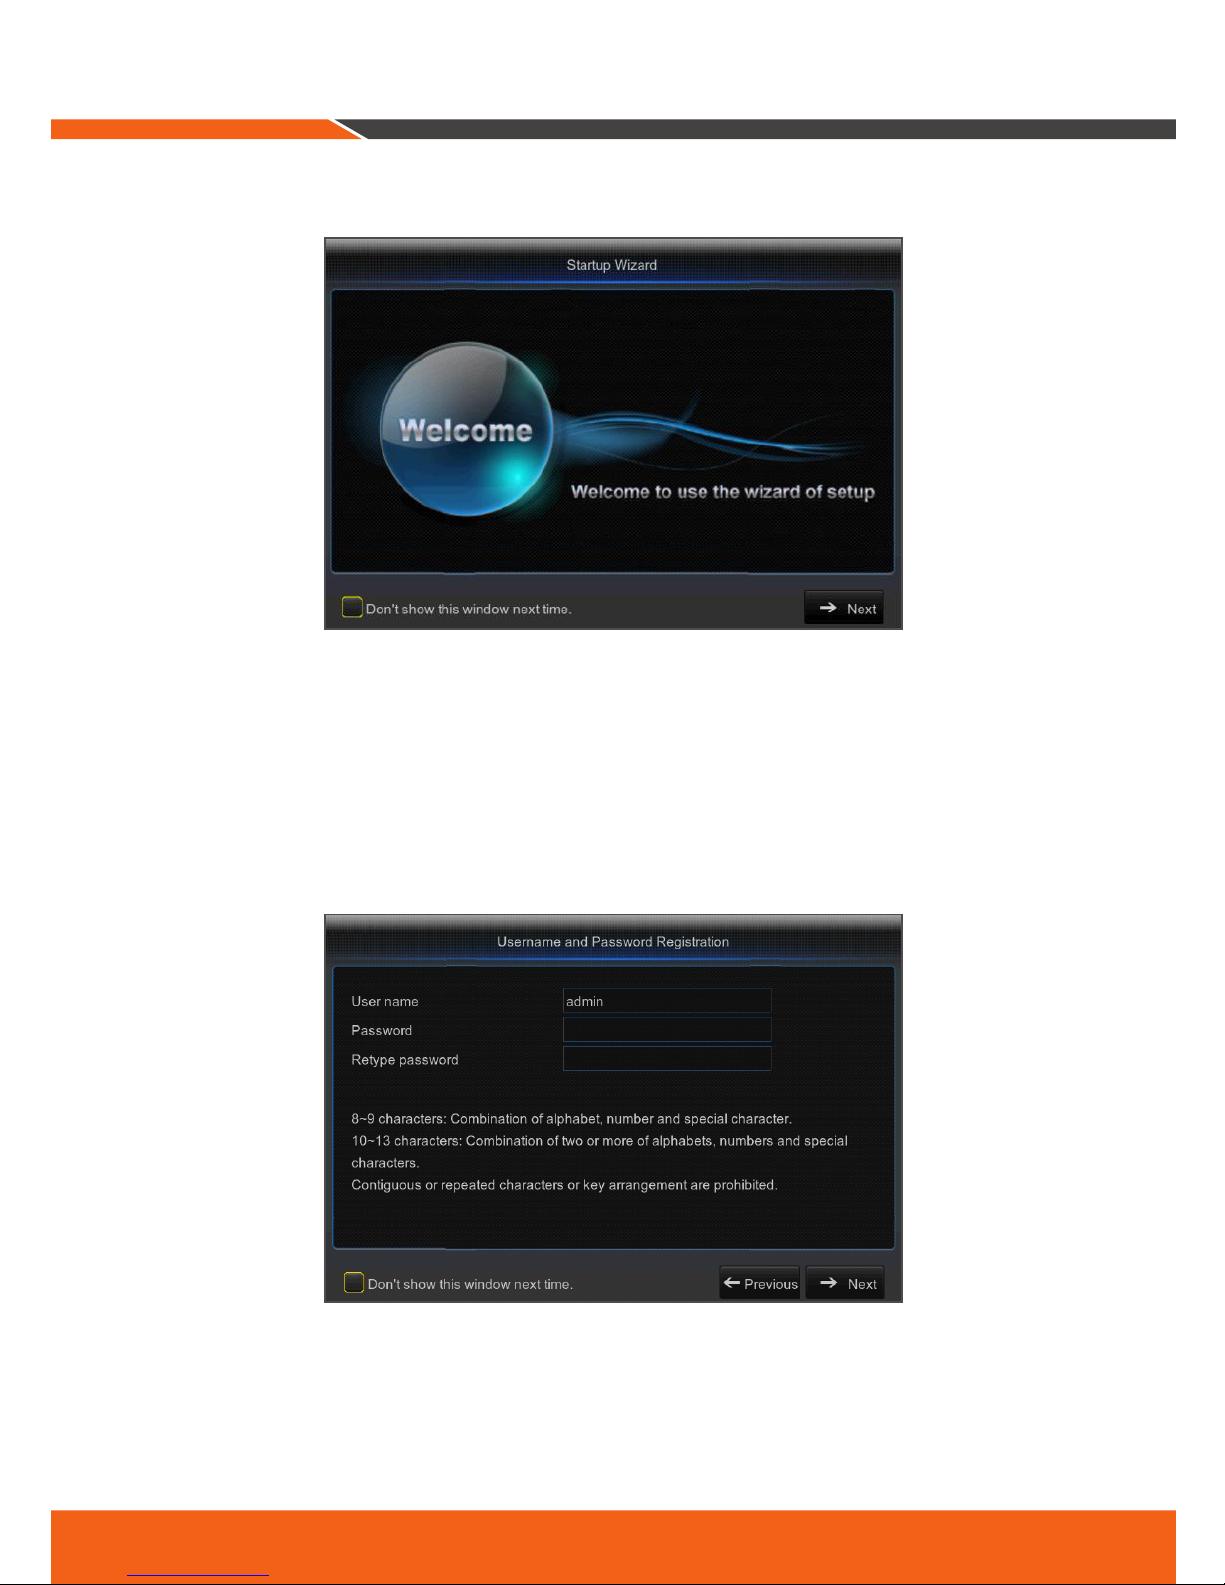
Once the setup is complete, the DVR will power on and display the Startup Wizard. Click “Next”.
2.
Right-click on the mouse within the text box for the digital keyboard to create a Username and Password
for your DVR. Retype password. Click “Next”. Password MUST be 8-13 characters long.
•If the password is 8~9 characters long, it should contain a combination of letters, digits and special
symbols.
•If it is 10~13 characters long, it should contain at least a combination of two types of characters. 4 or
more contiguous or repeated characters or key arrangement are prohibited, for example 1111, 1234,
abcd, qwerty.
Startup Wizard Guide
English _7
3.
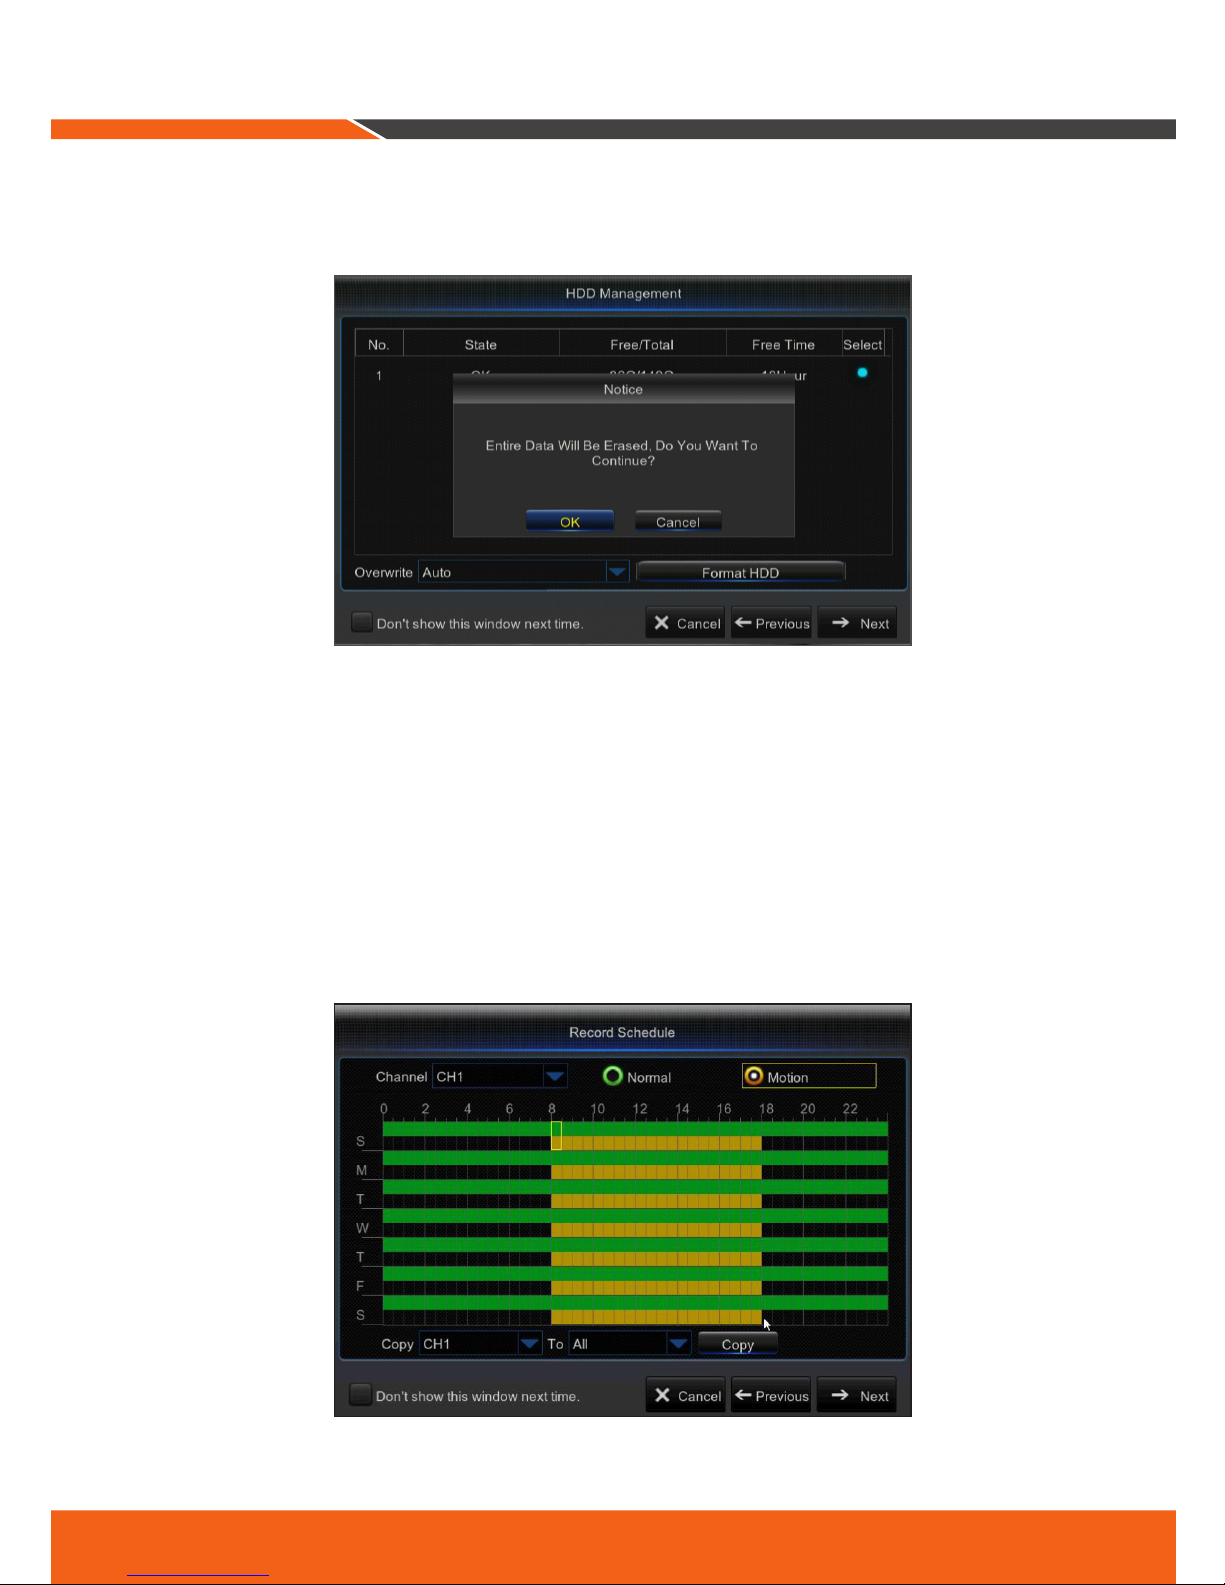
New Hard Disk Drive(s) (HDD) must be formatted before use. Click “Select” to choose the unformatted HDD
listed under HDD Management. Select O/Auto to Overwrite HDD. Click “Format HDD”. When done format-
ting HDD, Click “Next”. For more information, refer to the User Manual.
4.
Video Recording Schedule
Select the channel and type of scheduled recording mode, Normal or Motion. To set/unset the recording
schedule for the selected recording mode and channel, left-click on the mouse on the time to start/end
recording, hold down the mouse while you drag across the area you wish to highlight/unhighlight. Click
“Next”.
•No Highlights : No Recording
•Green Highlight : Normal Recording
•Yellow Highlight : Motion Recording
•Select the channel schedule recording you wish to copy and apply it to another channel or all channels.
(Optional)

8_ English
5.
General System Conguration. Set the date, time, date format, time format, language, video format, and
menu timeouts for the DVR. Click“Next”.
6.
To remotely access recordings via the Wiseview app or port forwarding, you must connect the DVR to the
router using an Ethernet cable. Click“Next”.
Set the Network Conguration for the DVR – DHCP, PPPoE, or Static Mode (For more information, refer to
the user manual).
•DHCP Mode: Router will automatically list the Network’s IP address to the DVR.
If the DVR fails to obtain an IP address, refer to the User Manual. If the problem still cannot be resolved,
please contact technical support.
Startup Wizard Guide
English _9
Optional Steps
7.
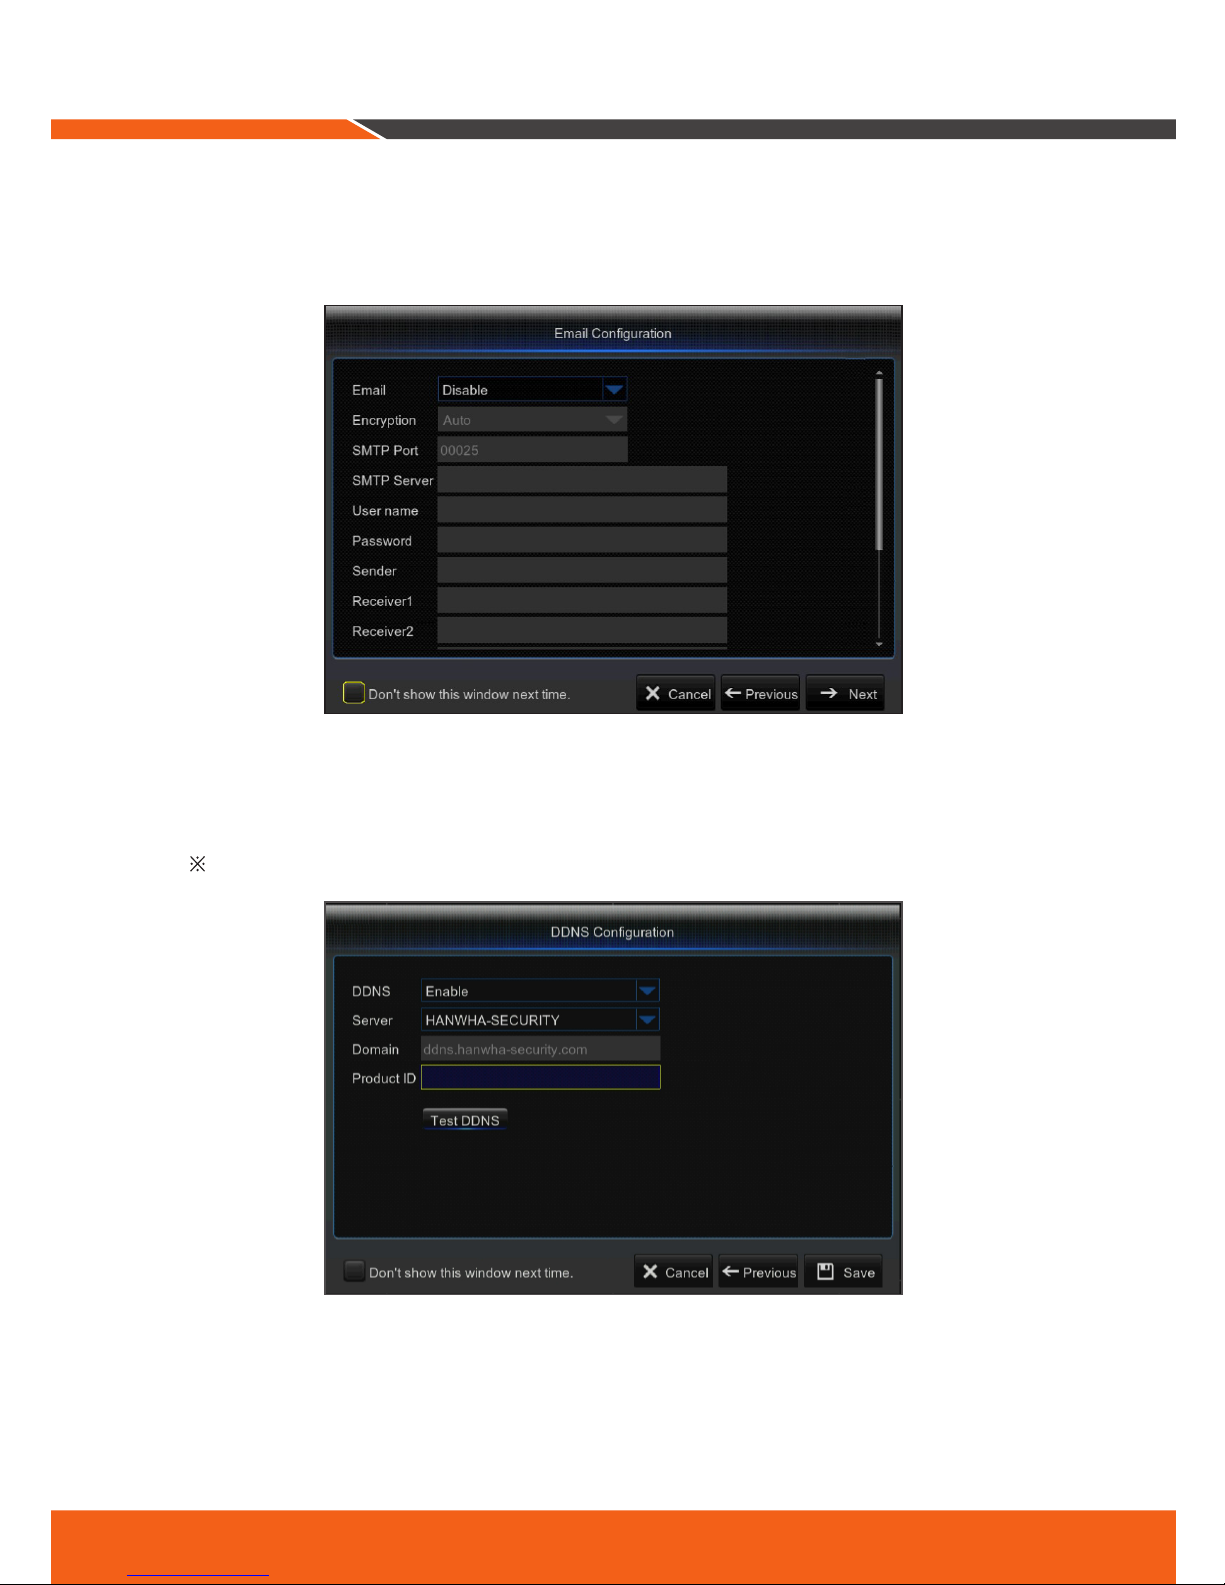
Enable/Disable Email Setting to send or receive email alerts from your DVR.
8.
DDNS : To use the web viewer to access your DVR, refer to the User Manual for further instructions
. Setting
this up will enable you to do port forwarding, where you can access your videos and camera recordings
from any computer, anywhere.
Click “Save” once you nished setting up the startup wizard.
10_ English
Main Interface
1 2 3 4
56789
10
11 12 13 14 15 16 17 18 19
Dieses Handbuch passt für folgende Modelle
11
Inhaltsverzeichnis
Andere Samsung Wisenet Sicherheitssystem Handbücher

Beliebte Sicherheitssystem Handbücher anderer Marken


EDM
EDM Solution 6+6 Wireless-AE Bedienungsanleitung

Highway Safety Group
Highway Safety Group EA401 Bedienungsanleitung

Siren
Siren LED GSM Bedienungsanleitung

Detection Systems
Detection Systems 7090i Montageanleitung

Se-Kure Controls
Se-Kure Controls MicroMini SK-4841 Bedienungsanleitung

Siemens
Siemens FDM273 Bedienungsanleitung