Secabo C60 V Bedienungsanleitung

OPERATING INSTRUCTIONS
for the vinyl cutters
Secabo C60 V, C120 V
S60 II, S120 II
Congratulations on the purchase of your Secabo vinyl cutter!
Please read the operating manual carefully to easily integrate your unit into your production
environment.
Any type of reproduction of this operating manual requires the written permission of Secabo
GmbH. Changes and errors in the technical data and the product characteristics are reserved.
The Secabo GmbH is not liable for any direct or indirect damages occurring as a result of the use
of this product.
Version 2.0 (21.06.2016)
1

Safety measures
Please read the information and safety measures carefully prior to initial operation of the unit!
● Do not place any magnetic objects in the vicinity of the cutting head; otherwise uniform
contact pressure is not ensured.
● Do not remove the connection cable from the computer while a cut job is in progress.
● Release the pressure on the pressure rollers when not in use by moving the pressure lever
up.
● Do not reach into the unit when it is connected to an electricity supply
● Never open the casing and do not make any modifications to the unit yourself.
● Ensure that neither liquids nor metal objects are put inside the vinyl cutter.
● Ensure that the wall socket used is grounded and protected with a ground fault switch.
● Ensure that the connected voltage (220V) does not deviate by more than ±10%. Otherwise
install a voltage stabilizer.
● Pull the power plug if the unit will not be in use for a longer period of time.
● Never reach into the unit in the vicinity of the blade holder during the cutting operation!
● Discontinue any printing jobs in progress before readjusting the blade holder!
● Always ensure that the vinyl cutter is out of reach of children during operation and never
leave the unit or individual parts of it switched on without supervision.
● Do not touch the tip of the sliding blade to avoid injury.
● Always place the unit on a stable base to prevent it from falling down.
● Do not operate the unit during thunderstorms; it can be damaged or destroyed by lightning.
2


The catch basket is not part of the scope of delivery of the S II series cutters, but can be ordered
as an accessory.
Assembly of the floor stand
Your Secabo vinyl cutter's floor stand (60 and 120 models) is easy to assemble using the supplied
parts. Simply follow these steps:
Step 1 and 2:
Step 3 and 4:
Done!
4


Control panel
Initial operation of machine and software
Caution! Please note that DrawCut LITE or PRO must be installed first to allow for a smooth
installation and complete configuration.
Installation DrawCut LITE
Our Secabo vinyl cutters are delivered with the cutting software DrawCut LITE. This software must
be activated over the internet. You do not necessarily need internet access on the computer, on
which DrawCut LITE will be installed. The activation can also be done through another computer.
In order to control your vinyl cutter via your computer, install the software as described below:
● Disable the Windows Firewall and your anti-virus software for the time of installation.
● Download the current version of DrawCut LITE at http://www.draw-cut.com/#downloads and
follow the installation wizard.
● Find your 26-digit DrawCut serial number on the printout that was delivered with your
Secabo vinyl cutter. Enter it when you are prompted to do so.
● Now you can use DrawCut LITE.
Installation of your Secabo vinyl cutter in DrawCut
Please keep in mind that your Secabo vinyl cutter can only be operated under Windows XP,
Windows Vista, Windows 7, Windows 8, Windows 8.1 and Windows 10. Operation with an older
version of Windows is not possible.
7

● First, make sure that your PC is connected to the Internet.
● Connect the vinyl cutter to your computer using the supplied USB cable.
● Switch on the device.
● Your Secabo vinyl cutter will now be detected. Windows will search for the appropriate
drivers and automatically install them. This can take some time. Afterwards, the device will
be ready for operation.
● Start DrawCut.
● Next, open the "Vinyl Spooler" in Drawcut.
● Now click on the "Connections" tab.
● Next, add your vinyl cutter by pressing the "Add" button (a Secabo S60 is used in the
example), select your model and click "Install".
8

● Click on the button labeled "Search device" and follow the instructions in the installation
wizard. Confirm the message regarding successful installation by simply clicking on the
button labeled "Done". Now you can control your Secabo vinyl cutter using DrawCut.
Initial operation of the device
Make sure that there is sufficient space for the film transport in front of and behind the device. The
cutter may only be operated in a clean and dry environment.
● Connect the vinyl cutter to a 230 V socket using the supplied power cable.
● Now switch on the cutter.
9
Installing and adjusting the blade
● Take the supplied cutting blade and place it in the blade holder in such a way, that the sharp
side extends at the front.
● Now set the cutting depth by turning the screw at the upper end of the blade holder.
● Initially, the depth is set correctly if you can carefully move your fingertip across the blade
and feel only a light scratching. Since the depth adjustment for the blade depends on the
material, it may be necessary to adjust it later.
● Secure the blade setting by tightening the gold lock nut.
● Press the pin on the rear end of the blade holder to remove and replace the blade at any
time. Caution - risk of injury!
The various material thicknesses require different blade settings or even special blades; it may
therefore be necessary to repeat the adjustment described above.
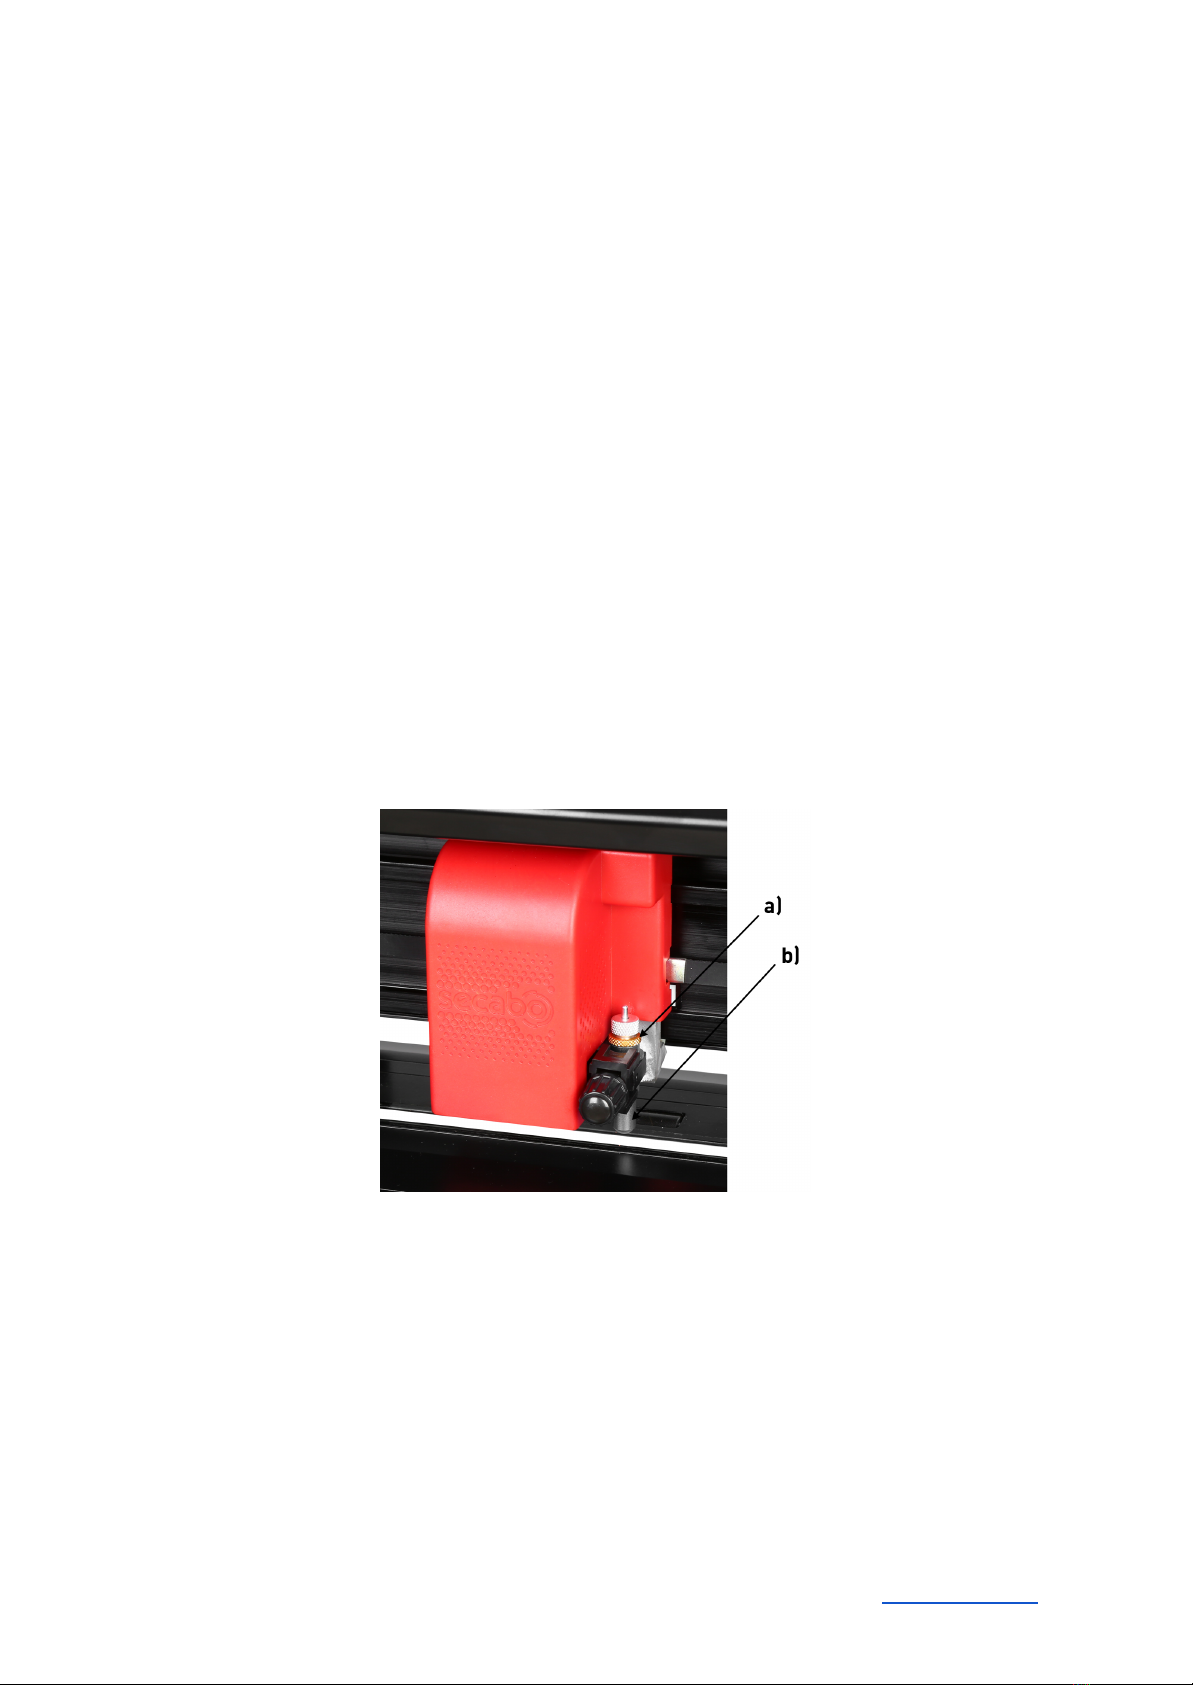
Inserting the blade holder
● First, sufficiently loosen the clamping screw for the blade holder on the cutting head.
● Next, press down the blade holder from above into the hole on the right side until there is
contact and pull the lock nut tight. In doing so, please ensure that the blade holder is also
secured correctly from above by means of the fixture provided for this purpose.
a) Clamp
b) Blade holder
Inserting the film
● Always insert the material into the device from the rear.
● Pull the film up to the cutting bar to correctly set the zero point.
● If inserting a roll instead of a film sheet, you can use the supplied holder integrated into the
base to ensure the film is rolled off cleanly.
10
Dieses Handbuch passt für folgende Modelle
3
Inhaltsverzeichnis
Andere Secabo Cutter Handbücher


Beliebte Cutter Handbücher anderer Marken

Milwaukee
Milwaukee HEAVY DUTY M12 FCOT Bedienungsanleitung

Makita
Makita DCS552 Bedienungsanleitung

SignWarehouse.com
SignWarehouse.com Bobcat BA-60 Bedienungsanleitung

Makita
Makita 4112HS Bedienungsanleitung

GEISMAR STUMEC
GEISMAR STUMEC MTZ 350S Bedienungsanleitung

Hitachi
Hitachi CM 4SB2 Fehlerbehebungshandbuch


