
Sew Pro QuikStitch SP-402 Bedienungsanleitung

Top Innovations, Inc.
Innovative Products to Make Your Life Easier
Model SP-402
Owner’s Manual
THIS IS NOT A TOY!
Adult supervision recommended
Item contains sharp functional points and small parts
Machine Sewing in Minutes
Adjustable Stitch Length
Sews with a Durable Lockstitch
Top Innovations, Inc.
400 NW Platte Valley Drive Riverside, MO 64150
(800) 711-6617 (816) 584-9700 Fax: (816) 584-9066
www.topinnovations.com

Dear Valued Customer:
Thank you purchasing your Quikstitch Sewing Machine from our rapidly
growing Sew Pro line. Our firm takes pride in providing you with quality, value,
and excellent service.
The QuikStitch Sewing Machine will become a valuable tool that will
keep your family’s wardrobe in shape. Although not designed to make
complicated clothing from scratch, it performs all of your basic sewing
jobs quickly and will provide a quality stitch. This machine was
specifically designed to be light and compact for easy portability. We
are confident you will enjoy the time you spend using our product.
Top Innovations, Inc. would like to invite you to take advantage of our
customer support web site at www.topinnovations.com. Here you will
find additional information about the many other exciting Sew Pro and
Steam Fast products that are available. We take pride in our quality
line-up of garment care and steam cleaning products and hope you
will visit our web site to review our product line.
Benny Lee
Chairman and CEO, Top Innovations, Inc.
2
3
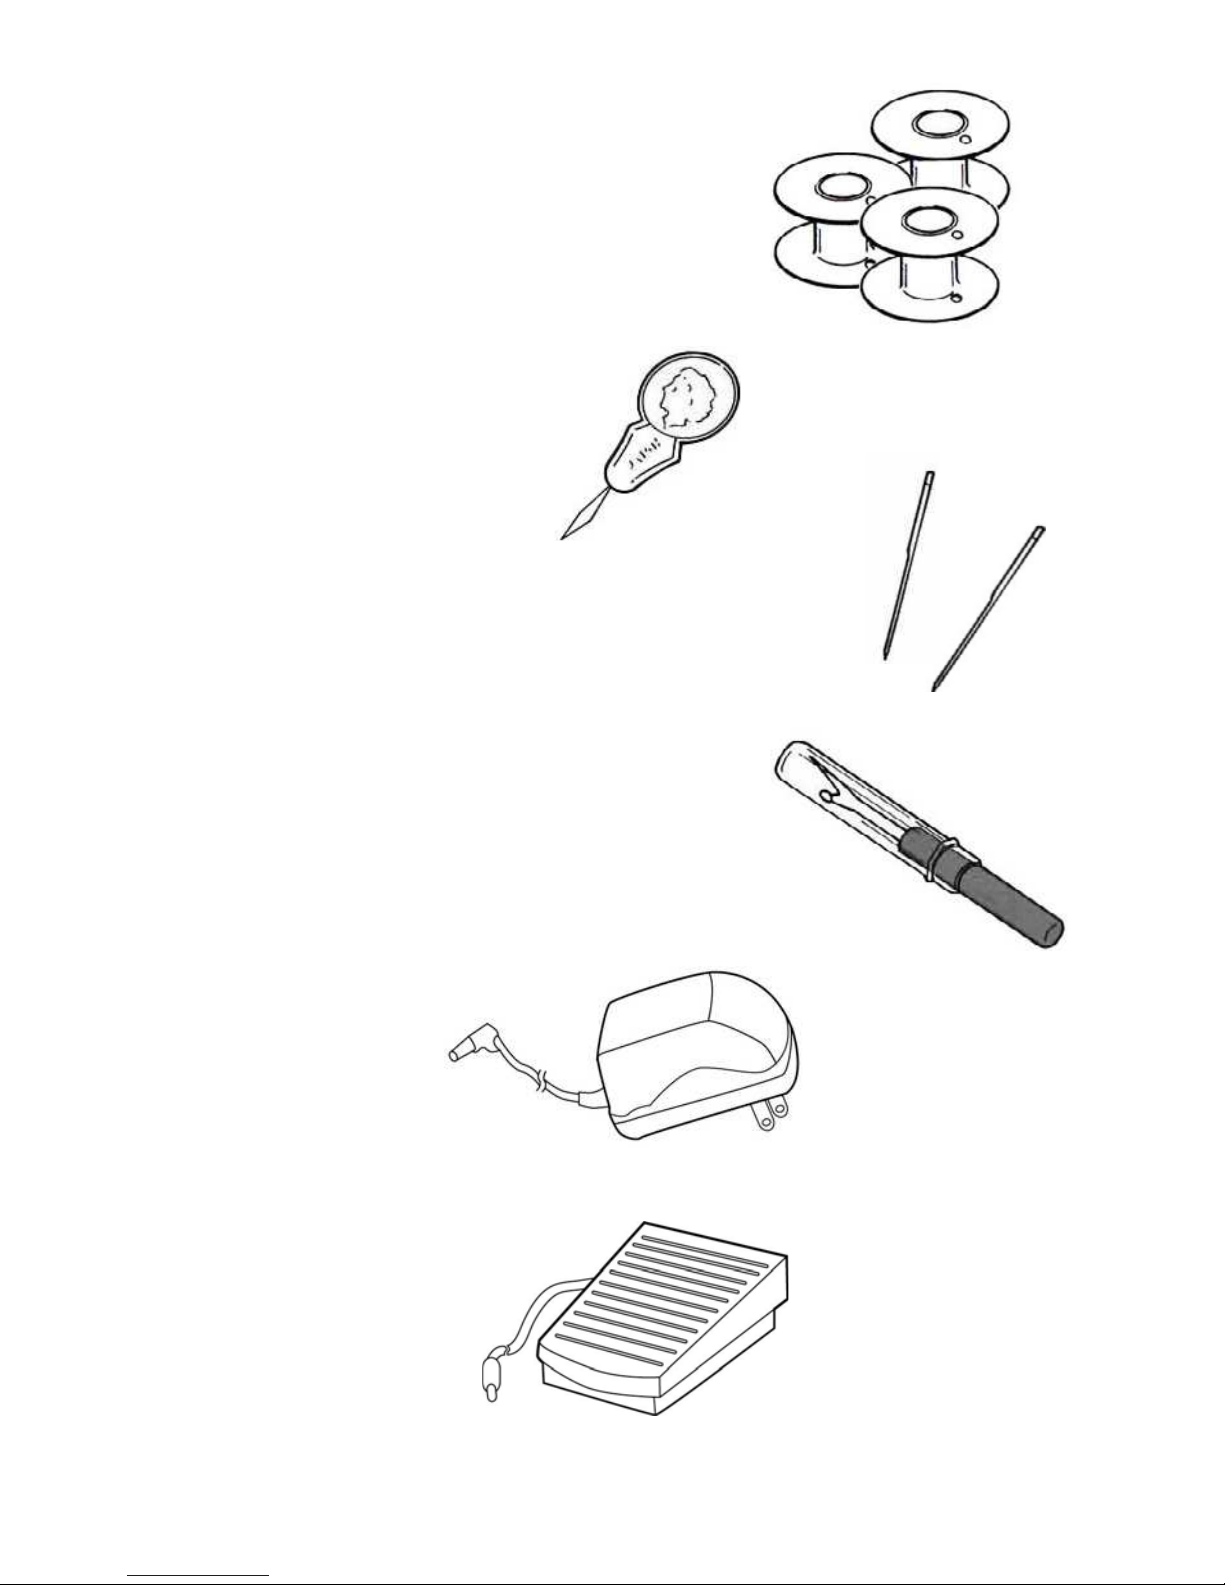
QUIKSTITCH PARTS AND ACCESSORIES
4
ACCESSORIES INCLUDED
1. In Accessory Drawer in front of machine
3 Bobbins (1 in machine)
For replacement, use class 66 bobbins
1 needle threader
2 needles (1 in machine)
For replacement needles, use size 14 needles
Combination seam ripper/thread trimmer
2. AC Adaptor
3. Foot Pedal

5
NOTE:
Even if you have sewn before, these instructions will make
your first use much easier!
TABLE OF CONTENTS
PAGE
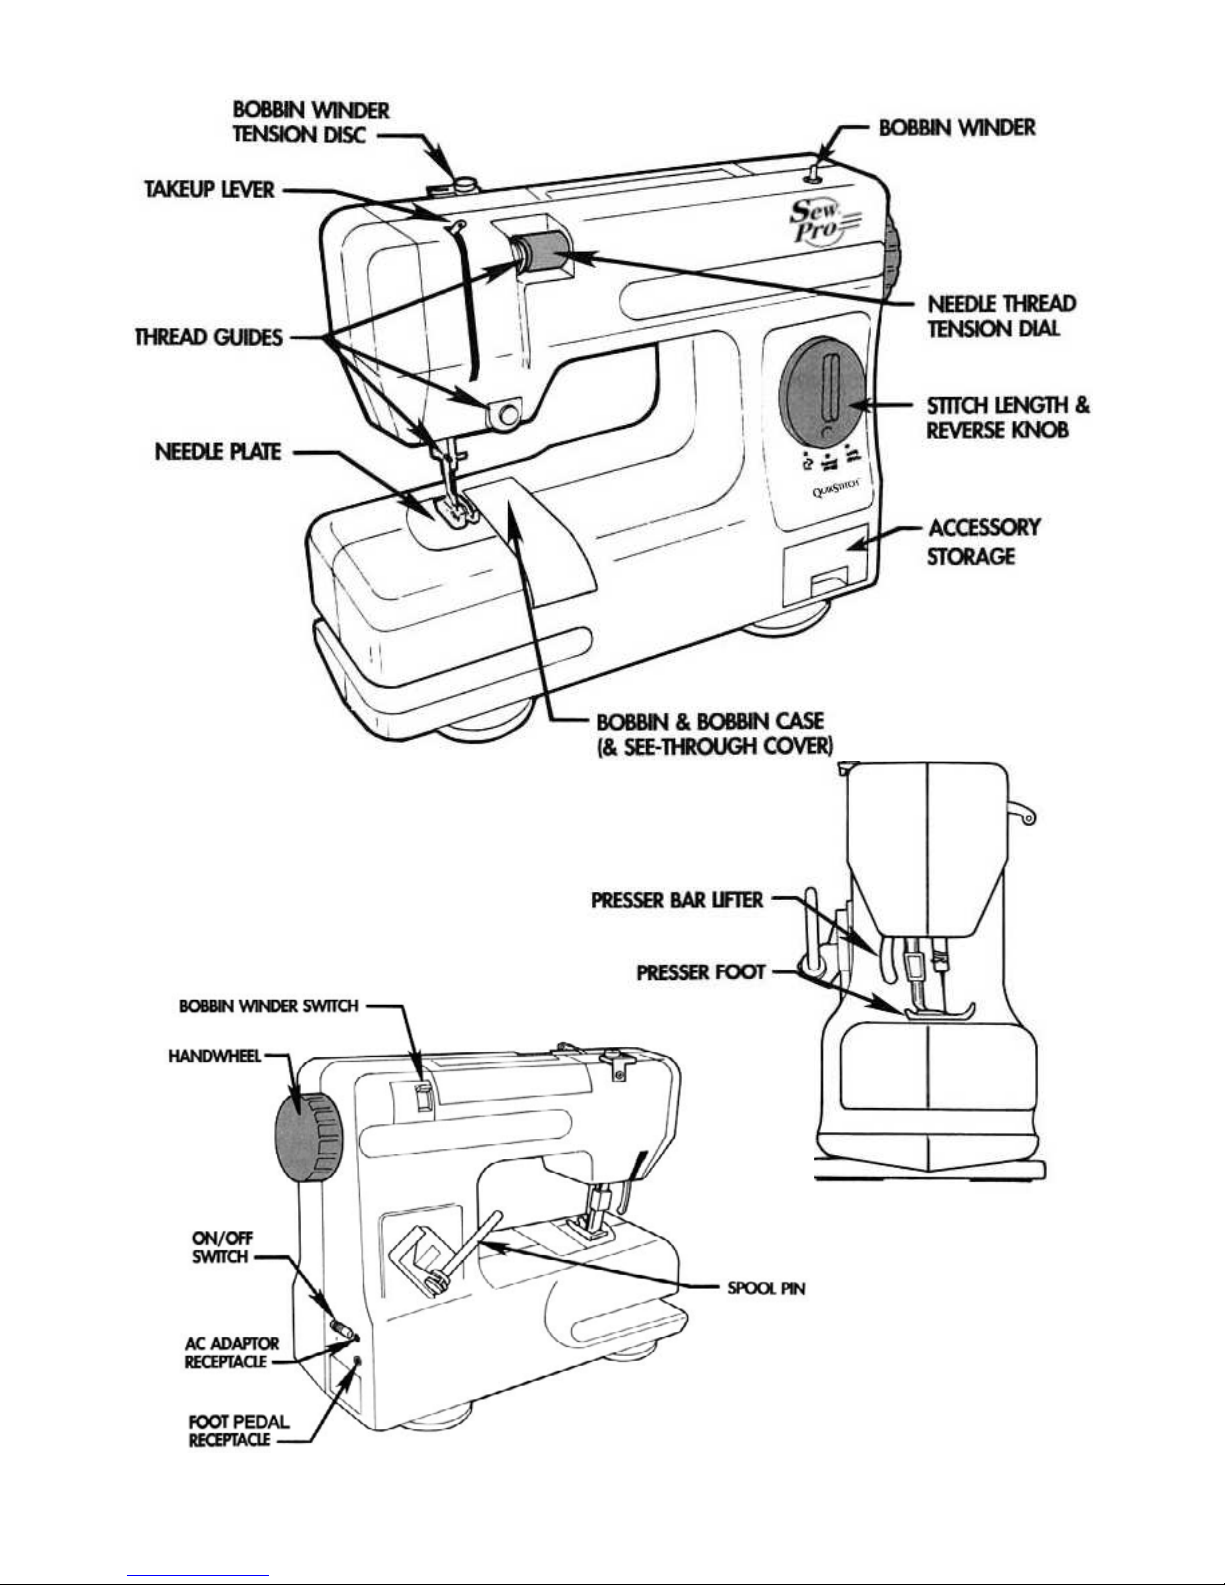
Handy Reference Guide.................................................................2
Getting Ready to Sew ....................................................................6
Winding the Bobbin ........................................................................7
Inserting the Wound Bobbin...........................................................9
Threading the Machine ..................................................................10
Raising the Bobbin Thread.............................................................12
Sewing a Broken Seam..................................................................13
Securing a Seam............................................................................14
Free Arm Sewing............................................................................14
Adjusting Tension...........................................................................15
Changing Needles..........................................................................16
Bobbin Case Replacement ............................................................17
Performance Checklist ...................................................................18
Limited Warranty ............................................................................19
IMPORTANT SAFEGUARDS
Before connecting machine, be sure that the voltage on the AC adaptor
matches your electrical supply
Always disconnect the foot pedal or AC adaptor when changing needles,
removing the bobbin, or cleaning the QUIKSTITCH
Always disconnect the AC adaptor whenever the QUIKSTITCH is
unattended
Work carefully and watch the sewing area to avoid the needle during
operation
Do not pull the fabric while sewing as the needle may bend, break or
cause other damage
Insure that the machine is threaded correctly before sewing
The QUIKSTITCH is a sewing machine and is not intended for garment
construction

6
GETTING READY TO SEW
1. Assemble spool holder by
snapping spool pin into spool
stand. Both of these parts are
found in accessory drawer located
in front of machine
2. Slide spool stand into its holder
on rear left of machine, until it
snaps firmly into place
3. Make sure that power switch is in
the “O” (Off) position. Plug in the
foot pedal and AC adaptor plug
4. Remove the red-handled seam
ripper/thread trimmer and needle
threader from accessory drawer
WINDING THE BOBBIN
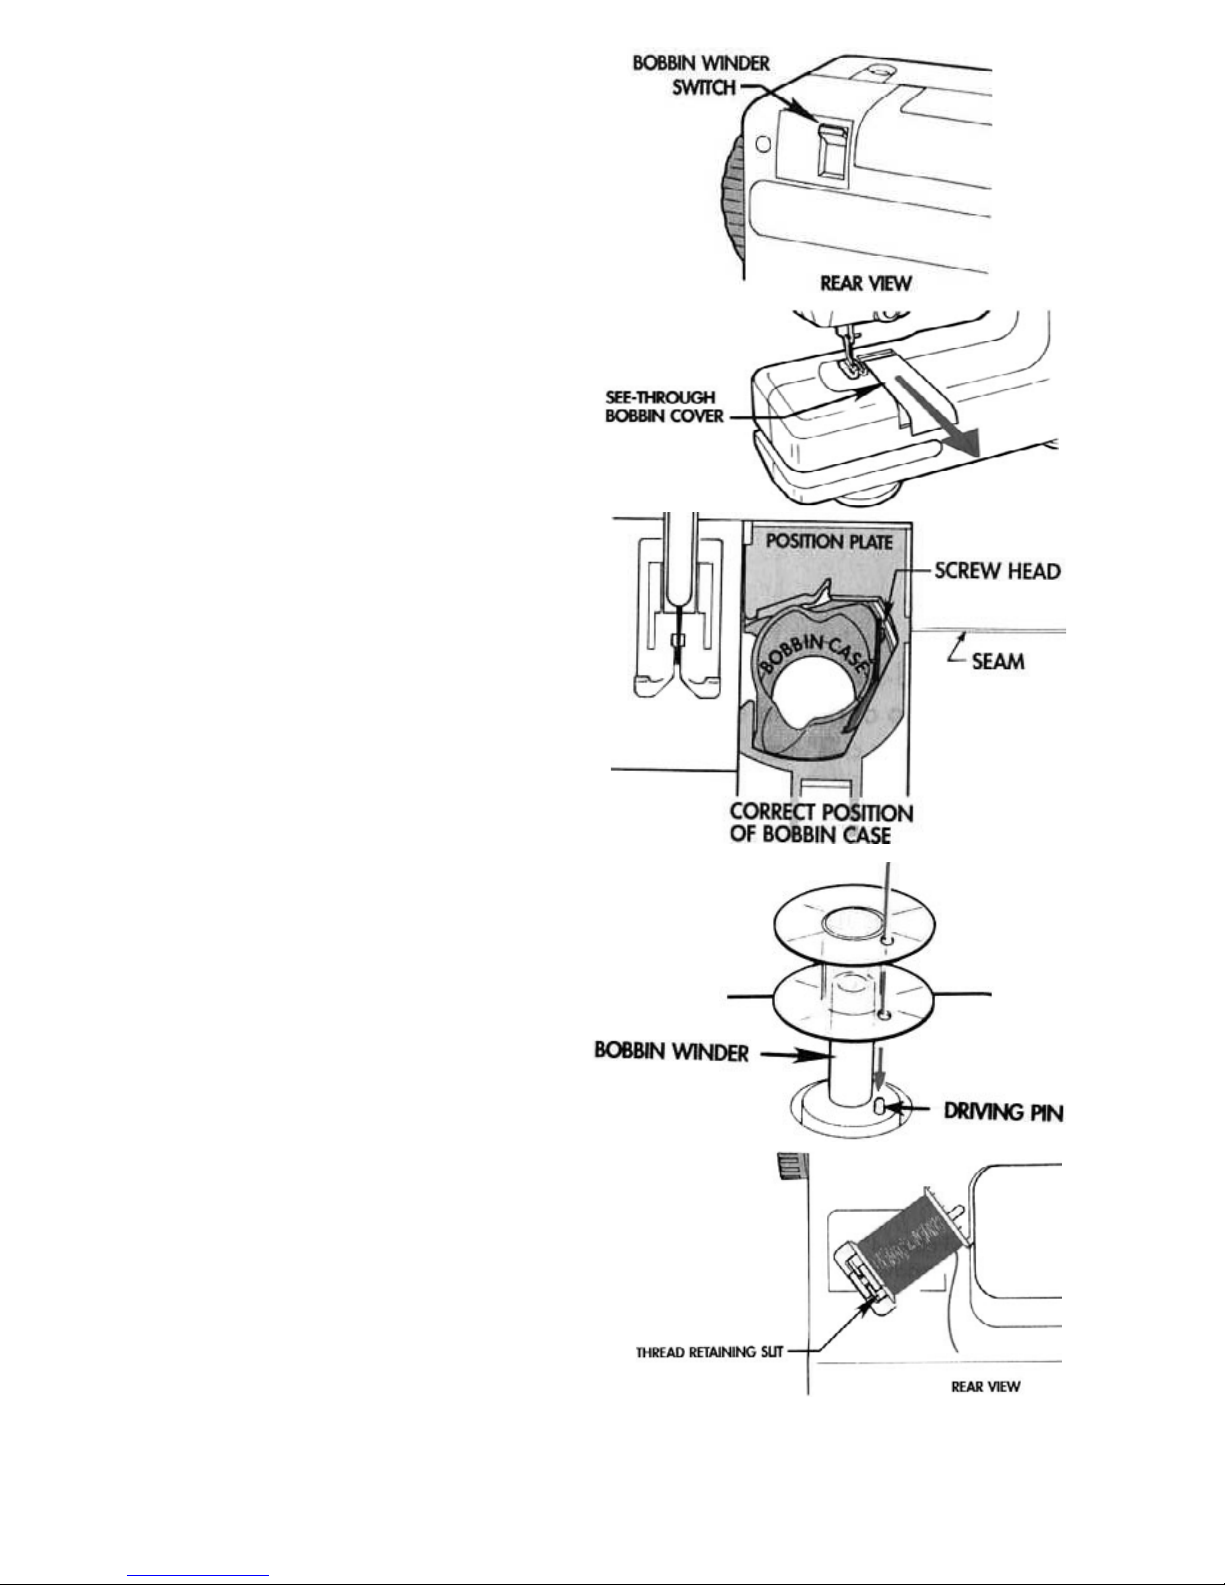
1. Push the bobbin winder switch
down to raise bobbin winder
2. Remove see-through bobbin
cover by sliding it toward the front
of machine.
Insure that the bobbin case is in
the proper position. The bobbin
case is held in place by a position
plate, which is designed to flex
slightly to allow the bobbin case to
move back and forth freely, about
1/16”.
The screw head should line up
with the seam in plastic casing of
machine and bobbin case should
move back and forth slightly
(about 1/16”) when hand wheel is
turned. If not, refer to page 17 for
repositioning instructions.
7
3. Remove empty bobbin from
bobbin case. The seam ripper
may make removal easier. Place
bobbin on the bobbin winder,
aligning the hole in bobbin with
the driving pin on bobbin winder.
You may have to turn the hand
wheel to help locate the driving
pin.
4. Slide spool of thread onto the
spool pin. NOTE: Make certain
that the thread retaining slit on
spool is near the bottom.
Otherwise, thread can become
caught in the slit and cause
problems during sewing.

5. Pull thread from spool and, using
two hands, pull it through the
diagonal slit in first thread guide
First thread guide should look like
this when properly threaded.
6. Wrap thread one time
counterclockwise around
tension disc.
7. Feed end of thread through small
hole in top of bobbin from the
inside, leaving a 3” tail.
8. Slide power switch into “1” (On)
position.
Hold the end of the thread (the
“tail”) firmly and step on foot pedal
until a few coils are wound onto
bobbin and stop.
9. Use the thread trimmer to cut off
tail, so it is flush with the top of
the bobbin. Continue winding
until the desired amount of thread
is wound onto bobbin. A full
bobbin holds 35 yards.
10. Cuts thread about 4” from the
bobbin and remove it from the
machine. Leave the spool of
thread on spool pin on back of
machine. Push bobbin winder
switch up into “Off” position.
8

9
INSERTING THE WOUND BOBBIN
1. Insert wound bobbin into bobbin
case with thread spooling off to
left side, as shown.
2. Guide end of thread to the back of
the bobbin.
3. Pull the thread toward you so that
it hooks on notch A(at 3 o’clock
position) and then pull to the left
so that it passes through notch B
(at 4 o’clock position)
4. Leave several inches of thread
laying across top of bobbin toward
the left of machine.
Bobbin threading is now complete.
(See page 12 to raise lower thread for
sewing)
10
THREADING THE MACHINE
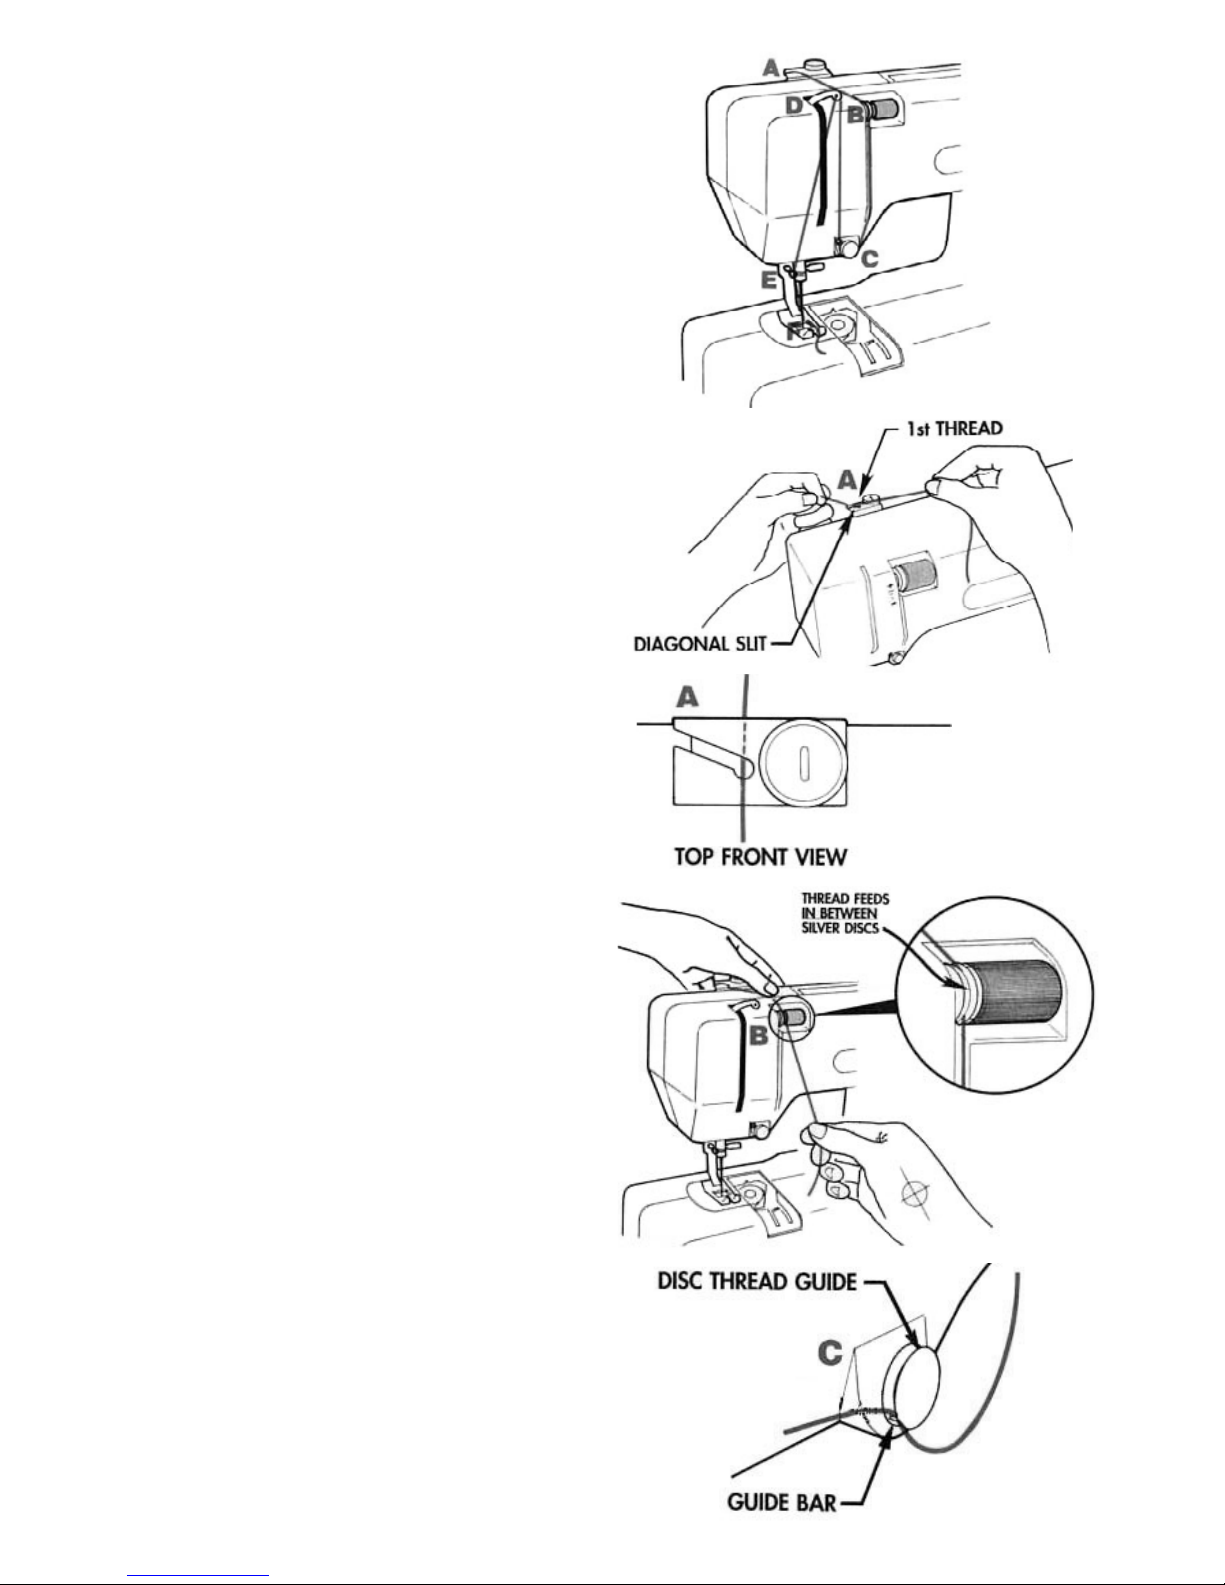
There are six thread guides that the
top thread passes through. The
diagram at right shows an overview of
the threading procedure; refer to the
specific instructions below for
important details.
Your spool of thread should be in the
same position as it was for winding
the bobbin- on the spool pin on the
back of the machine. Cut the thread
near the spool and pull the tail out of
the thread guide and tension disc.
1. Pull thread from spool, (using two
hands); pull it through diagonal slit
in thread guide “A”. Do not wrap
thread around tension disc for
sewing.
Thread guide “A” should look like
this when properly threaded.
2. Hold thread firmly against top of
machine between thread guides
“A” and “B” and pull down in
between two silver discs.
3. Feed the thread under disc thread
guide “C” and through opening
created by guide bar.
Insert thread from right to left.
Leave some slack in the thread to
the right.
Inhaltsverzeichnis
Andere Sew Pro Nähmaschine Handbücher


