SIXTOL V-checker Bedienungsanleitung
Car diagnostic tool V-checker / EN
Autodiagnostika V-checker / CZ
Autodiagnostika V-checker / SK
V302
Instructions for use
Návod k použití
Návod na použitie

1
EN
Instructions for use
Please read this manual carefully before using the product. This
will prevent possible damage to the device, vehicle or personal
injury.
A running engine produces carbon monoxide, which is toxic.
Handle the vehicle only in well-ventilated areas to prevent
poisoning or possible death from carbon monoxide
poisoning.
Protect your eyes from flying objects or hot liquid and gas
and always wear safety glasses.
A running engine contains components that can spin with
great speed and energy and can cause injury. Use caution
when working with a running motor to prevent injury.
Some parts of a running motor have high temperatures.
Avoid contact with these parts to prevent burns.
Make sure the handbrake is applied before testing or
repairing the engine. If your vehicle has an automatic
transmission, put it in park or neutral. Secure the vehicle
wheels with suitable chocks to prevent the vehicle from
starting on its own.
Never connect or disconnect diagnostic equipment when
the ignition is switched on. This could damage the
diagnostic equipment or the vehicle electronics. Always turn
off the ignition first before you can connect the instrument
to the vehicle's DLC connector.
Safety precautions:

2
EN
For measurements on the vehicle electronics, always use
digital measuring instruments with an internal impedance
equal to or greater than 10MOhm. Otherwise, damage to
the vehicle electronics may occur.
Vapors that evaporate from the tank and from the vehicle
battery are highly flammable. To prevent explosion, never
smoke near the vehicle or handle open flames, hot parts or
parts that spark. Ensure adequate ventilation in the area
around the vehicle.
Never wear loose clothing or loose articles of clothing or
jewelry when handling a running engine. A loose article of
clothing or jewellery could become caught in the engine and
injury could result. In addition, jewellery tends to be highly
electrically conductive and could cause a short in the wiring,
which could result in personal injury or damage to the
vehicle.
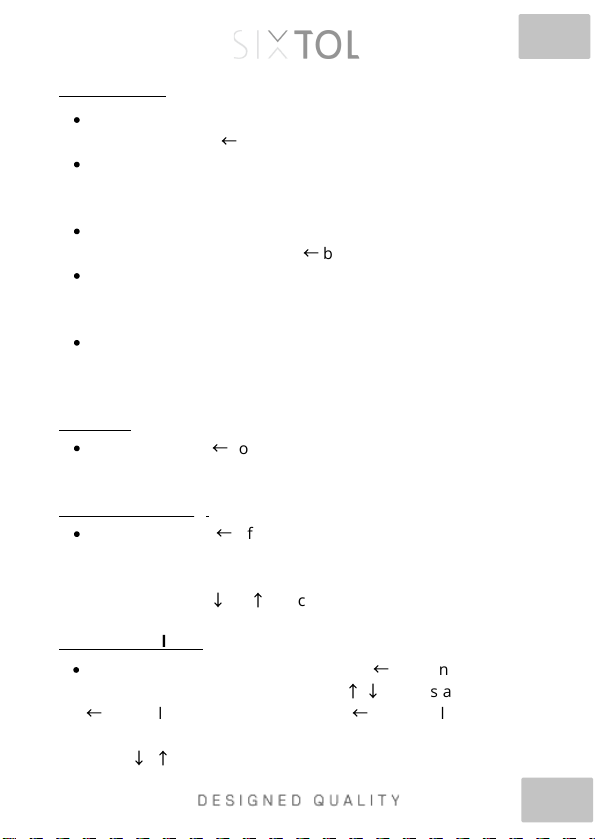
LCD display 128x64 pixels
Cable
item selection or move to previous screen
←
confirm/left
→
return/right
↓
item selection or move to next screen
OK button - confirm selection and enter
Exit button - cancel and return
Description of the device:
V-checker is a handheld device designed for VW, AUDI, Skoda,
and SEAT cars. The instrument is designed to obtain
information about the control unit, its coding, reading and
deleting error codes, basic settings, output tests, oil resets, etc.
Controls:
1.
2.
3.
4.
5.
6.
7.
8.

3
EN
Check engine oil, power steering fluid, transmission fluid,
coolant and any other fluids that are in your vehicle. Top off
fluids if needed.
Make sure the air filter is clean and in good condition. Check
all filter lines for good connections and damage.
Check all belts to ensure they are in good order.
Check the wiring of the engine sensors to ensure they are
well connected.
Check all rubber and steel hoses for fluid leaks or blockages
and for proper connections and attachments.
Make sure spark plugs are clean and in good condition and
properly connected.
Make sure the battery leads are clean and well connected.
Check the battery voltage.
Check the electrical wiring to make sure it is good and
properly connected, there is no damaged insulation or bare
wires anywhere.
Make sure the motor is mechanically in good condition.
Check compression, vacuum, valve timing, etc.
Check the following elements before you start testing:
Turn off the ignition
Plug the cable into the 16 pin DLC connector on the vehicle
The unit will turn itself on, wait a few seconds for the main
menu to appear.
Turn on the ignition to start communication with the unit.
In the menu you have the choice of Control Unit, Special
Functions, Supplier. Info and Procedures.
Connecting V-checker
4
EN
Select Control Unit in the main menu and confirm the
selection with the
←
button.
On the new screen, you will see 01 Engine electronics, 02
Transmission electronics, 03 Brake electronics, 15 Airbags,
etc. 78 systems are available here.
Take here for example 01 Engine electronics and confirm
the selection by pressing the
←
button
The display will show the message "Communication". Once
communication has been successfully established, the
version information of the control unit is displayed.
Press any button and the menu for Engine Electronics will
be displayed: 1 ECU Info, 2 Error code reading, 3 Measured
values, 4 Error code deletion.
Select and press
←
to display the version information of the
control unit.
Control Unit:
ECU info:
Select and press
←
. If there are error codes in the system,
they will be displayed here. The error code number, its
description and the total number of error codes are
displayed. Press
↓
or
↑
to scroll.
Error code loading:
Select and confirm by pressing the
←
button. Enter the
channel number (0-255) using the
↑
,
↓
arrows and confirm
←
. E.g. select channel 01 and press
←
. The display will show
the corresponding data. To view the next or previous block,
press
↓
,
↑
.
Measured values:

5
EN
Select and press
←
. Error codes will be cleared.
It is similar to measuring blocks, but allows setting of
individual parameters.
Deleting error codes:
Basic settings:
Warning:
Before interfering with this setup, read your car's manual so
you know what you're doing. Failure to follow the procedures
specified by the manufacturer may cause serious damage to
the vehicle. Select and confirm by pressing the button
←
. Enter
the channel number (0-255) using the
↑
,
↓
arrows and confirm
←
. E.g. select channel 01 and press
←
. The display will show the
corresponding data. To view the next or previous block, press
↓
,
↑
.
Mmodification - this function allows modification of certain
values or settings, if supported. Select Adaptation and press
←
. Enter the channel number (0-255) using the
↑
,
↓
arrows
and confirm
←
. Use the
↑
,
↓
arrows to change parameter
values. Press the
←
button to save the selection, press the
→
button to cancel the selection.
Bulk groups (blocks) are not supported in Basic settings.
The data contained in individual blocks varies greatly
depending on the type of control unit.
Adaptation:

6
EN
Independent Channel Value:
Independent channel (block) value, select in the menu and
confirm by pressing
←
. Enter the channel number (0-255) using
the arrows
↑
,
↓
, confirm the individual numbers
←
and finally
confirm
←
. With the arrows
↑
,
↓
you can change the channel
values, with the
←
button you save the selection, with the
→
button you cancel the selection.
Module Coding (Control Unit) - Warning:
Before interfering with this setup, read your car manual to
know what you are doing. Failure to follow the procedures
specified by the manufacturer may cause serious damage to
the vehicle. This function allows setting the parameters of the
control unit. Select in the menu and confirm
←
. You will be
prompted to enter the control unit code of the tested module.
Enter in the usual way using the arrows
↓
,
↑
and confirm
←
.
You can find control unit code from info about the control unit
(see previous chapters). The control unit needs to be coded if it
doesn’t displayed vehicle identification number, or when the
main module has been replaced. In general, if the new control
unit has the same designation and index as the old one, it is
enough to read the code of the old unit and enter it into the
new one. If the new unit does not have an index, it cannot be
encoded. If the index is different, contact the
manufacturer/importer for more information.
Supplier info:
Select in the main menu and confirm
←
. Use the
↑
,
↓
arrows to
change the sales representative number.

7
EN
Login:
For some types of control modules you need to log in before
you can change settings or coding. You can find the login codes
in the manual for your vehicle. Select Login and confirm
←
. The
5-digit code is for unit coding, the 7-digit code is for key
matching, immobilizer and customization. Make sure you have
the correct codes or the system may be destroyed.
Special functions:
Select in the menu and confirm
←
. The display will show
Service/Oil Reset. (service intervals and oil reset). On the
dashboard there are indicators of intervals for service
inspections and oil changes. After changing the oil, the indicator
should go out (reset). The menu includes 1) OIL (oil – indicator
goes off), 2) IN1 (15000km interval reset), 3) IN2 (30000km
interval reset).
Procedures:
Here you will find helpful information for some important
operations. Select Procedures in the menu and confirm
←
. The
display will show 1) Erasing learned values), 2) Throttle setting,
3) Exhaust gas setting 4) Automatic automatic setting.
gearboxes,
Claim conditions:
The warranty does not apply to: mechanical damage,
installation or use of the product contrary to the user manual,
unprofessional handling, dismantling of the cover, storage
outside the temperature range of 10°C to 45°C, normal wear
and tear, operation in an aggressive environment.

8
EN
Information for users on the disposal of electrical and
electronic equipment
The symbol on the product means that used
electrical and electronic products should not
be disposed of with your other household
waste. Dispose of the product properly at
designated collection points, where they will
be accepted free of charge.
By ensuring this product is disposed of
correctly, you will help prevent potential
negative consequences to the environment
and human health, which could otherwise be
caused by inappropriate waste handling of
this product. For further details contact your
local authority or the nearest collection point.
Improper disposal of this type of waste may
result in penalties in accordance with
national regulations.

9
EN
EU Declaration of Conformity
Subject of declaration, model, product identification:
V302 V-checker professional diagnostics VW group
Manufacturer/Importer:
TorriaCars s.r.o., Nádražní 12, 471 07, Žandov, ID: 28723163
Sixtol.cz
declares that he has issued this statement under his own responsibility
and above said device has been designed and manufactured in
compliance with the following standards:
EN 61000-6-3:2001+A11:2004, EN 61000-6-1:2001
and harmonization regulations: 2014/30/EU
and is in compliance with the CE certificate.
Completion of the technical documentation was carried out by Adam
Jágr, based at the address of the manufacturer/importer. Technical
documentation is available at the manufacturer's/importer's address.
Place and date of issue of the EU declaration of conformity:
Liberec 11.1.2018
On behalf of TorriaCars s.r.o.:
Adam Jagr
Managing Director
Dieses Handbuch passt für folgende Modelle
1
Inhaltsverzeichnis
Sprachen:
Andere SIXTOL Diagnosegeräte Handbücher


