SmartVent positive+ Bedienungsanleitung

HOME VENTILATION SYSTEMS
Firmware Version 3.7
User Manual
Your guide to a healthier home

Warning
- This appliance is not intended for use by persons (including children) with reduced physical, sensory or
mental capabilities, or lack of experience and knowledge, unless they have been given supervision or
instruction concerning use of the appliance by a person responsible for their safety.
- Children should be supervised to ensure that they do not play with the appliance.
- Isolate the mains supply before attempting to replace the system’s air filter.

3
Contents
How the System Works................................................................................................................ 4
Home Screen Icons .................................................................................................................... 5
Button Functions ........................................................................................................................ 5
Screen Highlights........................................................................................................................ 5
Modes
Auto Operation and Temperature Setting ................................................................................. 6
Manual Operation and System Fan Speed Setting.................................................................... 7
Boost ................................................................................................................................... 8
Recycle ................................................................................................................................ 8
Key Lock Setting.................................................................................................................... 8
Heat Transfer ............................................................................................................................. 9
Tempering Heater .................................................................................................................... 10
Home Screen Display Options
Relative Humidity ................................................................................................................ 11
Dew Point .......................................................................................................................... 11
System Time-Date Settings ....................................................................................................... 12
Scheduler Settings ................................................................................................................... 13
Advanced Settings
Advanced Setting Selection ................................................................................................. 14
Advanced Setting Menu ...................................................................................................... 15
Troubleshooting ....................................................................................................................... 16
Maintenance
Filter Replacement............................................................................................................... 18
Technical Specifications ........................................................................................................... 19
SmartVent Positive+ System
Firmware Version 3.7

4
1) For more information about SmartVent seasonal upgrades, contact 0800 140 150 or email [email protected]
How The System Works
Some features covered in this instruction manual are only available when installed and activated. Contact
SmartVent for more information if you are interested in adding additional features to your system.
The SmartVent Positive+ System
SmartVent Positive+ is a positive pressure system which uses air taken from the roof cavity to
ventilate your home.
Seasonal Upgrades 1)
Summer Feature
Adds outside air as second air source for continued quality ventilation in warmer months
supplying outdoor air when the roof cavity temperature exceeds that of the outside air.
Heat Transfer
To draw excess heat from your heated lounge and transfer it to bedrooms. Includes a
recycle function where inside air can be recirculated if the outside air temperature is
too cold to bring in as part of the primary ventilation process.
Tempering Heater
To help take the chill off incoming air (not a home heating solution).
When seasonal upgrades are added, your system can offer greater options in how it operates.
The options can override or influence one another as in the following examples.
Example: When the environment in your home meets your chosen heat transfer condition the ventilation and
tempering heater functions deactivate.
Example: When the system is ventilating and conditions are met for the heater to turn on, the speed of the fan
will be influenced by the heater function.

5
Home Screen Icons
Yellow highlight
indicates icon
is flashing
Green highlight
indicates button(s)
to push
Button Functions
Power OFF/ON or discard selections and return to Home Screen
From Home Screen enter setting screen or return to previous setting option
Scroll through setting options and change setting values
Save setting selection and go to next setting option
Screen Highlights
System Fan Speed
Ventilation Mode 1)
Air Source Indicator
Heat Transfer ON 2)
Tempering Heater ON 2)
Recycle ON
Temperature Sensing ON
Dew Control Mode ON
Dew Point Temperature
Home and Power
Settings
Up
Select
Down
Set 3)
Fresh Air Temperature 3) or
Fresh Air Relative Humidity 4)
Current Room Temperature or
Current Room Relative Humidity 5)
Key Lock ON
Rental Mode ON 6)
COMs 7)
Alert 8)
Time 9)
Scheduler Period and Day
1) Ventilation mode selections are AUTO or MAN (manual)
2) Only displayed if the seasonal upgrade is installed
3) The SET icon will appear when the temperature is being changed and the
progressive temperature changes being made will be displayed instead of
the Fresh Air temperature
4) Relative Humidity value is showing if the °C symbol is not displayed
5) Relative Humidity value is showing if the percentage % symbol is displayed
instead of the °C symbol.
6) When RENTAL mode is ON, user cannot switch system OFF
7) Flashes when communicating with ceiling controller
8) When an electronic fault in the system occurs, the alert icon will appear and
the applicable error code(s) will be displayed instead of the time
9) Time is displayed in a 24 hour clock format

6
Modes
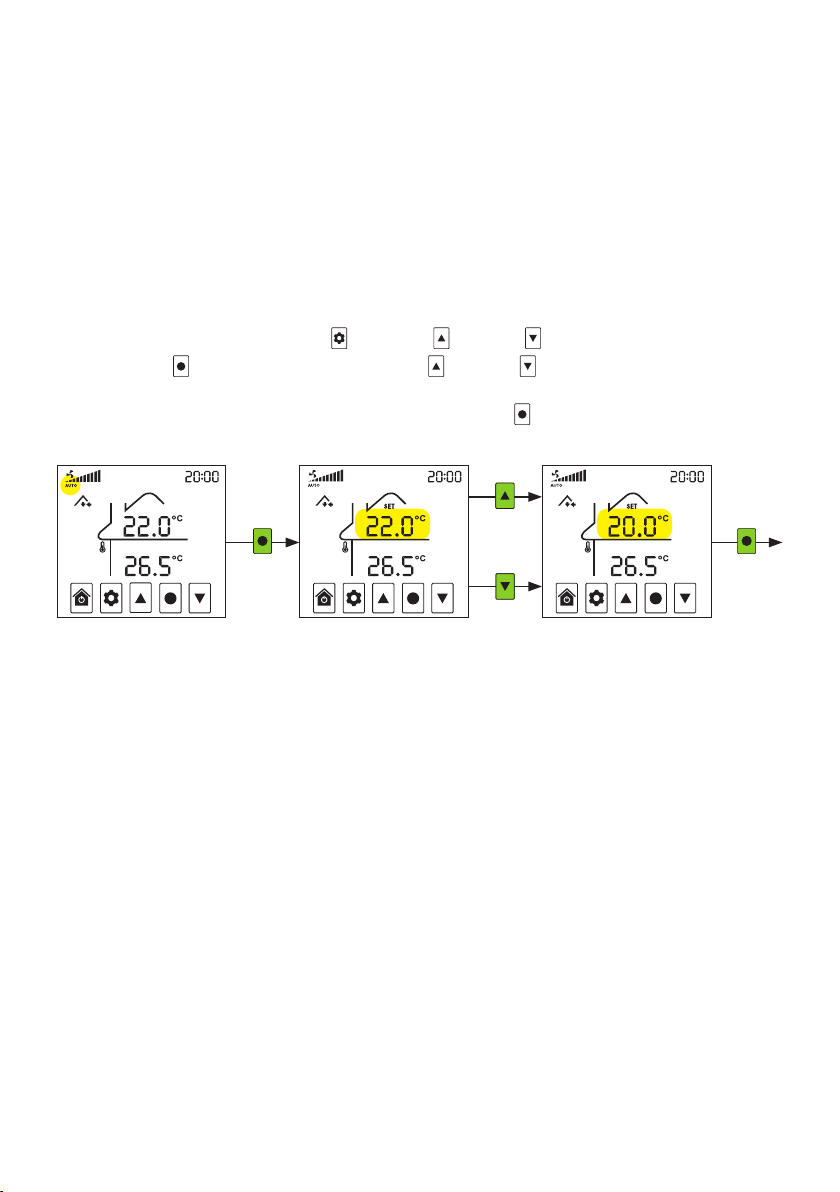
Auto Operation and Temperature (TEMP) Setting
Your SmartVent Positive+ system can choose where to draw air from and at what speed depending on the Dew
Point, and then the indoor and outdoor air temperatures, when in AUTO. If the system is in either BOOST or
RECYCLE modes, the fan will, instead, operate at the speeds set for those particular modes.
You select the SET temperature you want it to be in the home (ie. 22°C (default)) and the system will work on the
best air source to achieve your SET temperature 1).
For example, if you set your system to 20°C while the current house temperature is 18.3°C, the control system
measures the incoming air temperature and alters the fan speed to suit. If the incoming air temperature is
20°C or higher, the fan will operate at a high speed to use the free heat to try and increase the overall house
temperature. If lower than 20°C, the fan speed would decrease to reduce the cooling effect 2).
- On the Home Screen, press SETTINGS and then UP , or DOWN , to toggle to VENTILATION mode
- Press SELECT to enter VENTILATION mode then UP , or DOWN , to toggle to AUTO operation and
follow the guide below to complete the setting of the SET temperature.
- Alternately, if already in ON and on the Home Screen, press SELECT to toggle directly to AUTO operation
and follow the same guide below to adjust the temperature setting.
1) Your system is not a heating or cooling device. This parameter is designed to reduce nuisance over-heating or over-cooling of your home.
2) Additional features are available when low temperatures are present. See HEAT TRANSFER, TEMPERING HEATER and RECYCLE modes.
Confirm
AUTO
operation Select
TEMP
value
Go to
TEMP
value
Save all
settings
Go to
Home
Screen

7
Modes
Manual (MAN) Operation and System Fan Speed and Air Source Settings
Your SmartVent Positive+ system allows manual control of the fan speed and air source if required. Fan speed
will remain constant at the speed set.
- On the Home Screen, press SETTINGS and then UP , or DOWN , to toggle to VENTILATION mode
- Press SELECT to enter VENTILATION mode and then UP , or DOWN , to toggle to MAN operation and
follow the guide below to complete the setting of the system fan speed and the selection of the air source.
- Alternately, if already in ON and on the Home Screen, press SELECT to toggle to MAN operation and
follow the same guide below to change the system fan speed.
Go to
AIR SOURCE
value
Confirm
FAN SPEED
value
Select
FAN SPEED
value
Go to
FAN SPEED
value
Confirm
MAN
operation
Select
AIR SOURCE
value
Go to
Home
Screen
Save all
settings

8
Key Lock Setting
When Key Lock is ON, system settings cannot be changed
- Press UP and DOWN together for 3 seconds, until the KEY LOCK icon is displayed, to confirm that
the system is locked.
- Press UP and DOWN together for 3 seconds, until the KEY LOCK icon is not displayed, to confirm
that the system is unlocked.
Modes
Boost
BOOST enables you to immediately override fan speed settings and boost fan speed to maximum.
- On the Home Screen, press SELECT for 3 seconds and system’s fan will boost to maximum speed.
- In BOOST mode, the time segments will become a count down to the end of the BOOST mode.
- A quick tap of SELECT on the Home Screen will exit BOOST mode.
Tap to Exit3 seconds
Recycle
RECYCLE is designed for environments where extremes of temperature are common. When your system is in
VENTILATION mode and the roof cavity temperature exceeds the maximum roof cavity temperature (30ºC) setting,
or goes below the minimum roof cavity temperature (5ºC) setting, your SmartVent system will limit the amount of
air entering your home.
If HEAT TRANSFER is installed, the RECYCLE icon will be displayed to indicate that your system is in RECYCLE
mode recycling indoor air to help reduce condensation build-up. In RECYCLE mode the fan will operate at the
Recycle speed you set in the Recycle setting (default = OFF). Recycle temperature settings (004 and 005) can be
adjusted in the Advanced Setting Menu on page 13.
If a HEAT TRANSFER kit is not installed, it is recommended that Recycle speed is set to OFF.
- On the Home Screen, press SETTINGS and then UP , or DOWN , to toggle to RECYCLE mode and
follow the guide below to complete.
RECYCLE mode may need to be activated. See Installation Instructions for details.
Select
FAN SPEED
value
Go to
FAN SPEED
setting
Save all
settings
Go to
Home
Screen

9
Heat Transfer
When HEAT TRANSFER is ON, the fan speed will be low when the lounge temperature exceeds the SET
temperature, and it will gradually speed up as your lounge gets warmer.
HEAT TRANSFER mode has priority over VENTILATION mode. To ensure your home stays regularly ventilated, we
recommend you use the timer function to turn HEAT TRANSFER OFF during the day, the middle of the night and
early morning. We also recommend HEAT TRANSFER is set to ON in the evening.
OFF Mode
HEAT TRANSFER mode is OFF.
- On the Home Screen, press SETTINGS and then UP , or DOWN , to toggle to HEAT TRANSFER mode
- Press SELECT to enter HEAT TRANSFER mode
- Press UP , or DOWN , to toggle to OFF and press SELECT to save
ON Mode and Temperature (TEMP) Setting
HEAT TRANSFER starts when the lounge temperature is higher than the temperature you choose. SET is the
minimum temperature you want in your lounge before your system commences transferring heat. The SmartVent
Positive+ touch screen controller, with a built-in thermostat, must be located in the heat source room for it to be
effective.
- On the Home Screen, press SETTINGS and then UP , or DOWN , to toggle to HEAT TRANSFER mode
- Press SELECT to enter HEAT TRANSFER mode
- Press UP , or DOWN , to toggle to ON and follow the guide below to complete
SCHEDULER Mode
HEAT TRANSFER can be set to work to a schedule which enables you to make the most of your HEAT TRANSFER
feature. We recommend you use the timer function to turn HEAT TRANSFER OFF during the day, the middle of the
night and early morning. We also recommend HEAT TRANSFER is set to ON in the evening.
See Scheduler Settings for detail on how to set up the scheduled times on pages 11 and 12.
Confirm
ON
setting Select
TEMP
value
Go to
TEMP
value
Save all
settings
Go to
Home
Screen

10
Tempering Heater
Your TEMPERING HEATER works with VENTILATION mode to take the chill off incoming air. When the TEMPERING
HEATER is active, the fans will run at medium speed. The TEMPERING HEATER is not designed to warm your
home, however, it will take the chill off the incoming air.
OFF Mode
TEMPERING HEATER is OFF.
- On the Home Screen, press SETTINGS and then UP , or DOWN , to toggle to TEMPERING HEATER
mode
- Press SELECT to enter TEMPERING HEATER mode
- Press UP , or DOWN , to toggle to OFF and press SELECT to save
ON Mode and Temperature (TEMP) Setting
The TEMPERING HEATER turns ON when the fresh air temperature is cooler than the SET temperature.
- On the Home Screen, press SETTINGS and then UP , or DOWN , to toggle to TEMPERING HEATER
mode
- Press SELECT to enter TEMPERING HEATER mode
- Press UP , or DOWN , to toggle to ON and follow the guide below to complete
SCHEDULER Mode
TEMPERING HEATER can be set to work to a schedule which can reduce the running cost of your TEMPERING
HEATER. We recommend you use the timer function to turn your TEMPERING HEATER OFF during the day and
evening, and set to ON overnight and early morning.
TEMPERING HEATER will be disabled if HEAT TRANSFER is operating.
See Scheduler Settings for detail on how to set up the scheduled times on pages 11 and 12
Confirm
ON
setting Select
TEMP
value
Go to
TEMP
value
Save all
settings
Go to
Home
Screen
Inhaltsverzeichnis
Andere SmartVent Lüfter Handbücher

SmartVent
SmartVent SV02AD Bedienungsanleitung

SmartVent
SmartVent Lite+ Bedienungsanleitung

SmartVent
SmartVent Positive2 Bedienungsanleitung

SmartVent
SmartVent synergy3 SYN1015AD Bedienungsanleitung

SmartVent
SmartVent Synergy2 SYN190E2 Bedienungsanleitung

SmartVent
SmartVent POSITIVE Series Bedienungsanleitung

SmartVent
SmartVent Positive2 Bedienungsanleitung

SmartVent
SmartVent SYN1015AD Bedienungsanleitung