sparkfun MicroMod DEV-18575 Technisches Dokument

MicroMod Main Board Hookup Guide
Introduction
The MicroMod Main Board - Single and Double are specialized carrier boards that allow you to interface a
Processor Board with a Function Board(s). The modular system allows you to add an additional feature(s) to a
Processor Board with the help of a Function Board(s).
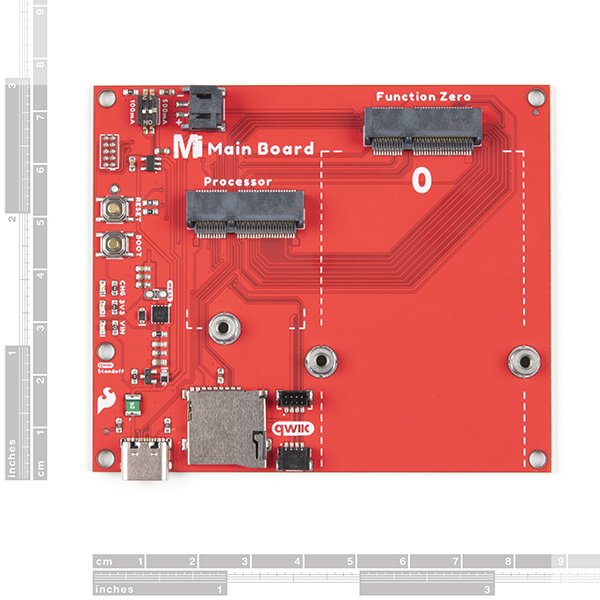
SparkFun MicroMod Main Board - Single
DEV-18575
Y
O
U
R
A
C
C
O
U
N
T
L
O
G
I
N
R
E
G
I
S
T
E
R

Required Materials
To follow along with this tutorial, you will need the following materials at a minimum. You may not need everything
though depending on what you have. Add it to your cart, read through the guide, and adjust the cart as necessary.
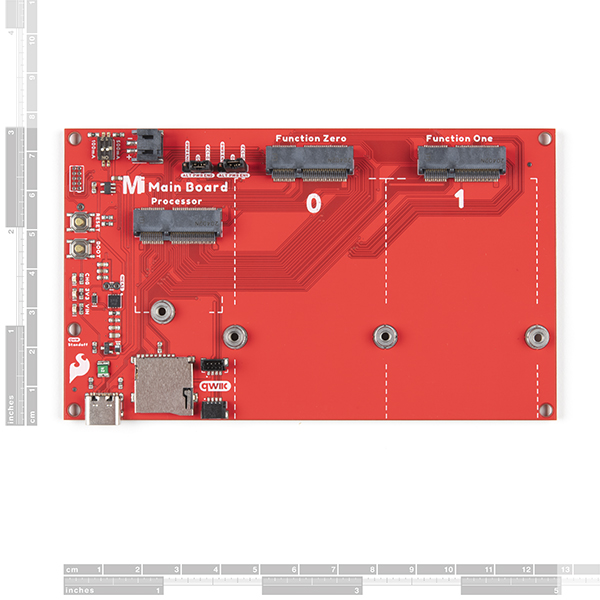
SparkFun MicroMod Main Board - Double
DEV-18576
Product Showcase: SparkFun MicroMod Main and Function BoaProduct Showcase: SparkFun MicroMod Main and Function Boa……

MicroMod Main Board
To hold the processor and function boards, you will need one Main board. Depending on your application, you may
choose to have either one or two function boards.
SparkFun MicroMod Environmental Function
Board
SEN-18632
SparkFun MicroMod Main Board - Single
DEV-18575
SparkFun MicroMod WiFi Function Board -
ESP32
WRL-18430
Reversible USB A to C Cable - 2m
CAB-15424
SparkFun MicroMod Artemis Processor
DEV-16401
Pocket Screwdriver Set
TOL-12891
microSD Card - 1GB (Class 4)
COM-15107

MicroMod Processor Board
There are a variety of MicroMod Processor Boards available to choose from. You will probably want to avoid
having the same Processor and Function Board since there is an ESP32 on both types of boards.
MicroMod Function Board
To add additional functionality to your Processor Board, you'll want to include one or two function boards when
connecting them to the Main Board. Make sure to check out the catalog for other function boards.
SparkFun MicroMod Main Board - Single
DEV-18575
SparkFun MicroMod Main Board - Double
DEV-18576
SparkFun MicroMod Artemis Processor
DEV-16401
SparkFun MicroMod ESP32 Processor
WRL-16781
SparkFun MicroMod nRF52840 Processor
WRL-16984
SparkFun MicroMod STM32 Processor
DEV-17713

Tools
You will need a screw driver to secure the Processor and Function boards. To set the charge rate, you will need a
precision screw driver (or a tiny, rounded object). The pocket screwdriver set is an excellent option. For users
using a microSD card and want to easily read the contents of the memory card, you will need a microSD card
adapter or USB reader.
Suggested Reading
SparkFun MicroMod Environmental Function
Board
SEN-18632
SparkFun MicroMod WiFi Function Board -
ESP32
WRL-18430
microSD USB Reader
COM-13004
Pocket Screwdriver Set
TOL-12891
SparkFun Mini Screwdriver
TOL-09146

If you aren't familiar with the MicroMod ecosystem, we recommend reading here for an overview. We recommend
reading here for an overview if you decide to take advantage of the Qwiic connector.
MicroMod Ecosystem Qwiic Connect System
If you aren’t familiar with the following concepts, we also recommend checking out a few of these tutorials before
continuing. Make sure to check the respective hookup guides for your processor board and function board to
ensure that you are installing the correct USB-to-serial converter. You may also need to follow additional
instructions that are not outlined in this tutorial to install the appropriate software.
Hardware Overview
What is an Arduino?
What is this 'Arduino' thing anyway? This tutorials dives
into what an Arduino is and along with Arduino projects
and widgets.
Installing Arduino IDE
A step-by-step guide to installing and testing the
Arduino software on Windows, Mac, and Linux.
How to Install CH340 Drivers
How to install CH340 drivers (if you need them) on
Windows, Mac OS X, and Linux.
Getting Started with MicroMod
Dive into the world of MicroMod - a compact interface
to connect a microcontroller to various peripherals via
the M.2 Connector!

The overall functionality of the Single and Double Main Boards are the same. We'll use the Single Main Board
more in this section to highlight the features since this is also included in the Double Main Board. We'll switch to
the Double Main Board when necessary to highlight the features that are only included in the Double Main Board.
The only differences are that the Double Main Board includes:
two jumper shunts
ability to add a second MicroMod Function Board to the mix
board's width
Main Board - Single Measurements Main Board - Double Measurements
(Zoomed Out)
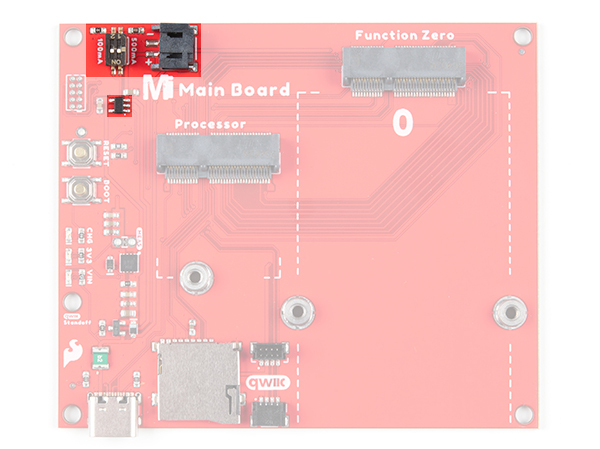
Power
There are two ways to power the Main Boards, Processor Board, and Function Board(s).
USB
Single Cell LiPo Battery
It is fine to connect a power source to the USB connector and LiPo battery's JST connector at the same time. The
MicroMod Main Board has power-control circuitry to automatically select the best power source.
Power USB
One option of powering the board is through the USB Type C connector. You will need a USB Type C cable to
power the board with 5V. Power connected to the board's USB C connector will go through a resettable PTC fuse
(rated at 2A max) and then the AP7361C 3.3V voltage regulator (rated at 1A max). The little green component
close to the USB connector is the resettable PTC fuse while the square IC is the voltage regulator. The voltage
regulator accepts voltages between ~3.3V to 6.0V.

The USB Type C connector is also used to upload code to your Processor Board, send serial data to a terminal
window, or charge the LiPo battery. Of course for portable power, you could connect a USB battery as an
alternative to using a LiPo battery.
Power applied to the connector will light up the VIN and 3V3 LED. If you decide to bypass the PTC fuse, simply
add a solder blob to the jumper labeled as PTC. There is also a jumper labeled as MEAS to measure the current
consumption at the output of the 3.3V voltage regulator for your project.
Power LiPo
The other option is to connect a single cell LiPo battery (i.e. nominal 3.7V, 4.2V fully charged) to the 2-pin JST
connector as shown below. A MCP73831 charge IC is included on the boards to safely charge the LiPo batteries
via USB Type C connector. A switch is included to set the charge rate. The charge rate is probably set to ~166mA
with both switches flipped to the ON position. This may vary depending on the position of the switch when it was
pulled from the reel. Flip the switch to adjust the charge rate to either 100mA or 500mA using a precision flat head
screw driver or tweezers.
The voltage from the LiPo battery is regulated down to 3.3V as it goes through the AP7361C 3.3V voltage
regulator (rated at 1A max).
Note: For more information on proper handling of LiPo batteries, check out the LilyPad Basics: Powering
Your Project - LiPo Battery Safety Care.

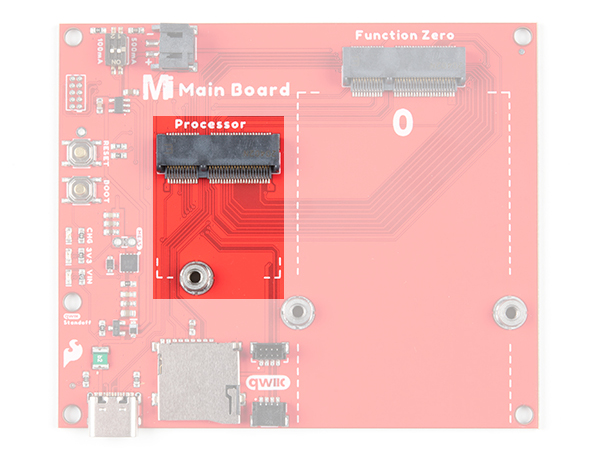
MicroMod Processor Board
The MicroMod ecosystem allows you to easily swap out processors depending on your application. The location of
the M.2 connector labeled as Processor is where you would connect and secure a MicroMod Processor Board.
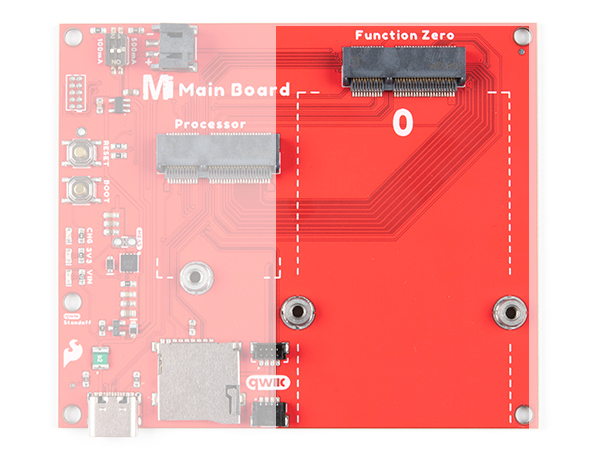
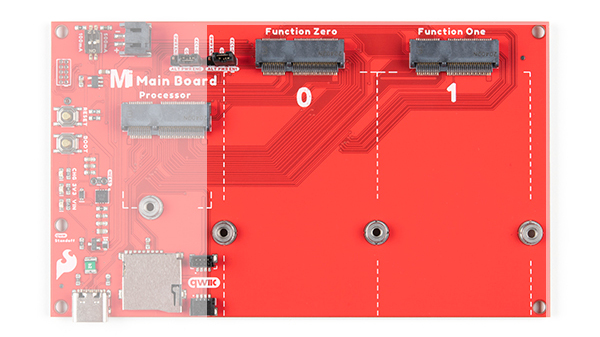
MicroMod Function Board
Beside the MicroMod Processor's socket is another M.2 connector for MicroMod Function Boards, which allow you
to add additional functionality to your Processor Board. The Single Main Board includes one socket for a single
Function Board while the Double Main Board includes two sockets for up two Function Boards.
Main Board - Single Function Board Socket Main Board - Double Function Board Sockets
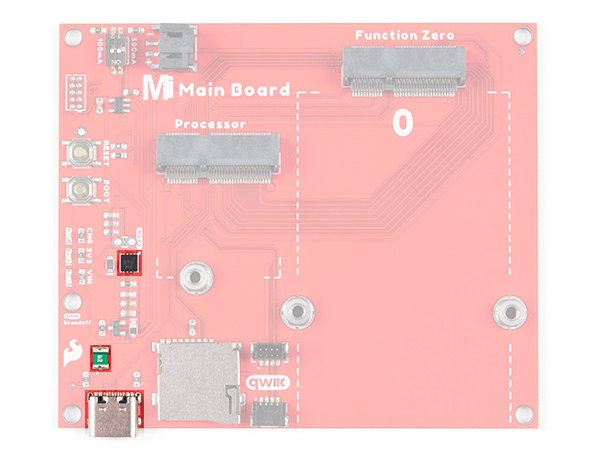
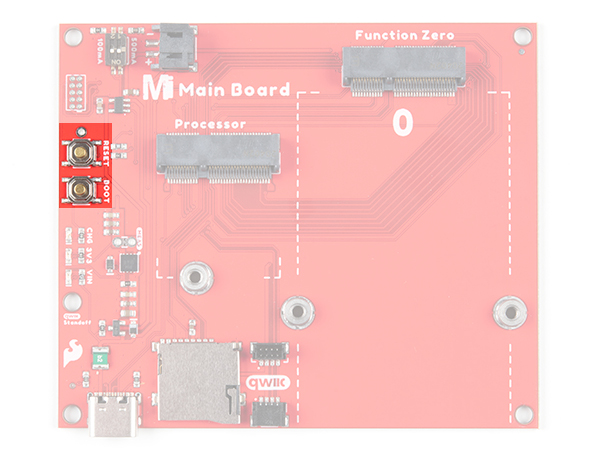
Reset and Boot Buttons

Each board includes a reset and boot button. There is an additional reset button PTH next to the reset button.
Hitting the reset button to restart your Processor Board. Hitting the boot button will put the Processor Board into a
special boot mode. Depending on the processor board, this boot pin may not be connected.
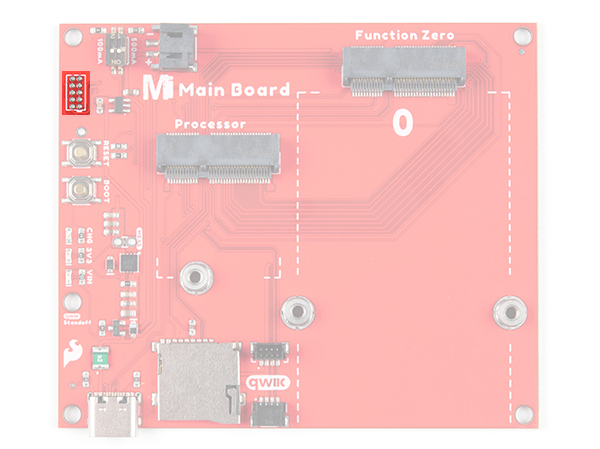
SWD Pins
For advanced users, we proke out the 2x5 SWD programming pins. Note that this is not populated so you will
need a compatible header and compatible JTAG programmer to connect.
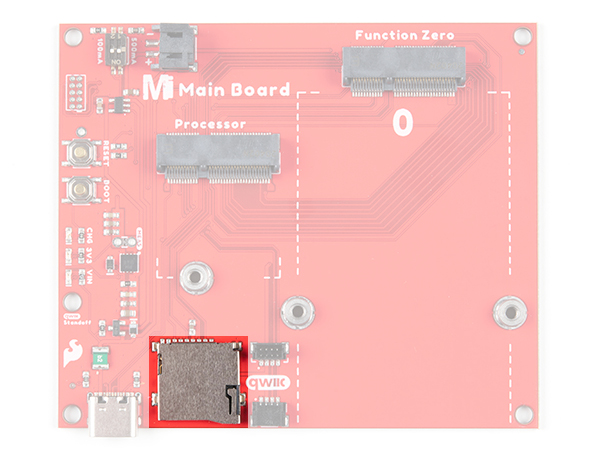
MicroSD Socket
The board includes a microSD socket if your application requires you to log and save data to a memory card. The
primary SPI pins (SDO, SDI, SCK, CS0) from your Processor and Function Board are connected to the microSD
Socket.
Dieses Handbuch passt für folgende Modelle
1
Inhaltsverzeichnis
Andere sparkfun Trägerplatine Handbücher


Beliebte Trägerplatine Handbücher anderer Marken

CTJ
CTJ TX2 Bedienungsanleitung

Amfeltec
Amfeltec AngelShark Series Bedienungsanleitung

Advantech
Advantech CPC-2420 Installations- und Betriebshandbuch

Bob's Space Racers
Bob's Space Racers BSR-3000 Bedienungsanleitung

RTimes
RTimes Z509 Bedienungsanleitung

mikroElektronika
mikroElektronika Clicker 2 Bedienungsanleitung


