
Strongarm Walking Foot Sewing machine Bedienungsanleitung
WALKING FOOT
SEWING MACHINE
USER MANUAL


Unpacking and Setting Up Your Strongarm
Sewing Machine.
Remove the tools and accessory box and the thread stand that are taped to the foam
packing surrounding the sewing machine.
Fit the base to the machine. It’s a job best done by two people, or by laying the machine
on the edge of a table. The base has two pins that insert into two holes on the back of
the sewing machine.
Slide the two pins on the base into the holes in the back of the sewing machine. The
two holes have small screws on their underside that may need to be loosened using the
screw driver supplied in the tools and accessory case. Once the pins are located in the
holes, tighten the screws to secure the base to the machine. The base can now be
swung under the machine. If the base doesn’t line up properly, loosen the screws to
adjust the position of the base, then re-tighten.
There is a small tab on the front right of the sewing machine that locks the base in
place.
Please retain the original foam and cardboard shipping container. You’ll need it if you
ever need to transport the machine or return it for service
Tools and Accessories Case
Inside the tools and accessory case you’ll find the thread post. It’s a small silver rod
about 5cm long with two holes.
The thread post screws onto the top of the machine just in front of the carry handle.
The thread stand is taped to the foam packaging. To assemble, screw the smaller rod
into the centre of the base. Loosen the small screw on the side with the supplied
screwdriver. Insert the thread guide into the hole and then tighten the screw.
Inserting Needles
INCORRECTLY INSERTED NEEDLES ARE THE NUMBER ONE CAUSE OF SEWING
PROBLEMS. PLEASE READ THE FOLLOWING INSTRUCTIONS CAREFULLY, AND RE-
READ THEM IF THE SEWING MACHINE IS FAILING TO MAKE A STITCH.
The Strongarm 2000U-33 comes with a size 20 (metric 125) sharp
point needle fitted.
Three spare needles are included in the tools and accessory case.
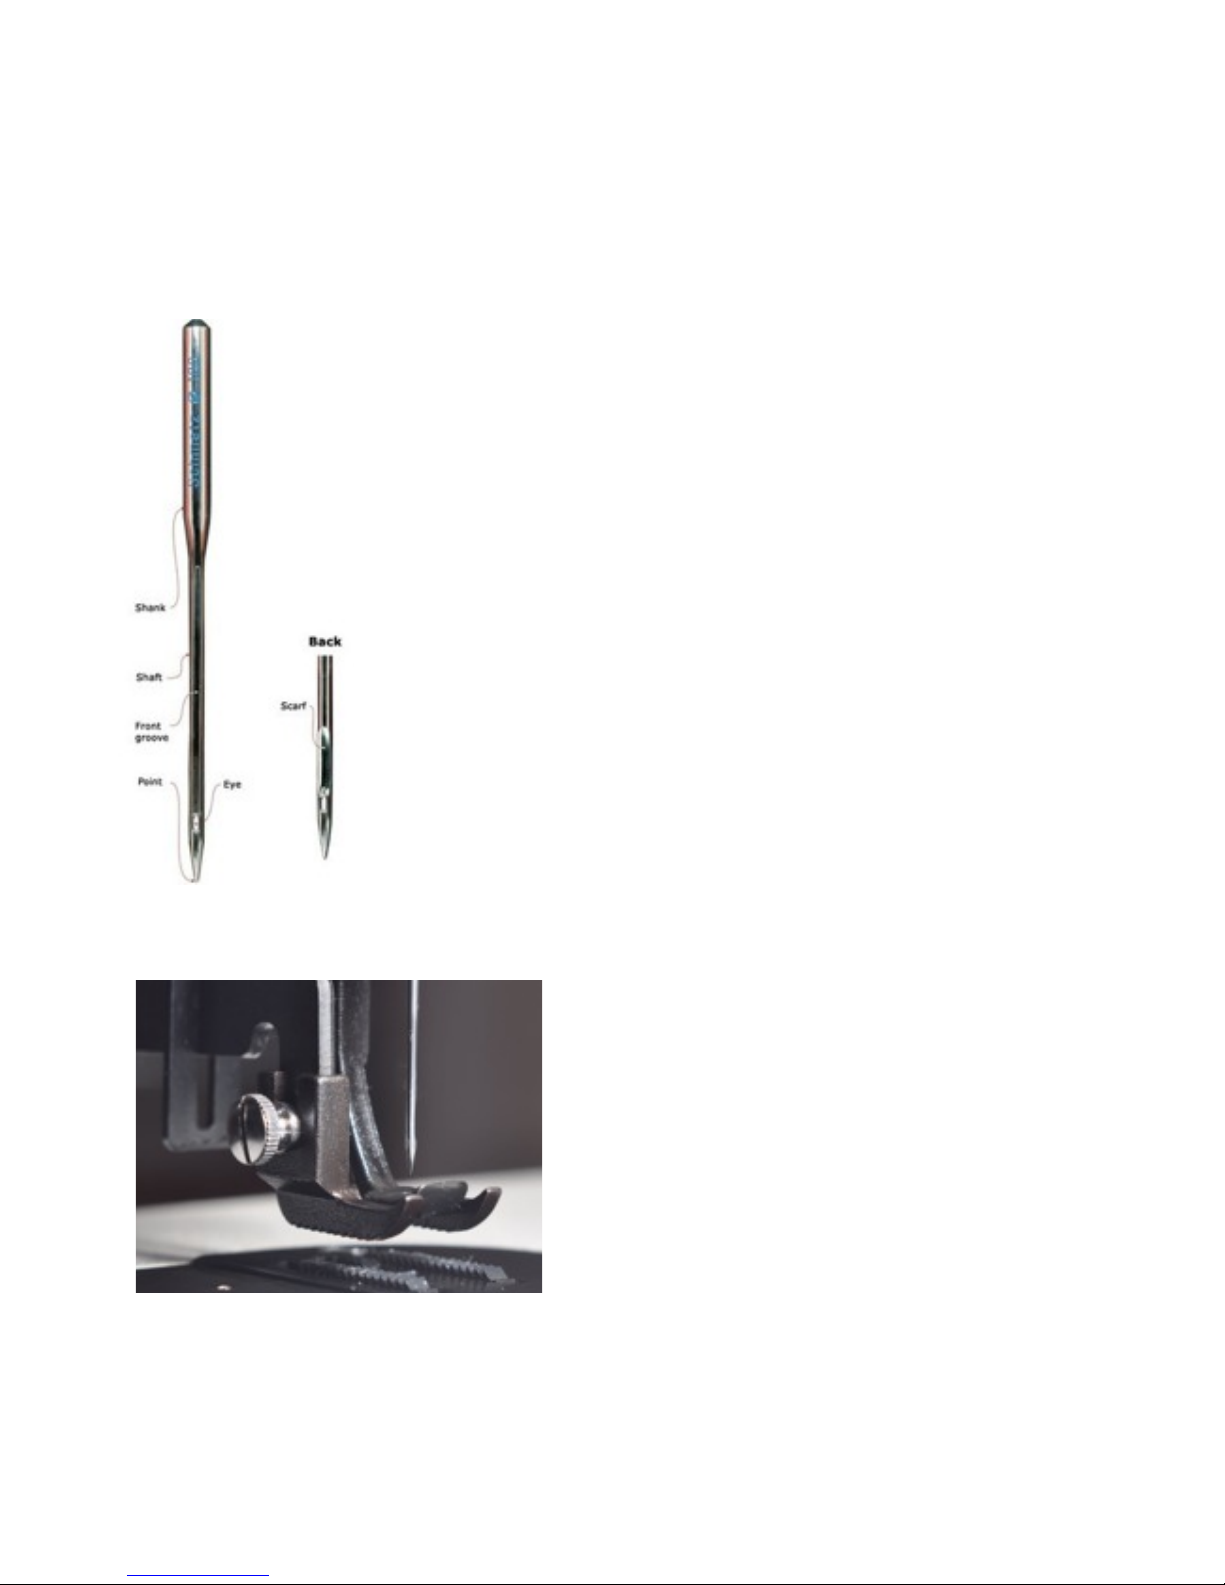
Unlike domestic sewing needles, industrial needles have a round
shank and can very easily be inserted the wrong way.
If you look closely at the needle, you will notice the needle has two
sides. One side has a groove that runs from the eye to the shank. The
other side has a smaller indent just above the eye, called a scarf.
Now look at the needle fitted to the sewing machine. Notice the long
groove faces outwards, or to the left as you face the sewing machine.
To insert a needle, loosen the small screw on the needle bar of the
sewing machine that secures the needle. Remove the old needle.
Insert the new needle with the long groove facing
outwards, or to the left as you face the machine.
Slide it all the way in, then tighten the small
screw to secure the needle.
IT’S NOT HARD TO INSERT THE NEEDLE
CORRECTLY, BUT IF IT ISN’T INSERTED
CORRECTLY, THE MACHINE WILL SKIP
STITCHES, BREAK THREAD OR BREAK
NEEDLES.
Threading up the machine
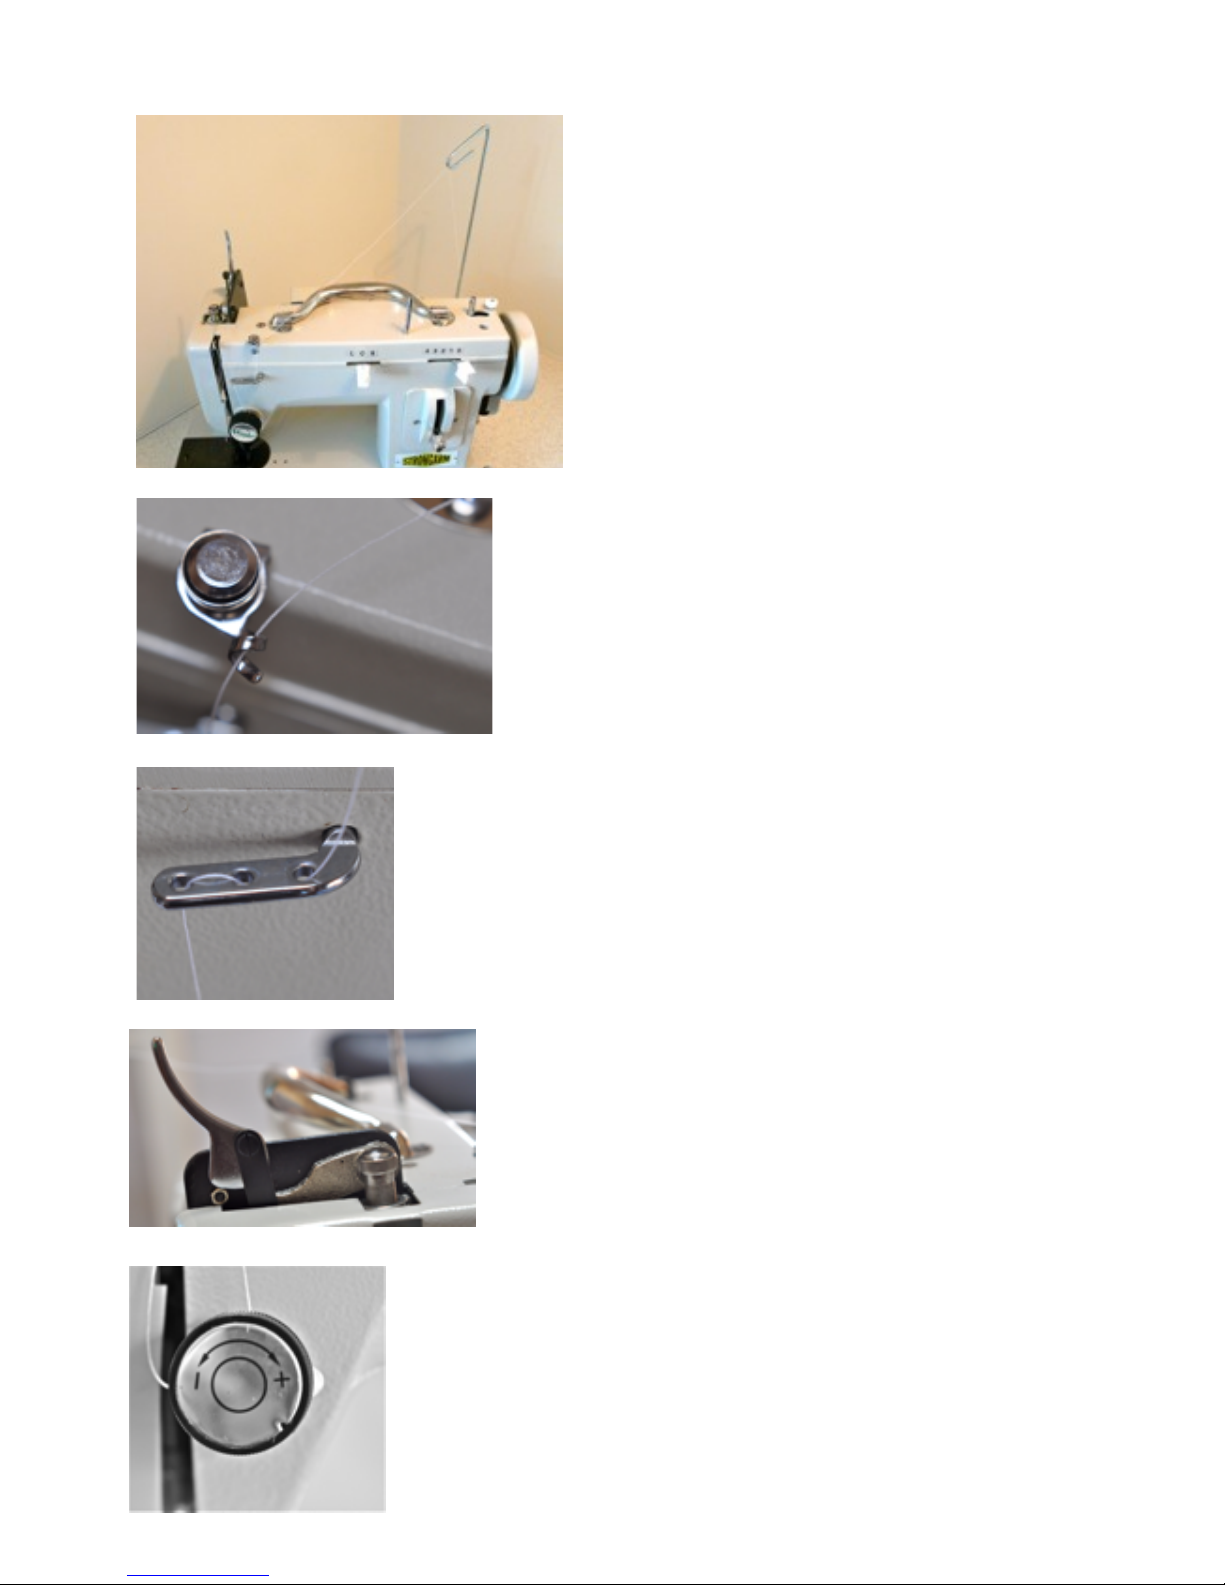
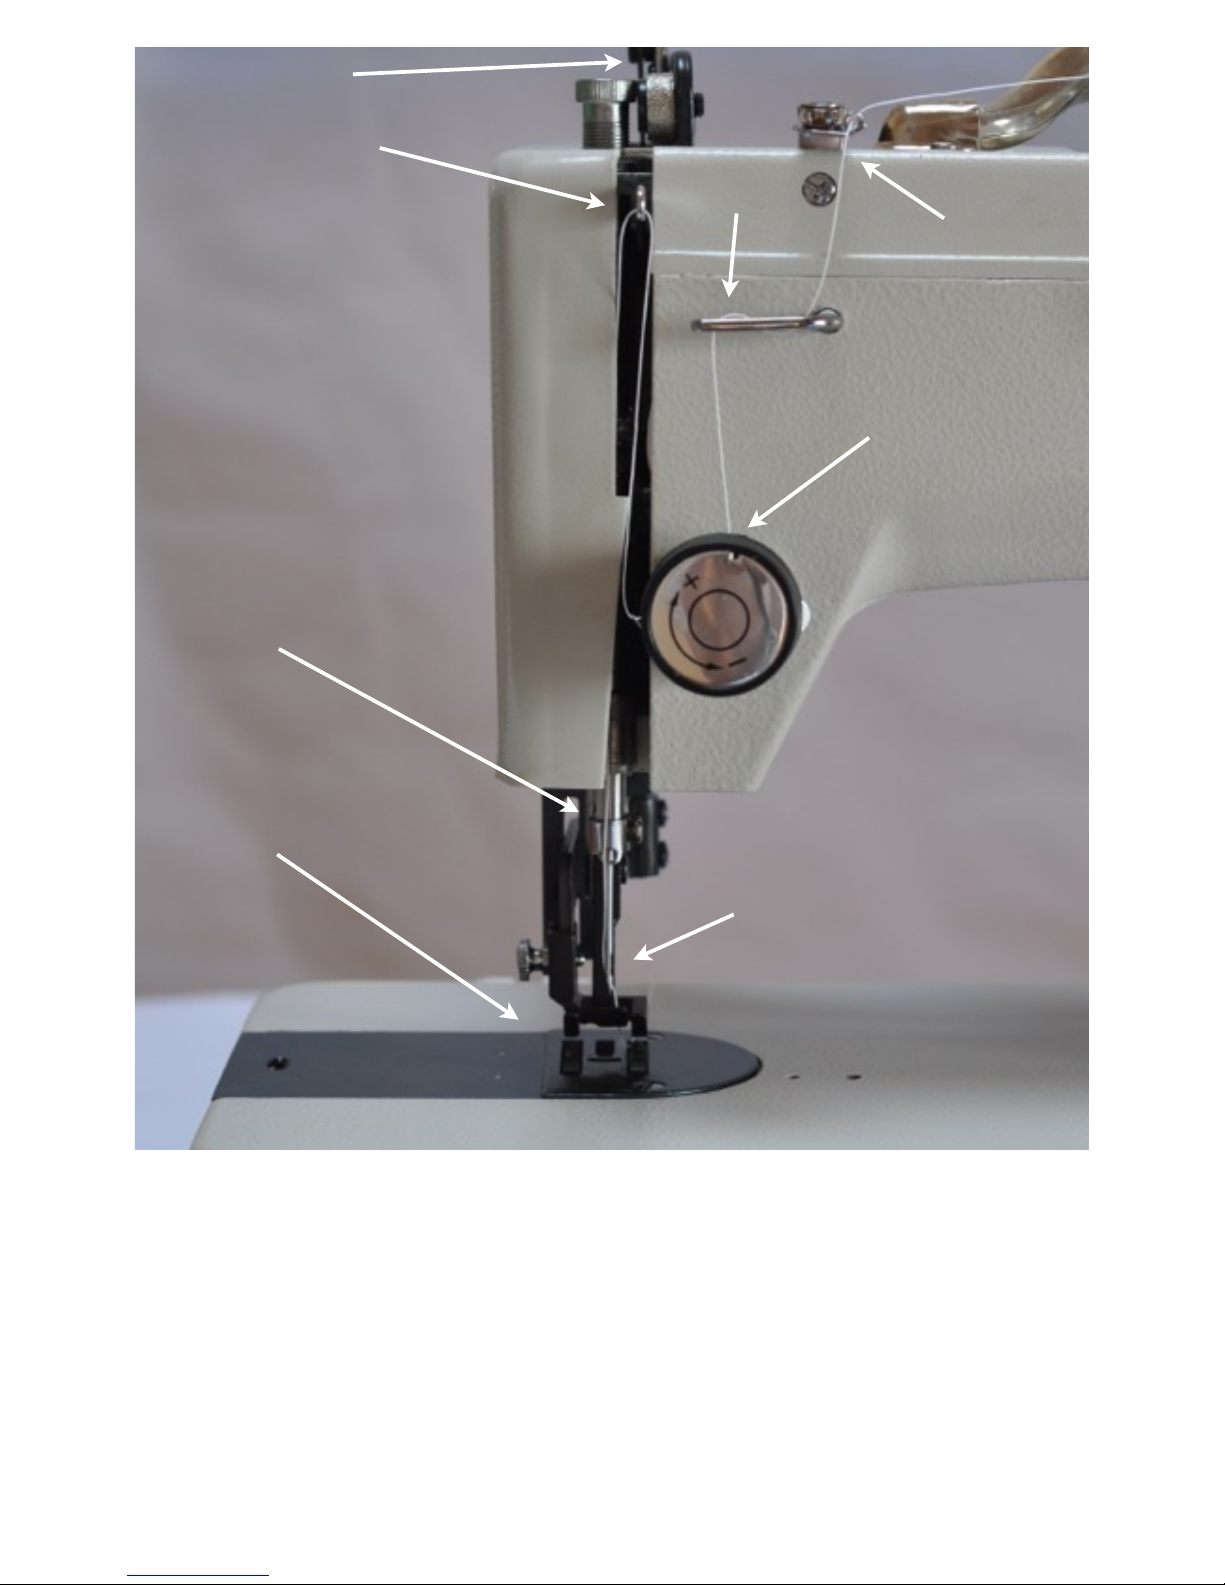
3. Run the thread down, up, then down through the three
holes in the thread guide.
4. Lift up the foot-lift on the top left of the machine. This
releases the tension on the thread tension disk.
1. Place the spool of thread on the thread stand
behind the machine. Run thread up through the
arm of the thread stand.
2. Run the thread through the pigtail next
to the bobbin tensioner.
5. Run the thread under the tension discs and up
underneath the thread spring. If you remove the lid, you
will see two grooves, make sure the thread goes around
the groove closest to the machine, not the outer groove.
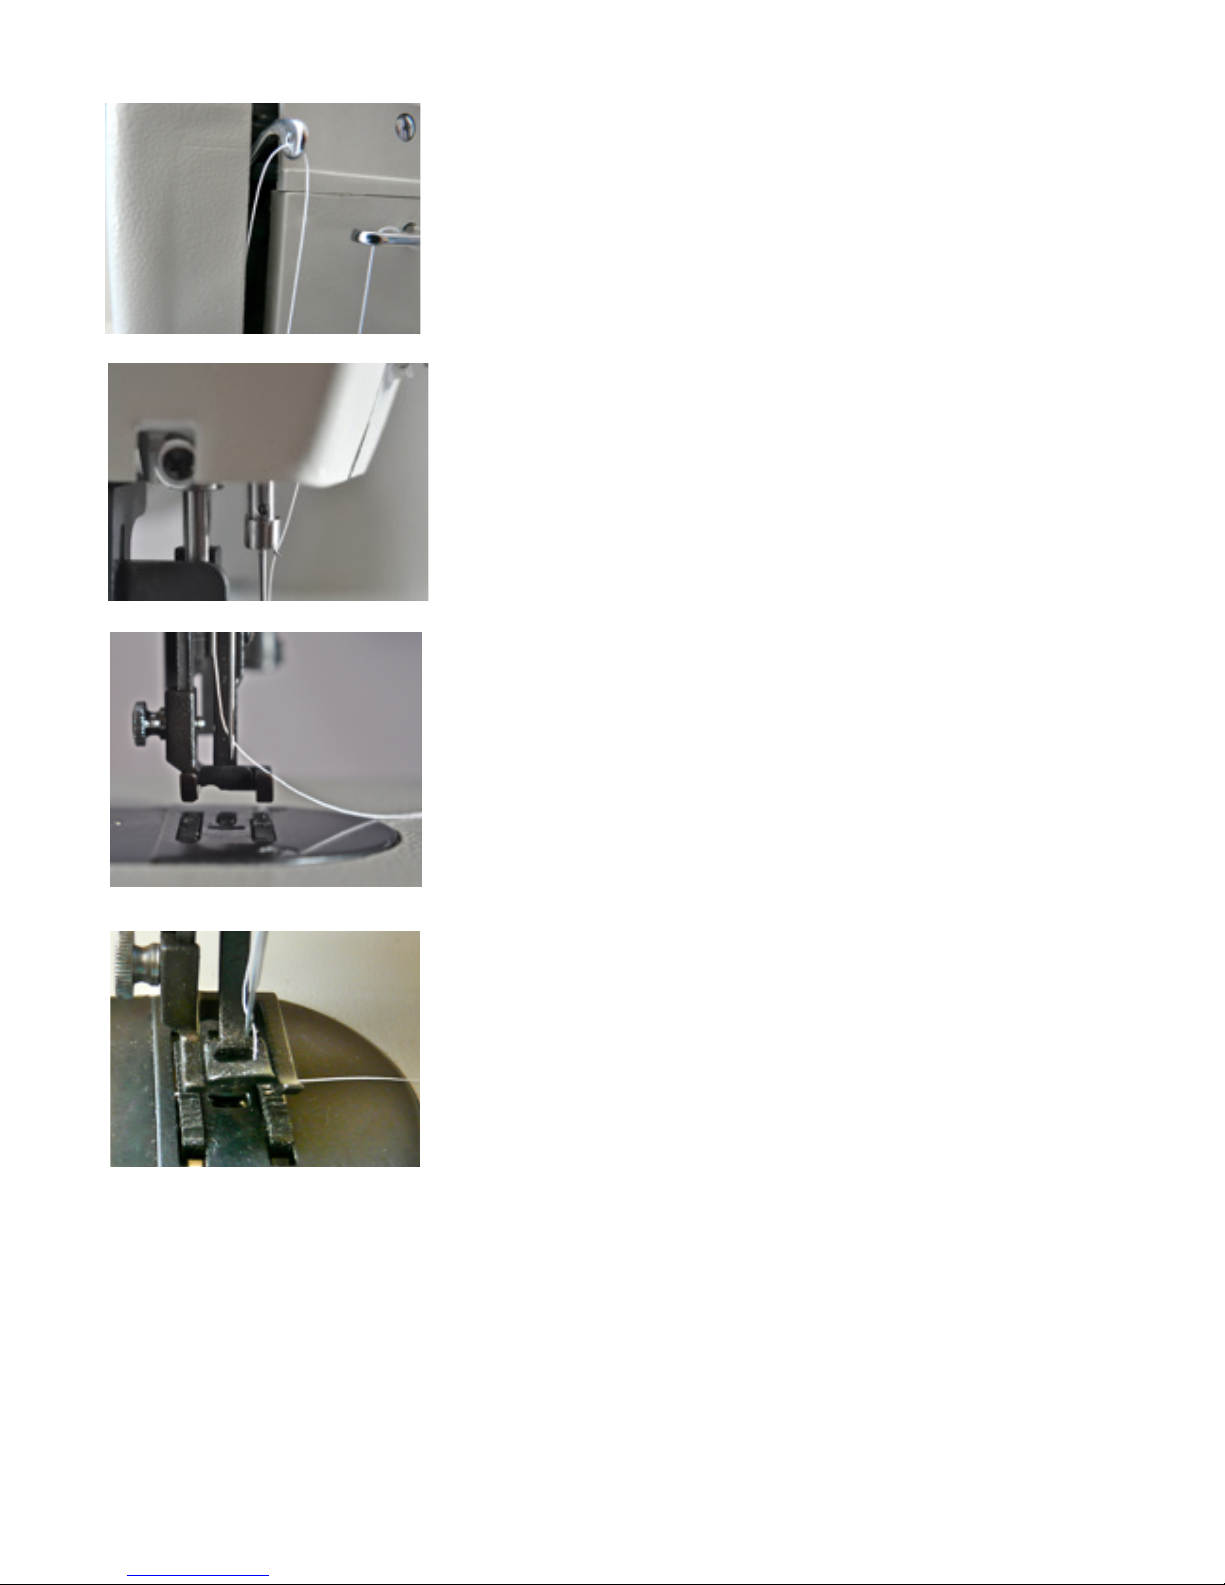
6. Thread the eye in the take up arm from right to left.
7. Run the thread through the hole on the front of the needle bar,
above the needle.
8. Thread the needle from left to right.
9. Slide the thread through the hole in the walking foot, and then
pull through about 10cm of thread.
3.
4.
7.
6.
8.
5.
2.
9.
This picture shows the correctly threaded machine.
Winding, threading and inserting the bobbin
Your Strongarm Sewing machine comes with a small amount of thread fitted to the bobbin.
This was used to test, or “sew off” the machine. You’ll need to wind thread onto the bobbin
before you start sewing.
To wind a bobbin
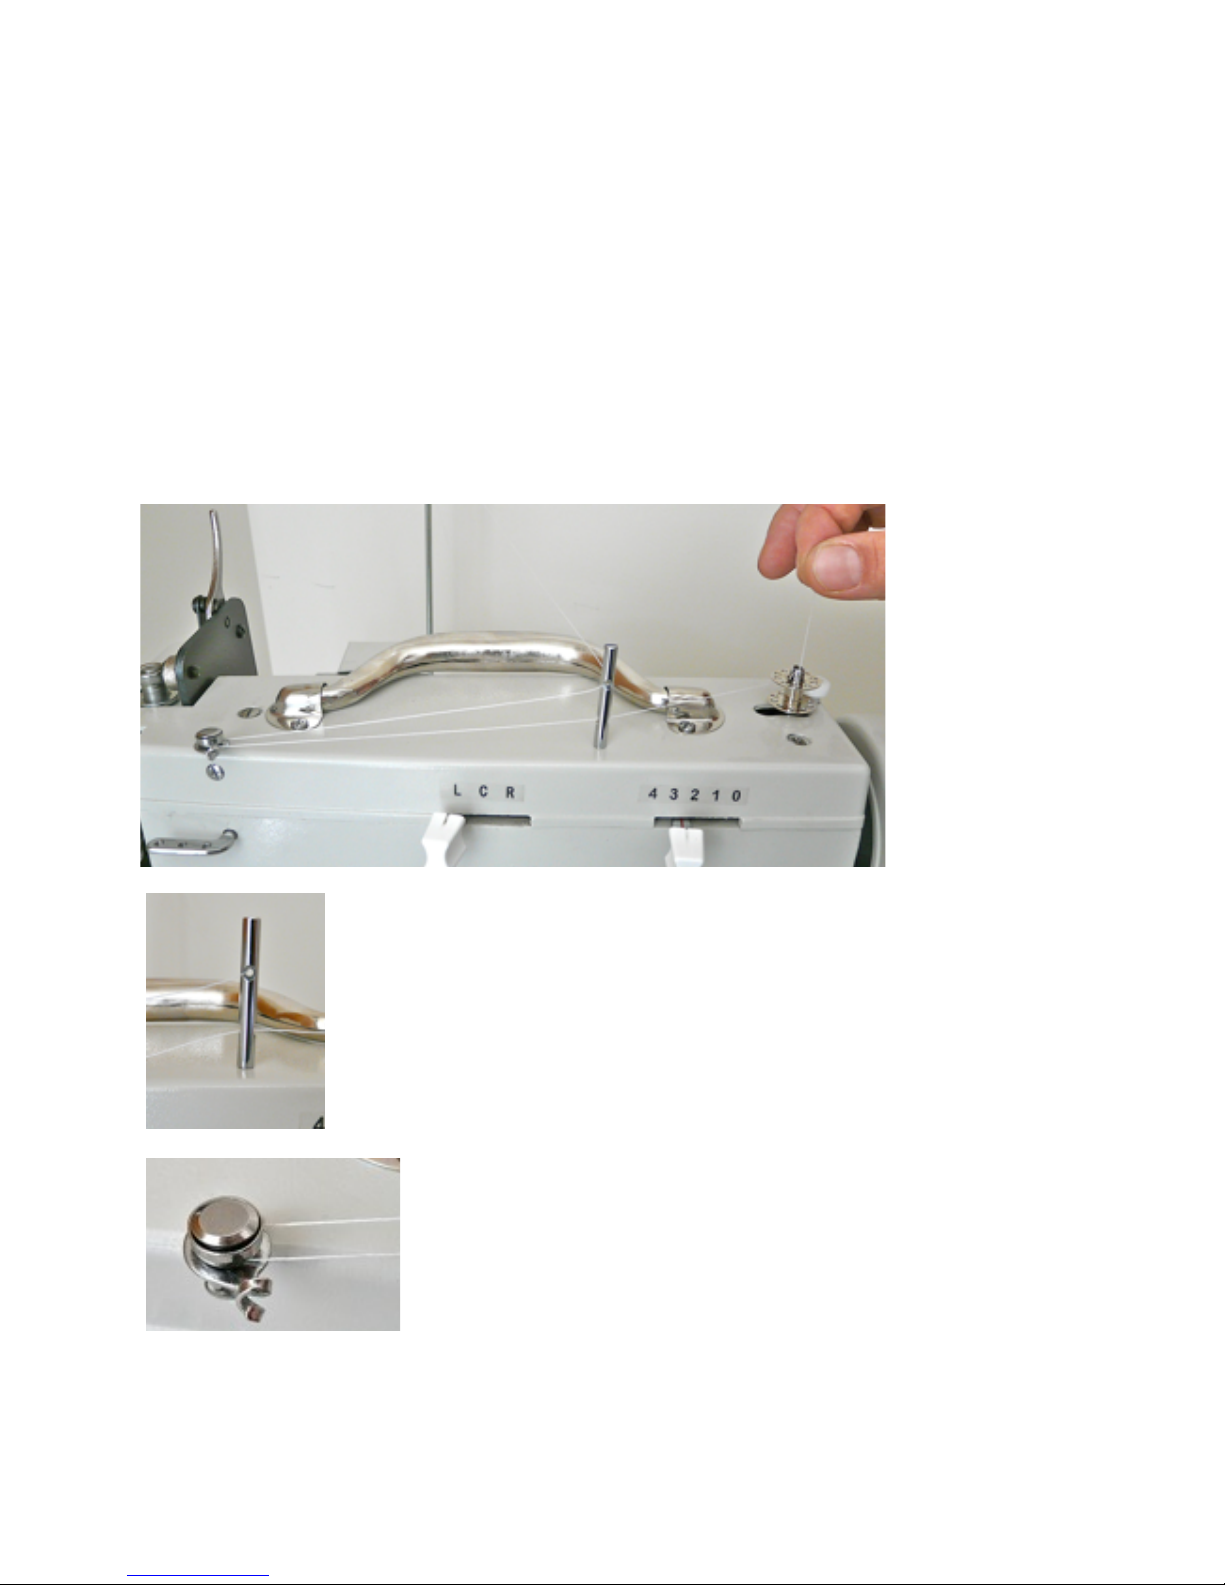
1. !Place a bobbin on the bobbin winder on the top right of the machine.
1. Run the thread from the thread stand arm through the top hole in the
bobbin post, from right to left.
2. Run the thread around the bobbin tensioner next to the pig tail.
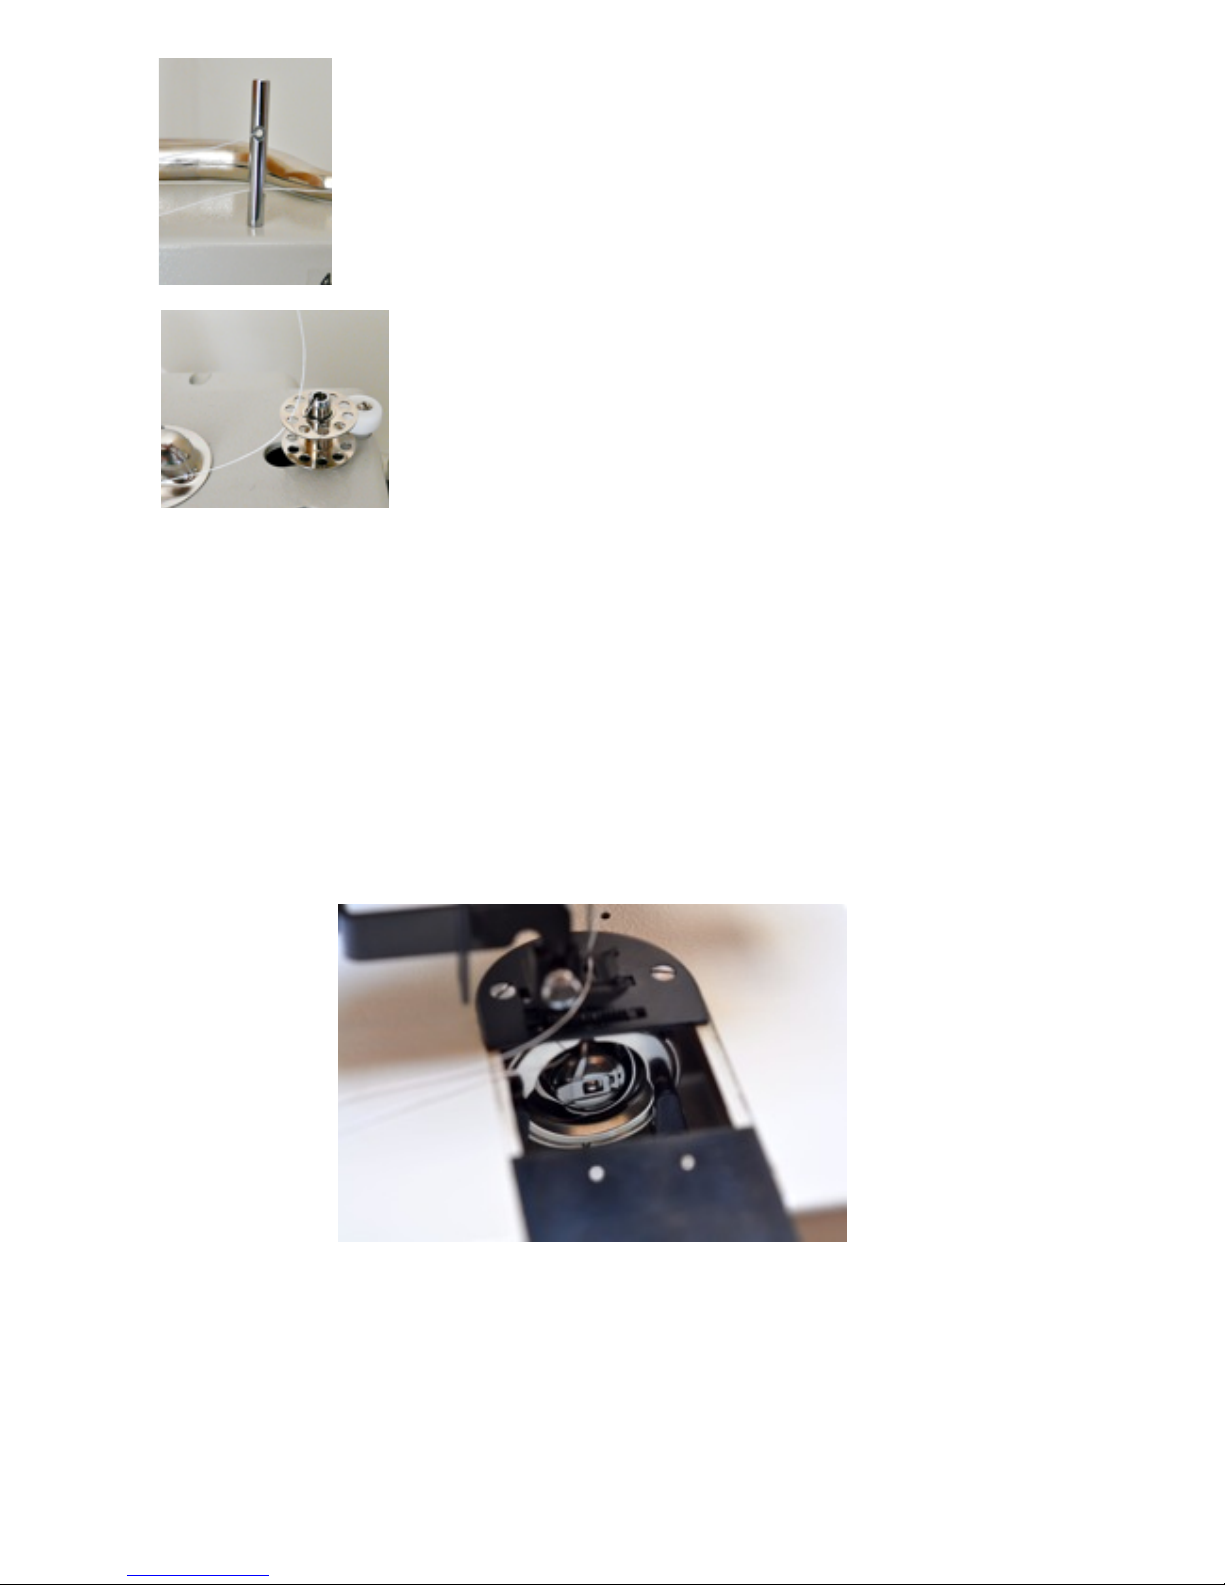
4. Bring the thread under and up through one of the holes on the
higher side of the empty bobbin and hold the end of the thread
to give a small amount of tension.
5. Click the bobbin to the right
6. Press the foot pedal to wind the thread onto the bobbin.
The bobbin will automatically stop winding when it is full. If you’re doing a big job, it’s a good idea
to wind all bobbins before you start to save unthreading the machine. Best of all is to have two
spools of thread, one for sewing and the other for winding bobbins as you sew. This will require
the purchase of a second thread stand.
Removing and installing the bobbin
The bobbin can be accessed through the machine’s black sliding cover plate to the left of the
needle.
Removing the bobbin case
Slide the cover-plate to your left and grab the small lever on the bobbin with your thumb
and forefinger.
Pull the bobbin case out from the machine. You’ll notice with the lever out, the bobbin is
captive inside the bobbin case.
One you release the lever, the bobbin is free to be removed from the bobbin case.
3. Run the thread back again through the lower hole in the bobbin post
this time
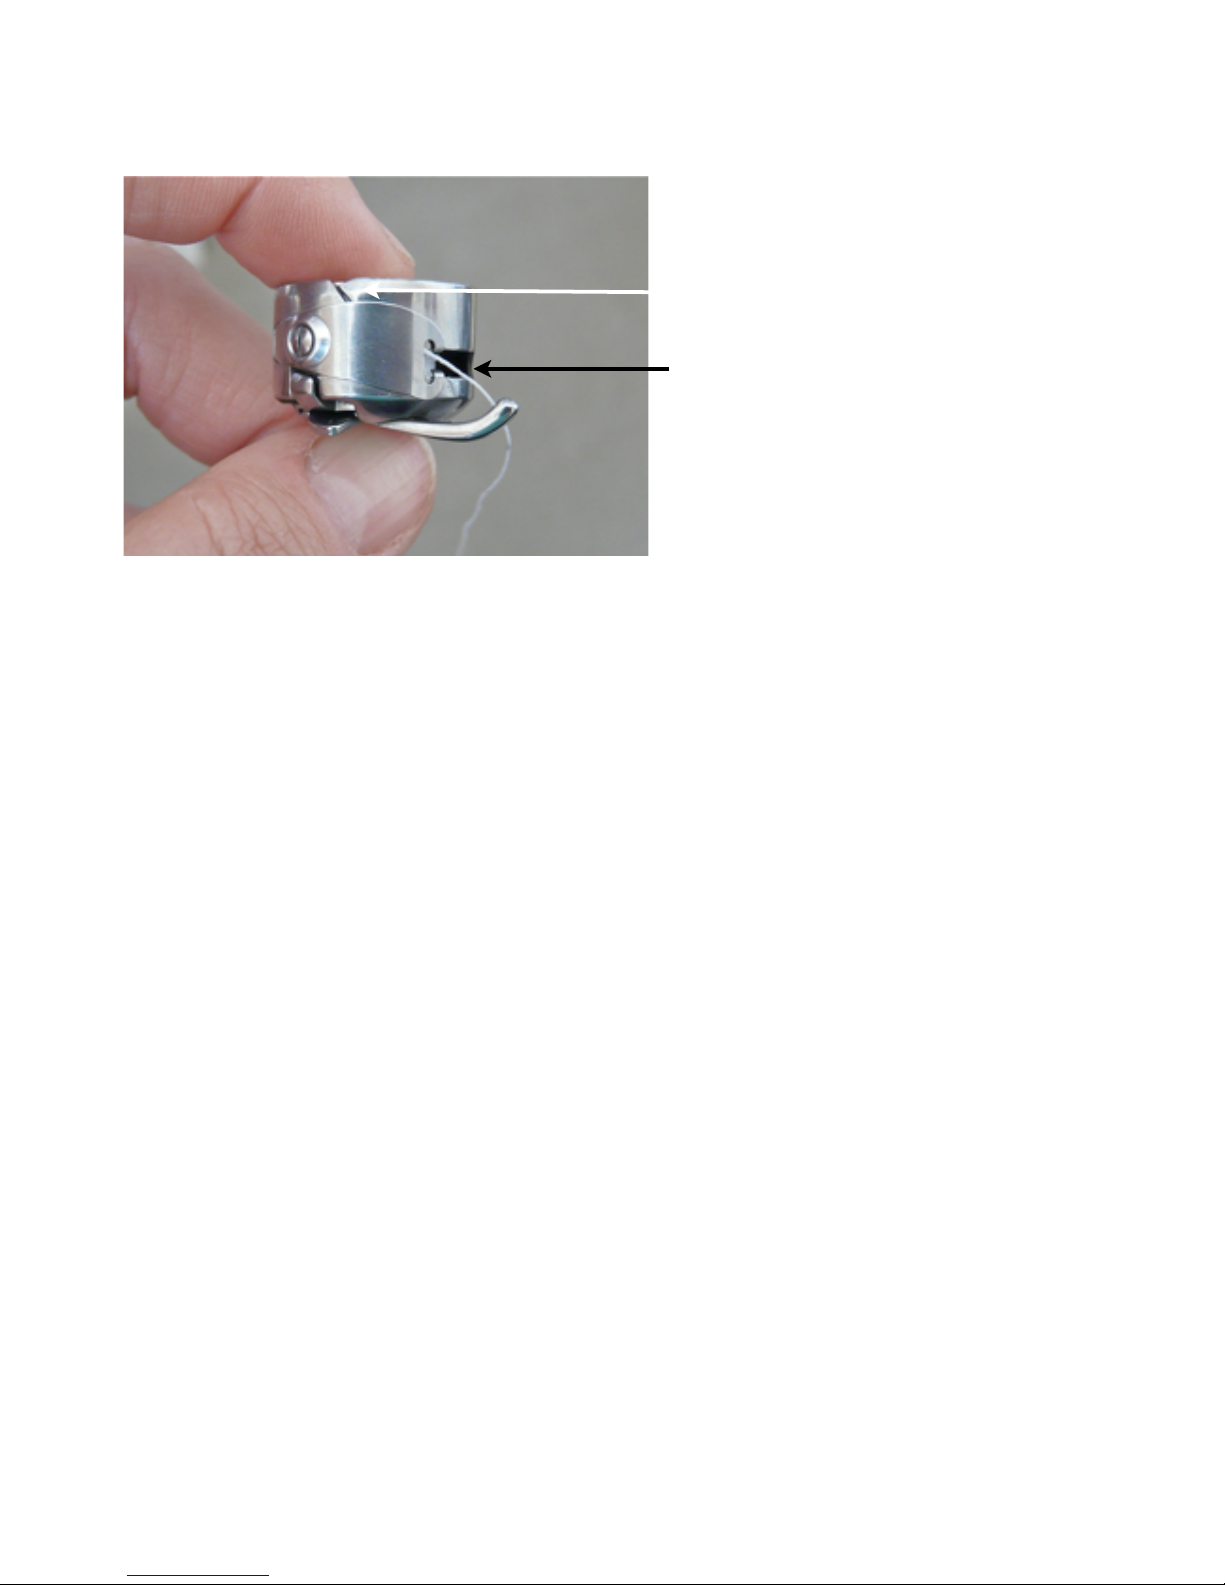
With a few cm of thread hanging loose,
place the bobbin in the bobbin case.
Slide the thread through the slit in the
side of the bobbin case.
Run the thread under the tension plate
to the notch in the top centre of the
bobbin case.
Pull out 10 or so cm of thread.
To install the bobbin case.
With the case threaded, hold the bobbin case by the lever to prevent the bobbin falling out, and
insert onto the axle of the shuttle. Keep the lever horizontal and the finger vertical.
Release the lever and push the bobbin case into the shuttle. You’ll feel the bobbin case click in
place.
To pick up the bobbin thread
Raise the foot bar using the lever on the top of the machine.
With the needle thread held in your left hand, turn the balance wheel towards you (from the top)
until the needle goes through one full revolution and finishes in its highest position.
The needle thread will now be looped around the bobbin.
Pull the needle thread gently to pull up the bobbin thread.
Fish out both threads using a flat object such as a pair of small scissors and pass at least 10 cm
of thread behind the foot. Make sure the needle thread is running through the hole in the centre of
the walking foot.
Threading the Bobbin Case.
Sewing.
With the machine fully threaded, lift the foot using the lever on top of the machine and place
some fabric under the foot.
Make sure at least 10 cm of both the needle thread and the bobbin thread are behind the foot.
Hold the thread ends lightly behind the foot and begin sewing, releasing the thread as the
machine starts to sew.
Holding the thread out of the way prevents the stray thread being sewn over.
Never sew without fabric under the machine as the thread may jam, causing damage to the
machine.
Dieses Handbuch passt für folgende Modelle
1
Inhaltsverzeichnis


