Tunersys WS161 Bedienungsanleitung

User Manual
Internet Radio Amplifier
WS161
Please read this user manual carefully
before using the internet radio amplifier

Contents
Location of Controls on Unit.. ......................................
Remote control.............................................................
Before You Start and Caution ......................................
Network Setup & How to input security code .............
Overview of features functions & Use shortcut keys.....
Internet Radio.............................................................
My Favorite ................................................................
Media Centre..............................................................
BT playback/Alarm/Sleep Timer Setting....................
Configuration and Adjust backlight level ....................
Add your favourite URL/ Manage favourite by PC…..
Trouble Shooting........................................................
Helpful Tips.................................................................
Connection Diagram...................................................
Technical Specification................................................
What's included in the box..........................................
Page
1
2
3
4
5
6
7
8
9
10
13
14
15
16
17
18

-1-
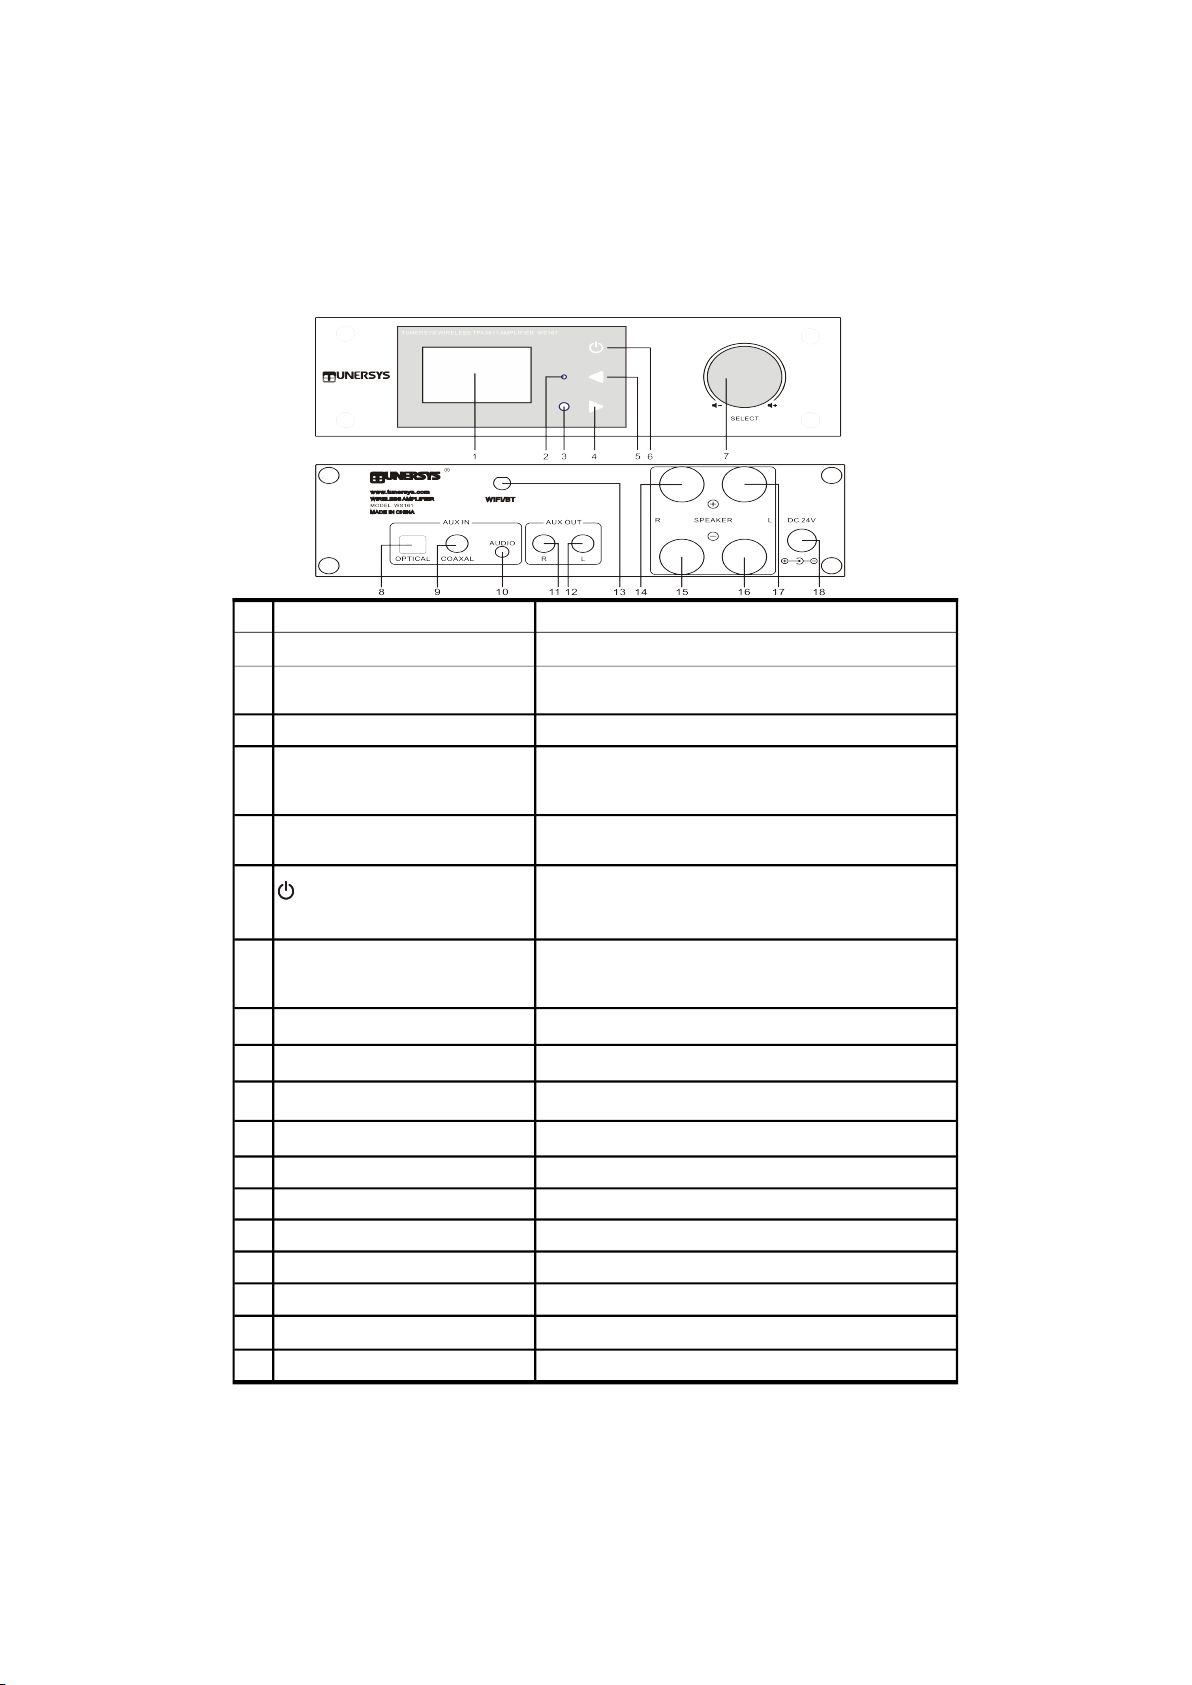
Location of interfaces and controls on the host
1 LCD 2.0” LCD Display
2 Indicator LED Light Sound Source Indicator LED Light:Red on Internet
radio, Blue on UPnP, Purple on BT Mode
3 IR sensor Receives Infra red signal from remote control
4 ► Right—Touch button Press to cycle through the display option in radio
playing mode / Enter edit menu in Favourite
list / cursor right
5 ◄ Back/Left -Touch button Press to exit to previous menu / delete entry of
character's input/ cursor left
6 Power Off/Menu - Touch button Press to display main menu to view different
modes or setting options,Press and hold for more than
1 second to enter/exit from Standby mode
7 Tune/Select (ok,Enter) Knob Rotate Knob to navigate menu on mian unit, Rotate to
adjust volume of amplifier, Press to select (ok,Enter) an
item
8 Optical Digital in Optical digital input, with volume control in AUX mode
9 Coaxial Digital in Coaxial digital input, with volume control in AUX mode
10 Audio in 3.5mm headphone Jack audio input, with volume control in
AUX mode
11 AUX out - R AUX/ Line Audio out-put Right channel
12 AUX out - L AUX/ Line Audio out-put Left channel
13 Wi-Fi/BT Antenna Jack External Wi-Fi/BT antenna
14 Terminal for Speaker +R Amplifier output (right channel positive) connects speaker
15 Terminal for Speaker -R Amplifier output (right channel negative) to speaker
16 Terminal for Speaker -L Amplifier output (left channel negative) to speaker
17 Terminal for Speaker +L Amplifier output (left channel positive) to the speaker
18 DC-IN Jack Power Supply DC 12-24V/3-5A
Name Operation

-2-
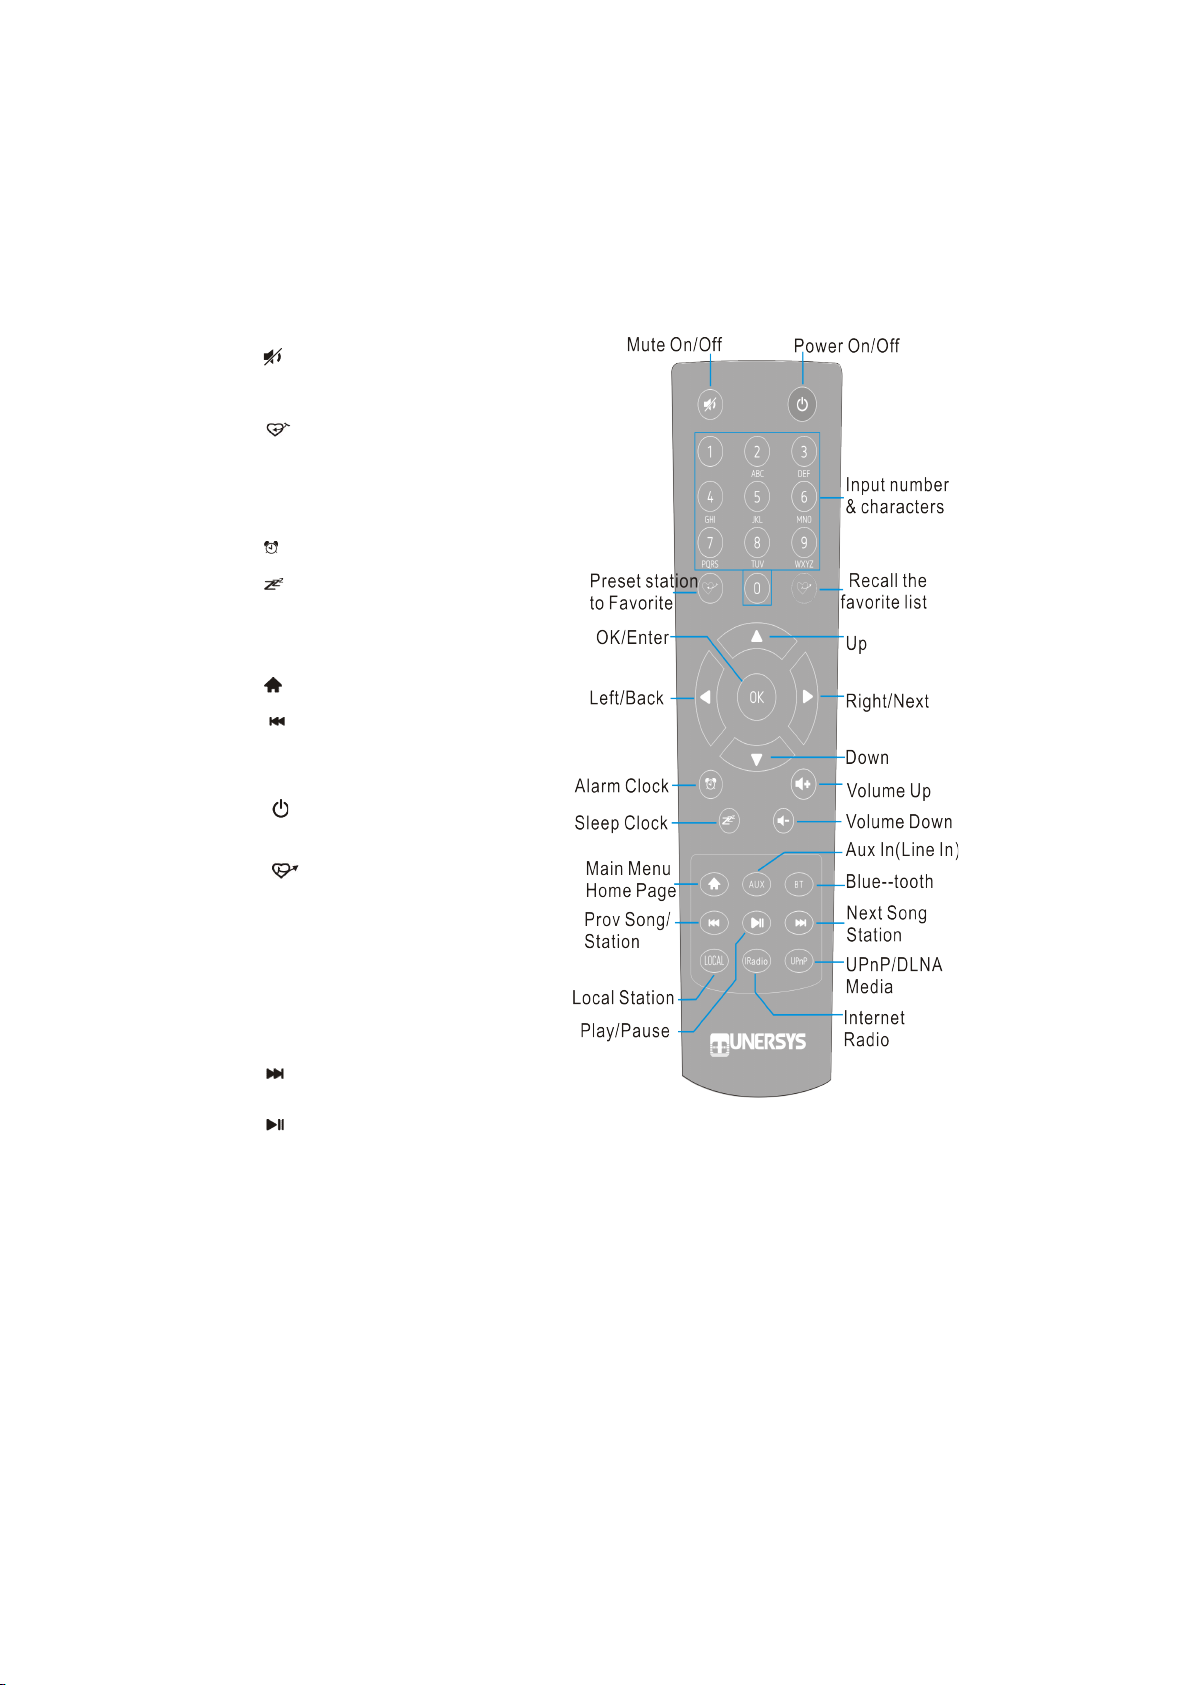
Remote Control function description
1. : Mute button
2. 0-9 : Enter numbers in the list / Enter
characters for the WiFi password
3. : Preset station button, Preset the
current playing station to Favorite
4. ▲ : Cursor up button
5. ◄ : Cursor left / back to previous menu
6. : Alarm button
7. : Sleep Timer button
8. AUX: AUX in button for Audio Line in-3.5
mm Jack/Digital in-put – Optical /Co-axial
9. : Main Menu button
10. : Previous station / previous track
11. Local: Access the local station list (Local
area set up in Configuration)
12. : Press to toggle between Standby
and On Operation
13. : Recall station from favorite list
14. OK: ok,Enter confirm button
15. ► : Cursor right button
16. ▼: Cursor down button
17. Vol+: Volume up button
18. Vol-: Volume down button
19. BT: to play audio from a mobile phone or
aother Bluetooth enabled device
20. : Next station / next track
21. : Play/pause button
22. UPnP: UPnP Media Centre button
23. IRadio: Internet radio button

-3-
Before you start
Please ensure the following is ready:
You have a broadband internet connection.
A wireless broadband router is connected to the internet successfully. The radio supports
Wireless B, G and N connection (Wireless N router can also be used with the setting on B or G).
You know the Wired Equivalent Privacy (WEP) or Wi-Fi Protected Access (WPA) data
encryption code/password. You need to key in the correct code when the radio is connected to
the wireless router for network connection. If you do not know the code/password, please
contact the person /technician who set up the router/network for you.
The radio can work via Wireless network connection (Wi-Fi connection) .
Precautions
The radio should not be used in a high temperature or high humidity environment over
prolonged periods of time as this may damage the unit.
Keep the radio away from liquids as it may get damaged. Please switch off the radio
immediately if water or liquids is spilled into the radio. Consult with the shop you bought this
radio for any question.
Avoid using or storing the unit in dusty or sandy environment.
Do not open and repair the radio by yourself.
Use only the AC adaptor supplied with the radio. Connecting a power supply with a different
rating will cause permanent damage to the radio and may be hazardous.
Clean only with dry cloth.
WARNING:TO PREVENT FIRE OR ELECTRIC SHOK HAZARD,
DO NOT WXPOSE THIS PRODUCT TO RAIN OR MOISTURE.
CAUTION:TO REDUCE THE RISK OF ELECTRIC SHOCK DO NOT RO-
MOVE THE RADIO BACK.NO USER SERVICEABLE PARTS IN-
SIDE.REFER SERVICING TO QUALIFIED SERVICE PERSONNEL.
THE LIGHTING FLASH AND ARROWHEAD WITHIN THE TRIANGLE
IS A WARNING SIGN ALERTING YOU OF “DANGEROUS VOLT-
AGE” INSIDE THE RADIO.
THE EXCLAMATION POINT WITHIN THE TRIANGLE IS A WARN-
ING SIGN ALERTING YOU OF IMPORTANT INSTRUCTIONS AC-
COMPANYING THIS RADIO.
CAUTION
RISK OF ELECTRIC SHOCK
DO NOT OPEN

-4-
1. To start up
• Remove internet radio amplifier(called Amplifier hereafter) from the package box.
• Install the Wi-Fi/Bluetooth external antenna (rotate clockwise to install into the thread of antenna
jack)
• Connect the speaker, and distinguish the positive and negative poles
• Plug in the DC adapter (Indicator LED Light will be lit).
• Caution: Use only the adaptor supplied with the Amplifier . Connecting a power supply with a
different rating will cause permanent damage to the radio and may be hazardous.
The Amplifier is intended to connect with external speaker. Can connect your stereo line/aux out
through the RCA Jack Analogue output and connect your stereo line/aux in through the 3.5mm Jack
Analogue input or Digital input located on the rear panel of the Amplifier for listening.
2. Network setup using remote control
Internet connection can be setup via wireless LAN (WiFi).your amplifier requires a broadband Inter-
net connection through WiFi. The easiest way to connect is through a Wifi router.
Wireless LAN (Wi-Fi)
• If this is first time use, the Configure Network wizard will be displayed. Use knob on amplifier or left
and right right arrows on remote to Choose Yes to start configuring network. Press the [Back/◄]
button to highlight Yes and press [OK] on remote to confirm.
• Select Add/Remove AP from the list, use the [OK] knob on amplifier or down and up arrows on
remote to scroll and press knob to confirm, then highlight Add AP (Scan) press [OK] to confirm.
• It will start scanning the available Wi-Fi routers around. Scroll to your network and press [OK] on
remote to confirm.
• If your wifi network has a security code protected, it will ask you to enter the passphrase/password.
How to input security code for your wireless network using remote control
On the alpha-numerical keypad, press each button repeatedly to cycle through the letters,
numbers and symbols as listed below.
To input a character, scroll to the correct one and when it is highlighted, press the ► button to
input the next character. When it comes to the last character of the password and it is highlighted,
press [OK] to confirm.
Button 1: 1 and different kind of symbols ! @ # $ % ^ & * ( ) _ + [ ] { } ; : ' ” \ | , . / < > ?
Button 2: 2 A B C a b c
Button 3: 3 D E F d e f
Button 4: 4 G H I g h i
Button 5: 5 J K L j k l
Button 6: 6 M N O m n o
Button 7: 7 P Q R S p q r s
Button 8: 8 T U V t u v
Button 9: 9 W X Y Z w x y z
Button 0: 0
Configure Network ?
<Yes> No
AP:[ ]
Add/Remove AP
Add A P( WPS button)
Add A P( Smart Confiig)
Add AP (Scan)
Wi-Fi Channel

-5-
How to input security code for your wireless network Using control button on the Amplifier
Use the knob on the amplifier to scroll through the characters, when the correct one is
highlighted, press [Forward/►] button on either the remote or the console to input the next charac-
ter. When it comes to the last character of the password and it is highlighted, press [Select] on main
unit to confirm.
Note: The password is case sensitive.
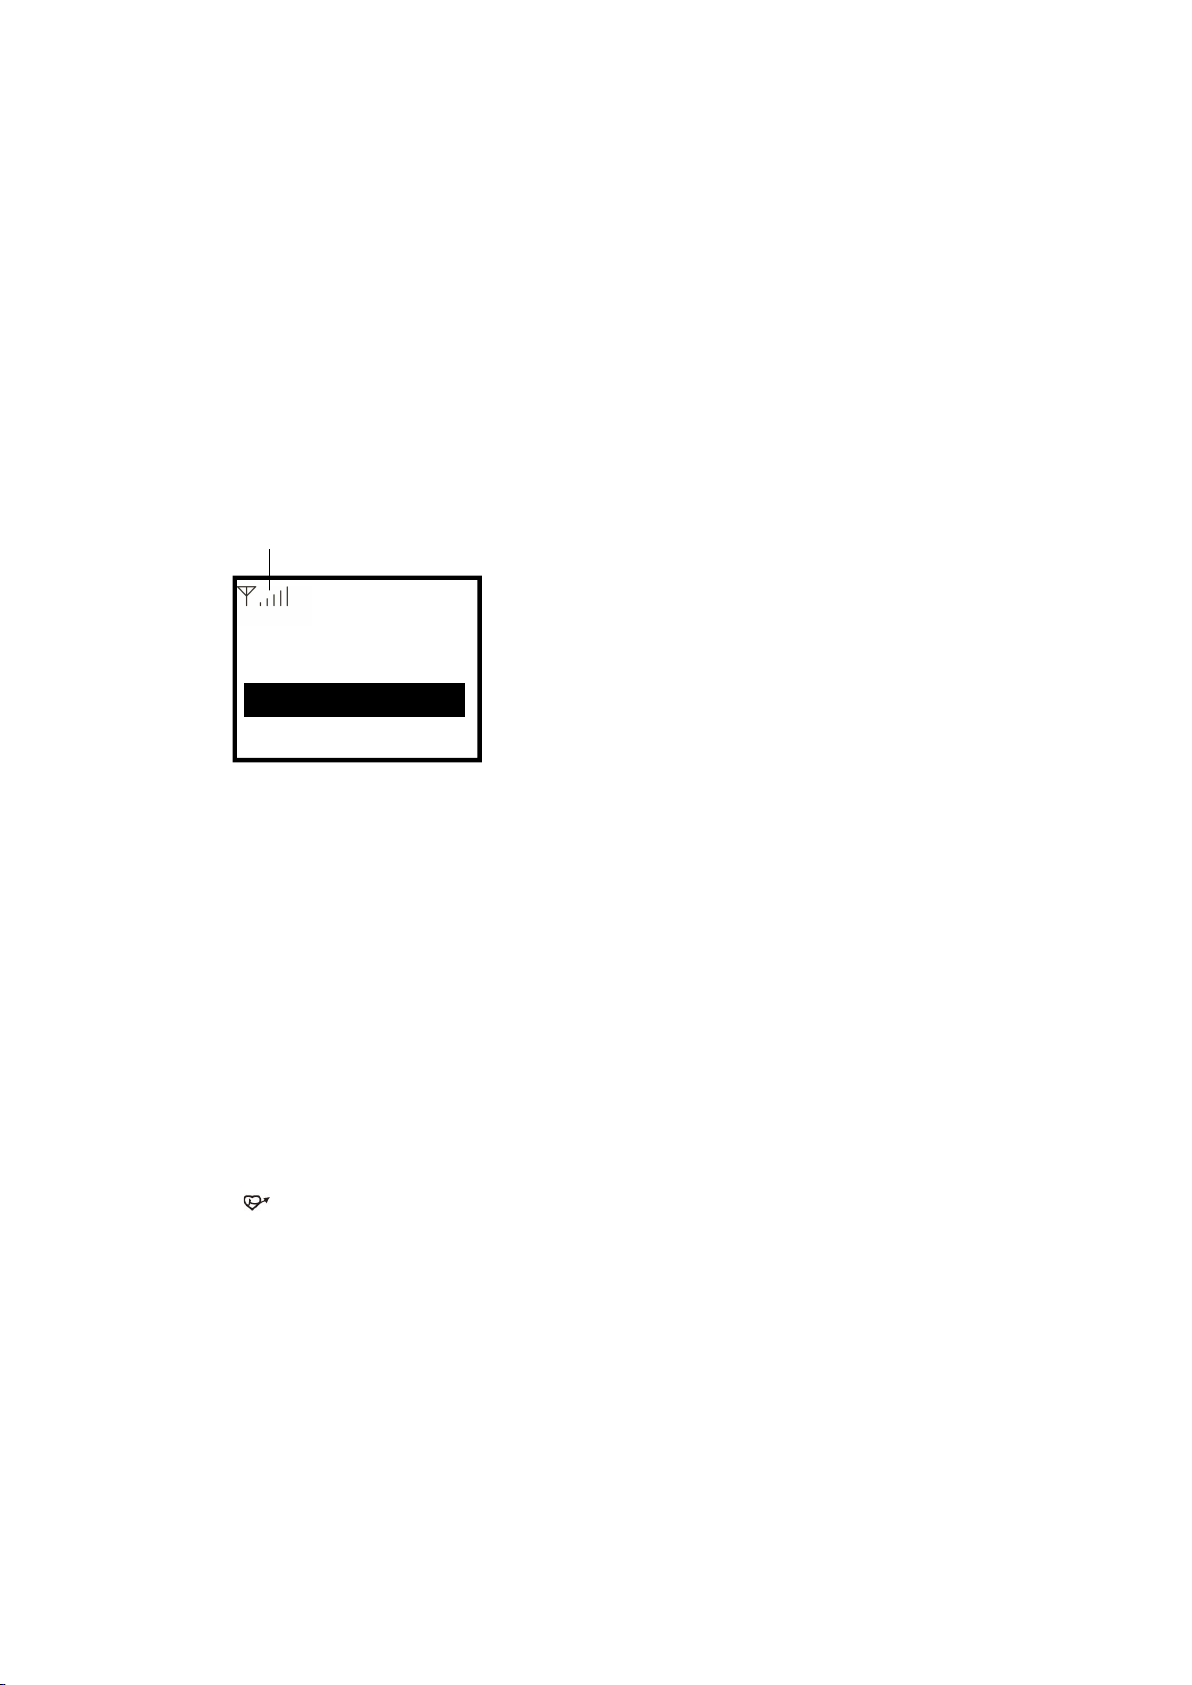
When the Wi-Fi connection is successful, the Association Complete will be shown briefly. The
wifi signal bar will appear on the top left corner of the display:
Wi-Fi signal bar
3. Overview of features and functions
Press the [ Power/Menu ] button on main unit or on the remote control to enter the main menu .
Scroll by rotating the knob on main unit or by using the [◄ / ►] buttons on remote:
My Favorite - To show the list of favorite stations which have been assigned to the presets.
There are up to 99 presets available.
Internet Radio - Start exploring the worldwide radio stations and music here.
Media Centre - You can browse and stream music from your network via UPnP or DLNA
Compatible devices.
Bluetooth - Bluetooth playback, to play audio stream (receive) from a mobile phone or another Blue-
tooth enabled device after pairing/connected each other.
AUX– AUX IN /LINE IN input , to play audio from another source, such as televisions and computer
connected by Optical,Coaxial or 3.5mm audio Cable.
Alarm - Alarm clock. Two music alarm settings available. Enable and set the timer to turn a radio
station of your favorites in on two Groups of music Alarm fo Monday to Sunday or Different week
Days.
Sleep Timer - Set the amplifier to go to sleep after a set amount of time
Configuration - More options/settings available to personalize as you desire.
Use shortcut keys to quickly One-button playback by remote control
[ My Favorite] : Start Listen to the stations that you heard before the last time form favorite
[ IRadio ] :Start Listen to the stations that you heard before the last time form Internet Radio
[ UPnP ] :Play music that you heard before the last time from your network via UPnP or DLNA
[ BT ] :Play music that you heard before the last time from your mobile phone or BT device
[ AUX ] :play audio from another source
08:30 am
My Favourite
Media Centre
Internet Radio

-6-
4. Internet Radio
On the main menu, choose Internet Radio and you will find the options below:
Skytune
Select Skytune to start enjoying thousands of radio stations over the world. You can filter your
search by Region, Music genre and talks.
The Local Radio let you access quickly the stations available in your local area through
internet connection.
Note - You can change the Local Radio area under Configuration> Local radio setup. Please
refer to section 11 for the details.
Note - When you scroll along the list of Globe All and want to quickly reach to a certain point of
the long list, input the index number on the remote control to quickly jump to that point. For
example, on the remote control, input 2 8 and press OK, it will highlight the station no. 28.
Search
Instead of browsing the radio station list, you can input a few characters of the desired station
to filter out / short list the stations.
History
The radio memorizes the stations you have listened up to 99 stations.
If you have listened more than 99 stations, it will supersede the first station that you have
listened.
Start playing internet radio
When a radio station starts playing, more radio information can be displayed.
such as the streaming bit rate, name of the song, artist name (if available) and the radio's station
name (if available):
Search
History
Skytuner
Local Radio
Globle All
Globle Most Popular
Globe By Genre
Globe By Region
08:30 am
Radio Paloma Live
1/99 3:08>
T Letzte Schmetterling
(Fly Away)
08:31 am
Radio Paloma Live
1/99 3:09>
i Genre:Schlager
08:32 am
Radio Paloma Live
1/99 3:10>
i MP3,128Kbps,
44100Hz,2 ch

-7-
Every time you press the ► button on the remote or the console, it will show the the big time clock
at a time when the radio is playing
My Favorite
This is to show the list of your favorite stations which have been assigned to the presets.
Preset a station
You need a remote control to preset the station.
When a radio station is playing, press the button on the remote control to add the radio
station to your favorite list, you will see the icon appear as below. It means the station is
added to the Favorite list.
Preset icon
The new added station will always show in the last item on the Favorite list.
You can store up to 99 presets
Recall a radio station
Press the button on the remote control to recall the list of presets, or navigate to My Favourite
on the main menu and select it to confirm.
Edit your favorite list
On the Favorite list, choose the radio station you want to edit then press the [►] button on the
remote control (or press [Forward/►] on main unit ). It will enter the Edit menu with the
following options:
Move down - To move down the ranking of a station
Move up - To move up the ranking of a station
Delete - To delete a particular station
Preset icon
History
25 May,2020 Mon
8:50
AM
08:30 am
1/99 3:18>
T Letzte Schmetterling
(Fly Away)

-8-
5. Media Centre
The device supports UPnP and is DLNA-compatible.
This provides the opportunity to stream music from your network. However, this requires you
to have a compatible device in your network that can function as a server. This can be e.g., a
network hard drive or a conventional PC with e.g., Windows 8 via which access to the shared
folder or media sharing is permitted. The folders can then be browsed and played on the Tuner.
Note - Please make sure your computer laptop is on the same Wi-Fi network as the Radio
before you start using this function.
Music streaming
• Once the UPnP/DLNA compatible server is configure to share media files with your radio, you
can start music streaming.
• On the main menu, select Media Centre and choose UPnP.
• It may take a few seconds for the radio to complete the scan for available UPnP servers. If no
UPnP servers are found, it will show Empty List.
• After a successful scan is done, select your UPnP server.
• The radio will show the media categories available from the UPnP server, e.g. 'Music',
'Playlists' etc.
• Choose the media files that you wish to play.
You can set the mode of playback under Configuration > Playback setup.
My Playlist
You can make your own playlist for the UPnP music files. Choose and highlight the song you
want to add to playlist, press and hold the [Tune/Select] knob on main unit or press and hold the
[OK] button on remote, until the sign appears. The song will be added to My playlist.
Clear My Playlist
Remove all songs in “My Playlist” to allow a new playlist to be prepared.
Note - If you have DLNA compatible servers available, follow the steps described above to
browse the audio files from DLNA compatible device on the Tuner to play.
Inhaltsverzeichnis
Andere Tunersys Verstärker Handbücher