URayTech URayCoder Gebrauchsanweisung

Preface
Thank you for your support of URayCoder video encoder and video decoder.
This quick user manual is for you to use the device quickly. If you need more information
about video encoder, please refer to another detailed user manual.
This manual is universal. If you have purchased an encoder with other interfaces (such as
SDI, VGA, etc), you can also use this manual.
If you need user manual in PDF format, you can open the USB flash drive to get it. By the
way, the video guidance is also included in the USB flash drive.
Since it is a professional product, and Amazon customer service is not familiar with this
product, if you encounter any technical problems when using the device, or encounter
document requirements(such as new firmware, SDK, APP etc), please contact us via the
following contact information, we will arrange professional engineers to provide you with
technical service.
Email: linda@szuray.com
Skype: .linda_go@yeah.net
Whatsapp: +86 135 9028 3020

Table Of Contents
1. Reset·········································································································1
2. Log in to the Control Panel············································································ 1
2.1. Windows Operating System·································································1
2.2. MAC Operating System······································································ 6
3. WIFI Connection························································································ 12
4. Preview Video Stream·················································································14
5. Adjust Output Video Audio Quality································································· 16
6. Online Live Streaming·················································································17
6.1. YouTube Live Streaming····································································17
6.2. Facebook Live Streaming·································································· 20
6.3. Push Stream to the Streaming Server·················································· 23
7. Port Mapping·····························································································25
8. Contact Us································································································26

1
1. Reset
There is a ‘‘RESET’’ hole on the front end of video encoder, which is used for conducting
initialization reset to the encoder. After turning on the power of the device, insert a pin into
the hole, then press the reset button and hold it down for about 8 seconds until you see all
three indicator light(VIDEO, LAN, POWER) go out All parameters will be initialized.
•The default IP address is 192.168.1.168. The default login ID and password are ''admin''.
•You can try to reset the device if you encounter any problems while using the device.
2. Log in to the Control Panel
Logging in to the control panel of video encoder is the first step in using the device. Most
customers cannot log in to the control panel of video encoder by entering 192.168.1.168
directly in the browser. The reason is that the IP address of video encoder(192.168.1.168)
and the IP address of PC(or laptop) are not in the same network segment, so they cannot
communicate with each other. In order to log in to the control panel of video encoder, we
first need to change the IP address of PC(or laptop).
This is how to log in to the control panel. If you are using windows, please refer to chapter
2.1; if you are using MAC, please refer to chapter 2.2.
2.1 Windows Operating System
Step 1. Connect the video encoder to the router via an Ethernet cable
Step 2. Connect the PC(or laptop) to the same router via Ethernet cable or WIFI. Right
click on the network icon to open <Network and Sharing Center>

2
Step 3. Click ''Ethernet'' or ‘‘WIFI’’
If you connect the PC(or laptop) to the router via WIFI, ‘‘WIFI’’ is displayed in here.
Step 4. Click ''Details''

3
You can check the IP address and default gateway of the PC(or laptop) in <Network
Connection Status>. For example, the IP address of my PC(or laptop) is 192.168.0.111,
and the gateway of of my PC(laptop) is 192.168.0.1.
Remember the IP address and the gateway of your PC(laptop), it will be used in step 10.
Step 5. Click ''Properties''
Step 6. Double-click ''Internet Protocol Version 4(TCP /IPv4)''

4
Step 7. Select ''Use the following IP address''
Step 8. Change the IP address and default gateway of PC(laptop), and then click ''OK''
You can set the IP address to 192.168.1.30 and the default gateway to 192.168.1.1.
In order for the IP settings to take effect, please remember to click ‘’OK’’ in the window of
<Local Area Connection Properties>.
Step 9. Log in to the control panel of video encoder 192.168.1.168
The default ID and password are ''admin''.
If you cannot log in to the control panel, please reset the device. (Refer to chapter 1)
5
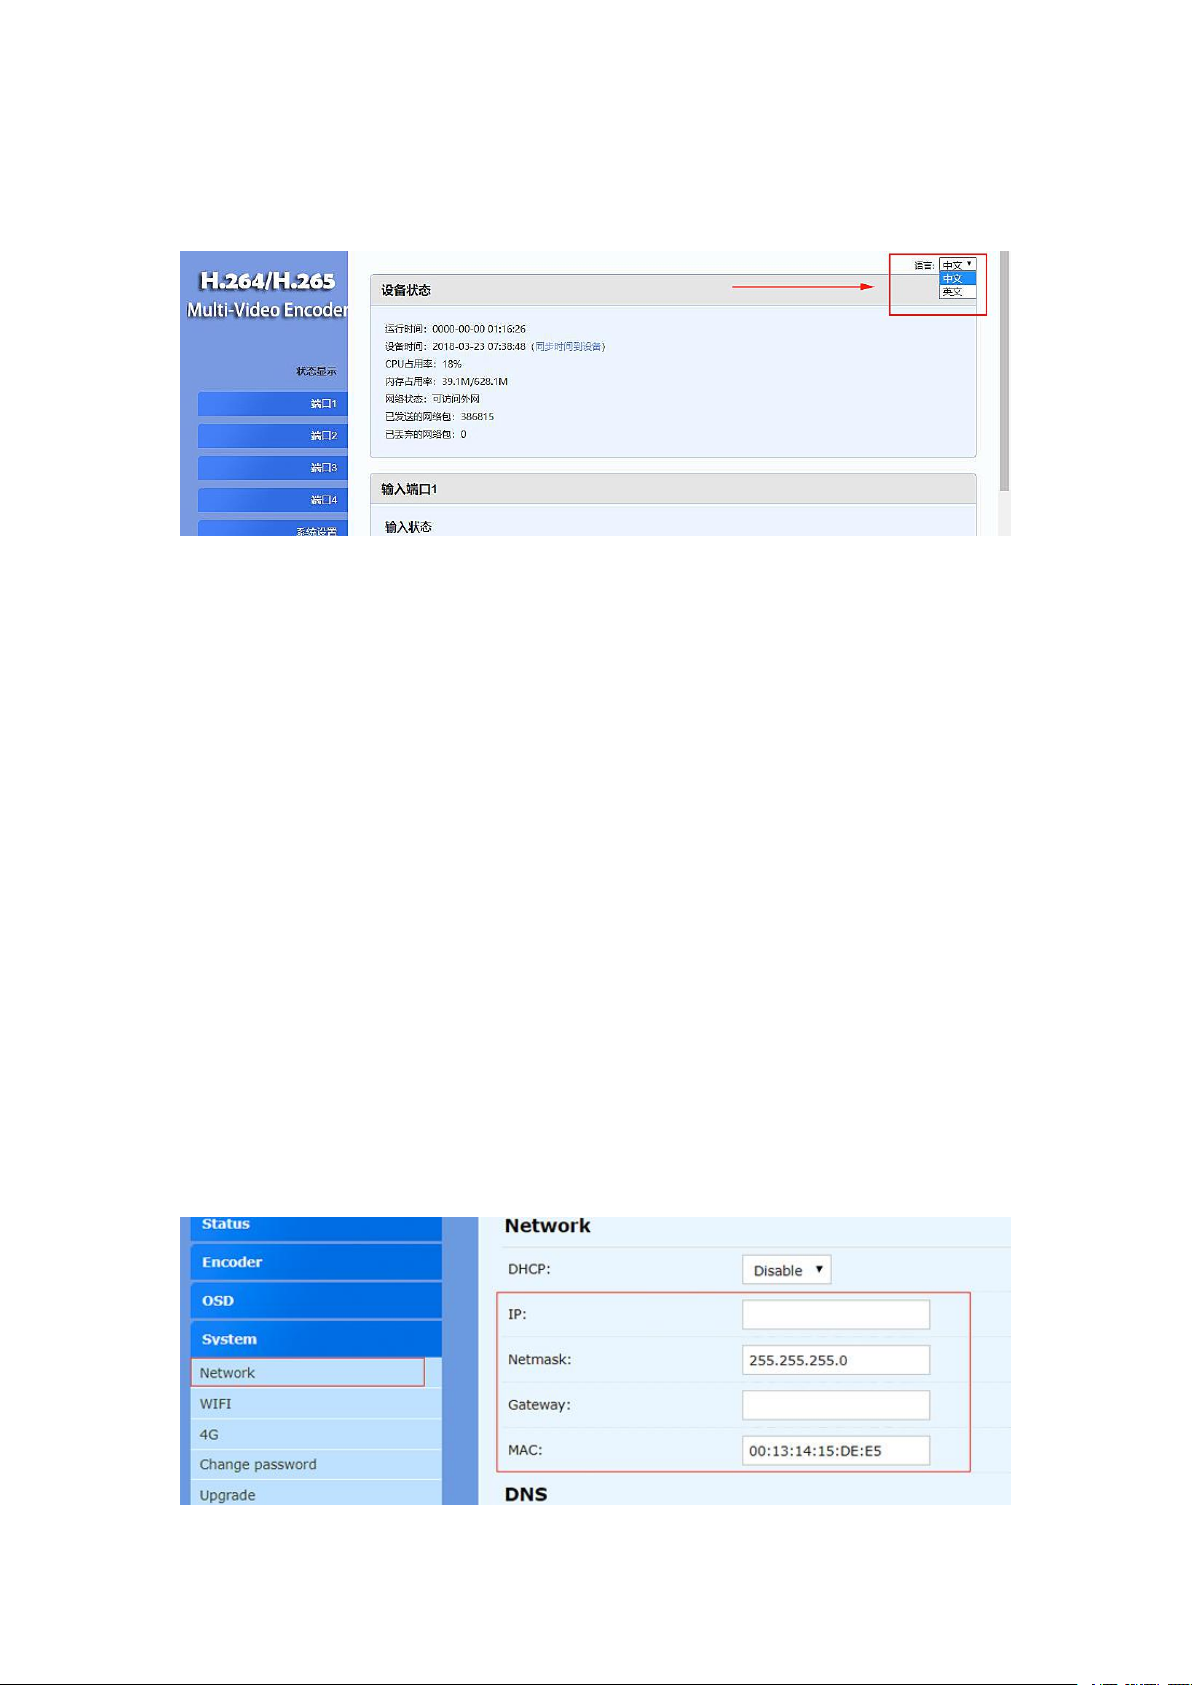
Usually, the language of the control panel is English. If Chinese is displayed, you can
change the language in the upper right corner of control panel. Please select ‘‘英文’’.
Now the video encoder can be used in local area network(LAN). In order to use it in a wide
area network(WAN), we need to change the IP address of video encoder.
Step 10. Change the IP address and gateway of video encoder
In step 4, you already know the IP address and default gateway of the PC(or laptop).
For example, the IP address of my PC(or laptop) is 192.168.0.111, and the gateway is
192.168.0.1. Therefore, I can change the IP address of the video encoder to
192.168.0.168(in order to avoid IP conflicts, please don’t make the IP address of video
encoder the same as the IP address of your PC), and change the default gateway to
192.168.0.1.
Since each PC(or laptop) has a different IP address, I can only use my computer IP as an
example. Before changing the IP address and gateway of video encoder, please refer to
the IP address and gateway of your computer(In Step 4). If you have any question, please
contact us. We will arrange an engineer to help you set up.

6
Step 11. Click ''Reboot'' to restart the video encoder
Step 12. Select ''Obtain an IP address automatically'', and then click ''OK''
Please remember the new IP address of the video encoder.
In order for the IP settings to take effect, please remember to click ‘‘OK’’ in the window of
<Local Area Connection Properties>.
Step 13. Log in to the new IP address of video encoder
2.2 MAC Operating System
Step 1. Connect the video encoder to the router via an Ethernet cable
Step 2. Connect the MAC to the same router via WIFI. Open the window of <System
Performance>
Step 3. Click ‘‘Network’’

7
Step 4. Click ‘‘Advanced’’
Step 5. Click ‘‘TCP /IP’’
You can check the IP address and default gateway of the MAC here. For example, the IP
address of my MAC is 192.168.0.112, and the gateway of my PC(laptop) is 192.168.0.1.
Remember the IP address and default gateway of your MAC, it will be used in step 10.

8
Step 6. Select ‘’Manually’’ in the setting of ‘’Configure IPV4’’
Step 7. Change the IP address of MAC, and click ''OK''.
You can set the IP address to 192.168.1.30 and the default gateway to 192.168.1.1.
Inhaltsverzeichnis


