Vantage Controls STAT Technisches Datenblatt

Vantage Communicating
Thermostat
AW000084-D

Page 2
Operating Manual
and
Installation Instructions
Congratulations on the purchase of your new Vantage Controls®thermostat. It has been designed
for easy programming to save energy costs and allow a comfortable living environment.
Features:
•Single Auto Mode programming of yearly Heating and Cooling needs.
•Easy change of Temperature and Schedule.
•Large easy to read backlit display.
•Silent operation.
•Short circuit protection.

Page 3
Table of Contents
OPERATING THE THERMOSTAT............................................................................................5
NAVIGATING THE CONTROLS....................................................................................................5
HOME SCREEN.............................................................................................................................6
HELP BUTTON..............................................................................................................................6
SETTING THE TIME......................................................................................................................7
SELECTING THE ACTIVE SETPOINT..........................................................................................8
TEMPERATURE HOLD .................................................................................................................9
HEATING AND COOLING MODES.............................................................................................10
FAN MODES................................................................................................................................11
TEMPERATURE SETTINGS .......................................................................................................12
USER OPTIONS..........................................................................................................................13
LANGUAGES..............................................................................................................................13
CHANGE FILTER REMINDER.....................................................................................................13
TEMPERATURE UNITS AND CALIBRATION.............................................................................14
SERVICE INFORMATION............................................................................................................15
POWER OUTAGES .....................................................................................................................15
INSTALLATION AND MAINTENANCE...................................................................................16
MOUNTING THE THERMOSTAT................................................................................................16
MOUNTING THE REMOTE SENSORS.......................................................................................16
CLEANING THE THERMOSTAT.................................................................................................16

Page 4
WIRING CONFIGURATION.........................................................................................................17
THERMOSTAT WIRING OPTIONS.............................................................................................18
SETUP MENU OPTIONS.............................................................................................................21
PASSWORD...............................................................................................................................21
SETPOINT RANGE.....................................................................................................................22
EQUIPMENT TYPE.....................................................................................................................22
EQUIPMENT SETTINGS.............................................................................................................22
CONVENTIONAL SYSTEMS....................................................................................................22
HEAT PUMP SYSTEMS...........................................................................................................23
CONTROL OPTIONS..............................................................................................................23
RESET.......................................................................................................................................24
CONVENTIONAL SYSTEM TEST...............................................................................................25
HEAT-PUMP SYSTEM TEST ......................................................................................................26
Q-ETS3 / STHERR101 SETUP AND CONFIGURATION ............................................................27
VANTAGE THERMOSTAT INTEGRATION ROLE ......................................................................32
HOW TO REPLACE OLD VANTAGE THERMOSTATS...............................................................33
TEMPERATURE AVERAGING....................................................................................................38
PRODUCT SPECIFICATIONS.....................................................................................................40
PRODUCT CONFORMITY...........................................................................................................41
CONTACT INFORMATION..........................................................................................................41

Page 5
OPERATING THE THERMOSTAT
Navigating the Controls
The function of the LEFT and RIGHT TAB buttons appears on the bottom of the display screen.
To SCROLL through the menus and options, lightly touch your finger on the outside of the wheel.
SCROLL to make changes and touch the SELECT button to accept/select options. You can always
go back or cancel prior to saving changes.

Page 6
Home Screen
The Home menu displays current temperature and operation data. Touch any button to view this
screen when the backlight is off. Icons such as the heat or fan are animated when the equipment is
running.
HELP button
The thermostat’s HELP button gives you a quick reminder of how to navigate through the
individual menu screens. It is intended to provide information to help you quickly change settings
without referring to this user manual; however, it is not intended to replace this manual. Please
keep this manual for reference.
Page 7
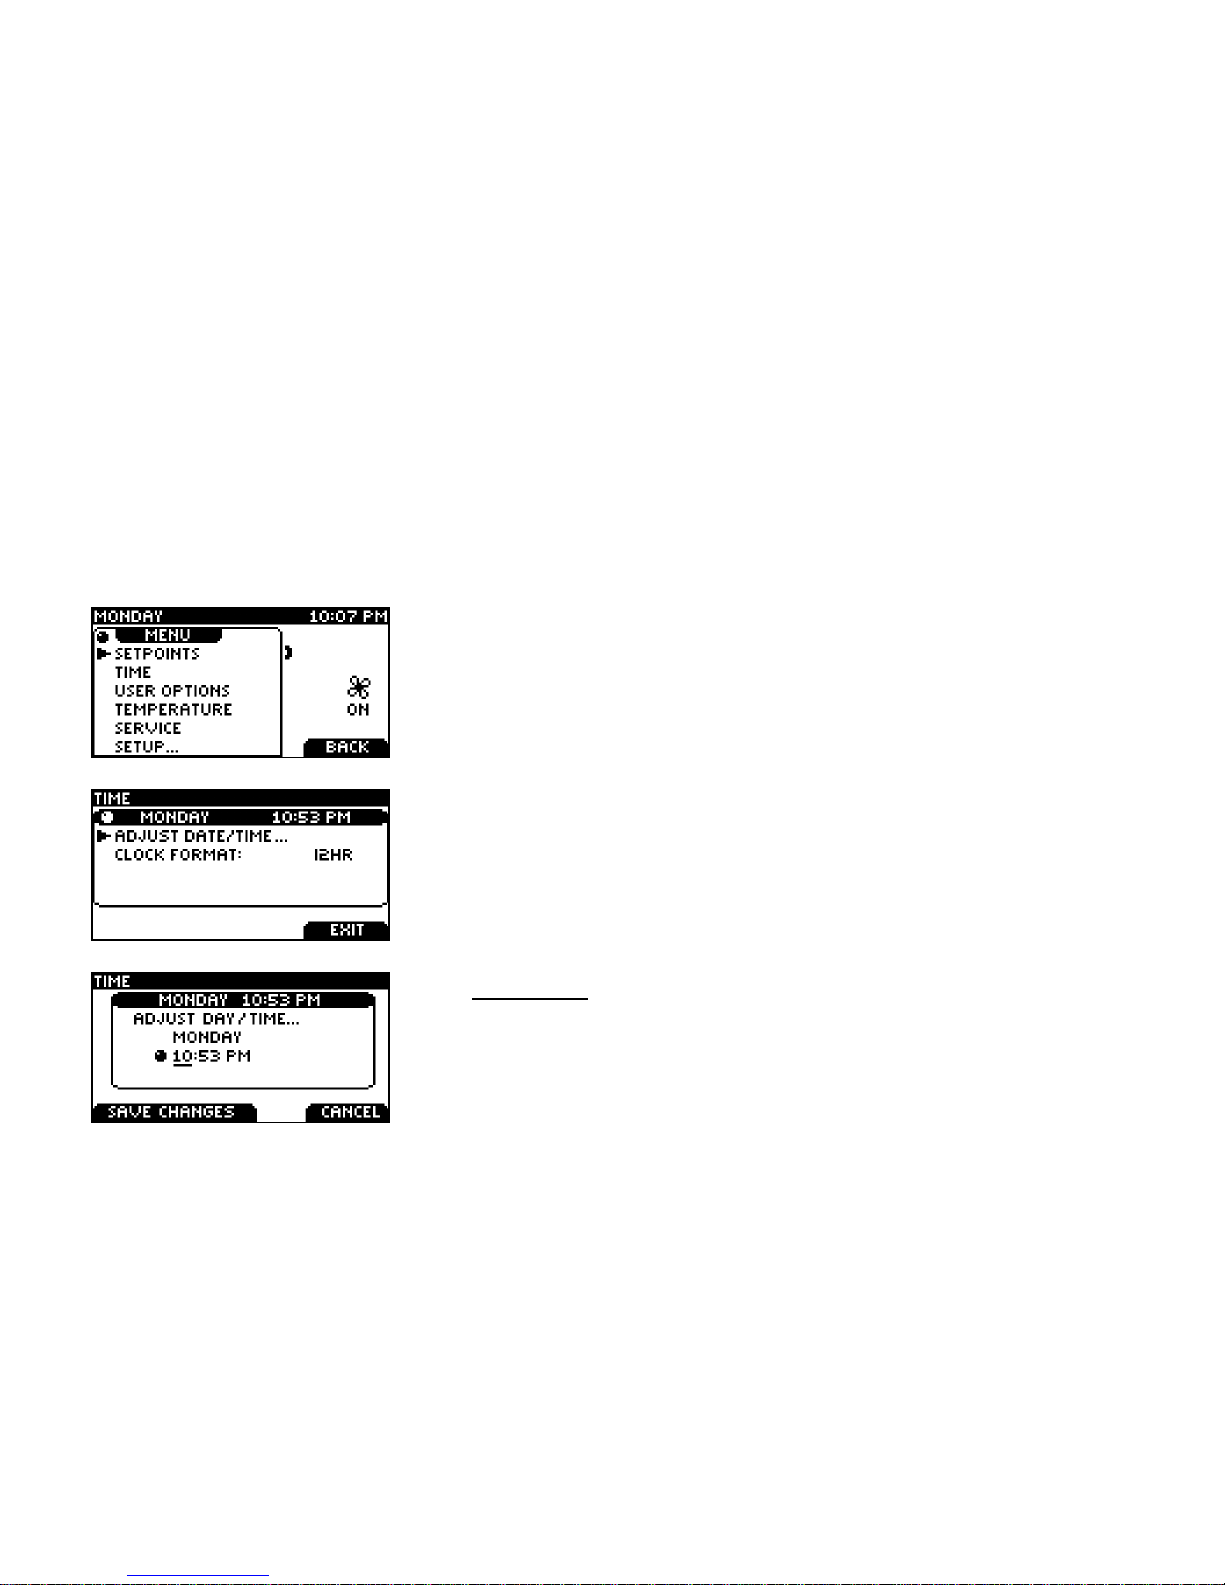
Setting the Time
Setting the clock is not necessary when connected to the Vantage System. The thermostat will get
the current date and time automatically from the Vantage System once every hour and every time
the system boots after a power outage. The Vantage System will also automatically adjust for
daylight saving time in your area. You can change the time clock readout to display in a 24h or 12h
clock. For standalone applications the current date and time should be set at initial installation.
Touch the Left Tab button on the home screen to view this screen
Use the SCROLL to select the TIME menu.
Touch SELECT to enter the TIME menu.
Use the SCROLL to select between these three menus.
To adjust the day and time, touch SELECT on the ADJUST
DATE/TIME menu.
The underlined selection will be changed using the SCROLL.
Touch SELECT to move between hour and minute adjustment.

Page 8
Selecting the Active Setpoint
Follow these steps to change the thermostat from OCCUPIED to UNOCCUPIED setpoints.
Choose SETPOINTS from the Main Menu.
SCROLL to the OCCUPIED or UNOCCUPIED setpoint.
Touch the LEFT TAB to SET ACTIVE the selected setpoint.

Page 9
Temperature Hold
This thermostat lets you temporarily make the temperature warmer or cooler, without affecting the
pre-set programming. Pre-set programming refers to Occupied and Unoccupied set points.
If the user password is not required, or a valid password was entered, you can set a permanent
hold. The thermostat will hold the TARGET temperature permanently and display HOLD.
If the user password is required and a valid password has not been entered you can only set a one
hour timed hold. The thermostat will hold the TARGET temperature for one hour and display TIMED
HOLD.
Touch the
SCROLL
to view this screen.
Set the desired temperature using the
SCROLL
.
Touch the
LEFT TAB
to ENGAGE HOLD, or
RIGHT TAB
to CANCEL
and return to the Main Menu.
To cancel a HOLD, touch any of the buttons to return to this screen. Use the RIGHT TAB to
CANCEL HOLD.

Page 10
Heating and Cooling Modes
This thermostat can be configured for automatic operation (AUTO). It will select between heating
and cooling based on the Active Setpoint.
You can manually change the operating mode between AUTO, HEAT, COOL, OFF, and EMERG.
Press the RIGHT TAB button on the home screen to view this
screen
Use the SCROLL to select the desired operating mode. Press
SELECT to engage the operating mode.
AUTO: The thermostat automatically selects heating or cooling depending on the indoor
temperature.
HEAT: The thermostat controls only the heating system.
COOL: The thermostat controls only the cooling system.
OFF: Heating and cooling systems are off.
EMERG.: (only for heat pumps with auxiliary heat). The thermostat only controls the Emergency
(Auxiliary) heat leaving the heat pump’s compressor locked out. Use this setting only when you
suspect the heat pump is out of service or the outdoor conditions render inefficient the operation of
the heat pump.
Inhaltsverzeichnis
Beliebte Thermostat Handbücher anderer Marken

EWELLY
EWELLY EW-181 Bedienungsanleitung

Prolon
Prolon T1100 Montageanleitung

Computherm
Computherm Q20 Bedienungsanleitung

Heatmiser
Heatmiser neoStat Bedienungsanleitung

Aube Technologies
Aube Technologies TH111GFCI-NP 240 VCA Bedienungsanleitung

Mars
Mars HEAT CONTROLLER IR Wireless Thermostat Bedienungsanleitung


