
Winton WFP Series Bedienungsanleitung

WINTON PROFESSIONAL FINISHING MOWER
WFP SERIES
PLEASE READ THIS MANUAL BEFORE OPERATING THE MOWER
OWNERS MANUAL

V1 2 Winton WFP
Congratulaons on purchasing your new Winton mower!
Before you get started, we have provided a helpful space to jot down a few important
details about your new Winton machine.
Model Number: WFP
Serial Number:
Date of purchase:
Factory Reference: EA180 / EA215 / EA235
This manual should be considered a permanent part of this machine and should remain with it even if
the machine is subsequently sold.
Winton connually seeks advancements in its product design and quality. Therefore, while this manual
contains the most current product informaon available at the me of prinng, there may be minor
discrepancies between your machine and this manual.
If you have any quesons concerning this manual, please consult your local dealer.
First Published:

V1 1 Winton WFP
General Safety Informati n
Ensure all potenal operators read this manual thoroughly before using the machine.
Safety: Ensure tractor and machine is staonary and keys out of ignion before set-up/maintenance.
Safety: Failure to follow good safety standards could result in severe injury or even death.
Misuse: This machine is designed for use with compact tractors, and should be used only for the
indicated purpose. Winton does not take responsibility if the machine is used for any other
purpose. Children must not operate the machine under any circumstance.
Modi ca on: Do not modify equipment in any way. This may impair the operaon and overall
safety of the machine.
Tractor requirements: Use only with compact tractors within power range specied.
Misuse transport: Do not use machinery to transport personnel or livestock.
Condi on: For the safety of personnel and opmum performance of the machine, you should
check the condion of the machine and the tractor before starng. Before use check all nuts and
bolts are ght.
Spa al awareness: Always check the operang area is safe before starng machinery.
Operator clothing: The operator should not wear loose clothing while operang machinery.
Safety wear: Always use appropriate ear protecon when running a tractor and machinery.
Ensure you are wearing protecti e gloves when servicing and using machinery.
Bystander safety: Ensure bystanders keep away from the machine when it is in use. Do not
touch moving parts when the machine is at work.
Public places: When travelling on the road/public places, always keep the PTO turned off
Maintenance: Always keep the machine maintained and in a good state. Where necessary,
repair or replace any defecve parts. Do not modify the machine.
Sharp objects: Pay aenti n to the sharp/pointed parts while servicing the machine.
Safety guards: All protecve parts should be in good condion before operang machinery.
Safety signs/s ckers: Keep all safety signs clean and legible. Replace any which are missing or
illegible. If a component with safety sign(s) is replaced, make sure new safety sign(s) are
aached in the same locaons.
Opera ng speeds: Machinery and PTO should be operated at the recommended speed at all
time .
Safety awareness: Good safety requires that you familiarise yourself with various safety signs,
the type of warning and the area, or parcular funcon related to that area.
Alertness: Never consume alcohol or drugs as these can hinder alertness/coordinaon. Consult
your doctor about using this machine while taking prescripti n medicati ns.

V1 2 Winton WFP
General Safety Informati n (Conti ued)
Machinery Pre-Use Checks
On receipt of your new Winton machine and again within the rst 4 hours of use, or the ‘shake in
period’, we always recommend checking over the machine.
• Check all bolts, nuts and screws are ght on the unit.
• Tighten/check any bolts and nuts securing blades.
• If your machine has belts check the tension and adjust if required.
• Apply grease to grease points if necessary.
• Check gear oil level and top up if needed. Do not overll.
Tractor Pre-Use Checks
Check that the machine is properly aached to the tractor. Ensure that secure pins are used on
the linkage mounng pins.
Be sure to add extra weights to the front of the tractor or add wheel weights if required.
Check that the tractor PTO sha turns freely and that the machines PTO drive sha can extend
easily. Grease the PTO drive sha using the grease points.
The chain on the PTO sha should be checked and in a good condion. The universal joints
installed should be in a good state, with proper protecti e parts.
Before installing the PTO sha, the tractor and machine should be stopped and the key removed.
Install and secure all safety guards, doors and covers before starng.
Bystanders should leave the immediate area before connectin the drive to the tractor.
Running/Opera ng Checks
• Always keep the PTO output from the tractor at 540 RPM when running machinery.
Post-Use Regular Checks
Check blades, belts and wearing parts. Be sure they are not damaged and blades swing freely in
their mount. Repair or replace as required.
Clean machinery and check for/clear any entangled material which may have got stuck around
the rotati g parts.

V1 3 Winton WFP
Contents
Pg.
General Safety informaon 1-2
1. Dimensions and Specicaons 3
2. Installaon & Set Up 4
3. Cung Height Adjustment 5
4. Gear Oil Change & Check 6-7
5. Adjusng Belt Tension 8
6. Linkage Extension 9
7. Servicing & Maintenance 10-11
8. Parts Diagram & Parts List 1 12-15
9. Parts Diagram 2 & Parts List 2 16
10. Parts Diagram 3 & Parts List 3 17
PTO Shaft Resizing 19
Winton Product Warranty 20
Trouble Shoong 21
1. Dimensions & Speci cation
Model WFP180 WFP215 WFP235
Weight 239kg 289g 320kg
Working Width 180cm 215cm 235cm
Number Of Blades 3 3 5
Recommended Tractor HP 25-55 HP 30-60 HP 35-70 HP
Width 190cm 230cm 245cm
Depth 170cm 170cm 170cm
Height 80cm 80cm 80cm
PTO Sha Size 70-100cm 70-100cm 70-100cm
Cung Height 2-9cm 2-9cm 2-9cm
Linkage Size Category 1 Category 1 Category 1
Number Of Drive Belts 2 2 2

V1 4 Winton WFP
2. Installati n & Set Up
Safety: Ensure tractor and machine is staonary and keys out of ignion before set-up/maintenance.
Safety: Before aaching/detaching machinery ensure the hydraulic li system is in a neutral posion.
Safety: Make sure the PTO drive isn’t connected at any point unl instructed to do so.
You will need:
Your tractor, tractor top link arm (adjustable), linkage pins, PTO shaft & some elbow grease!
Aaching The Mower
Start by nding a at piece of ground. Lower the three point linkage on your tractor to its lowest
posion and aach the mower to the tractor using the three point linkage pins and linch pins. Aach
the top linkage arm to the oang top link to allow the mower to “oat” behind the tractor [see
secti n on linkage extension].
Ensure that all four wheels are level on the ground when aached. Check the clearance between the
boom of the blades and the ground, this should be at least 20mm.
The cung height can be set by adjusti g the wheel spacers on the machine to increase or decrease
the blade clearance as required [see secti n on adjusng the cung height].
The working speed of the machine should always be at a walking pace (approx. 2 to 5 mph) depending
on the working condions. Longer patches of grass should be cut at a much slower pace for the best
cut and to avoid any damage to the mower. Remember, nishing mowers are designed for shorter
frequently maintained grass. You may need to cut or top any overgrown areas rst before using the
nishing mower.
Check your PTO sha’s grease points and apply grease if needed. Then aach the PTO drive sha and
ensure the locking pin is secure on both the tractor and mower sides. Aach the chain to a secure point
on the tractor/implement.
Operate the mower the with tractor in low range gear and the PTO delivering 540 RPM.
Pre-Mowing Checklist
Before starng the machine, always check and adjust the following:
• Set correct cung height. [Secon 3]
• Oil level of the gearbox. [Secon 4]
• Check the belt tension. [Secti n 5]
• Lubricaon/grease points. [Secon 7]
• Tightness of all bolts, nuts and screws.
• All protecti e guards are in place before operang.
V1 5 Winton WFP
3. Cutti Height Adjustment
Safety: Ensure tractor and machine is staonary and keys out of ignion before set-up/maintenance.
Note: Clearance of blades to the ground should be at least 20mm and higher on un-even ground.
Geng the cung height right is the key to creang the best cut and nish when mowing. The cut
height can be set by simply adjusng the mower deck height with the wheel spacers.
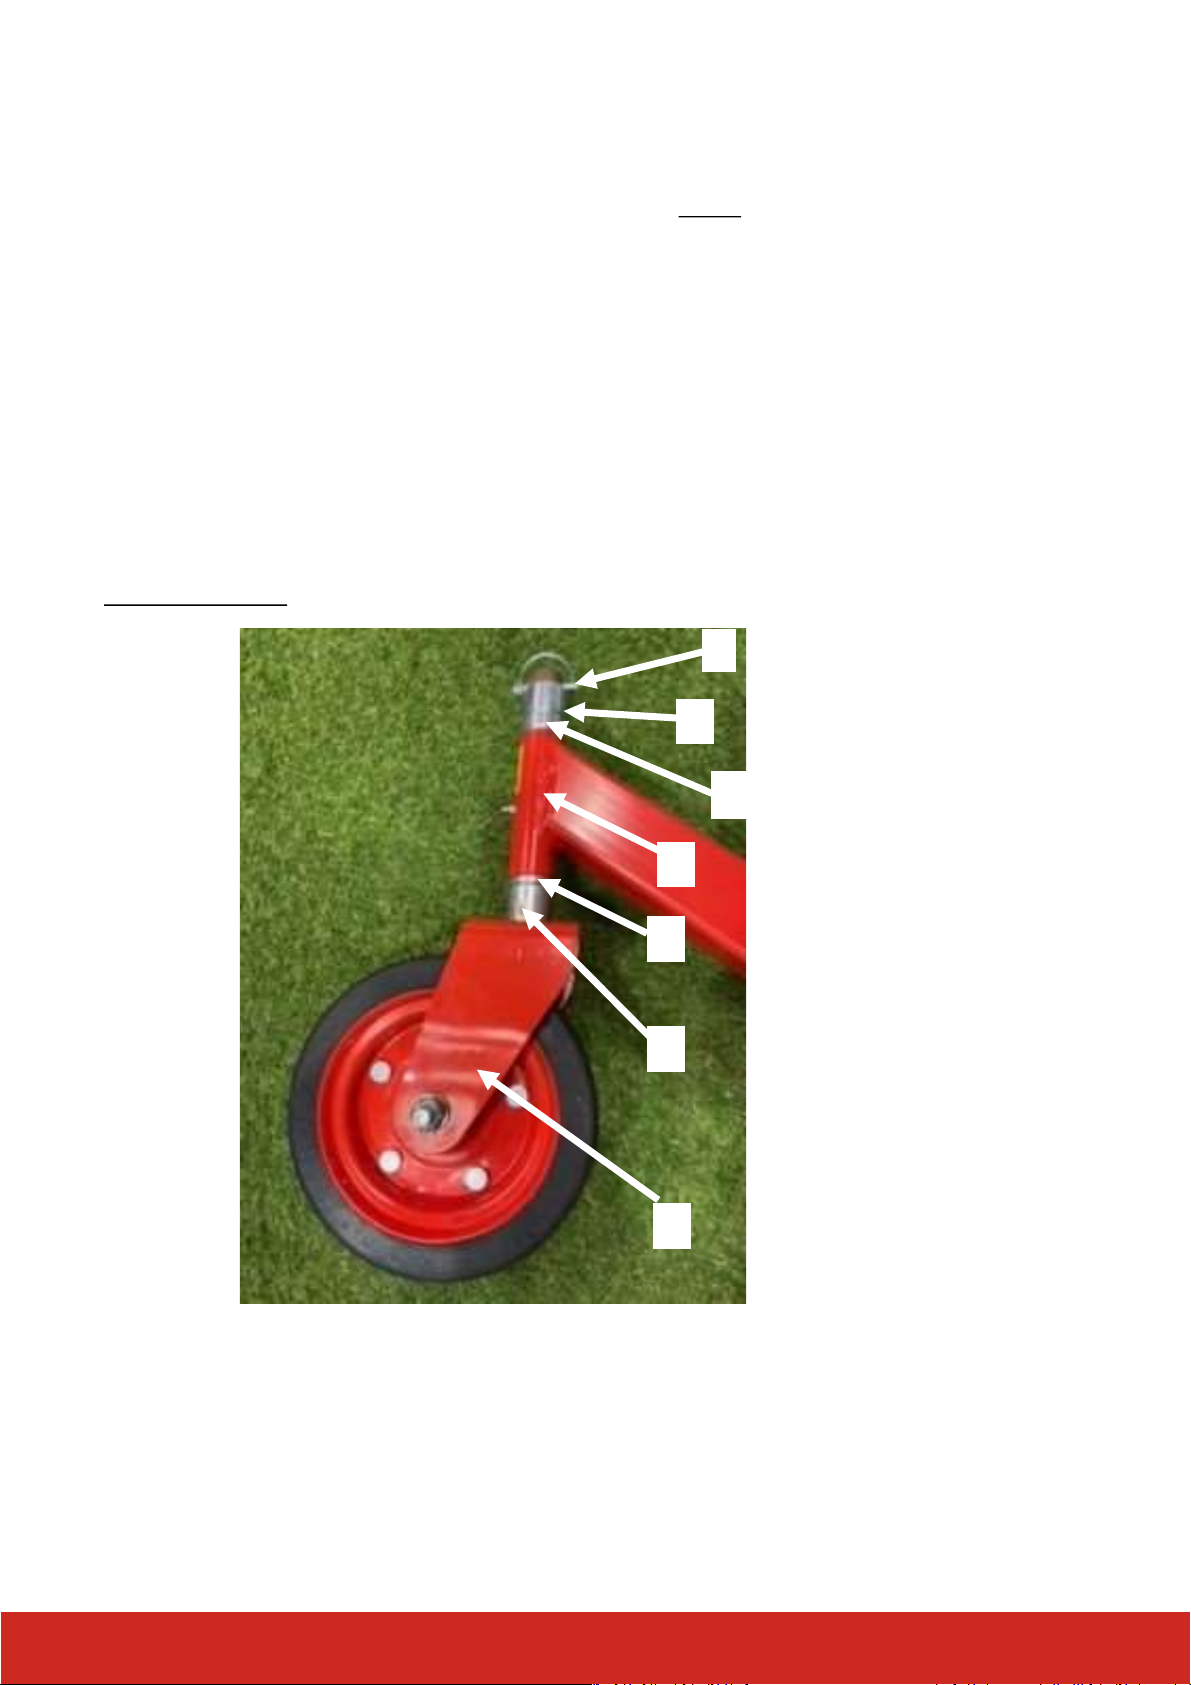
There are dierent sizes of adjusng spacers on the wheel forks which can be used to achieve a range
of cung heights. The spacers are moved from under and above the wheel bracket to achieve the
desired height.
Always make sure all spacers are in the same posion on all wheels to ensure an even and level cut.
Wheel Adjustment
1. Use the tractor linkage and secure stands to raise the mower o the wheels.
2. Remove linch pin (1) and slide wheel fork (2) out of bracket (3).
3. Posion spacers (4, 5, 6 & 7) above or below the wheel bracket as required.
4. Replace wheel fork (2) and linch pin (1).
5. Repeat above on the remaining three wheels.
1
4
3
7
6
2
5
V1 6 Winton WFP
4. Gear Oil Check & Change
Safety: Ensure tractor and machine is staonary and keys out of ignion before set-up/maintenance.
Safety: Always follow manufacturers instrucons for oils and lubricants.
Important Informaon
Do not mix old and new oils together or mix dierent types of oil. Always dispose of old oils in the
safely and in the correct manner.
Always make sure the machine is on a at and level surface when checking oil levels. The machine
should be le at a standsll to cool down for at least 10 minutes. Ensure the machine is stable before
carrying out work and will not upturn.
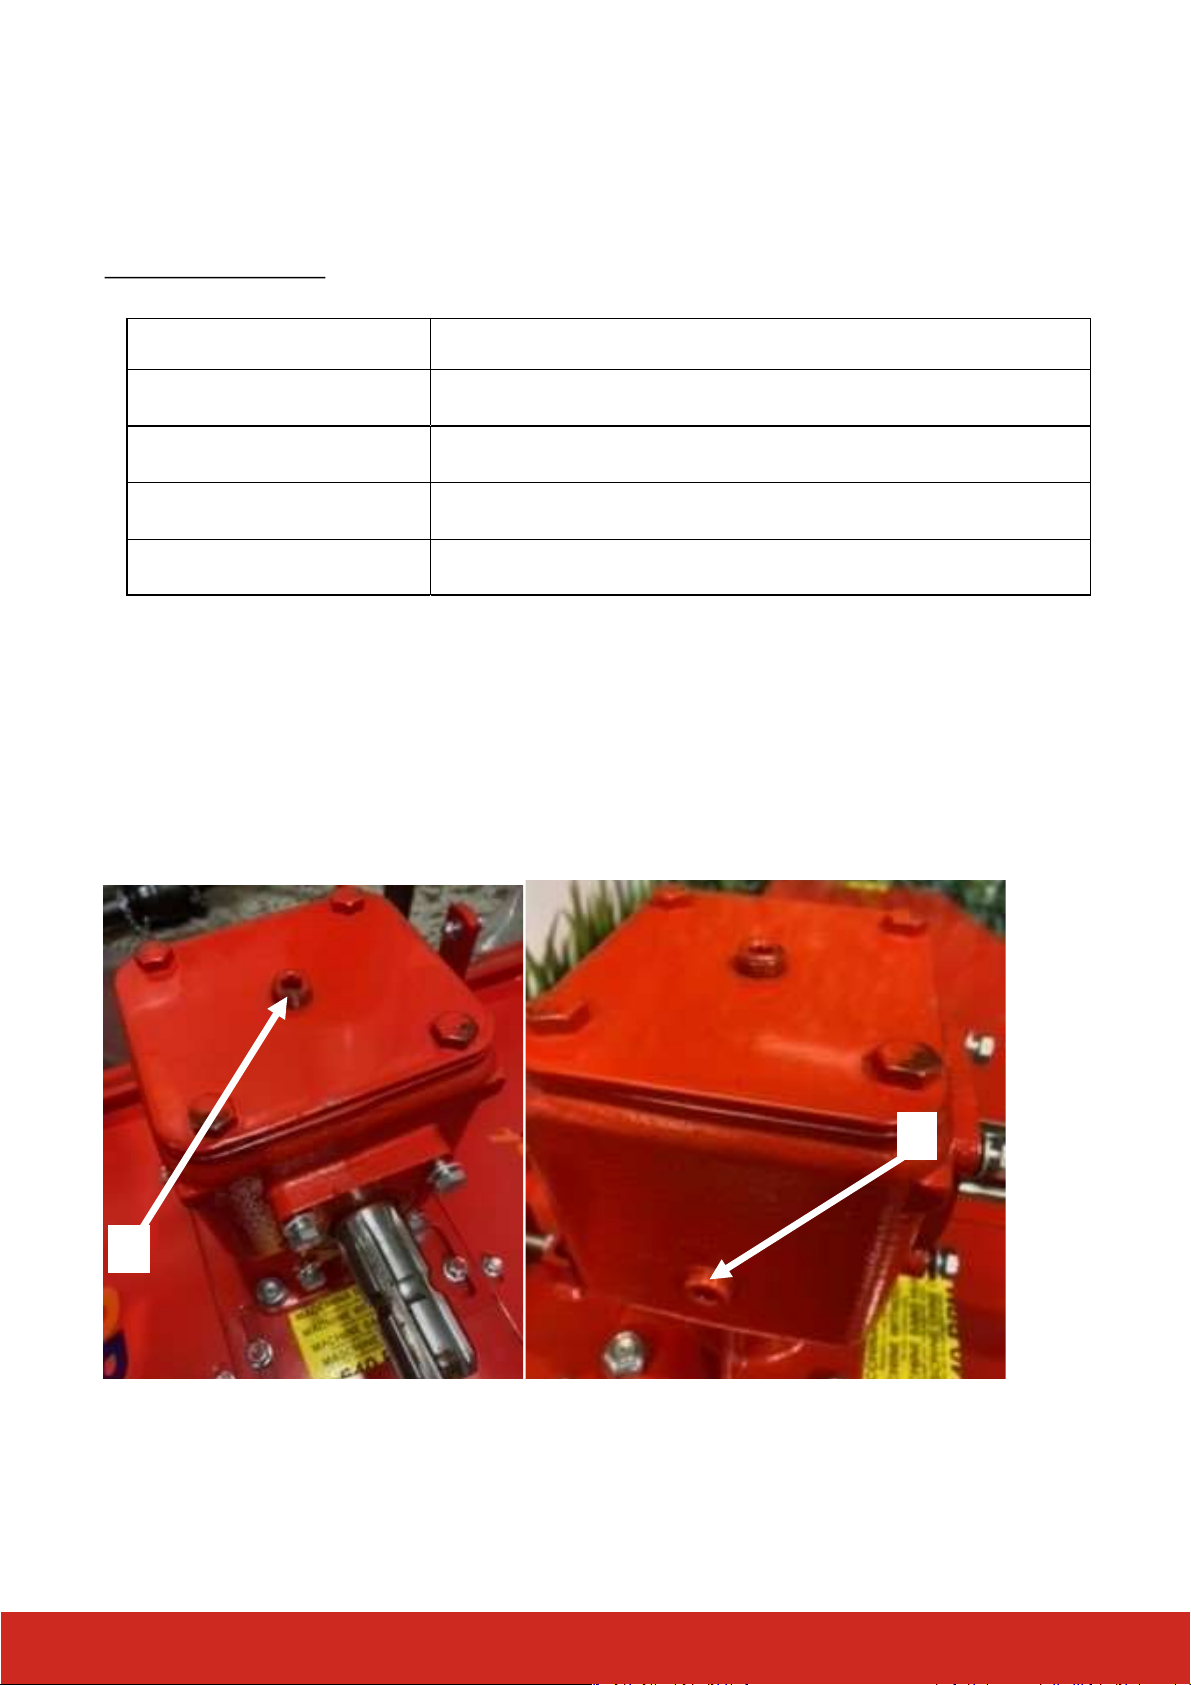
Gear Oil Grade 80w90 gear oil (API GL5 grade) for all condions (or equivalent)
Gearbox Oil Level Approx. 0.5 litres to level plug
Level Plug Size 8mm Allen key
First Oil Change 50 hours use
Oil Change Frequency 250 hours/yearly (whichever is rst)
2
1

V1 7 Winton WFP
4. Gear Oil Check & Change (Contin ed)
Safety: Ensure tractor and machine is staonary and keys out of ignion before set-up/maintenance.
Safety: Always follow manufacturers instrucons for oils and lubricants.
Oil Change/Check Gearbox
1. Remove ller/breather plug (1) on top of the gearbox unit.
2. Remove level plug (2)on the side of the gearbox.
3. Add oil through the ller/breather (1) (if required). The oil should reach the boom of the
level plug (2).
4. Replace ller/breather plug (1) and level plug (2).
Draining oil: Use an oil pump to remove old oil and any debris when changing oil.
Bolt tension: Always make sure bolts are ghtened correctly. The ller/level plug should be secure but
not over ghtened.
Oil Change Log
Oil Change #1 Oil Change #2 Oil Change #3 Oil Change #4 Oil Change #5 Oil Change #6
/ / / / / / / / / / / /
V1 8 Winton WFP
5. Adjusting Belt Tension
Safety: Ensure tractor and machine is staonary and keys out of ignion before set-up/maintenance.
Correct Belt Tension
The correct belt tension is achieved when the belt can be deected by the belt thickness about 10mm
at the centre point between the pulleys. A generic measure across machines is the belt should be able
to twist a quarter turn by hand. Any more and they are too loose and any less and too ght, you may
run the risk of losing drive to the mower or burning the belts out prematurely.
Always use a straight edge to make sure the belt pulleys are in line and running true. If misaligned,
contact your dealer or service engineer for technical support.
Belt Tensioning & Replacement
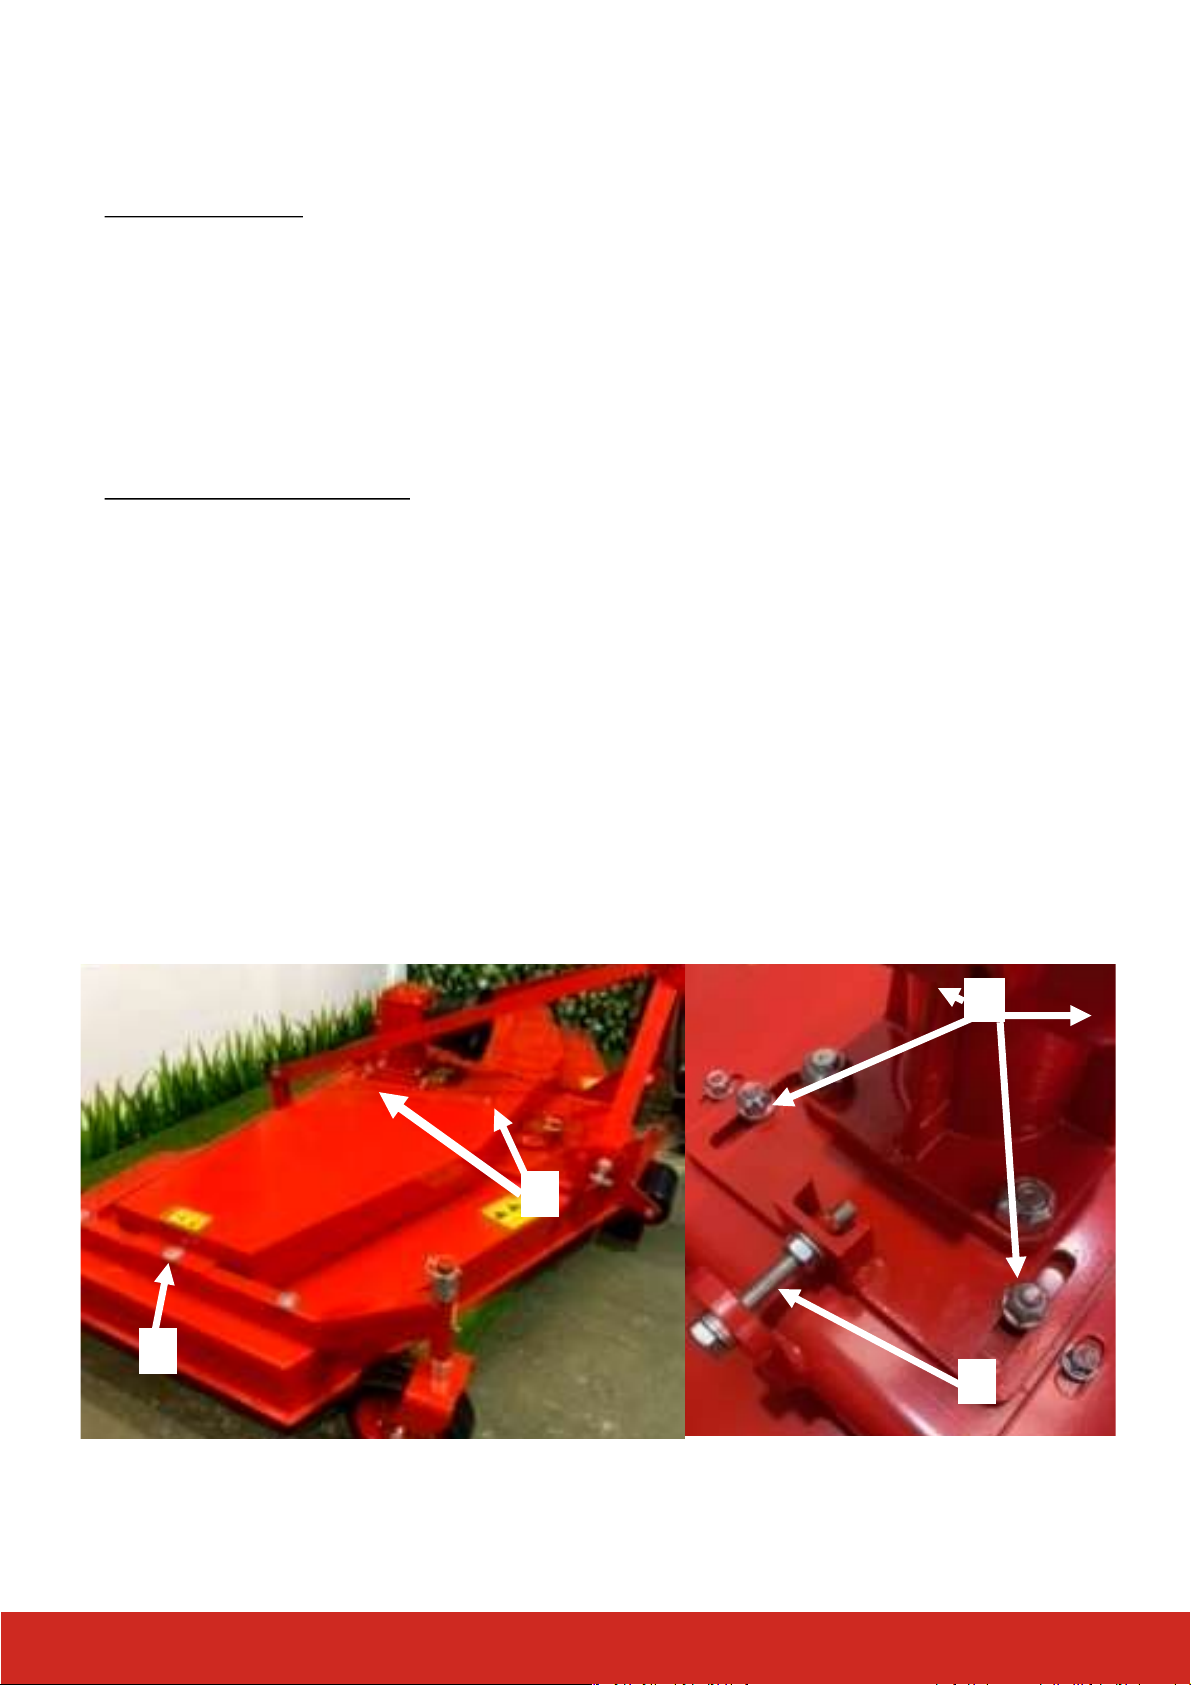
1. Remove bolt (1) on the wheel brackets then bolts (2) on the guard by the gearbox, repeang
on both sides..
2. Remove both belt guard panels to gain access to the belts.
3. Loosen o bolt & nuts on gearbox adjustment plate (3).
4. Wind in/out bolt (4) to adjust the plate and tension the belts as required.
5. Tighten bolt & nuts (3) and replace belt guards.
6. Replace and ghten bolts (1 & 2)
To change belts, loosen o the belt tension. They are a ght t and will need some elbow grease.
1
2
3
4
Dieses Handbuch passt für folgende Modelle
3
Beliebte Rasenmäher Handbücher anderer Marken


TALEN TOOLS
TALEN TOOLS AVR HGM30 Bedienungsanleitung

DEWEZE
DEWEZE ATM-725 Bedienungsanleitung

Weed Eater
Weed Eater 180083 Bedienungsanleitung

Husqvarna
Husqvarna Poulan Pro PP185A42 Bedienungsanleitung

Better Outdoor Products
Better Outdoor Products Quick Series Bedienungsanleitung

Cub Cadet
Cub Cadet 23HP Z-Force 60 Betriebsanleitung


