
Bang & Olufsen Playmaker Bedienungsanleitung

Playmaker
Installation Guide for installation and setup of Playmaker
Version 1.0

Introduction 2
How to navigate this guide
When the guide is opened, it automatically opens in Full Screen Mode (can be left as desired - see below). This is primarily done to optimise the usability of
screen reading. There are several ways to navigate when using the guide, see the survey of keys, icons and hot keys below:
Navigates to the next page
Navigates to the previous page
Navigates you to the previous view
Navigates you directly to the start page
Navigates directly to the table of contents (these are active links - click the link to be directed directly to the associated section)
Prints the document - the print dialogue box opens (Ctrl + P also brings up this feature)
Esc
Exit Full Screen Mode (x2 Esc button in web browsers). Press CTRL + L to return to Full Screen Mode.
Furthermore to ease the navigation, this guide contains links. The links are mouse over active and marked with blue text. Just click on a page reference to be
transferred to that page.
Introduction
General
Playmaker is a digital music player which can stream and play audio from a handheld device through connected, active speakers. It supports Airplay / DLNA
devices and analogue sources connected to the line-in sockets. Playmaker must be set up in either a wired or a wireless (2.4 GHz) network to be able to play
music from a handheld device.
This guide contains information about how to install and set up the Playmaker. The intention is to make this process as effortless and easy as possible. The
guide is an interactive document and would therefore be most useful when it is displayed on a laptop, or the like.

Installation overview
Basically the Playmaker supports two types of network connections - LAN (Local Area Connection) and WLAN (Wireless Local Area Connection).
External audio sources is connected to the LINE IN phono sockets. The connection types are illustrated in two examples below:
Playmaker in a LAN setup (wired)
Playmaker in a WLAN setup (wireless) / LINE IN
Installation overview 3
WLAN
(( ))
( (
DLNA /
AirPlay
( (
LINE POWER LINK
Router / switch
LAN
(( ))
DLNA /
AirPlay
( (
POWER LINK
Router / switch

Connecting Playmaker 4
Connecting Playmaker
> Follow the illustrations above to get access to the connectors
Playmaker in a LAN setup
> Run cables through the hole in the back cover
> Connect the Power Link cables to the SPEAKERS sockets
> Connect the Ethernet cable to the Ethernet socket (RJ45)
> Connect external audio sources to the LINE IN socket (optional)
> Connect the mains cable to the Mains supply socket
! Do not connect the cable to the mains yet
> Secure the cables to a cable tie if desired and reassemble the
Playmaker*
Playmaker in a WLAN setup
> Run cables through the hole in the back cover
> Connect the Power Link cables to the SPEAKERS sockets
> Connect external audio sources to the LINE IN socket (optional)
> Connect the mains cable to the mains supply socket
! Do not connect the cable to the mains yet
> Secure the cables with a cable tie if desired and reassemble the
Playmaker* *Skip this step if a static IP address is needed (network configuration
with disabled DHCP) because of other, temporary cable connections.
Mains supply
SPEAKERS
LINE IN
Ethernet
Cable tie
(optional, not supplied)
cdef
Network indicator

Setting up Playmaker 5
Setting up Playmaker
Important
Before continuing with setting up Playmaker there are some important precautions to understand. Please read and comply with the following precautions
during the installation:
– It is strongly recommended not to connect more than 4 Playmakers to the same network.
m UNHCOK@BHMFSGDOQNCTBSHMCHQDBSRTMKHFGSNQCHQDBS@QSHÖBH@KKHFGSRTBG@R@RONSKHFGS@RSGHRL@XHLO@HQSGD(1QDBDOSHNM
– Make sure that the product is set up, placed and connected in accordance with the instructions.
m /K@BDSGDOQNCTBSNM@ÖQLRTQE@BD@MCKD@UDDMNTFGRO@BD@QNTMCSGDOQNCTBSENQ@CDPT@SDUDMSHK@SHNM
– Do not subject the product to high humidity, rain or sources of heat.
– The product is intended for indoor use in dry, domestic environments only. Use within a temperature range of 10–40°C (50–105°F).
– If the product has been exposed to temperatures below 5°C (40°F), leave it at room temperature and wait until the product has regained normal room
temperature before it is connected to the mains and switched on.
m #NMNS@SSDLOSSNNODMNSGDQO@QSRNESGDOQNCTBSSG@MSGDA@BJBNUDQ+D@UDRTBGNODQ@SHNMRSNPT@KHÖDCRDQUHBDODQRNMMDK
Elements
Playmaker is now ready to be set up and connected to the network. The main elements are:
> Connecting Playmaker to the network
> Check for software updates
> Setting Option on Playmaker
Choose setup method
Basically, there are two types of methods for setting up Playmaker. Continue by choosing the desired device for the setup:
(mobile iOS device) (any other device)
iOS PC / Mac

Setting up Playmaker - iOS device 6
iOS device
For iOS devices, use the Bang & Olufsen app BeoSetup to change the product name, update the software and check/set up the network
connection. The iOS device must be on the same network as the Playmaker!
> Download and install the BeoSetup app from App Store (click or scan the QR code to be linked directly there).
LAN setup
> Connect the mains cable from the product to the mains supply and wait for the product
to connect to the network (approximately one minute - the network indicator becomes
solid white).
> Start the app BeoSetup. The application will now locate and show a list of Bang &
Olufsens products connected to the network.
> Select the product - the product name is shown as Playmaker_xxxxxxxx ('x' = serial
number).
If the product list is empty, it means that the Playmaker was not assigned an IP address
THENETWORKINDICATORmASHESORANGE)NTHISCASECONTINUETO3TATIC)0ADDRESS
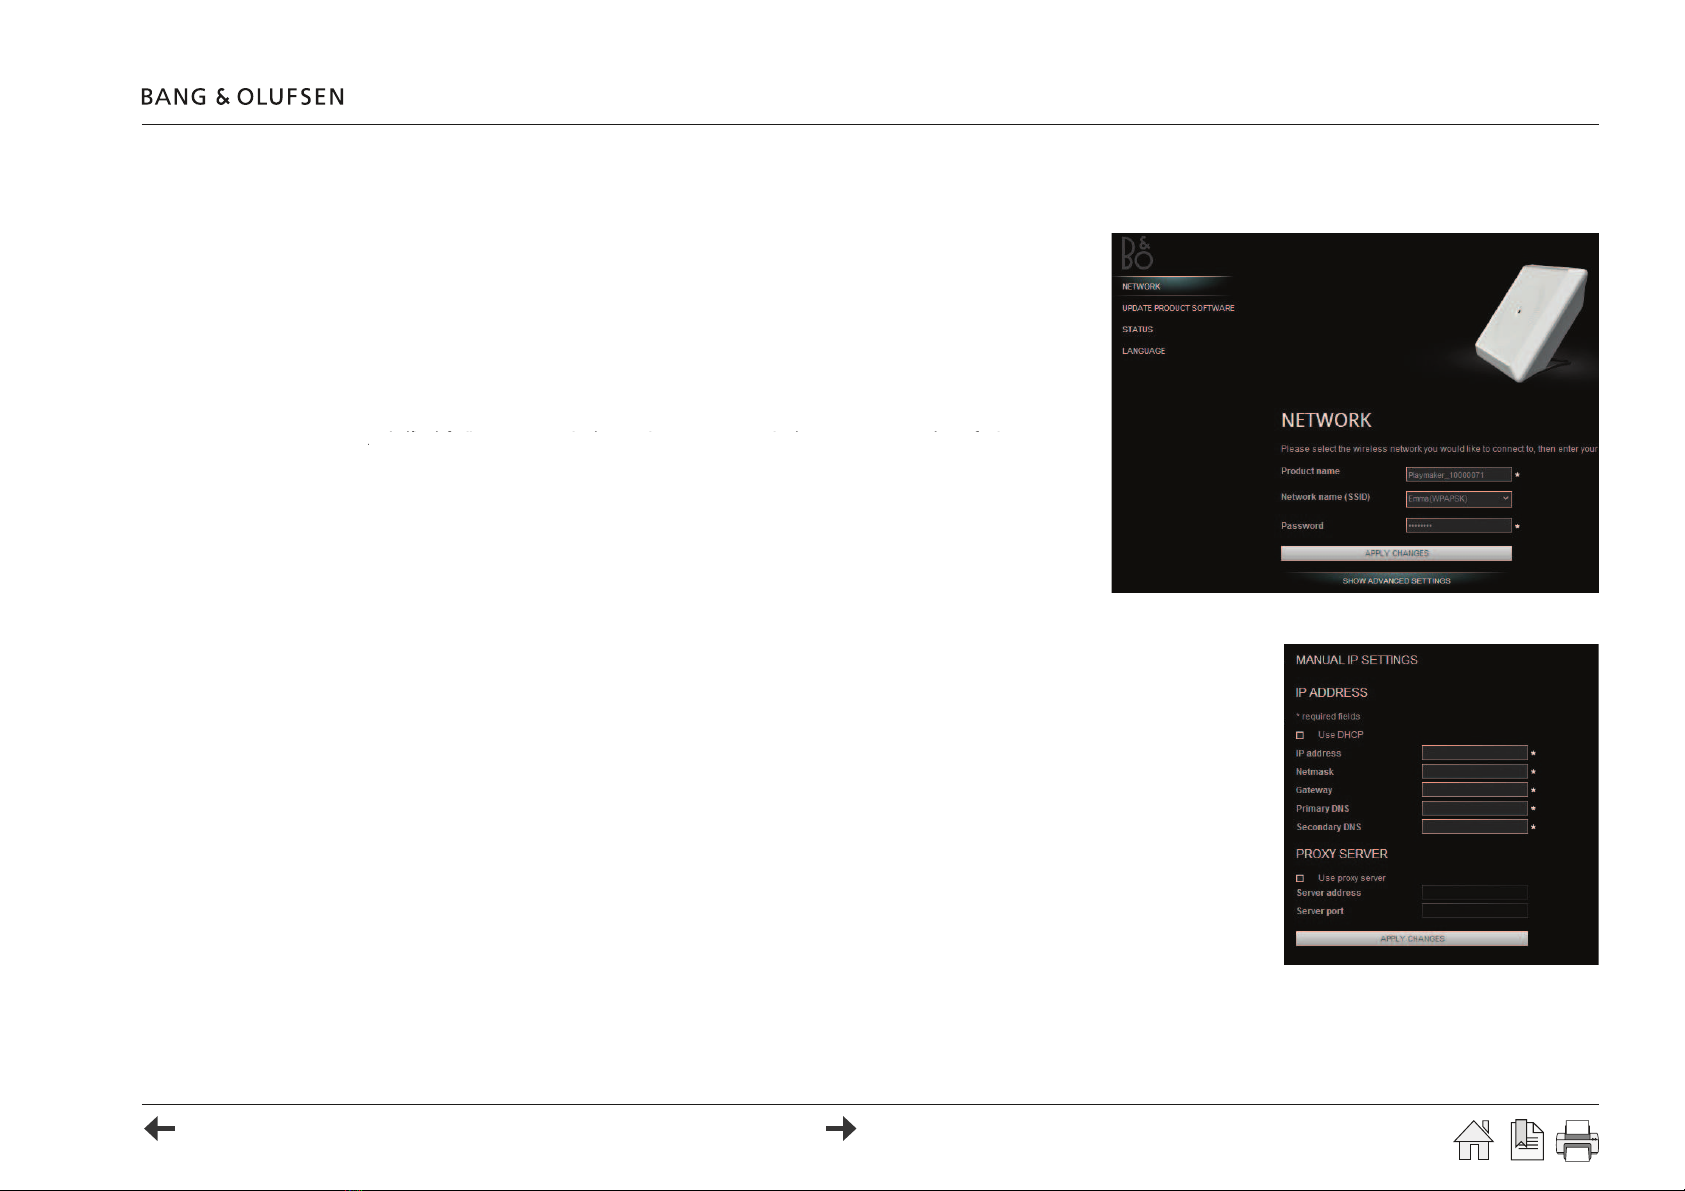
Now the setup page for the product is shown (illustrated to the right):
,@MT@KBNMÖFTQ@SHNM
Static IP address (DHCP disabled) ...
(ESGDQNTSDQHRBNMÖFTQDCVHSG#'"/CHR@AKDCSGD/K@XL@JDQLTRSADRDSTOVHSG@RS@SHB(/@CCQDRR
> Choose SHOW ADVANCED SETTINGS to open the section for manual IP settings (illustrated to the right).
> Remove the checkmark for Use DHCPSGDÖDKCRENQL@MT@K(/RDSSHMFRADBNLDR@BSHUD
%HKKHMSGDÖDKCRENQ(/RDSSHMFRL@QJDCVHSG*@BBNQCHMFSNSGDQNTSDQBNMÖFTQ@SHNM
> If a proxy server is needed, checkmark Use proxy server @MCÖKKHMSGDÖDKCR*.
> Press the APPLY CHANGES button to save settings.
WLAN setup
See next page.

Setting up Playmaker - iOS device 7
WLAN setup - Auto
> Connect the mains cable from the product to the mains supply.
> Press the Easy wireless setup button on the Playmaker.
> Press the WPS button on the router or activate the function from the routers web interface
Wi-Fi PROTECTED
SETUP
.
3GDMDSVNQJHMCHB@SNQ×@RGDRFQDDMVGHKDRD@QBGHMFSGDMDSVNQJ6GDM/K@XL@JDQ@MCSGDQNTSDQ@QDBNMMDBSDCSGDMDSVNQJHMCHB@SNQADBNLDRRNKHCVGHSD
WLAN setup
> Connect the mains cable from Playmaker to the mains supply and wait approximately two
LHMTSDRENQSGDOQNCTBSSNFDMDQ@SD@M@BBDRRONHMS3GDMDSVNQJHMCHB@SNQ×@RGDR
orange when ready.
> Connect the iOS device to the new access point Playmaker_AP.
> Start the app BeoSetup. The application will now locate and show a list of Bang &
Olufsens products connected to the network.
> Select the product - the product name is shown as Playmaker_xxxxxxxx ('x' = serial
number).
Now the setup page for the product is shown (illustrated to the right):
> Click on the drop-down list for Network name (SSID) and choose the desired network. If
necessary, press the Refresh list... to perform a new network scan.
> Press the Password area to enter the passphrase for the wireless network.
> Press the APPLY CHANGES button to save settings.
,@MT@KBNMÖFTQ@SHNM
Static IP address (DHCP disabled) ...
(ESGDQNTSDQHRBNMÖFTQDCVHSG#'"/CHR@AKDCSGD/K@XL@JDQLTRSADRDSTOVHSG@RS@SHB(/@CCQDRR
> Choose SHOW ADVANCED SETTINGS to open the section for manual IP settings (illustrated to the right).
> Remove the checkmark for Use DHCP SGDÖDKCRENQL@MT@K(/RDSSHMFRADBNLDR@BSHUD
%HKKHMSGDÖDKCRENQ(/RDSSHMFRL@QJDCVHSG*@BBNQCHMFSNSGDQNTSDQBNMÖFTQ@SHNM
> If a proxy server is needed, checkmark Use proxy server@MCÖKKHMSGDQDPTHQDCÖDKCR*.
> Press the APPLY CHANGES button to save settings.
Windows XP ... Windows Vista ... Windows 7 ... Apple Safari ...
... or refer to appendix
Setting up Playmaker - Other device 8
Other device
LAN setup
> Connect the mains cable from the product to the mains supply and wait for the product
to connect to the network (the network indicator becomes solid white when connected).
)FTHENETWORKINDICATORCHANGESFROMmASHINGWHITETOmASHINGORANGEAFTER
approximately two minutes), it means that the Playmaker was not assigned an IP address.
In this case go to Static IP address below.
> Start up and connect a computer to the same network as Playmaker. Choose a system:
Now the setup page for the product is shown (illustrated to the right):
,@MT@KBNMÖFTQ@SHNM
Static IP address (DHCP disabled) ...
(ESGDQNTSDQHRBNMÖFTQDCVHSG#'"/CHR@AKDCSGD/K@XL@JDQLTRSADRDSTOVHSG@RS@SHB(/@CCQDRR
> Disable the wireless network on the computer and connect directly to Playmaker, using an Ethernet cable.
> Connect the mains cable from Playmaker to the mains supply and switch on the product. The network indicator
×@RGDRVGHSDENQ@ANTSRDBNMCR@MCSGDMADBNLDRRNKHCVGHSD
> Enter the IP address 'http://169.254.11.22' in the address bar of an internet browser, and press enter.
The setup page with network settings appears. If not, wait a while and refresh the page.
> Choose SHOW ADVANCED SETTINGS to open the section for manual IP settings (illustrated to the right).
> Remove the checkmark for Use DHCP SGDÖDKCRENQL@MT@K(/RDSSHMFRADBNLDR@BSHUD
%HKKHMSGDÖDKCRENQ(/RDSSHMFRL@QJDCVHSG*@BBNQCHMFSNSGDQNTSDQBNMÖFTQ@SHNM
> If a proxy server is needed, checkmark Use proxy server @MCÖKKHMSGDÖDKCR*.
> Press the APPLY CHANGES button to save settings.
> Disconnect Playmaker from the PC and connect it to the network. Playmaker is connected when the network
indicator becomes solid white.
WLAN setup
See next page.
Apple Safari ...
> Open the Apple Safari browser -> Click the bookmark icon on the left side of the
browser -> Click Bonjour and click on Playmaker_xxxxxxxx ('x' = serial number)
Windows 7 ...
> Right-click on Start and choose Open Windows Explorer -> choose Network (in
Folders section) and double-click on Playmaker_xxxxxxxx ('x' = serial number)
Windows Vista ...
> Right-click on Start and choose Explore -> choose Network (in Folders section) and
double-click on Playmaker_xxxxxxxx ('x' = serial number)
Windows XP ...
> Right-click on Start and choose Explore -> choose My Network Places (in Folders
section) and double-click on Playmaker_xxxxxxxx ('x' = serial number).

Setting up Playmaker - Other device 9
WLAN setup - Auto
> Connect the mains cable from the product to the mains supply.
> Press the Easy wireless setup button on the Playmaker.
> Press the WPS button on the router or activate the function from the routers web interface
Wi-Fi PROTECTED
SETUP
.
3GDMDSVNQJHMCHB@SNQ×@RGDRFQDDMVGHKDRD@QBGHMFSGDMDSVNQJ6GDM/K@XL@JDQ@MCSGDQNTSDQ@QDBNMMDBSDCSGDMDSVNQJHMCHB@SNQADBNLDRRNKHCVGHSD
WLAN setup
> Disable the wireless network on the computer and connect the computer directly to
Playmaker, using an Ethernet cable.
> Connect the mains cable from Playmaker to the mains supply and switch on the product.
3GDMDSVNQJHMCHB@SNQ×@RGDRVGHSDENQ@ANTSRDBNMCR@MCSGDMADBNLDRRNKHCVGHSD
> Enter the IP address 'http://169.254.11.22' in the address bar of an internet browser, and
press enter.
The setup page with network settings appears. If not, wait a while and refresh the page.
> Click on the drop-down list for Network name (SSID) and choose the desired network.
! If necessary, press the Refresh list... to perform a new network scan.
! If the SSID is hidden, click SHOW ADVANCED SETTINGS, checkmark MANUAL
SETTINGS and type in the SSID.
> Press the PasswordÖDKCSNDMSDQSGDO@RROGQ@RDENQSGDVHQDKDRRMDSVNQJ
> Press the APPLY CHANGES button to save settings*.
,@MT@KBNMÖFTQ@SHNM
Static IP address (DHCP disabled) ...
(ESGDQNTSDQHRBNMÖFTQDCVHSG#'"/CHR@AKDCSGD/K@XL@JDQLTRSADRDSTOVHSG@RS@SHB(/@CCQDRR
> Choose SHOW ADVANCED SETTINGS to open the section for manual IP settings (illustrated to the right).
> Remove the checkmark for Use DHCP SGDÖDKCRENQL@MT@K(/RDSSHMFRADBNLDR@BSHUD
%HKKHMSGDÖDKCRENQ(/RDSSHMFRL@QJDCVHSG*@BBNQCHMFSNSGDQNTSDQBNMÖFTQ@SHNM
> If a proxy server is needed, checkmark Use proxy server @MCÖKKHMSGDQDPTHQDCÖDKCR*.
> Press the APPLY CHANGES button to save settings*.
*The Playmaker reboots after the APPLY CHANGES button is pressed. Allow up to two minutes for Playmaker to
connect to the network.

Final setup 10
Final setup
Name the Playmaker
(MNQCDQSNNOSHLHYDD@RXHCDMSHÖB@SHNMNE/K@XL@JDQHMSGDMDSVNQJDRODBH@KKXHERDUDQ@KOQNCTBSR@QDBNMMDBSDCHMSGDMDSVNQJHSHRQDBNLLDMCDCSN
rename the Playmaker.
> Choose the NETWORK tab to go to the settings menu.
2DKDBSSGDÖDKCENQProduct name and rename the product of your choice.
E.g. Playmaker_Living Room
> Press the APPLY CHANGES button to save settings.
Software update
(SHRHLONQS@MSSG@SSGD/K@XL@JDQG@RSGDK@SDRSRNESV@QDSNDMRTQDADRSONRRHAKDODQENQL@MBD2NESV@QDTOC@SDQDPTHQDR(MSDQMDSBNMMDBSHNM@MCSG@SSGD
product is wire connected to the network router or switch. Follow the procedure below to check for updates:
> Choose the UPDATE PRODUCT SOFTWARE menu from the setup page.
> Read the CAUTION section before proceeding the update.
> When ready, press the YES button to start the update.
#TQHMFSGDRNESV@QDTOC@SDOQNBDRRSGD/K@XL@JDQLTSDHMCHB@SNQVHKK×@RGQDC6GDM
SGDRNESV@QDTOC@SDHRÖMHRGDCSGDOQNCTBS@TSNL@SHB@KKXQDRS@QSR3GDOQNCTBSHRQD@CXENQ
use, when the network indicator becomes solid white.
Option programming (optional)
The Option programming tells the product how to react on IR-commands from the remote control. The following options are available:
Option: 0- IR receiver is switched off (no reaction on IR-commands).
4/K@XL@JDQOK@BDCHMSGDR@LDQNNL@RNSGDQ!@MF.KTERDMOQNCTBSR1DLNSDBNLL@MCRLTRSADOQDÖWDCVHSGLINK (e.g. LINK + A.MEM).
5 - The product responds directly to its own codes (A.MEM or A.AUX).
> Press V+ tSNNODMSGDBNMÖFTQ@SHNMLDMT
> Press tuntil OPTION? is shown in the display and press GO/CENTRE.
> Press tuntil A.OPT is shown in the display and press the desired digit (option 0/4/5).
Andere Handbücher für Playmaker
3
Inhaltsverzeichnis
Andere Bang & Olufsen Empfänger Handbücher

Bang & Olufsen
Bang & Olufsen BeoLink Wireless 1 Bedienungsanleitung

Bang & Olufsen
Bang & Olufsen Playmaker Bedienungsanleitung

Bang & Olufsen
Bang & Olufsen DVB-HD Bedienungsanleitung

Bang & Olufsen
Bang & Olufsen BeoLab 1 Kurzanleitung

Bang & Olufsen
Bang & Olufsen Beolit Teena 609 AM Export Bedienungsanleitung

Bang & Olufsen
Bang & Olufsen beomaster 3300 Bedienungsanleitung

Bang & Olufsen
Bang & Olufsen Beomaster 5500 Bedienungsanleitung

Bang & Olufsen
Bang & Olufsen BeoLink Active Bedienungsanleitung


