
Fit4Home TF-D2450 Bedienungsanleitung
1
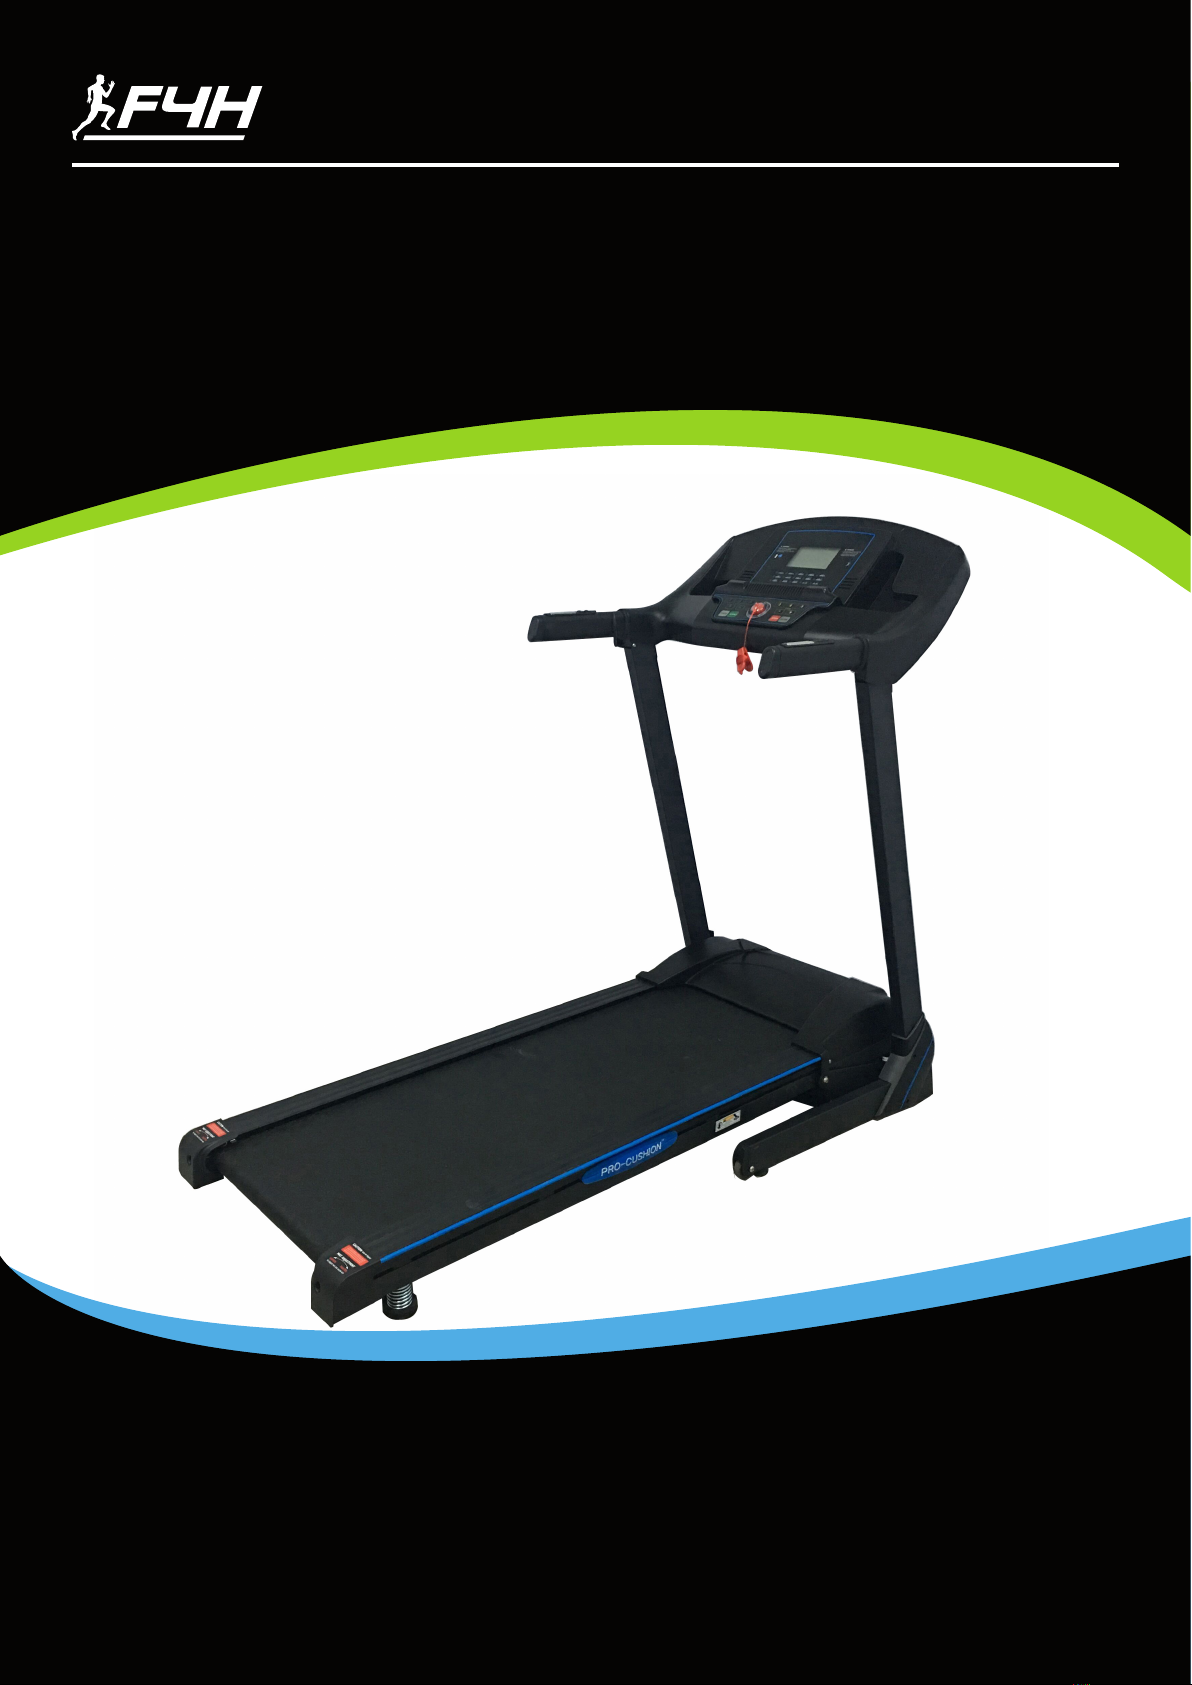
F4H-TM-D2450
Please Keep For Future Reference
IMPORTANT - Please Read Instructions Fully Before Assembly Or Use
These instructions contain important information which will help you get the best
from your equipment and ensure safe and correct assembly, use and maintenance.
If you need help or have damaged or missing parts,
call the Customer Helpline: 0330 124 0718 (Opening hours: Mon-Fri 9:00am-3:00pm)
or Email: customerservices@fit4home.co.uk
TF-D2450 TREADMILL
USER MANUAL
2
CONTENTS
Safety Information
Assembly Instructions
Step 1
Step 2
Step 3
Step 4
Step 5
Step 6
Folding Instructions
Technical Parameter
Computer Operation Guide
Exercise Instructions
Warm Up
Running Belt Adjustment
Exploded Drawing
Parts List
Troubleshooting
Declaration
03-04
05
05
05
06
06
07
07
08
09
10-13
14-15
16
17-18
19
20-21
22
23

3
IMPORTANT SAFETY INFORMATION
Warning: We suggest that you should consult with your physician or health professional
before starting your workout, especially for the age up to 35 old or health problem
related people. We take no responsible for any troubles or hurts if you don’t following our
specication. Treadmill should be carefully assembled and covered the motor shield, then
connect to the power.
Attention:
1. Ensuring the safety clamps were attached to the clothing or belts before using the treadmill.
2. Please do not insert any items to any part of the equipment, which would damage the
equipment.
3. Position the treadmill on a clear level surface. Do not place the treadmill on thick carpet as it may
interfere with proper ventilation. Do not place the treadmill near water or outdoors.
4. Never start the treadmill while you are standing on the walking belt. After turning the power on
and adjusting the speed control, there may be a pause before the walking belt begins to move,
always stand on the foot rails on the sides of the frame until the belt is moving.
5. Wear appropriate clothing when exercising on the treadmill. Do not wear long, loose tting
clothing that may be caught in the treadmill. Always wear running or aerobic shoes with rubber
soles.
6. Keep the children and pets away from the treadmill while starting workout.
7. Don’t exercise in 40-Mints after dinner.
8. The equipment is suitable for adults, Juveniles need be accompanied with adults while workout.
9. You must hold on to the handrails until you become comfortable and familiar with the treadmill
when rst start the workout.
10. Treadmill is indoor-using equipment, not outdoor-using for avoiding damage. Keep the store-
place clean and at, drying. Prohibiting other purpose of using, only for workout.
11. Please purchase the power-line to the distributor or contact with us directly, for the power-line
only equip to the treadmill.
12. If the treadmill suddenly increase in speed due to an electronics failure or the speed being
inadvertently increased, the treadmill will come to a sudden stop when the pull pin is disengaged
from the console.
13. Do not connect the line to the middle of cable; do not lengthen cable or change the cable plug;
do not put any heavy thing on cable or put the cable near the heat source; forbid using socket
with several holes, these may cause re or people may be hurt by the power.
14. Cut o the power when the equipment is not used. When the power is cut o , do not pull the
power line to keep the wire in good condition.Insert the plug to the socket with the safety
ground circuit, for the power-line is professional equipment .You must contact with the
professional people directly while the line is damaged.
15. This Treadmill only for home-using.
• The owner’s manual is only for customers’ reference.
• The supplier can not guarantee for mistakes occurring due to translation or change in technical
specication of the product.
• All data displayed are approximate guidance and cannot be used in any medical application
4
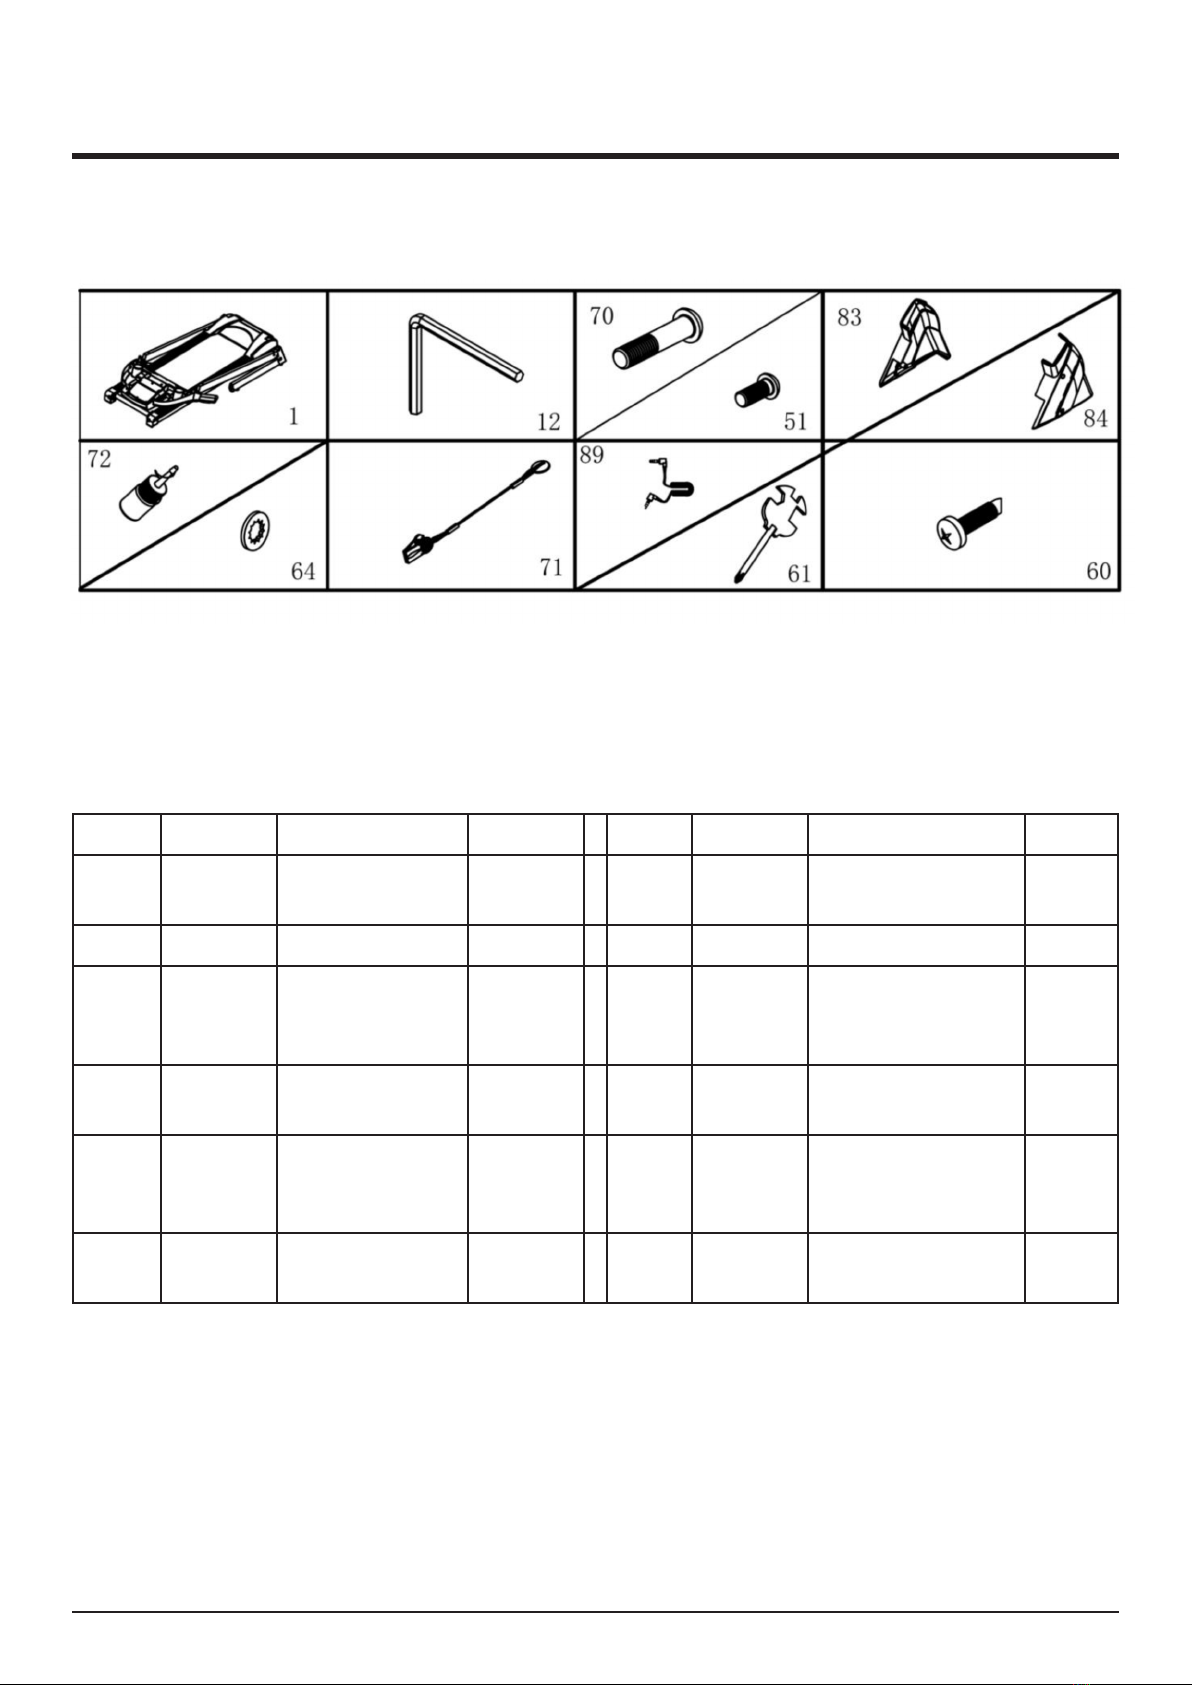
When you open the carton, and you will nd the below parts in the carton
FIXING TOOLS:
#5 Allen Wrench 5mm 1pc
Wrench w/screw Driver S=13,14,15 1pcs
Notice: Do not get through power before complete assembly.
IMPORTANT SAFETY INFORMATION
NO. DES. Specication Qty. NO. DES. Specication Qty.
1 Main
frame
1 12 #5 Allen
wrench
5mm 1
70 Bolt M8*45 2 Bolt M8*16 4 4
83 Left
base
cover
1 84 Right
base
cover
1
72 Oil bot-
tle
1 64 Lock
washer
8 6
71 Safety
key
1 61 wrench
w/screw
driver
S=13,14,15 1
60 Bolt ST4.2*19 4 89 MP3
Wire
1
5
ASSEMBLY INSTRUCTIONS
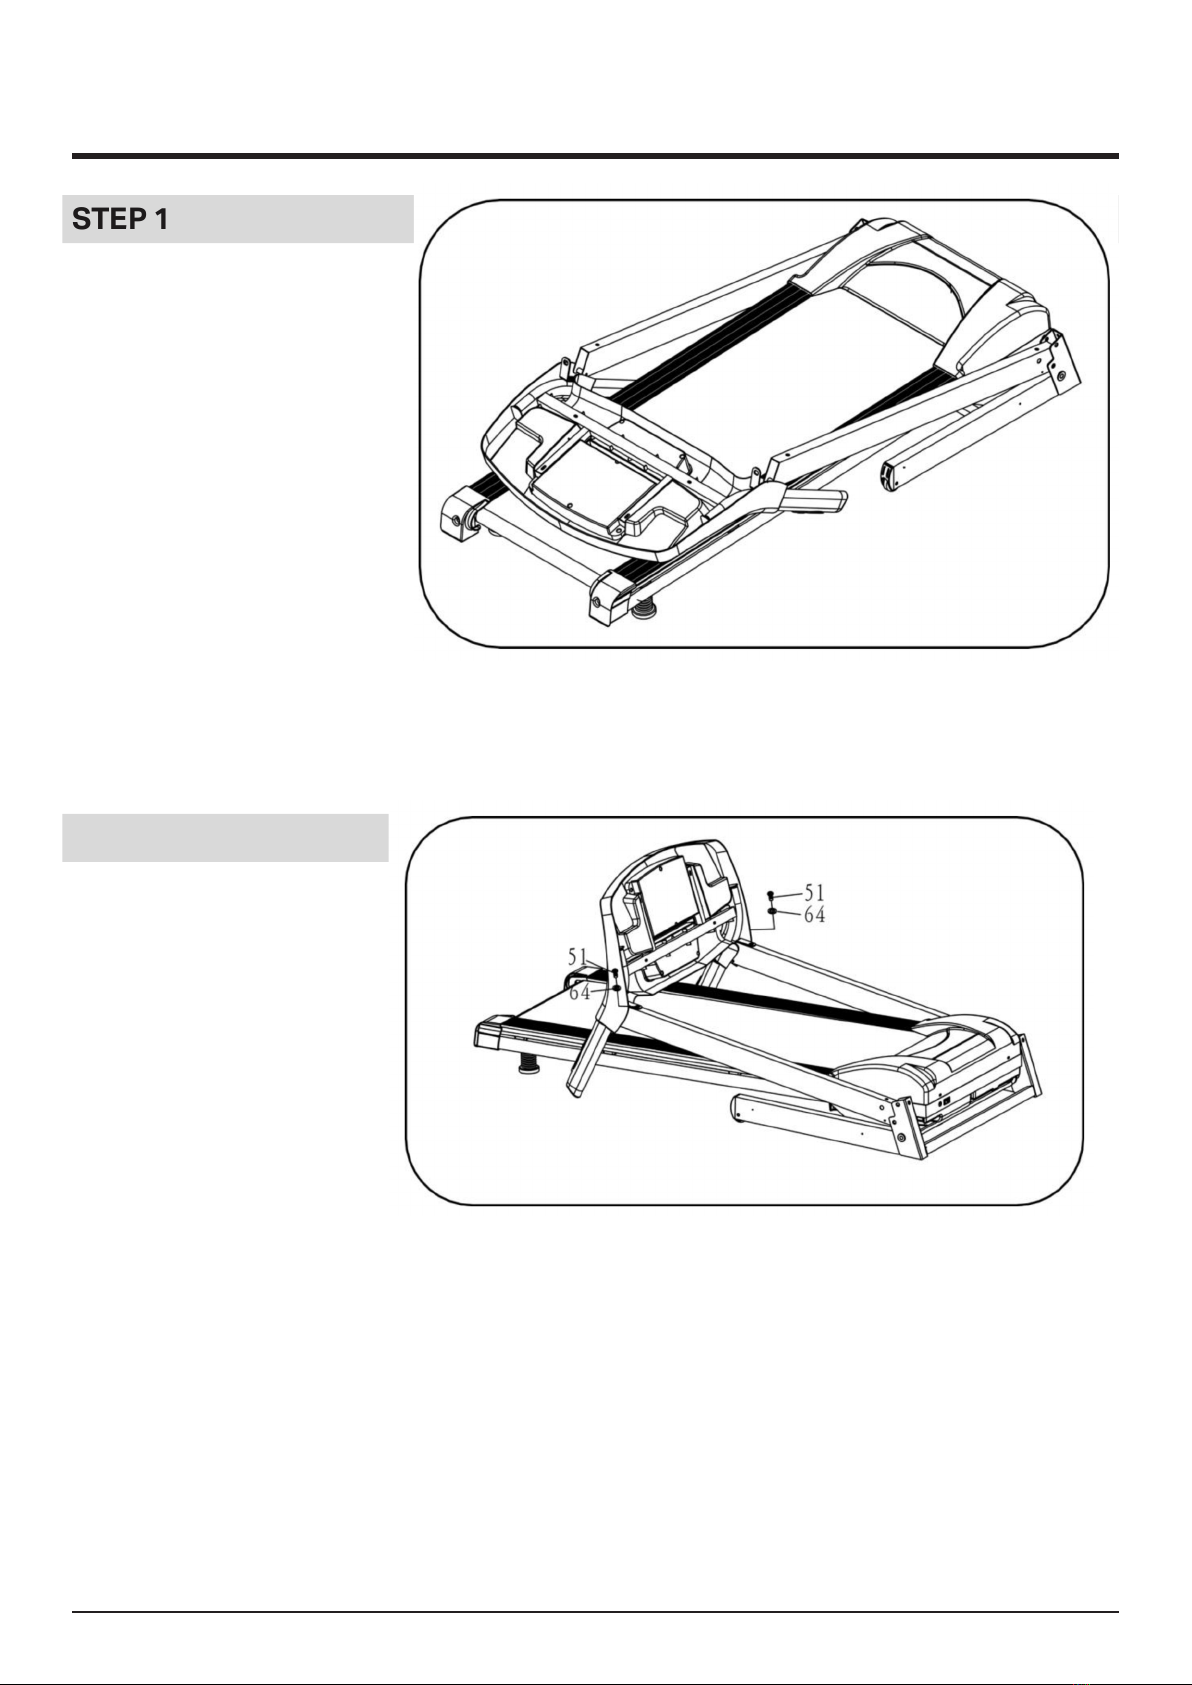
STEP 1
1. Open the carton, get out
the above spare parts,
and put the Main Frame
onto the level ground.
STEP 2
Notice: Do not press
the computer wire when
folding the computer.
1. Put the computer
as below illustration,
screw o Bolt M8*16
(51) and the Lock
washer (64) of Left
Upright and Right
Upright.
2. Lock the Computer
frame to Left Upright
and Right Upright tight
by Bolt M8*16(51) and
the Lock washer (64) .
Notice: Support the
upright with hand avoid
falling down to have any
hurt.
6
ASSEMBLY INSTRUCTIONS
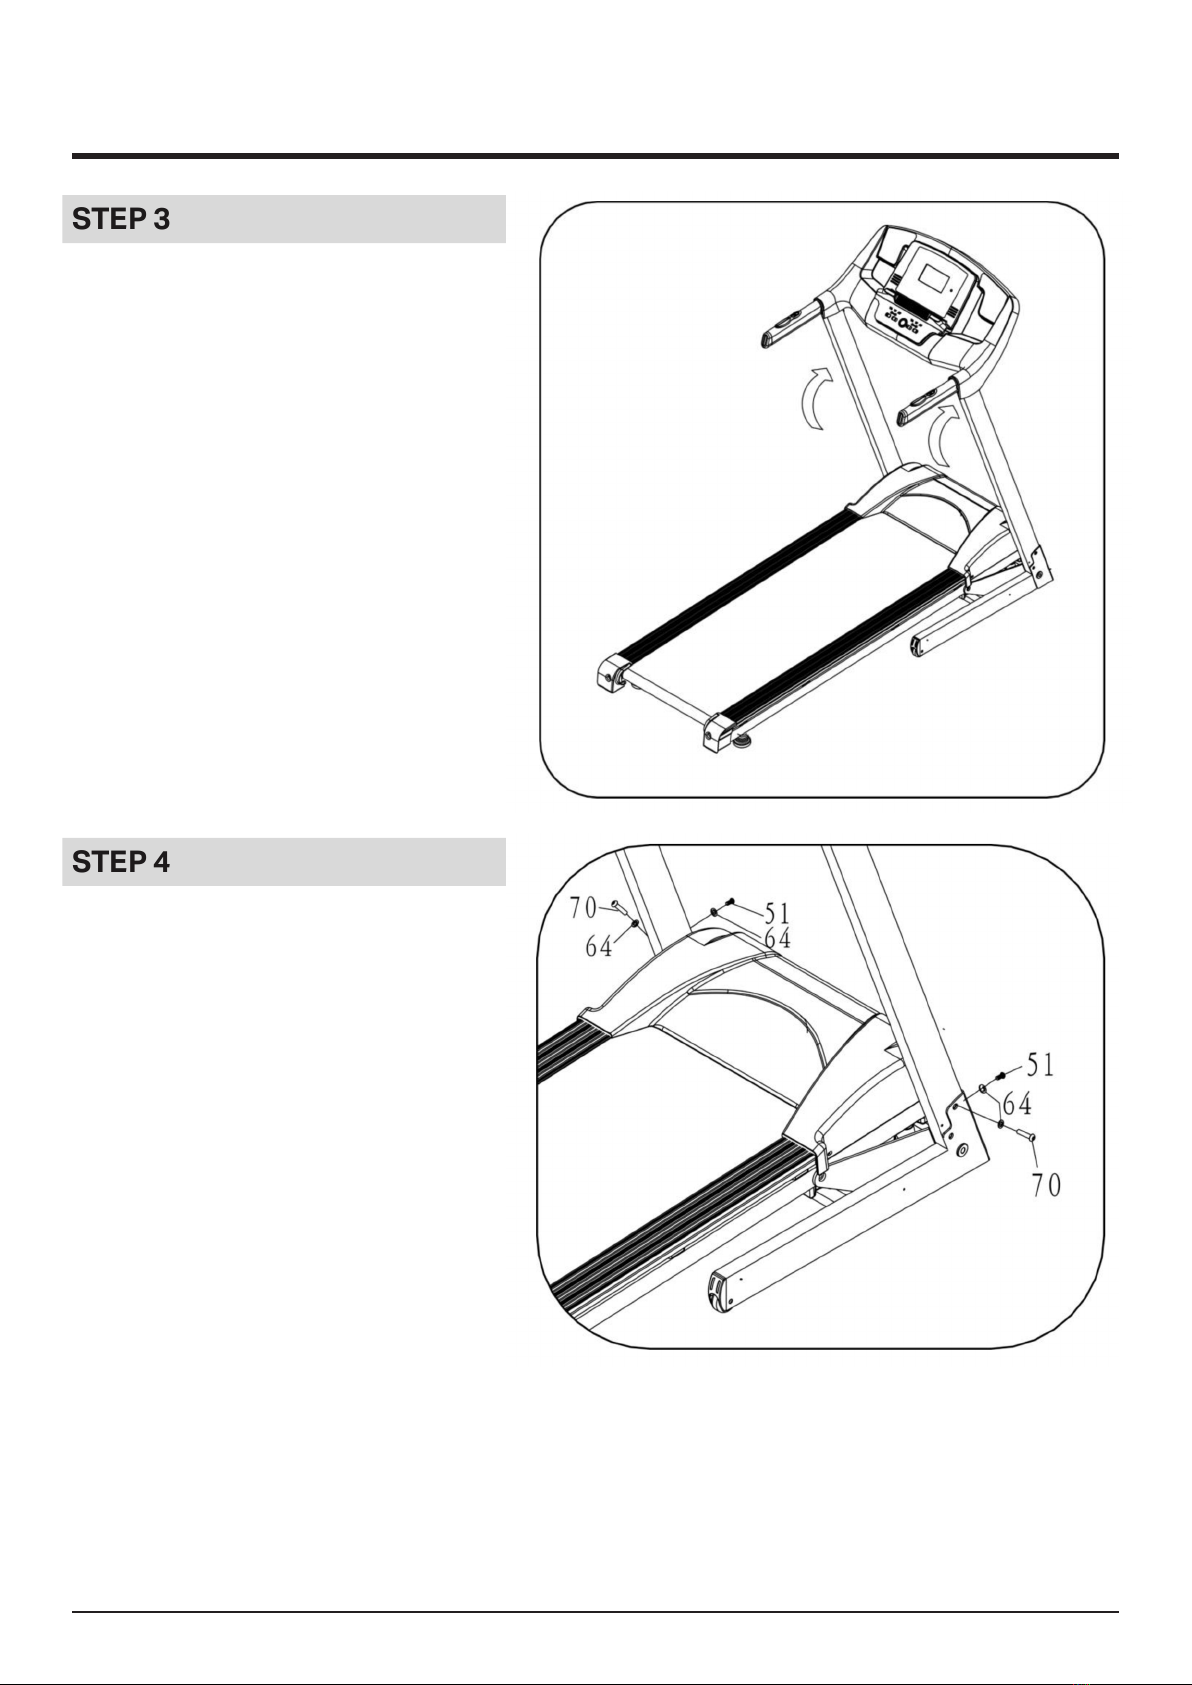
STEP 3
1. Pull up the Computer and L& R
upright as the arrow position.
Notice: When you pull up them, make
sure the upright not press the wires
in upright; keep touch the upright and
computer by hand, that they will not
fall down escaping any hurt.
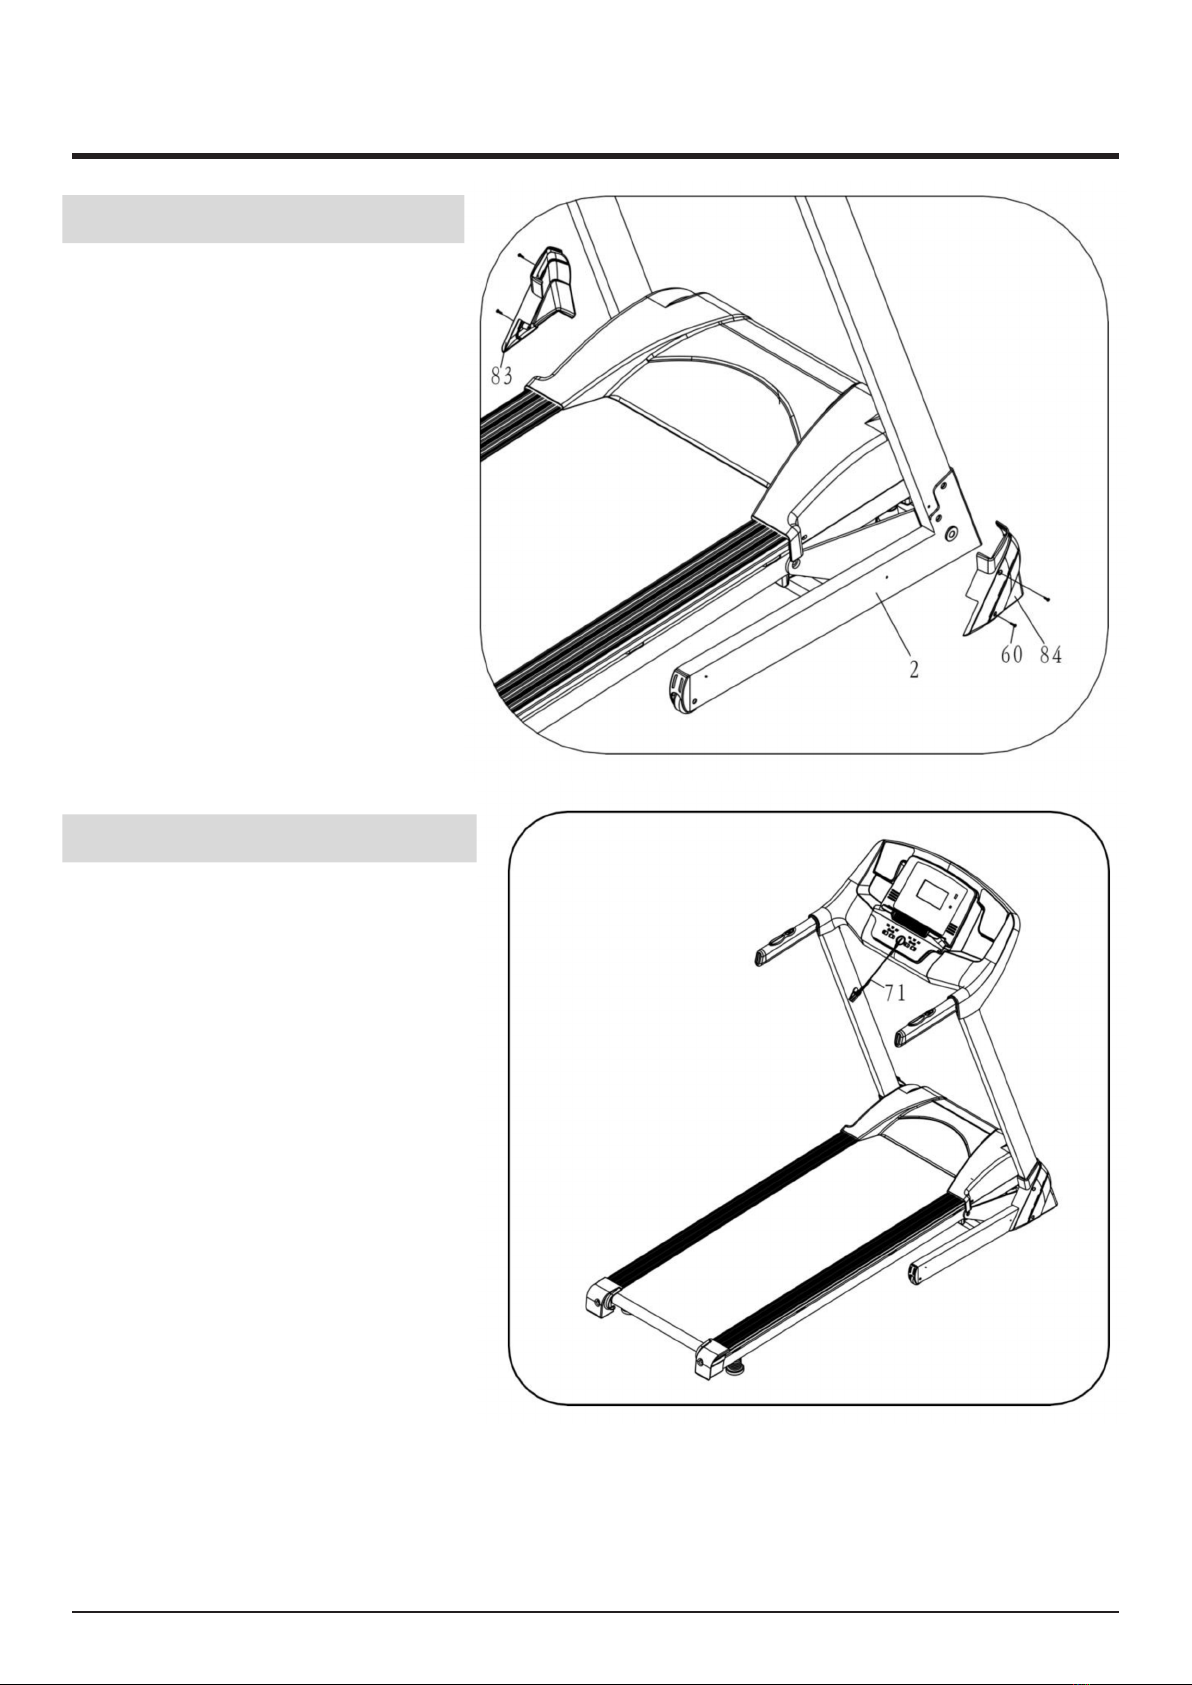
STEP 4
1. Use the 5# Allen wrench,lock
the Bolt M8*45 (70) and Lock
washer(64),lock the Right Upright
Tube to the Main Frame;
2. Use the 5# Allen wrench, Bolt
M8*16 (51) and Lock washer(64)
lock base frame and right upright.
3. Left side assembly method same
as right side.
7
ASSEMBLY INSTRUCTIONS
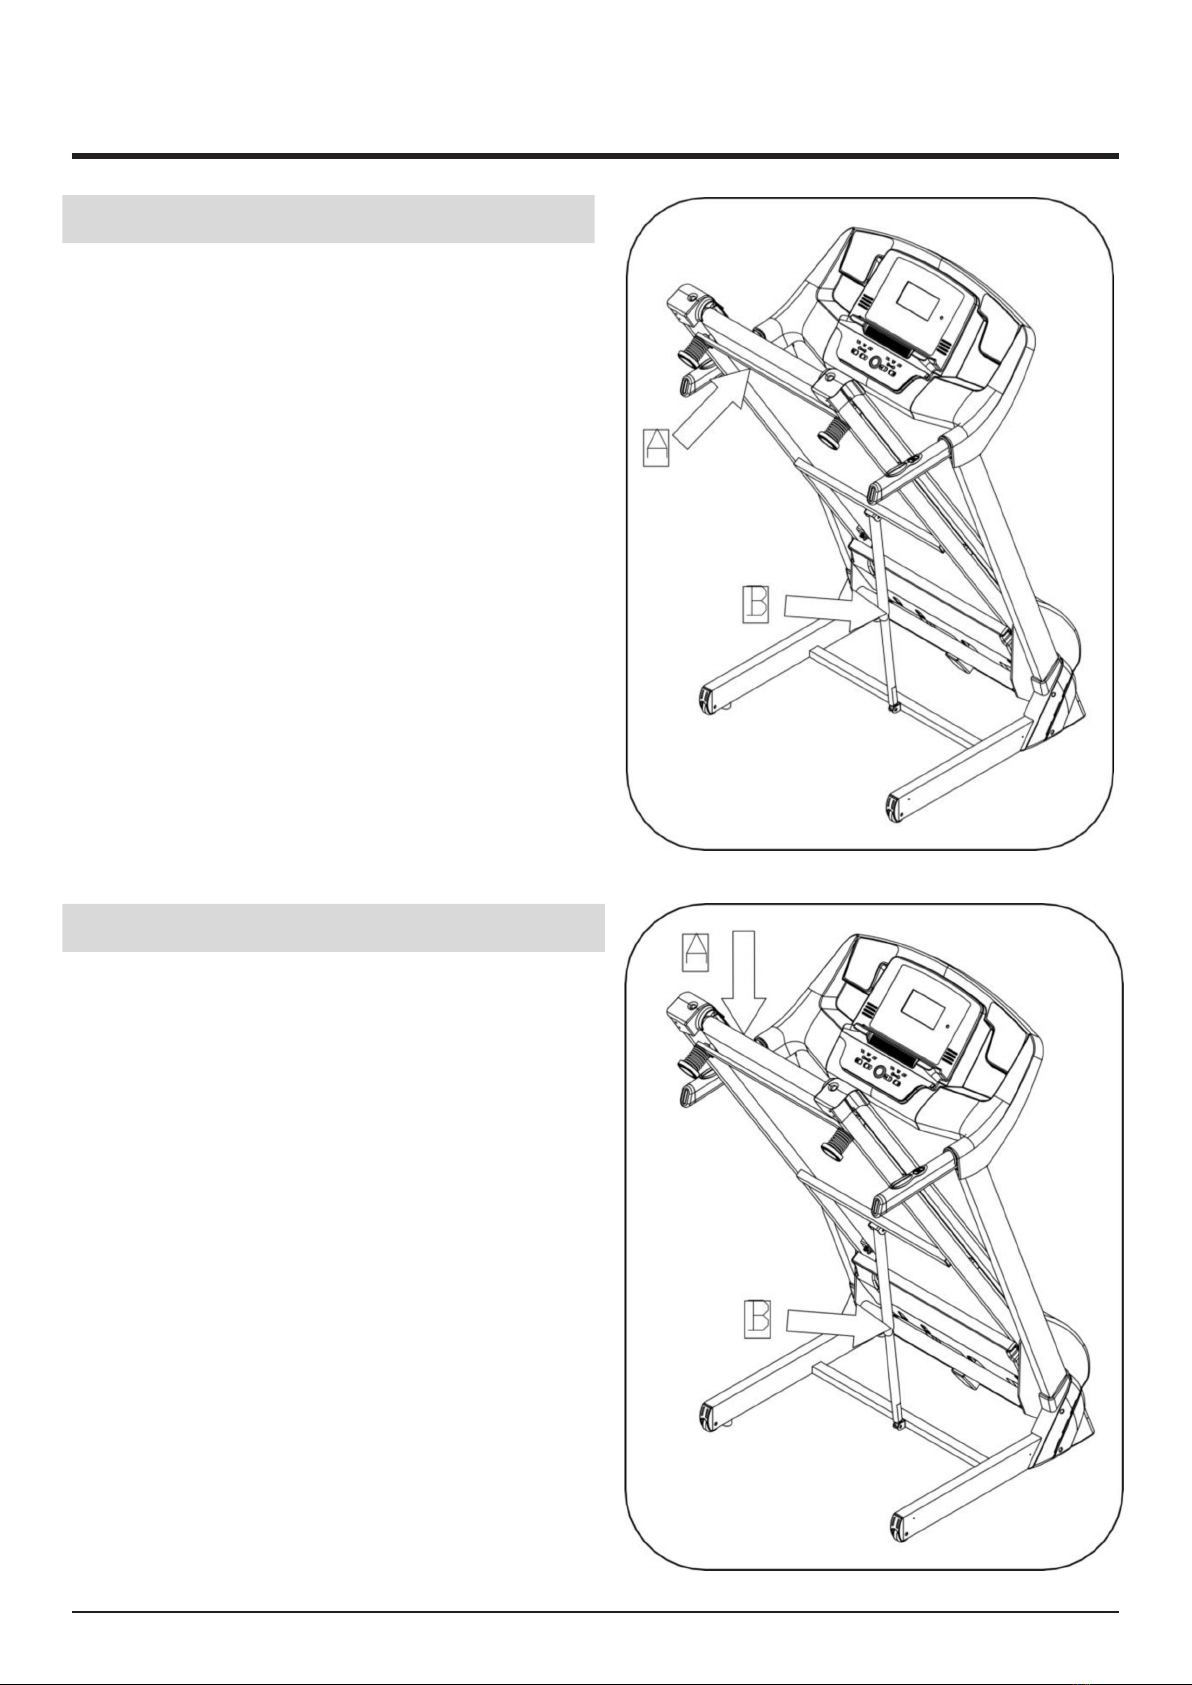
STEP 5
Use wrench w/screw driver,
lock the Right base cover (84)
and ST4.2*19 Bolt(60) to the
right upright and base.
Left side assembly method
same as right side.
STEP 6
Put the safety key (71) on the
computer.
ATTENTION: Please conrm complete assembly as the require above and
lock all the bolt. Do the following operation after checking everything is
OK. Before you use the treadmill, please read the instruction carefully.
8
FOLDING INSTRUCTIONS
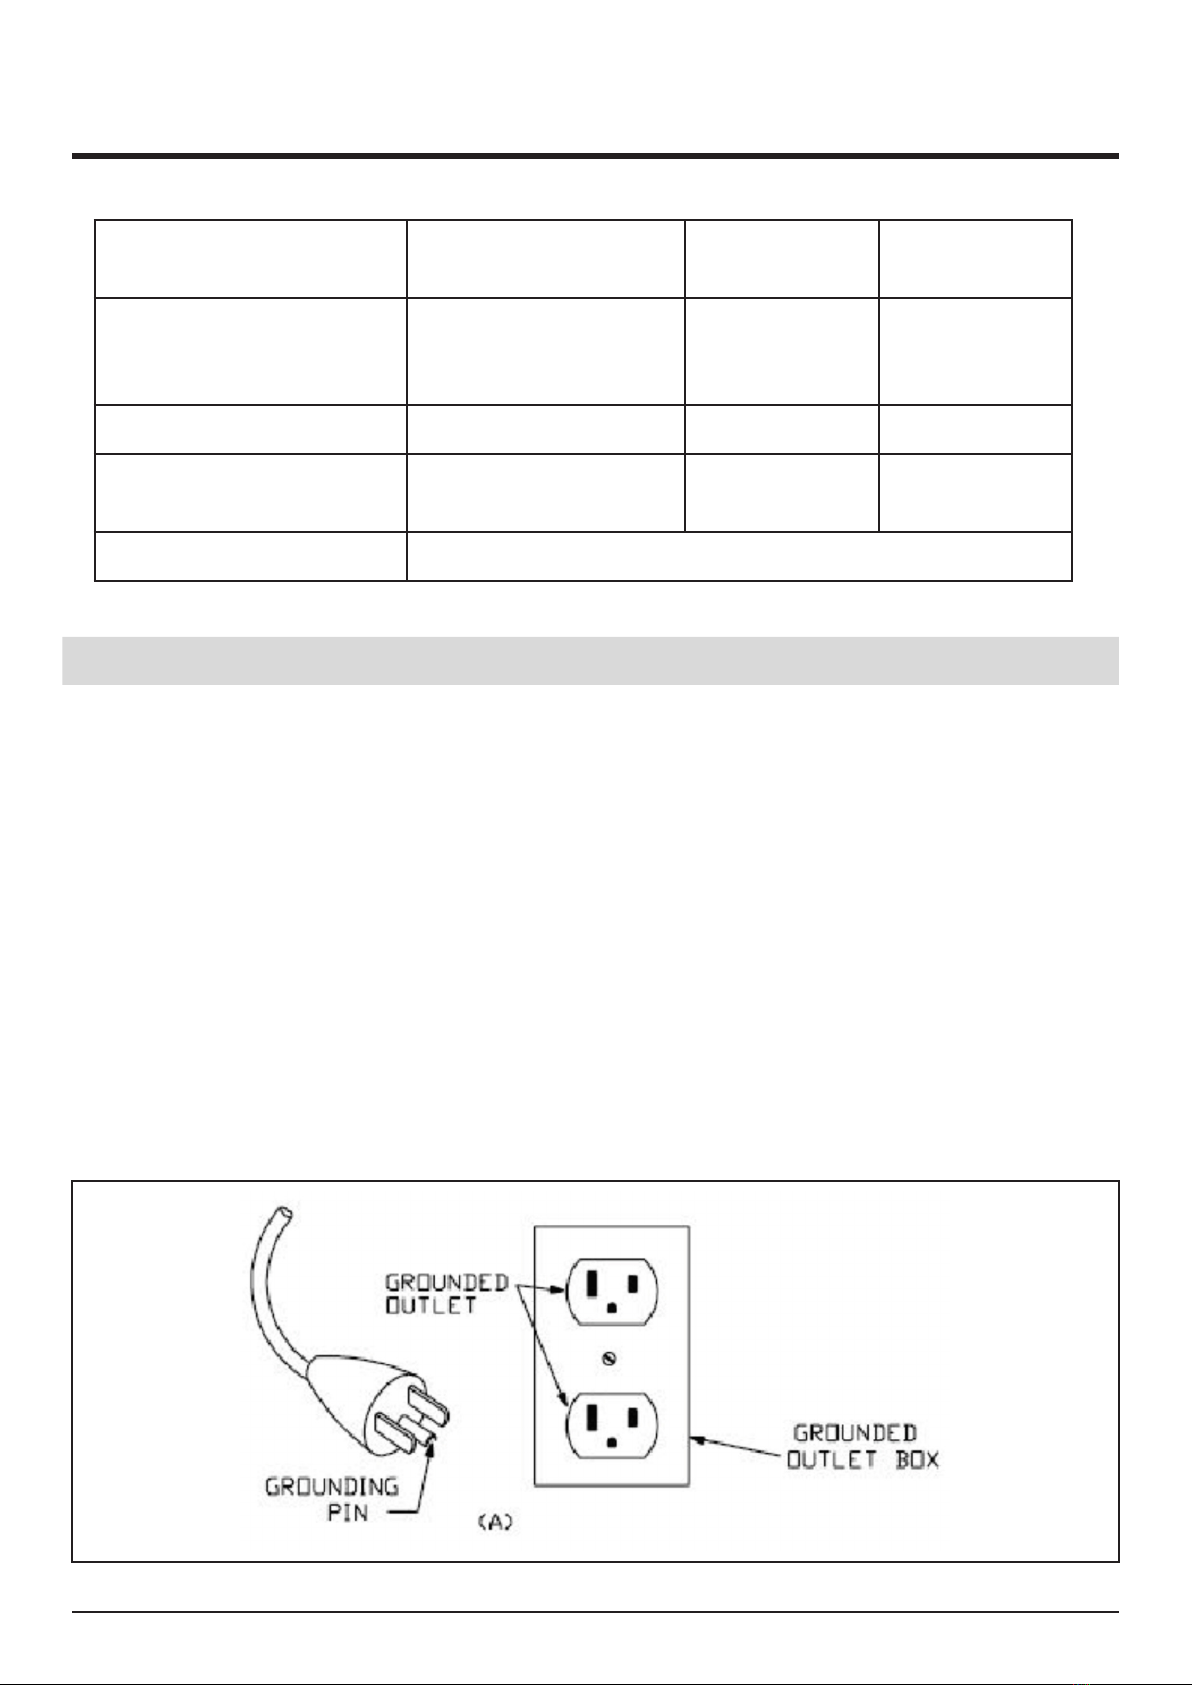
PULLING UP
1. Pull up the base frame at position( A) till
hearing the sound that the air pressure bar
(B) is locked into the round tube.
PULLING DOWN
1. Support place A with hand , kick the place
of air pressure bar, then the base frame
will fall down automatically (Please keep
anybody and any pet away the machine
when falling down).
9
TECHNICAL PARAMETER
BUILT UP SIZE (mm) 1620*700*1339mm POWER As the rating
label showing
FOLDED SIZE (mm) 900*700*1445mm MAXIMUM
OUTPUT
POWER
As the rating
label showing
RUNNING AREA (mm) 450*1250mm SPEED RANGE 1.0-16KM/H
NET WEIGHT 56.5KG MAX USER
WEIGHT
100KG
1 LCD WINDOW DISPLAY SPEED, TIME, DISTANCE, PULSE, CALORIES
GROUNDING METHODS
This product must be grounded. If it is malfunction or breakdown, grounding provides a path of
least resistance for electric current to reduce the risk of electric shock. This product is equipped
with a cord having an equipment-grounding conductor and a grounding plug. The plug must be
plugged into an appropriate outlet that is properly installed and grounded in accordance with all
local appliance.
DANGER – Improper connection of the equipment-grounding conductor can result in a risk of
electric shock. Check with a qualied electrician or serviceman if you are in doubt as to whether
the product is properly grounded. Do not modify the plug provided with the product – if it does
not t the outlet, have a proper outlet installed by a qualied electrician.
This product is for using on a nominal 220-240/100-120 volt(please choose the correct voltage)
circuit and has a grounding plug that looks like the plug illustrated in sketch A in following gure.
Make that the product is connected to an outlet having the same conguration as the plug. No
adapter should be used with this product.( The below picture is just for reference, the actual plug
and jack is depends on import country)
10
COMPUTER OPERATION GUIDE
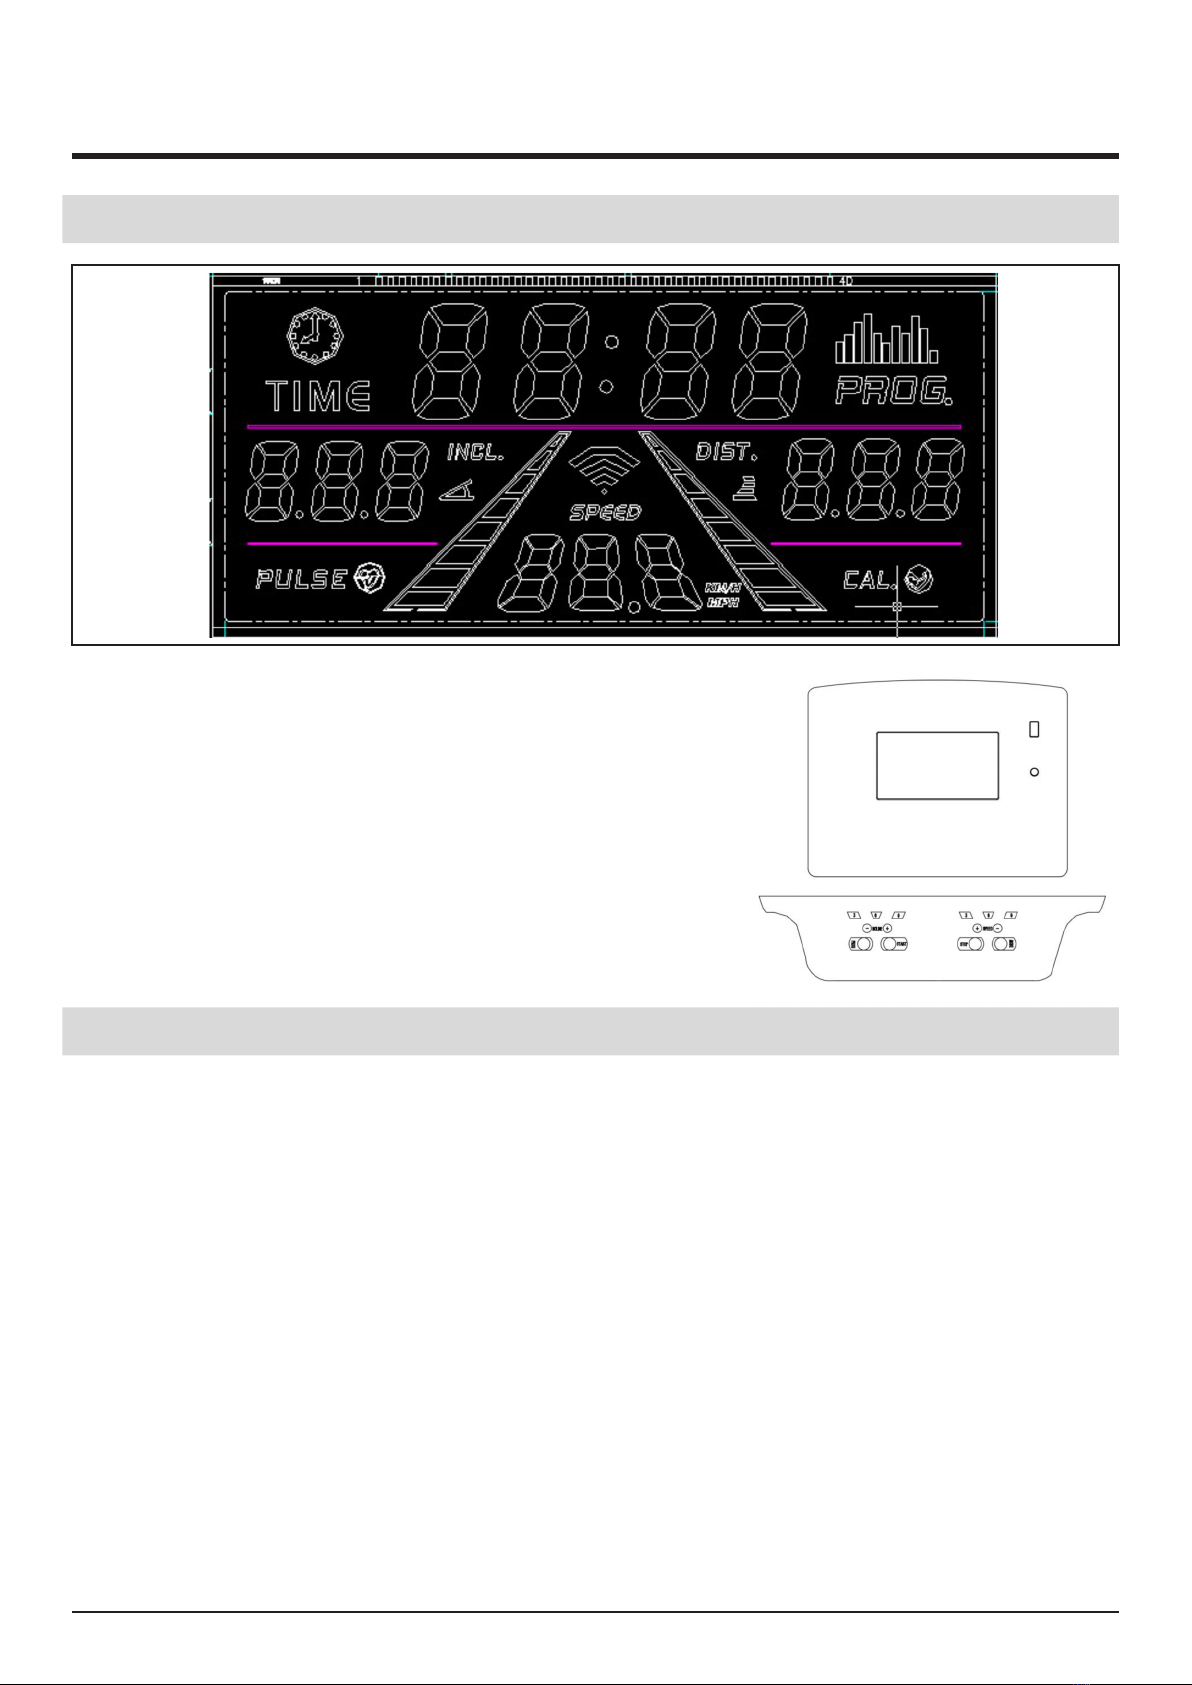
1. LCD WINDOW DISPLAY
SPEED: Show speed and program;
When start the machine, speed arrangement is 1.0-16.0KM/h.
The window will count down:3,2,1,when it goes program. It shows
P01-P15----U01-U03 –FAT.
TIME: Show running time;
DIST.: Show distance;
CAL.: Show calories;
PUL.: Show heart beat data;
INCL.: Show the incline data
2. BUTTON FUNCTION
“PROG” button: Press this button to choose program P1----P15---FAT;
“MODE” button: When machine in standby state, press this button to choose the mode: mode-
time count down, mode-distance count down, mode-calories count down; “START” button:
Press this button to start the machine, the machine will run at the lowest speed or at the speed
of default program after 3 seconds time count down;
“STOP” button: Press this button to stop the machine, the machine will stop smoothly;
“ SPEED+” “ SPEED-” : Adjust the speed. Press the button to adjust the speed when running,
and adjust the data when stop;
“ INCLINE+” “INCLINE-” : Adjust the incline. Press the button to adjust incline section when run,
and adjust the data when stop;
SPEED(3,6,9,12) : Adjust the speed quickly
INCLINE(3,6,9,12) : Adjust the incline quickly
When the user hold the bar of hand heartbeat about 6 second,it could show the pulse data.
Dieses Handbuch passt für folgende Modelle
1
Inhaltsverzeichnis
Andere Fit4Home Tretmühle Handbücher


Beliebte Tretmühle Handbücher anderer Marken


Smooth Fitness
Smooth Fitness EVO 3i Bedienungsanleitung

NordicTrack
NordicTrack NETL81810.0 Bedienungsanleitung

Schwinn
Schwinn 830/Journey 8.0 Bedienungsanleitung

Keys Fitness
Keys Fitness HealthTrainer HT-740T Bedienungsanleitung

Spirit
Spirit XT8 Bedienungsanleitung

NordicTrack
NordicTrack T 14.0 Treadmill Bedienungsanleitung