
Gilis BebeStars MACAN 920 Bedienungsanleitung

MACAN 920
ISOFIX
Group 0+123
Suitable for 0-36kg
2
INTRODUCTION
1.NOTICE
1.1 Group0+, I (Rearward Position),II,III
This Child Restraint is classified for “Semi-universal” use and is
suitable for fixing into the seat positions of the following cars:
CAR FRONT REAR
Outer Centre
AUDI A4 Yes Yes No
Passat Yes Yes No
Seat positions in other cars may also be suitable to accept this
child restraint.
If in doubt, consult either the child restraint manufacturer or the retailer.
1.2 Group I (Forward Position)
This is an ISOFIX CHILD RESTRAINT SYSTEM. It is approved to
Regulation No.44, 04 series of amendments for general use in vehicles
fitted with ISOFIX anchorages systems.
It will fit vehicles with positions approved as ISOFIX positions
(as detailed in the vehicle handbook), depending on the category of the
child seat and of the fixture.
ENEN
3
ENEN

4
ENEN IMPORTANT! Please carefully read and make sure you understand
all instructions in this manual and in the vehicle owner's manual
related to child safety seats. Install and use the child safety seat as
described in the instruction manual. Failure to do this could result in
serious injury or death of your child. Keep the instructions together
with the child restraint for future reference.
IMPORTANT! Because of potential medical issues inherent to low
birth weight and premature infants, always have a trained professional
doctor or hospital staff member assess the suitability of the child
restraint prior to leaving the hospital or using the child restraint.
DO NOT modify or attempt to modify the child safety seat in any way.
DO NOT take apart or attempt to take apart this child safety seat
except as instructed in this manual.
DO NOT use a child safety seat with damaged or missing parts.
DO NOT use damaged or frayed harness straps or vehicle belt.
NEVER use this child safety seat without the car seat cover.
DO NOT replace the child seat cover or harness with any other than
the ones we recommend as these parts are integral to the child safety
seat's performance.
NEVER use this child restraint with any other base except ones that
the manufacturer permits.
DO NOT use a child safety seat that has been in a crash. A crash can
cause damage to the child safety seat that you cannot see.
DO NOT use a second-hand child seat or child seat whose history
you do not know.
ALWAYS check the tightness of the restraint and the harness before
each use.
ALWAYS make sure no vehicle belts or harness straps are twisted
before each use.
NEVER leave the child in the seat when the harness straps are loose
or undone.
DO NOT leave your child in this restraint for an extended period of
time.
DO NOT use on vehicle seats that face the sides or rear of the vehicle.
Use the child safety seat only on forward-facing vehicle seats.
According to accident statistics, children are safer when properly
restrained in rear seats than in front seats.

5
ENEN
DO NOT use in any configuration not shown in the instructions.
NEVER use this child safety seat with 2-point vehicle belts.
DO NOT use alternative routings not shown in these instructions.
MAKE sure that the child safety seat does not become trapped by a
folding or moveable passenger seat or in the door of your car.
MAKE sure all folding passenger seats are properly latched.
DO make sure any loose objects such as luggage or books in your
car are properly secured as they may cause injuries in the event of an
accident.
This child restraint should be securely belted in the vehicle or store in
trunk even when not in use. In a crash or sudden stop, an unsecured
child safety seat may injure other occupants.
ALL occupants of the vehicle should be correctly restrained.
Unrestrainded passengers may be thrown against other passengers
and cause serious injury or death in a crash.
DO NOT allow children to play with or adjust the child safety seat.
NEVER take a child out of the child safety seat when the vehicle is
moving.
HOT! Cover the child safety seat when left in direct sunlight. Parts of
a child safety seat may become too hot for the child's skin. Always
check surfaces before placing a child in the seat. Seat cover may
fade in direct sunlight.
Make sure the lap strap of the harness is worn low down, so that the
infant pelvis is firmly engaged.
Before adjusting any parts of child safety seat please carry out your
child.
When using ISOFIX, please read over manufacturer handbook about
ISOFIX fixed point illustrations.
Correct/ Proper
Car Safety Belt—Diagonal Belt
Car Safety Belt—Lap Belt

6
ENEN
4.SAFETY SEAT USE METHOD
4.1 How to Use the Harness Buckle
Hold the two buckle latches together.
Make sure the right side is up.
Engage them before putting them into the harness buckle,
which should make a CLICK noise.
Pull shoulder straps to remove all slack from the lap section ensuring
that the harness is lying flat and the harness buckle is locked.
Open the harness buckle by pressing the red button.
Instructions

7
ENEN
4.2 Removing 5-Point Harness
A.Removing Shoulder Pads and Belts
Loosen the 5-point harness of the child seat as much as possible by
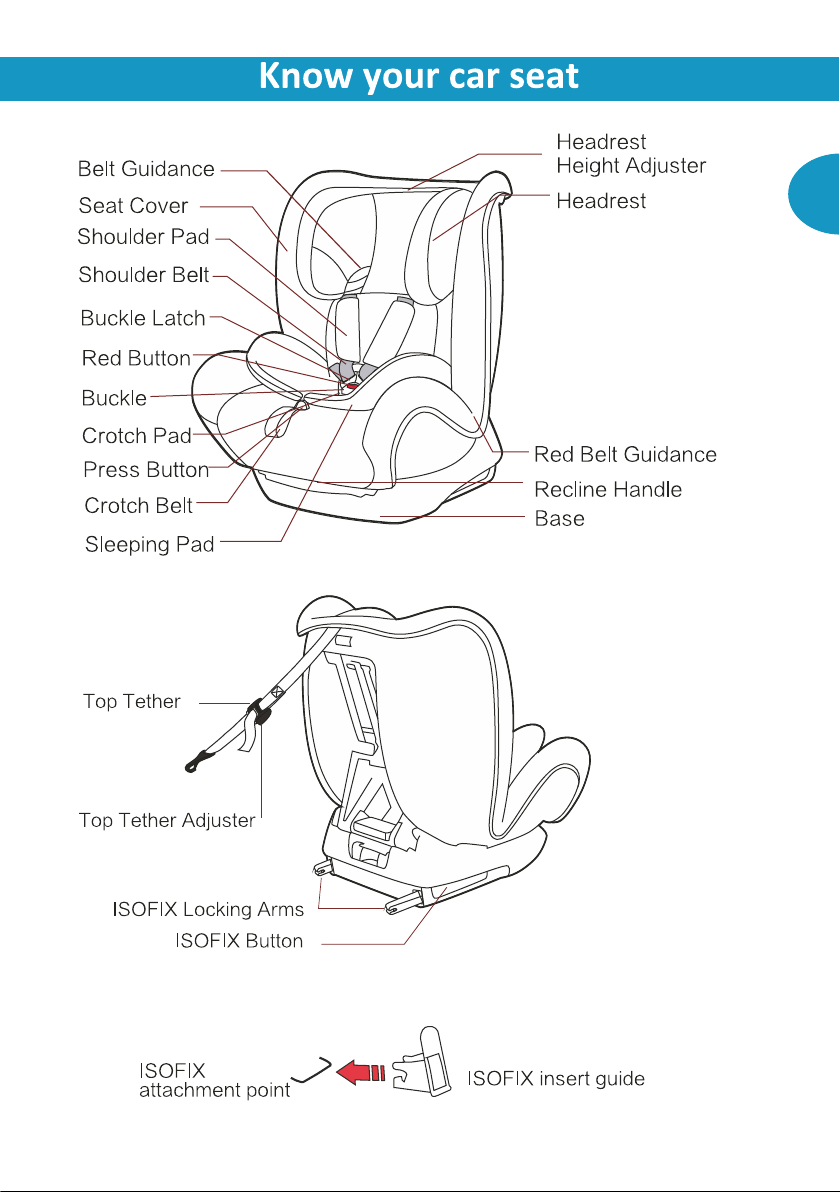
press the button of the shoulder belt height adjuster.
Slide the belt loops off from Gear fixed link, slide the left shoulder belt
first then to the right one, you can remove the shoulder belt.
Then from the front of the child seat, pull out shoulder straps through
the slots, put them on below of cloth cover.
B.Removing Buckle
Pull down buckle to clot, and vertically push out “8” metal plate from
the back of seat.
Remove safety belt from mental link and pull out it from buckle hole.
Then remove buckle, finally put redundant belt into cloth cover.
B:
A:
Instructions

8
ENEN
4.3 Removing the Fabric Cover
1. Remove the 5-point harness.
2. Take off the cover from the backrest and base.
3. Move the headrest of the child seat up to the highest position.
4. First take the cover off the base of the headrest, then remove the
cover of the headrest.
To re-fit the cover, simply follow the above steps in reverse.
CAUTION! Never use the child seat without a correctly installed buckle.
Make sure that the metal plate is correctly attached.
CAUTION! Check that the harness straps are not twisted and that they
have been correctly inserted in the belt slots of the cover.
1
4
5
4.4 Adjust the Angle of the Child Safety Car Seat
This child safety car seat can be adjusted to 4 positions.
Before fixing a child in the child restraint system, the seat must be set
on the recline position for rear-facing use, lying level (see picture⑤) or
in the siting position for forward-facing use, see pictures ①②③④.
To achieve this, use the recline handle located in front of the child
restraint system between the seat and the base to adjust it to the
desired position.
Four levels of inclination are possible:
①first level②second level③third level ④fourth level
lying level
Instructions

9
ENEN
4.5 Adjust Safety Belt Lengthen
A. Tighten Safety Belt
Pull up shoulder belt and the lap belt will tighten,
then pull crotch belt to tighten safety belt.
As soon as possible tighten safety belt.
Lap belt as lower as possible, the belt should
put near child's crotch not belly.
P.S.: Loose safety belt is dangerous.
Please check safety belt adjuster whether work,
then tighten safety belt.
B.Loosen Safety Belt
Press red button can loosen safety belt.
When pressing limited slide button, the other
hand grasping shoulder belt which under
shoulder pad (not grasp shoulder pad belt) to
child right ahead to loosen safety belt.
B:
A:
4.6 Adjust the headrest
A. When Use in Group0+,Ⅰ(Use 1-7 level)
The shoulder straps are adjusted as follows:
Loosen the shoulder straps of the child seat
as much as possible.
Pull the headrest height adjuster, select the
correct height of the
shoulder straps and engage it in the
position that fits your child by
releasing the adjuster.
B. When Use in GroupⅡ,Ⅲ(Use 7-10 level)
When child grow up above 15KG, the headrest should use 7-10 level
height.
Slide the belt loops off from Gear fixed link, slide the left shoulder belt
first then to the right one, you can remove the shoulder belt.
Then from the front of the child seat, pull out shoulder straps through
the slots, put them on below of cloth cover.
After remove them, pull the headrest height adjuster, select the correct
height of the shoulder straps and engage it in the position that fits your
child by releasing the adjuster.
Instructions

10
ENEN
ATTENTION! A correctly adjusted headrest ensures optimal protection
for your child in the safety seat:
The headrest must be adjusted so that the shoulder straps are at the
same level as your child's shoulders.
CAUTION! The shoulder straps must not run behind the child's back,
at ear height or above the ears.
4.7 Adjust Seat Forward and Rearward Direction
Forward direction change to rearward direction follow these step:
①One hand pull the headrest height adjuster let the spring blot be
retracting, and the other hand pull the seat body follow direction of
red arrow.
②Pull the seat body until the body and base seperated.
③Don't move base, still pull the adjuster, turn the body 180°degree,
insert the body into base.
④Pull the body into base follow red arrow direction, until the spring blot
popping into groove, at the end, slightly shake seat body to confirm
whether already locking.
popping popping
retracting retracting
Instructions
Inhaltsverzeichnis
Sprachen:


