
Ismart X8 MEGA Bedienungsanleitung
USER MANUAL
High Definition Digital Satellite
Televison Receiver
and Recorder

1. Introduction........................................................................................................... 1
1.1 Overview
1.2 Main Features
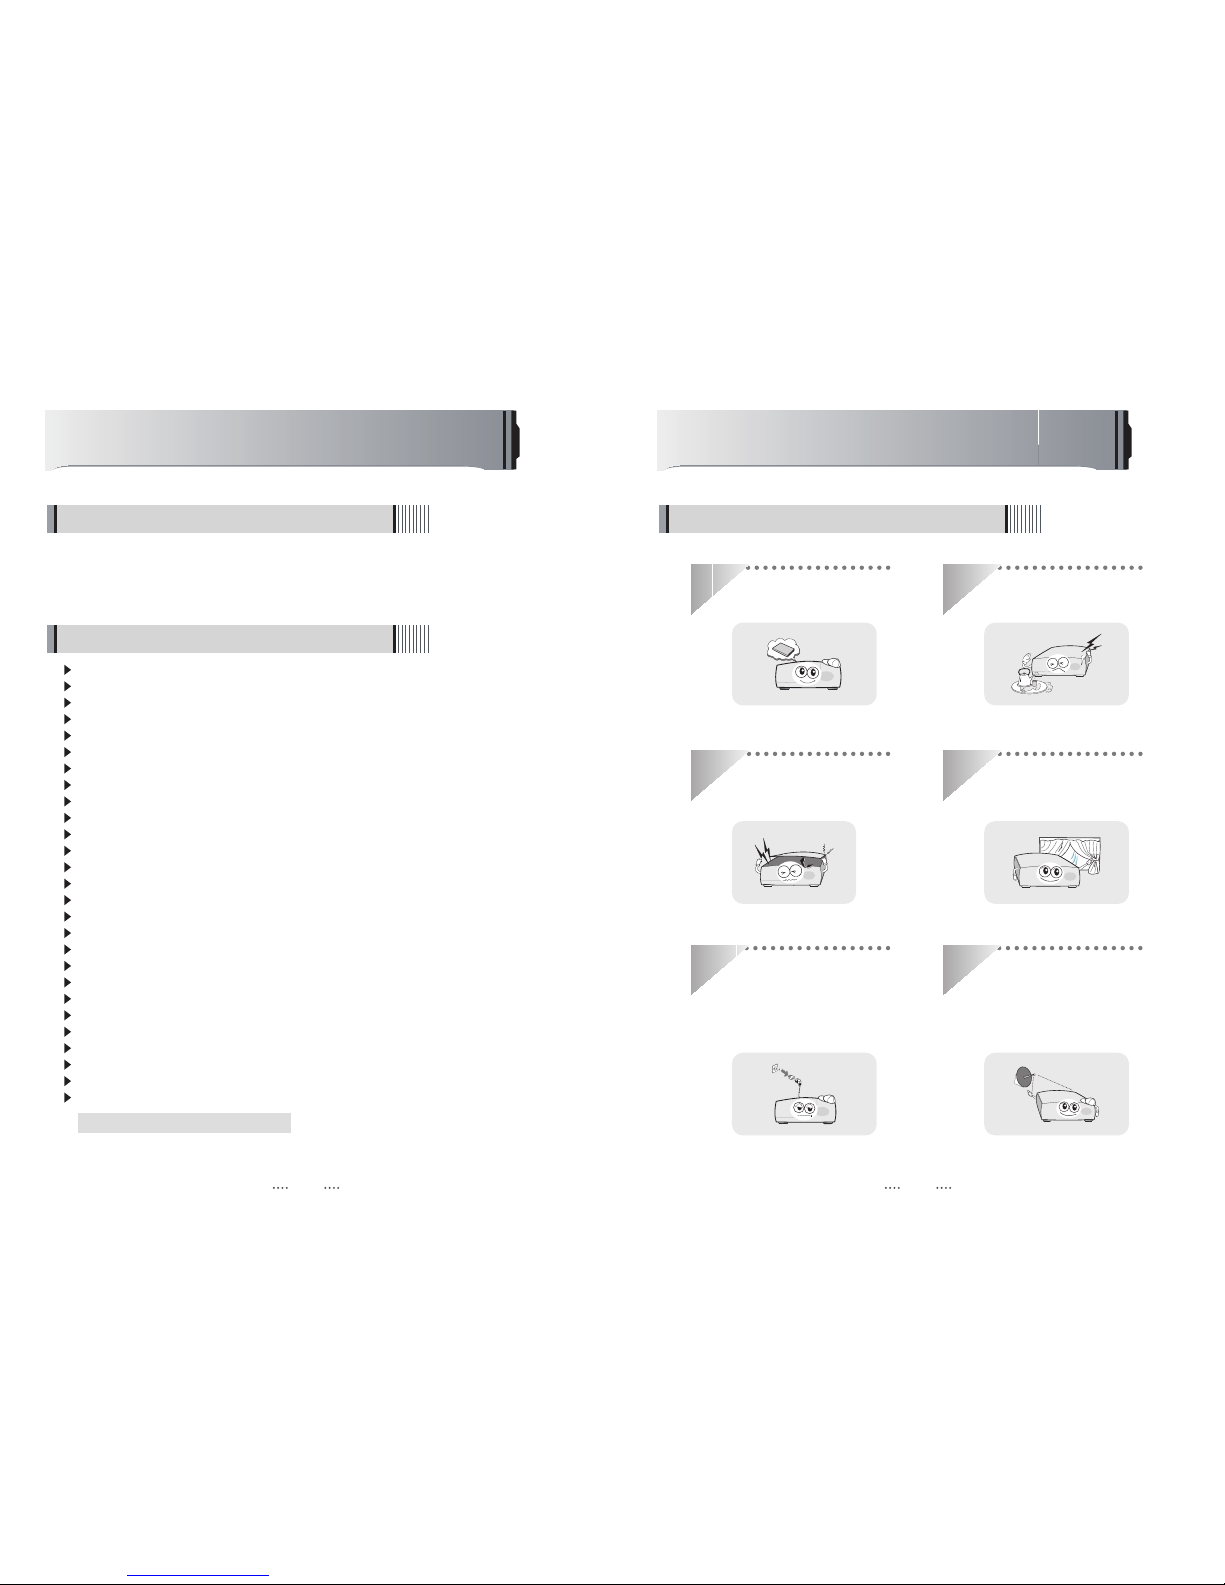
2. Safety/Precautions ............................................................................................... 2
2.1 Safety
2.2 Precautions
2.3 Positioning
3. Points to Check before Use................................................................................. 4
3.1 Accessories
4. Controls/Functions .............................................................................................. 5
4.1 Front Panel
4.2 Rear Panel
4.3 Remote controller
4.4 Front Display
5. How to Connect .................................................................................................... 9
6. Operation............................................................................................................. 10
6.1 Getting Started
6.2 System Setting
6.3 Channels
6.4 Electronic Program Guide
6.5 Entertainment
6.6 Media Manager
6.7 System Information
6.8 DVR
6.9 MEDIA
6.10 PIP Function(Picture in Picture)
7. Troubleshooting ................................................................................................. 56
8. Specifications ..................................................................................................... 57
Contents
21
This satellite receiver is designed for the reception of free-to-air and encrypted
channels. Depending on your location, enjoy the rich choice of up to 10,000 different
channels broadcasting a large range of programs: culture, sports, cinema, news,
events, etc. This receiver is assembled with high quality electronic components.
Introduction
1.1 Overview
Video Resolution : 1080p / 1080i / 720p / 576p / 576i
DVR Ready via USB External Mass Data Storage Device
Time Shift, Record & Playback
USB 2.0 Host for MP3 Playback, JPEG Viewing & Firmware Update
Embedded CONAX CAS7
10,000 Programmable Channels
DVB-S, MPEG-2/MPEG-4 Compliant
HDMI Output
Component Video (Y, Pb, Pr) Outputs
On-screen display with true color full resolution
Advanced Blind Scan
Auto & Manual Channel Search
Dolby Digital Output
Channel Sorting by Alphabet, Transponder or CAS
16 Favorite Channel Groups
OSD in 12 Languages
Multi Picture Display and Zoom
16:9 Full Screen, 4:3 Letterbox & Full Screen
DiSEqC 1.2 and USALS Compatible
Data Transfer Between Units
Extended Electronic Program Guide (EPG) and program reservation through EPG
Teletext by OSD/VBI (Vertical Blanking Interval)
Auto Voltage (AC 90 - 250V) SMPS
High speed software upgrade via USB 2.0
Parental Lock/ Installation Lock / Receiver Lock / Channel Lock / Lock Channel Confirm
Software & channel database upgrade via RS-232C: PC to STB/ STB to PC
Video color adjustment function.
1.2 Main Features
Be sure to read this user's manual before
starting the operation of the unit.
Do not touch the power cord with wet
hands as it may cause electric shock.
Never open the cover. It is very
dangerous to touch the inside of the
unit due to possible electric shock.
Place the unit in a well ventilated and
no-heat environment.
When you do not use this unit for a
long time, make sure that power cord
is pulled out from the outlet. Also do
not use a damaged power cord as it
may cause fire or electric shock.
A professional installation is required.
If reception is interrupted, contact
your local service centre.
Safety/Precautions
2.1 Safety
DiSEqC is a trademark of EUTELSAT
43
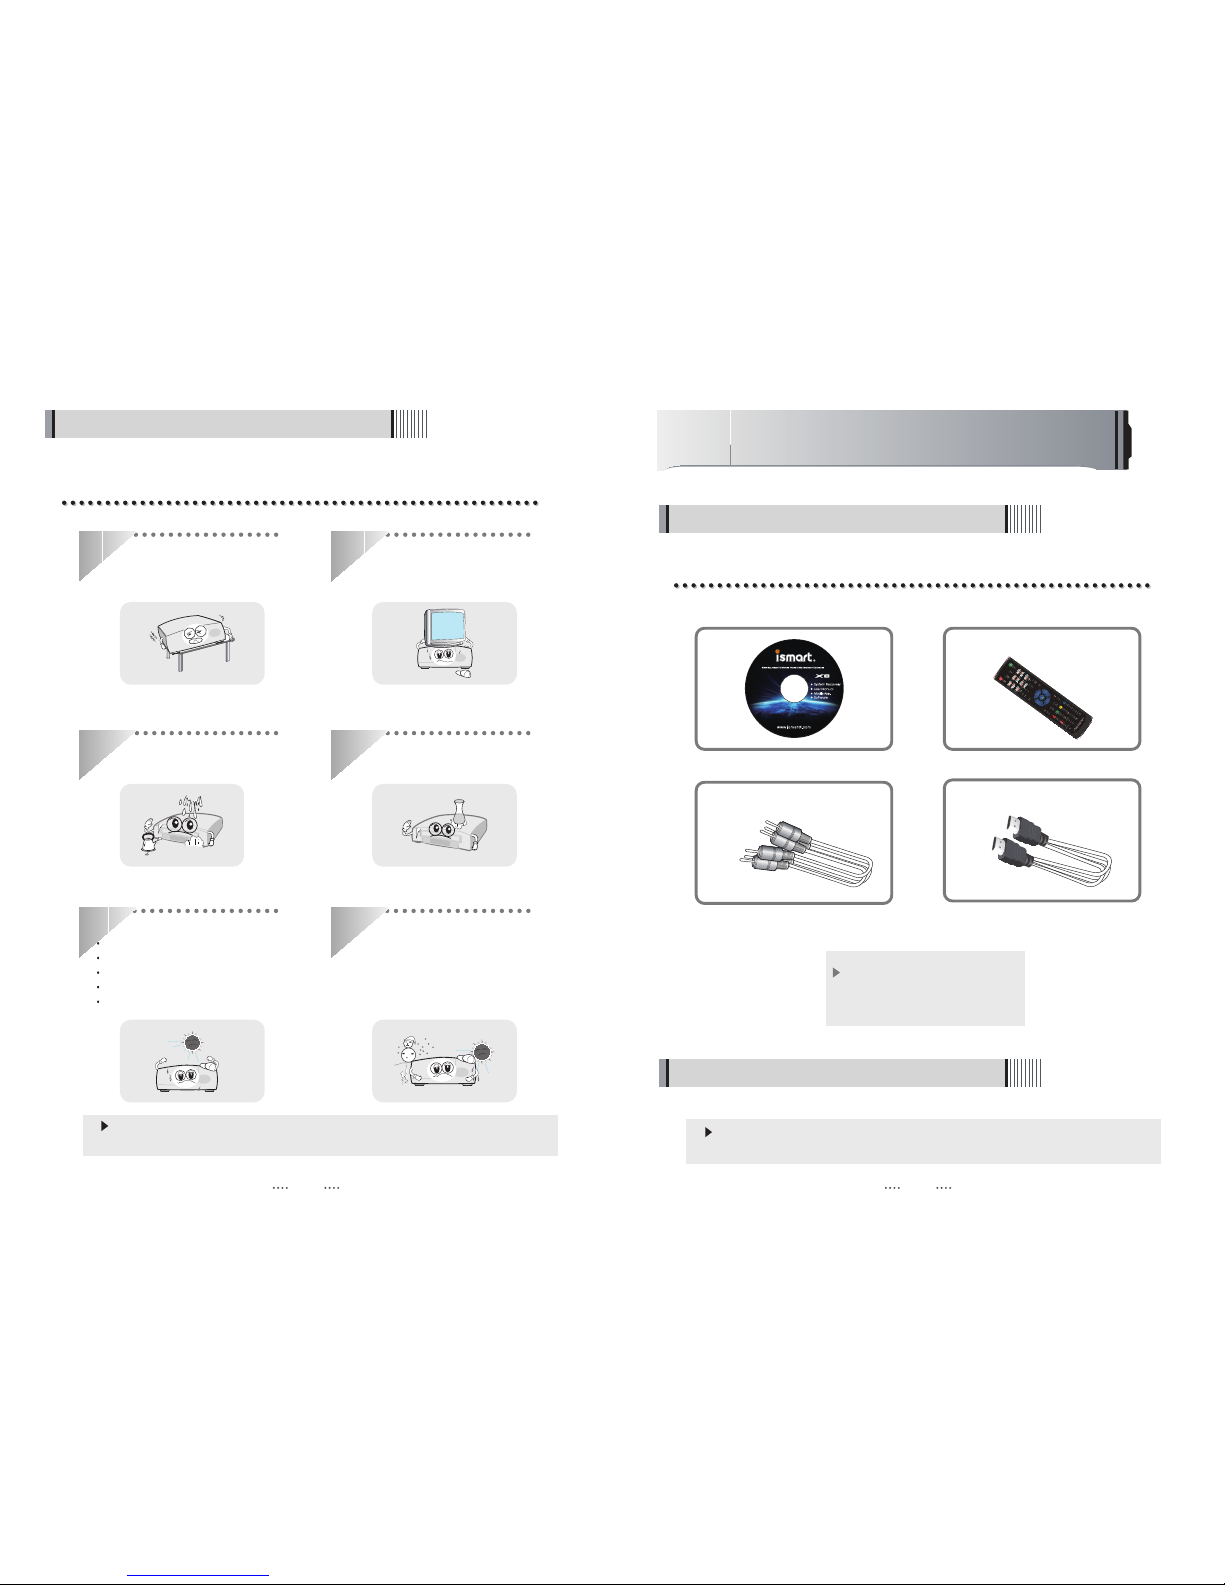
When installing the unit
2.2 Precautions
Install the unit horizontally. An uneven
installation may cause the unit to be
damaged.
Do not put heavy items such as a TV
set on the unit. That may damage
the unit.
Do not place the unit near water. Do not put water holding items such
as vases on the unit.
Do not install the unit:
Where it is subject to vibrations
Where it is exposed to direct sunlight
Where there is humidity
Where the temperature is too high or too low.
Where there is no ventilation
Moving the unit to a hot area from a
cold one will cause condensation.
Do not operate the unit for one or two
hours or until it has dried completely.
CD : 1 Remote control : 1
HDMI Cable : 1
RCA Cable : 1
If any of the above-listed
accessories is missing, contact
your sales representative.
The accessories below are included with this receiver:
Points to Check before Use
3.1 Accessories
Your dish should be properly installed and azimuth and elevation must be precisely set up.
This unit supports DiSEqC 1.2 and can work with a compatible antenna positioner.
Ask your dealer for information.
The mains plug is used as the disconnect device.
The disconnect device shall remain readily operable.
3.2 The Satellite dish
Controls/Functions
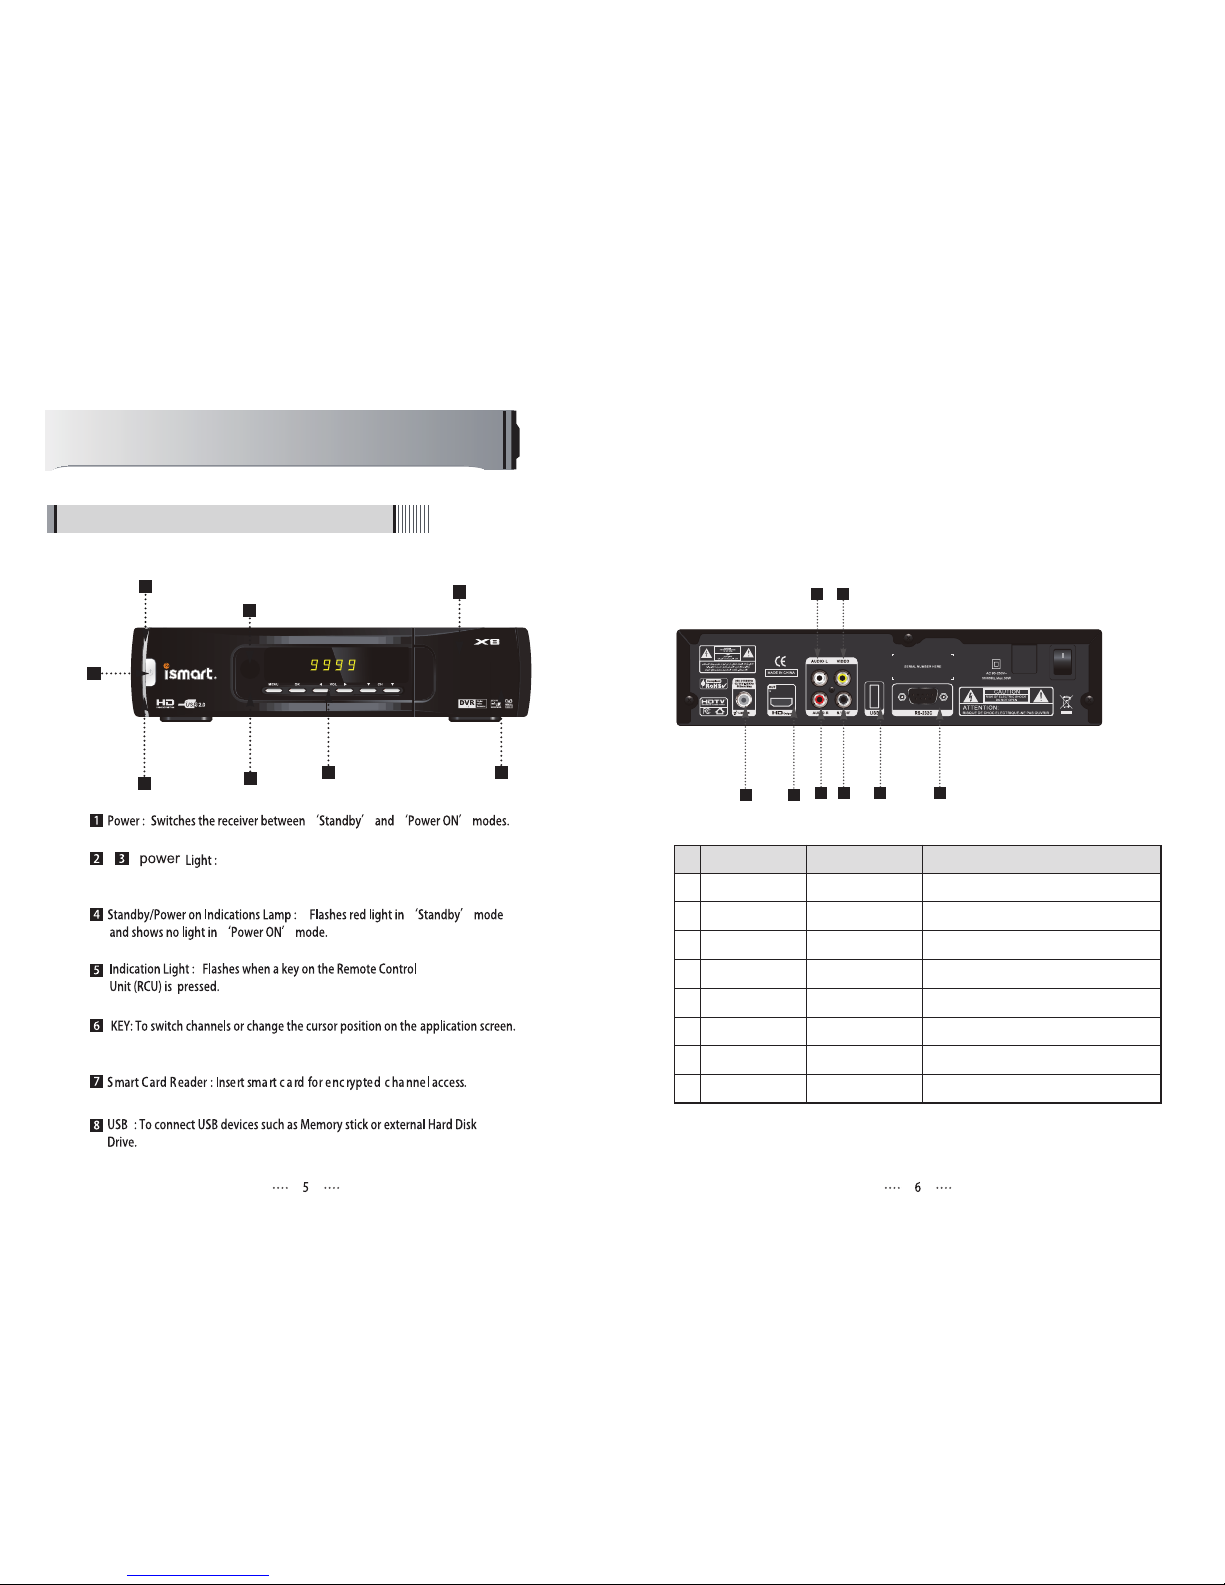
4.1 Front Panel
- :
2
4
7
356 8
No. Name Connector Function
1 LNB INPUT IEC 169-24 FEMALE IF input from LNB to digital tuner
2
3 VIDEO RCA cinch Composite video output
4 AUDIO L RCA cinch Left audio output
5 AUDIO R RCA cinch Right audio output
6 S/PDIF RCA cinch Digital audio output
7
8RS-232C DB-9 Low speed serial port
USB USB USB WiFi Output
HD OUT PUT HD OUT PUT Digital Video/Audio Output
34
5 6 7 8
1 2
1
when the receive work the Light will become blue colour.
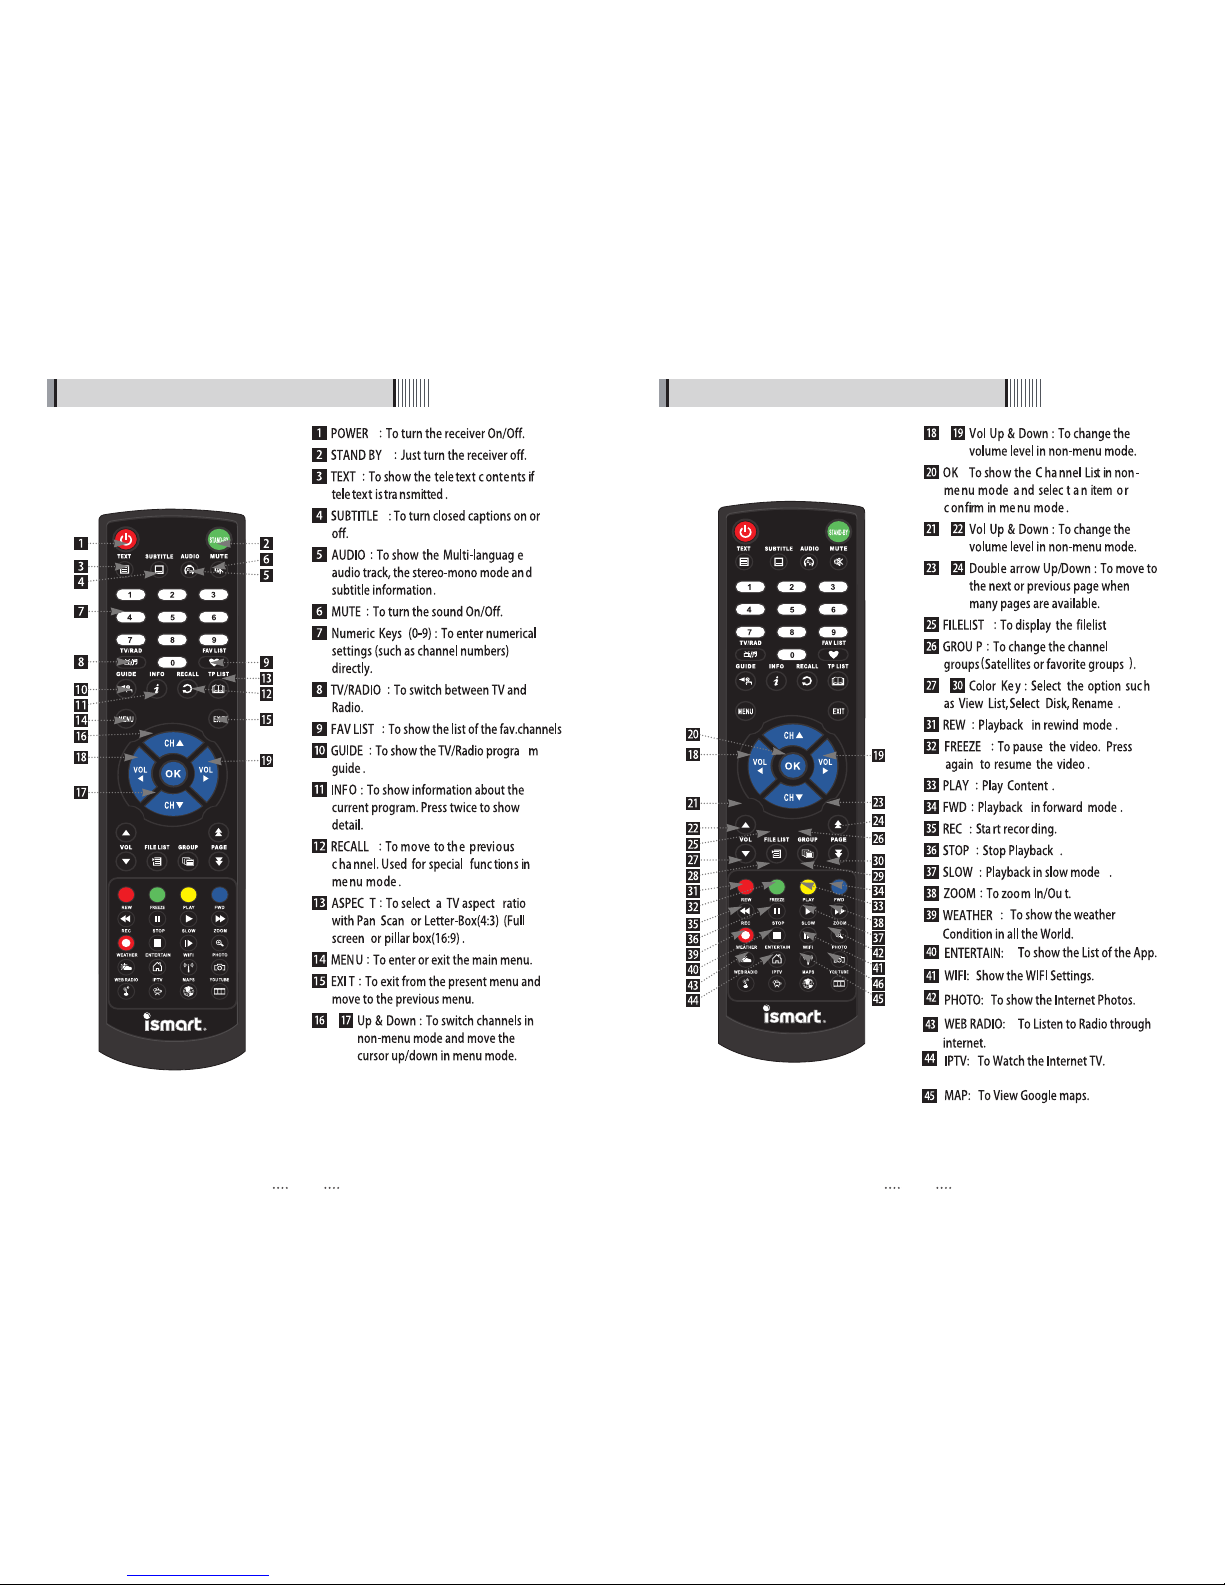
87
4.3 Remote controller 4.3 Remote controller
-
-
:
-
-
-
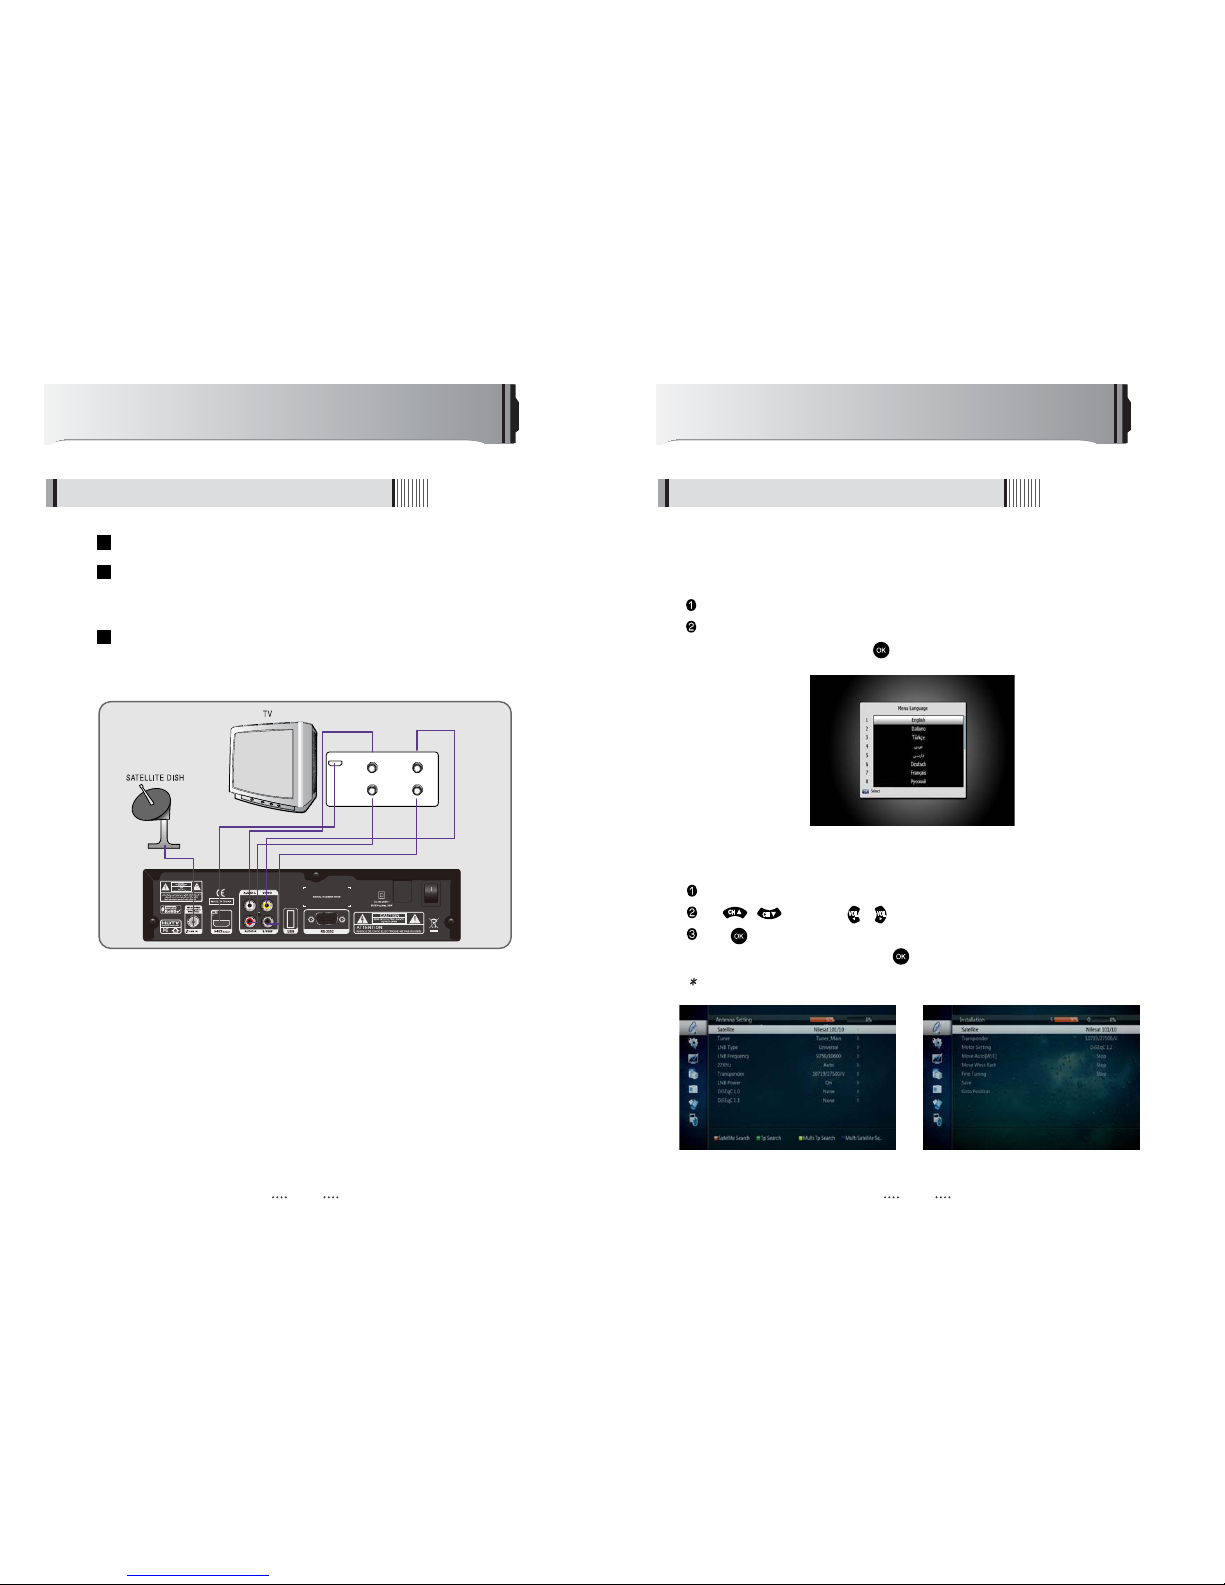
109
How to Connect
Connect the TV antenna to TV ANT IN
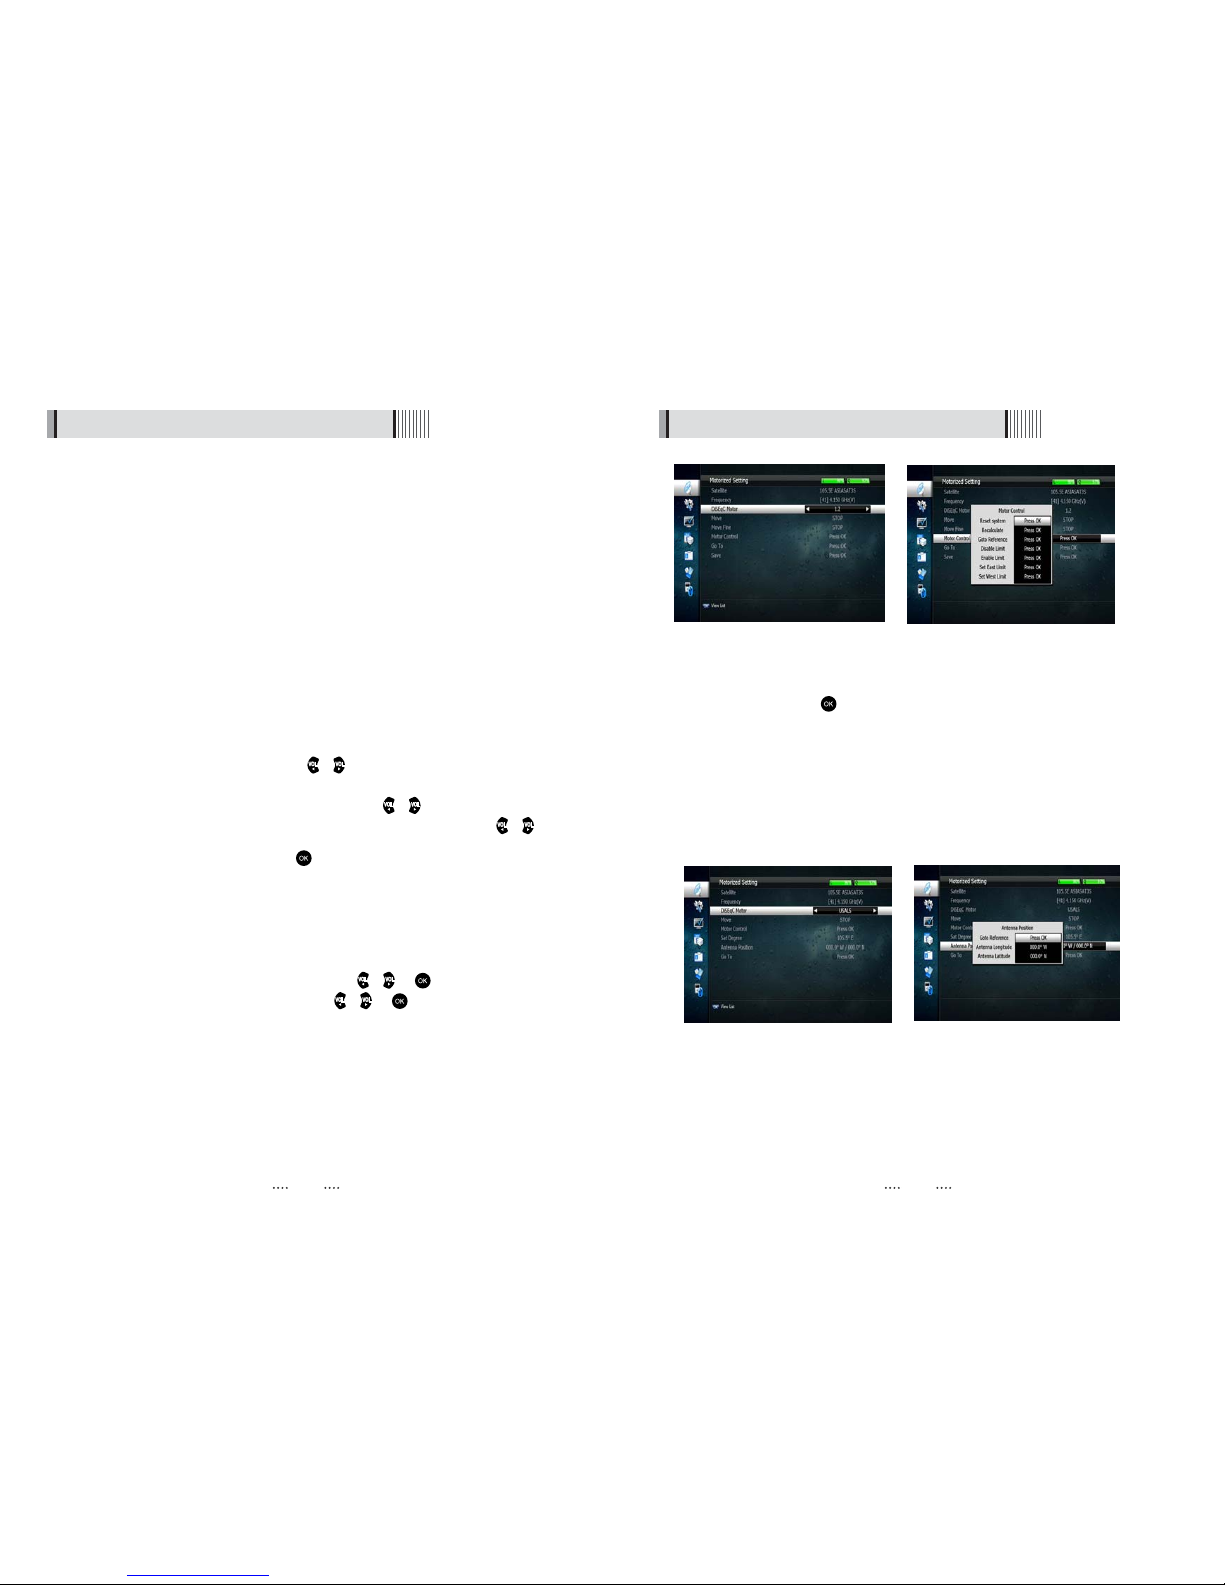
Connect the Video and Audio of the TV to Video and Audio: connect the red
and white connectors to Audio R and Audio L, and the yellow connector to
Video
Connect your satellite dish
3
2
1
When Connecting the Receiver to a TV
Operation
6.1 Getting Started
<Figure 6.1.1>
After your receiver is powered on, proceed with installation as follows :
1) Menu Language Setting
Turn on your TV and receiver.
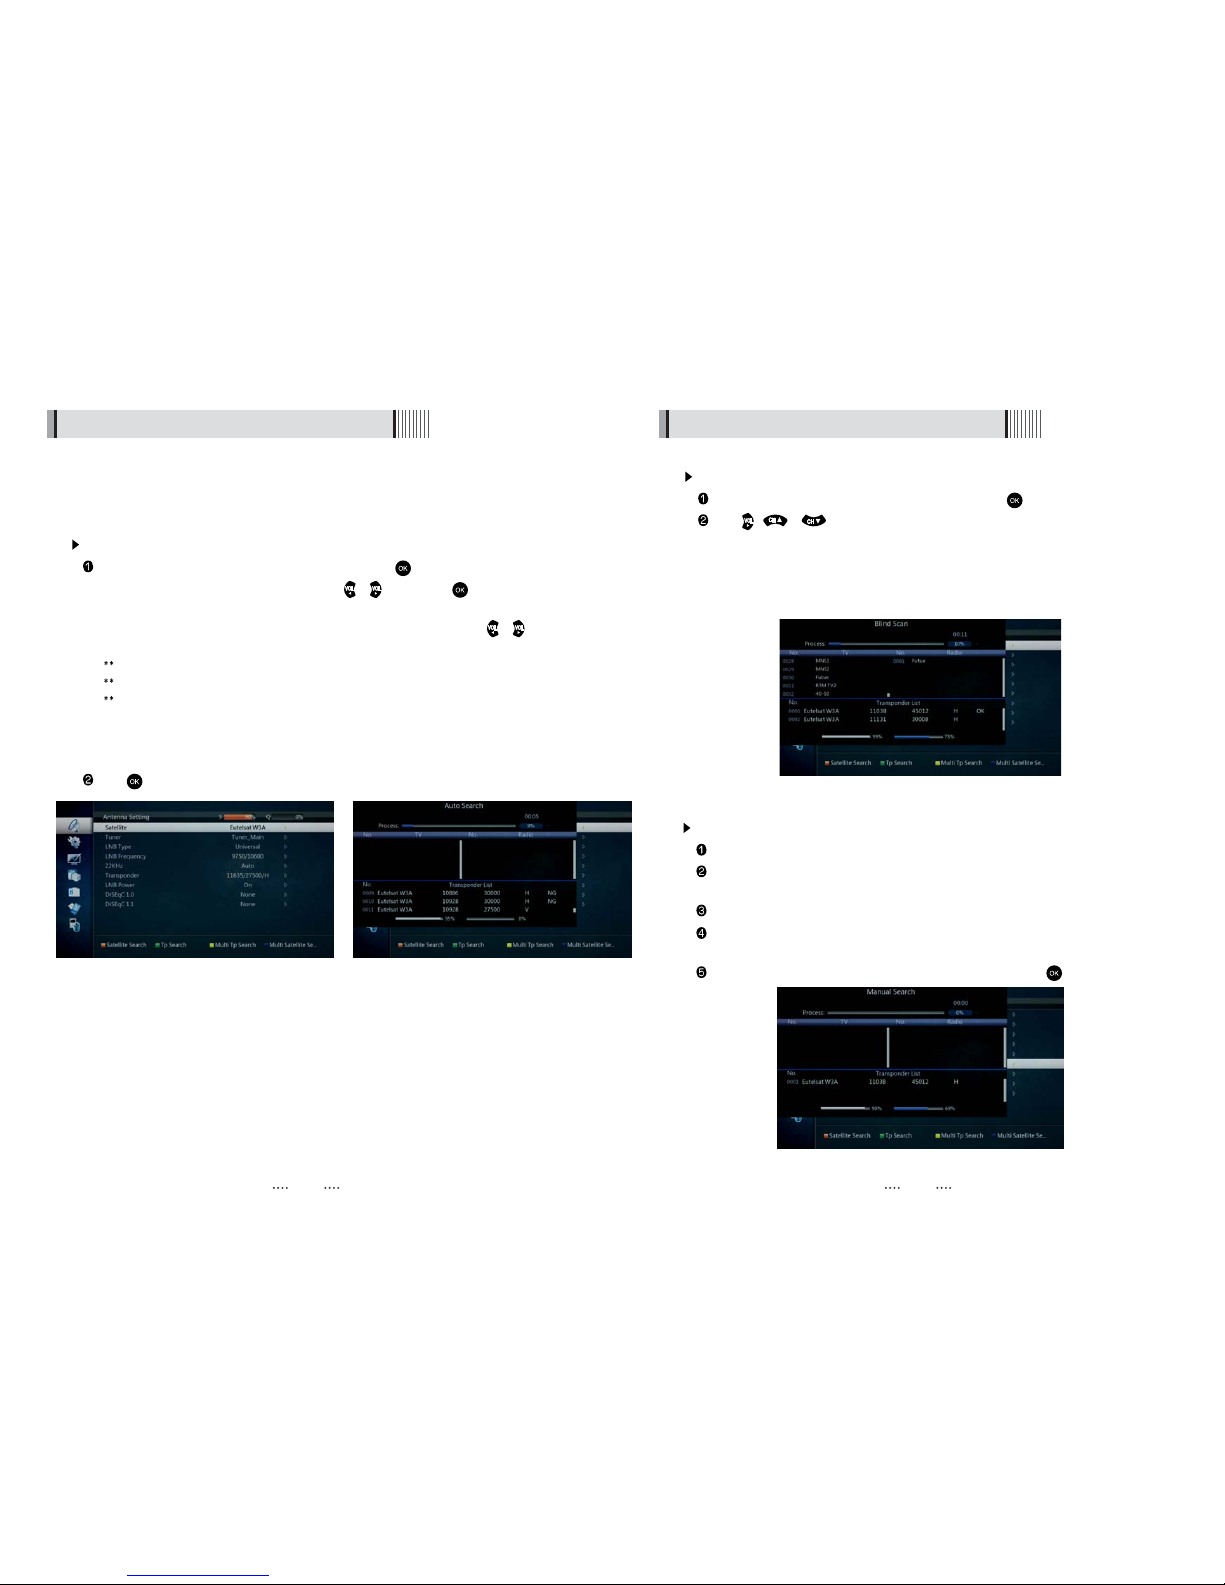
The pop-up menu for language selection will apprear. <Figure 6.1.1>
Select one language and press button to proceed.
2) Antenna Setup
Press the button to display the main menu.
Use / button and / button to move in the menu.
Press button on “Dish Setting”. The following window will aprrear. <Figure 6.1.2>
If you have a motorized dish, press button on “Motorized Setting”. <Figure 6.1.3>
Note : Enter a 4-Digit password if need arise. the default password is '0000'.
>3.1.6erugiF<>2.1.6erugiF<
MENU
AUDIO-L
HD
Output
VIDEO
S/PDIFAUDIO-R
1211
<Figure 6.1.4> <Figure 6.1.5>
⊼Select the item that you want to edit and set its parameters as desired. <Dish Setting>
6.1 Getting Started6.1 Getting Started
- LNB Power : Select among ON/OFF/13V/18V.
- LNB Type : Select among Single/Universal/OCS.
- LNB Freq : Set the frequency of the LNB oscillator.
- 22KHz : When not AUTO, set the signal path from LNB or switch by selecting a control
signal among 0/22KHz.
- DiSEqC 1.0 : Select DiSEqC 1.0 Port
- DiSEqC 1.1 : Select DiSEqC 1.1 Port
⊽Select the item that you want to edit and set its parameters as desired. <Motorized
Setting>
- Frequency : If the default TP frequency is not appropriate, you can select another TP
frequency at which to check for signal.
- DiSEqC Motor : Select DiSEqC protocol among OFF/1.2/USALS as appropriate for
your Motor.
(When the DiSEqC Motor parameter is set as 1.2 <Figure 6.1.4>)
- Satellite : Select any satellite by pressing / buttons.
- Frequency : Displays the current TP value of the selected satellite.
- Move : Move the dish position to west/east by pressing / buttons.
- Move Fine : Move the dish position 1 step at a time to west/east by pressing /
buttons.
- Motor Control : Control motor by press button on the remote. <Figure 6.1.5>
⍜Recalcuate : Recalculate the position of all other saved satellites relative to the
known position.
⍜Reset System : Reset the position of all saved satellites.
⍜Goto Reference : Move the dish to the 0 position.
⍜Disable Limit : Disable east and west limit.
⍜Enable Limit : Enable the saved east and west limit.
⍜Set East Limit : Edit & Save east limit by pressing / or buttons.
⍜Set West Limit : Edit & Save limit by pressing / or buttons.
- Go To : Go to the position of the saved satellite.
- Save : Save the current setting of DiSEqC 1.2 system.
(When the DiSEqC Motor parameter is set as USALS <Figure 6.1.6>)
- Sat Degree : Satellite location.
- Antenna Position : Press .
- Goto Reference : Move the dish to the reference 0 position.
- Antenna Longitude : Your longitude at present.
- Antenna Latitude : Your latitude at present.
ҫ
Note : You need to know what LNB you are using to correctly set the L.O. (local
oscillator) frequency.
ҫ
Note : You need to understand how your receiver is connected to properly set the
22KHz and DiSEqC.
⊾When you are done, press the EXIT button.
<Figure 6.1.6> <Figure 6.1.7>
1413
6.1 Getting Started6.1 Getting Started
3) Satellite Scan
Through this function, the receiver searches for all the available channels and saves
them in memory.
Auto Scan <Figure 6.1.8>
Select the satellites you want to search by pressing the button on the remote.
You can select more satellites by pressing the / button and button on
the remote.
- Search Type : Select the type of channel search you want by presssing /
buttons on the remote.
All : To search all the Free To Air and scrambled channels, TV & Radio channels.
Free : To search Free To Air channels only.
TV : To search TV channels only.
- Network Search : Select Network Search ON/OFF to find more transponders
through NIT Search.
- Scan : Begin channel search of the selected satellite.
Press under ‘SCAN’ to scan the selected satellites. <Figure 6.1.9>
>9.1.6erugiF<>8.1.6erugiF<
Blind Scan <Figure 6.1.10>
Select the satellites you want to search by pressing the button on the remote.
Press , / to set the “Polarization” and “Scan Mode” options.
- TP : Select TP Frequency
- Polarization : Select among All / Vertical / Horizontal
- Mode : Select among All / Free / TV
- SCAN : Begin channel search of the selected satellites.
Manual Scan <Figure 6.1.11>
Select a transponder.
To change a transponder’s information (Frequency, Symbol Rate), use the
NUMERICbuttons.
To add a new transponder, press the GREENbutton.
To delete a transponder, press the YELLOWbutton with the cursor next to the
Frequency parameter.
To search a transponder, set its different parameters and press .
<Figure 6.1.10>
<Figure 6.1.11>

1615
6.1 Getting Started
3) Channel Selection
You can use the and or and keys to navigate between channels to
select desired channels.
If you know the channel number you can enter it using the NUMERIC buttons on the
remote control and wait 2 seconds for the change.
Detailed information about the selected channel will be displayed on the right hand
side of the screen <Figure 6.1.13>
<Figure 6.1.13>
You can use the following buttons to navigate between channels
-and : Moves one channel up or down
-and : Moves one page up or down
- RED : Shows all channels in the current group
- Green : Shows all the favorates channels .
- Yellow : Shows all channels by transponder.
- Blue : Edit the channels ( Delete , reneame , move , lock , find ) .
Press when the selection bar is positioned on the desired channel.
Andere Handbücher für X8 MEGA
1
Dieses Handbuch passt für folgende Modelle
1
Inhaltsverzeichnis


