Marco ColdBRU Bedienungsanleitung

1
ColdBRU
Instruction Manual: 1900950
Machine P/N: 1000950

2
Contents
1. Box Contents.......................................................................................................3
-Compatible with...............................................................................................3
2. Information........................................................................................................4
-Introduction......................................................................................................4
-Safety...............................................................................................................4
-Electrical Installation Procedure........................................................................5
-Plumbing Installation Procedure........................................................................5
-Backflow Prevention..........................................................................................5
-Maintenance.....................................................................................................5
-Hazards.............................................................................................................6
3. Installation.........................................................................................................7
-Connecting the ColdBRU to water......................................................................7
-Connecting the ColdBRU to power......................................................................7
4. Setup.................................................................................................................8
- Calibrate the machine......................................................................................8
-Create your own recipe......................................................................................8
-Prepare ColdBRU for Brewing.............................................................................9
5. Brewing with ColdBRU........................................................................................10
-Method 1: Create new brew.........................................................................10-12
-Method 2: Record brew...............................................................................13-14
-Accessing saved brew.................................................................................15-16
6. After Brew........................................................................................................17
7. Cleaning...........................................................................................................18
8. Adjust recipe/Troubleshooting.........................................................................19

3
1. ColdBRU machine 1000950
2. Brew Chamber 1801489
3. ColdBRU Tamp 2200638
4. Filter Plate 2200635
5. Container Lid 1801487
6. 7.67 Litre (2.03 US Gallon) Container 1801486
NOT LABELLED
1x C13 IEC power cable
1x Inlet hose
1x Instruction manual 1900950
Box Contents
1
2
3
4
5
6

4
Introduction
The information provided in this manual is intended to assist in the installation and
maintenance of the appliance. Please read the instructions carefully to prevent
accidents and ensure an efficient installation. This manual is not a substitute for
any safety instructions or technical data affixed to the machine or its packaging.
All information in this manual is current at the time of publication and is subject to
change without notice. The company accepts no responsibility for any damage or
injury caused by incorrect or unreasonable installation and operation.
Safety
When using electrical appliances, basic safety precautions should always be followed
to prevent the risk of fire, electric shock, burns, or other injuries or damages.
• Read all operating and safety instructions carefully.
• This appliance is suitable for indoor use only.
• This appliance must be placed/installed on a horizontal flat stable surface.
• The ambient temperatures this appliance should operate within are 5 °C - 35 °C
(41°F-95°F).
• Do not store the appliance in ambient temperature lower than 5 °C (41°F).
• The hose supplied with the product is non-toxic food quality. However, a hose is
not a permanent connection. It is, therefore, advisable to switch off and close the
stopcock valve when the appliance is not in use, e.g. overnight etc.
• If a non-fixed water connection is implemented, use only the water hose provided
with the appliance, alternatively, if a fixed water connection is used it must be
implemented using a non-detachable water hose.
• The utmost care has been taken in the manufacture and testing of this
appliance. Failure to install, maintain and / or operate this machine according to
the manufacturer’s instructions may result in conditions that can cause injury or
damage to property. If in any doubt about the serviceability of the machine always
contact the manufacturer or your own supplier for advice.
• This appliance is not intended for use by persons (including children) with reduced
physical, sensory, or mental capabilities, or lack of experience and knowledge, unless
they have been given supervision or instruction concerning use of the machine by a
person responsible for their safety.
• Children should be supervised to ensure that they do not play with the appliance.
• In the event where any wires are damaged, such wires can only be replaced by
qualified service technicians.
• CAUTION - Risk of fire and electric shock. Only to be used with manufacturer’s
specified power cord set.
• This appliance should not be installed in an area where a water jet could be used
to clean it.
• Access to the service area of the appliance is restricted to persons having
knowledge and practical experience of the appliance and the relevant safety and
hygiene requirements.
Information

5
Electrical Installation Procedure
When installing the appliance, always observe the local regulations and standards.
The appliance is supplied with a moulded power cord. A suitable mains power supply
socket should be available within easy access of the appliance so that it can be
disconnected easily after install.
Plumbing Installation Procedure
• Ensure that the equipment is installed according to local plumbing & water
regulations.
Mains water pressure required (limits): 8 -50psi (50 -1000kPa, 0.05 - 1MPa).
• Fit a stop valve on a cold water line and attach a 9/16-24 UNEF (3/8 Compression
Threads).
• Turn on the water to flush any impurities, dust etc from the inlet hose and water
pipe. Allow several litres through. Especially for new installations.
• Connect the hose to the inlet valve of the appliance.
• Turn on water and check for leaks.
Backflow Prevention
This equipment must be installed with adequate backflow protection to comply with
all applicable federal, state and local codes.
Maintenance
This appliance has been designed to give many years of trouble free service. The
only regular maintenance required is regular wipe down of body and spray head as
well as washing of containers.
Information

6
Information
DANGER
ELECTRICAL MAINS
Always disconnect the equipment from the electricity supply before doing any work on
it, to prevent damage and health hazards.
CAUTION
ELECTRICAL REQUIREMENTS
The electrical circuit must be correctly earthed and connected by means of a suitable
dierential safety breaker.
CAUTION
ELECTRIC POWER SUPPLY
Do not connect or disconnect the machine from the socket with wet hands.
Insert the plug into the wall socket rmly.
Do not pull on the supply cable in order to remove the plug from the socket.
CAUTION
REPLACEMENT OF THE POWER CABLE
If the power cable is damaged, it must be replaced by the manufacturer or their
assistance
service or a similarly qualied person in order to prevent any possible risk.
WARNING
MALFUNCTION
If smoke, unusual smells or strange noises are emitted from the machine,
disconnect it immediately from the socket and contact the local retailer or technical
service assistance.
Use of the machine in these conditions could cause res or electric shocks.
ATTENTION
If the equipment is installed in a kitchen, European Standard EN 60335-2/75
species that it must be connected to an equipotential circuit via a wire with
section between 2,5 and 10 mm2. This connection must be carried-out by a skilled
technician, in compliance with the regulation in force in the country of use.
WARNING
WATER SUPPLY
Connect the water dispenser exclusively to a line of drinkable water supply.
WARNING
WATER SUPPLY
In order to avoid accidental ooding due to losses that may occur on the water
supply line, external or internal device it is necessary to install the appropriate
anti-ooding valve “WATER BLOCK” (not included in the unit) .
CAUTION
SANITISATION
Before sanitising the equipment, carefully read the instructions given by the sanitisation
product manufacturer and put on all the necessary personal protective equipment
(gloves, masks, etc.).
Ensure that the premises are well ventilated.
The sanitisation operations should only be carried out by specialised technical
Hazards
7
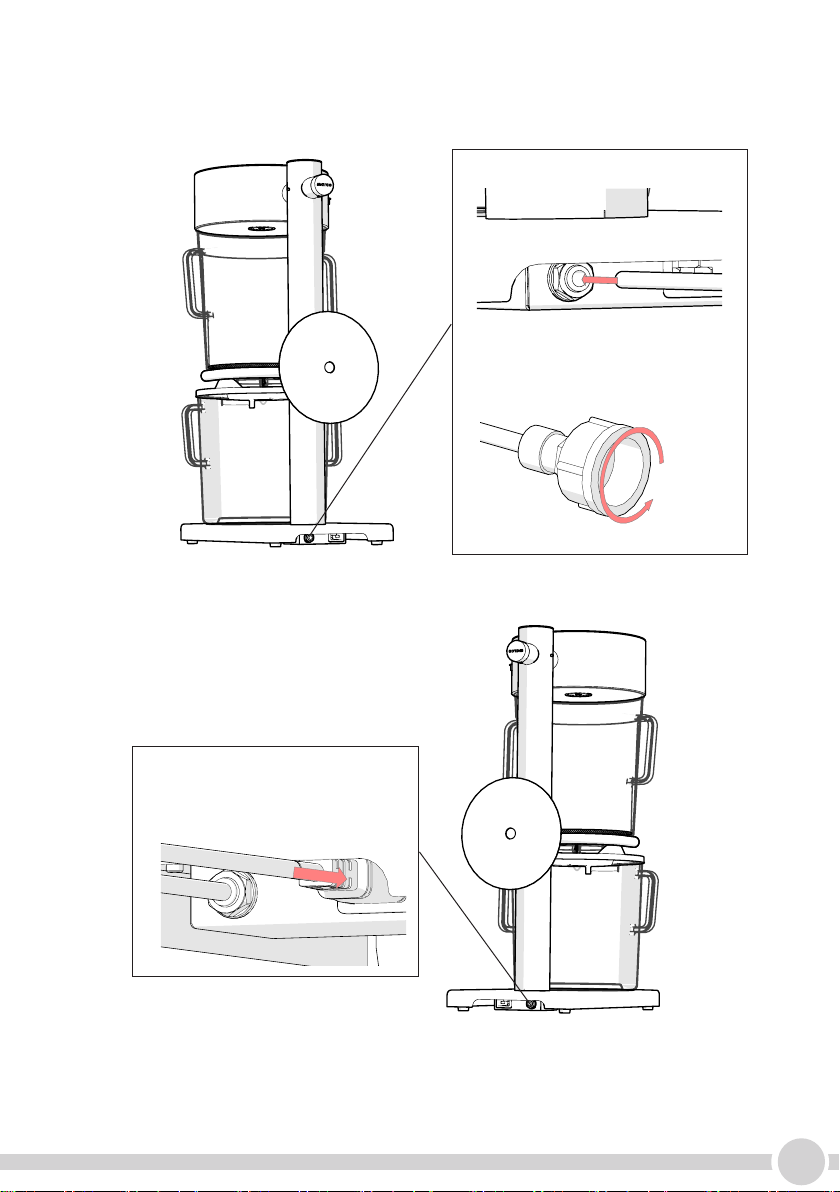
Installation
1. Connecting the ColdBRU to water
2. Connecting the ColdBRU to power
1. Insert power cord to rear of
machine.and plug into mains
2. Connect 3/4” threaded tting to
water mains
1. Push 1/4” hose into water in push
tting

8
Calibrate the machine. (Only necessary on initial plug in of machine or if water pressure
changes).
Right after plug in, settings icon will appear, press all three buttons at once.
if you miss this menu, unplug and try again.
Next Start
2. Calibrate ow meter
Weigh water Input weight into machine
Setup
Create your own recipe
Note: the maximum dispense of the ColdBRU is 10.5 Litres/2.75 Gallons (US). To avoid
overlling the ColdBru, we suggest starting with a medium sized brew and adjusting based on
your results. If you achieve less than this, you should repeat the brew, grinding ner, or increasing
the coee dose to create a deeper bed.
Suggested starting point for New recipe (medium capacity brew) for ColdBru:
• 800g medium ground coee.
• 5000ml/1.3 Gallons (US) water.
• 02:00hr Brew Time (this refers to the water delivery time, overall contact and drain time will
vary).
• Initial pulse should be set to 60% total volume, ideally this will create a head of brew water
above the coee bed. Initial pulse value can be increased if necessary.
-SERVICE MENU-
1. Set security PIN

9
Insert metal lter Weigh and grind into brew chamber
according to recommended grind size
Level coee bed. Do
not shake/tap to level
as this will force coee
through the lter
Tamp coee bed with
minimum 2kg of force
Ensure container is open
and lined up correctly with
nozzle of brew chamber
Insert brew chamber
into machine
2.1. 3.
4. 5. 6.
Weigh amount of coee
according to recipe
on screen
Prepare ColdBru for brewing

10
Next
Step 1:
Grind coee at the
recorded grind setting Follow on-screen prompt.
Next
Step 2:
Tamp the coee
Next
Step 3:
Insert Brew chanber
into the machine
Follow on-screen prompt.
Follow on-screen prompt.
New List Esc
If you want to create a brew dierent to
those saved in memory select “New”.
Select Brewing
Method
Record Preset
Select “Preset” mode.
Method 1: Create new brew
Note: The Preset Brew option dispenses the desired water volume over 6 separate phases.
Each phase consists of a water dispense time and a drain time. The amount of water dispensed
in the 1st phase is dictated by the user as a percentage of the entire volume of water. The
remaining water dispensed is distributed in equal parts across the remaining 5 phases.
1
2
3
4
5
Brewing with ColdBru
Dieses Handbuch passt für folgende Modelle
1
Inhaltsverzeichnis
Andere Marco Brausystem Handbücher

Beliebte Brausystem Handbücher anderer Marken


Curtis
Curtis ThermoPro G4 Series Bedienungsanleitung

Animo
Animo ComBi CB5 Bedienungsanleitung

MoreBeer
MoreBeer BrewSculpture Bedienungsanleitung

Keurig Hot
Keurig Hot Commercial Series Bedienungsanleitung

Keg King
Keg King KEGMASTER XL Bedienungsanleitung

Blichmann Engineering
Blichmann Engineering BrewEasy Compact TC Montageanleitung