Optibox ALLIGATOR Bedienungsanleitung

User’s Manual
MPEG4(H.264) HDTV Digital Satellite and Terrestrial Receiver
Please read the entire manual thoroughly and retain it for future reference.
Optibox ALLIGATOR

2
Important safety instructions
Safety Warnings
Danger
Read this manual carefully before using the product.The cautions described below contain important information about safety,
and are categorized into: Danger,Warning and Notice.
The company will not take any responsibility for accidents or damage resulting from careless handling by the user.
If the user mishandles the product, there is a risk of loss of life or critical injury.
Connect the power cord only to A/C outlets as specied by the user manual or product specication.
If the power code is connected to a non-specied A/C outlet, it could result in re or electric shock.
The product must not be exposed to water or liquid of any sort, or be exposed to drips or splashes.
It could result in re or electric shock.
Do not place heavy objects, including the product itself, on top of the power cord. If it is damaged, it could result in
re or electric shock.
Do not place metal objects on top of the apparatus. If metal objects fall into the apparatus, it could result in re or
electric shock.
Do not repair, disassemble or modify this apparatus yourself. It might cause re or electric shock.
If internal checking or maintenance is needed, please contact your service center or agency.
Do not block or cover any ventilation opening. A re might result from overheating.
Turn o and unplug the power as quickly as possible during electric storms.
Failure to do so could result in re or electric shock.
Remove the antenna’s power plug from the outlet as quickly as possible during electric storms.
Failure to do so could result in re or electric shock.
Do not drop the apparatus (for example by putting it in a place where it may fall) or subject it to impact.
The product might be damaged. If it is damaged, please turn o the power and remove the plug from the power
outlet, or re or electric shock may result.
Never touch the power cord with wet hands. It could result in an electric shock.
This symbol indicates that dangerous voltage
consisting a risk of electric shock is present within
this unit.
This symbol indicates that there are important
operating and maintenance instructions in the
literature accompanying this unit.
CAUTION
: To reduce the risk of electrical shock, do not remove
the cover. No user serviceable parts inside. Refer any servicing to
qualied Service personnel.
RISK OF ELECTRIC SHOCK
DO NOT OPEN
CAUTION

3
Warning
Notice
Disposal
Batteries and packaging material do not belong in domestic waste.The batteries must be delivered to a collection center for old
batteries.The separate disposal of packaging materials protects the environment.
Disposal old electrical & electronic equipment
(Applicable in the European Union and other European countries with separate collection systems)
This symbol on the product or on its packaging indicates that this product shall not be treated as household waste.
Instead it shall be handed over to the applicable collection point for the recycling of electrical and electronic equipment.
By ensuring this product is disposed of correctly, you will help prevent potential negative consequences for the
environment and human health, which could otherwise be caused by inappropriate waste handling of this product.
The recycling of materials will help to conserve natural resources. For more detailed information about recycling of this product,
please contact your local city oce, your household waste disposal service or the shop where you purchased the product.
If the product is mishandled, the user might receive a serious or minor injury.
Damage or loss to the user’s property might also result.
The product must not be exposed to water or liquid. If the apparatus is exposed to drips or splashes, it might cause
a problem that cannot be repaired.
Do not repair, disassemble or modify this apparatus yourself. It might be seriously damaged, possibly beyond repair.
Turn off the power and unplug the power cord as quickly as possible during electric storms.
They might damage the apparatus.
Remove the antenna’s power plug from the outlet as quickly as possible during electric storms, or the apparatus might be damaged.
Data recorded in the HDD might be lost due to a shock, lightening or electricity failure.
The user must back up his or her own data, and the company does not take any responsibility for failure to do so.
If the product is mishandled, it might cause minor damage.
If the apparatus becomes marked, clean it gently with a soft cloth or towel. Never use chemical solvents such as benzene, thinner,
acetone or other solvents.The surface of the apparatus might become discolored and the paint might peel.
Do not place or keep the apparatus in the following situations. Doing so might cause problems.
- Where it is too hot or cold.
- Where there is high humidity.
- Where there are excessive temperatures, for example in front of airconditioners or heating vents.
- Where there is dust or soot.
- In confined areas where the heat cannot be released.
- Where it is exposed to direct sunlight.
Turn the apparatus off or unplug the power cord if it is to remain unused for a long period of time.
Do not place heavy objects on top of this apparatus. It might cause malfunction or damage.
If the apparatus is so seriously damaged that it cannot be repaired, or has stopped working altogether, dispose of it
properly in accordance with the local laws or regulations in your area.

4
Contents
1. Getting Start
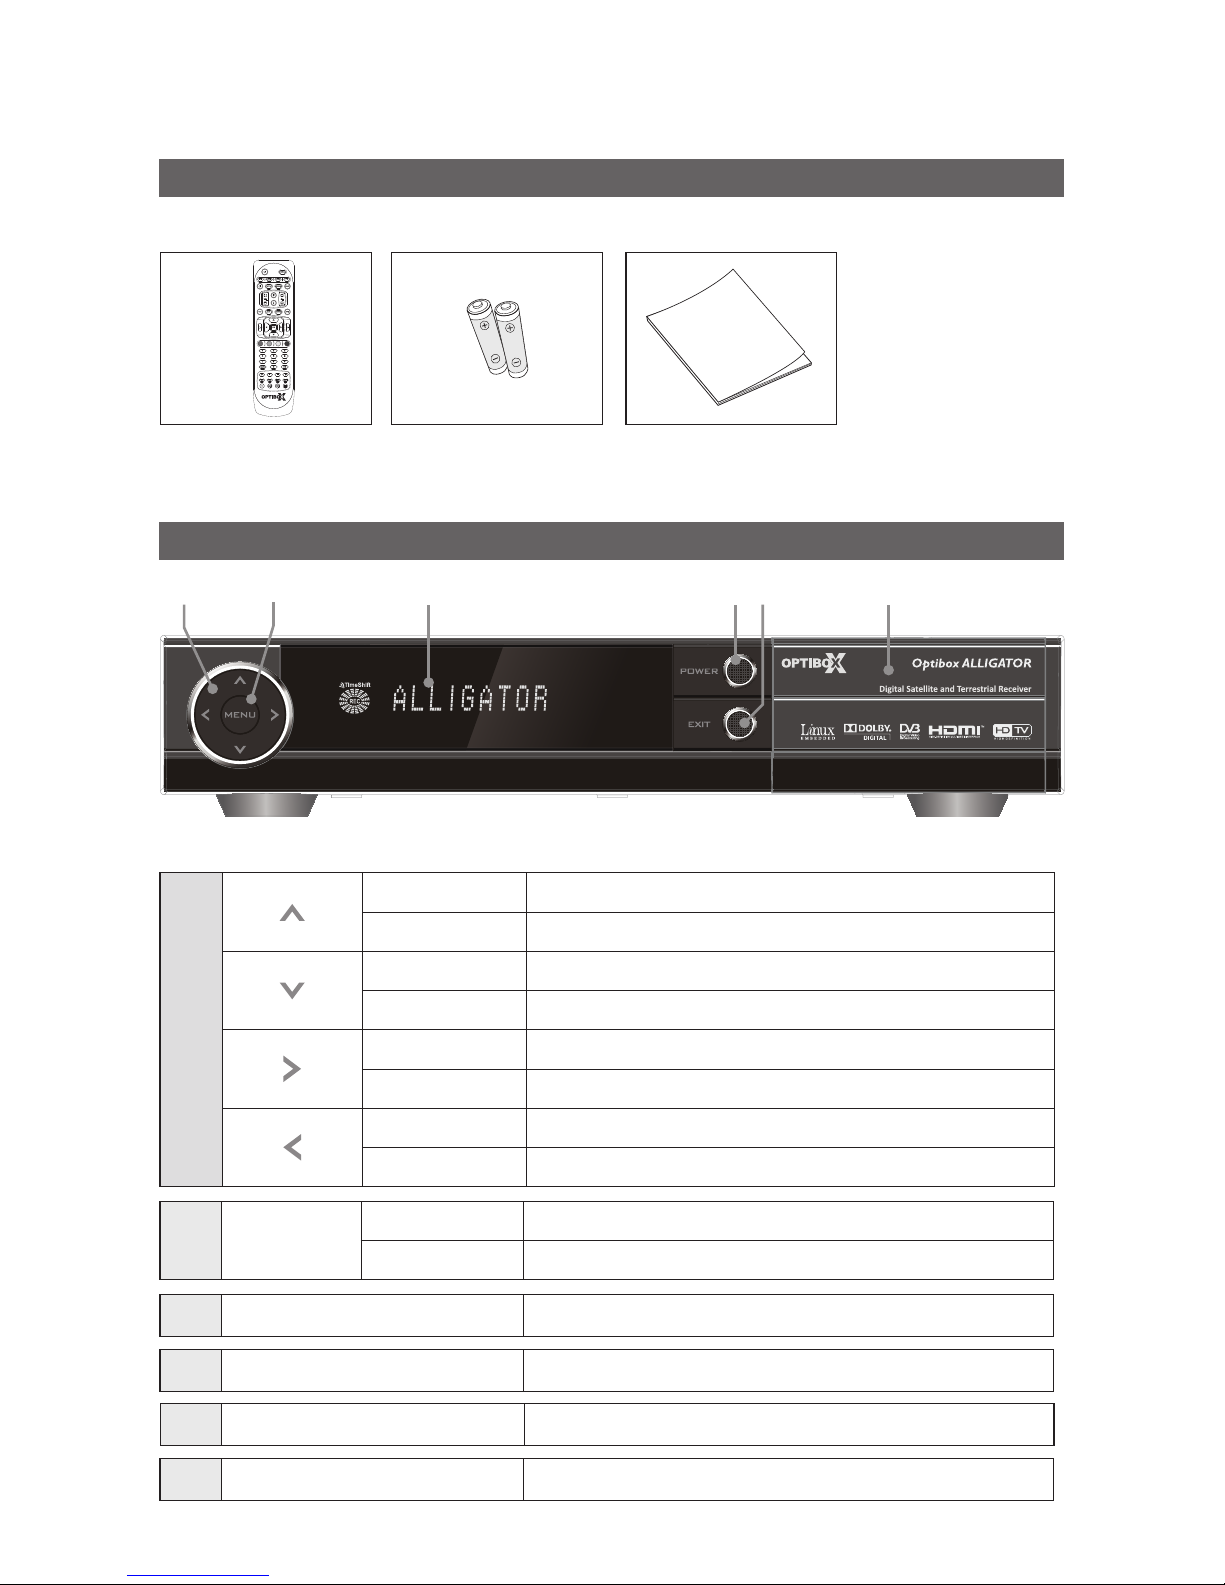
1.1 Package Contents......................................................................................................................................................................... 5
1.2 Front Panel.................................................................................................................................................................................... 5
1.3 Rear Panel..................................................................................................................................................................................... 6
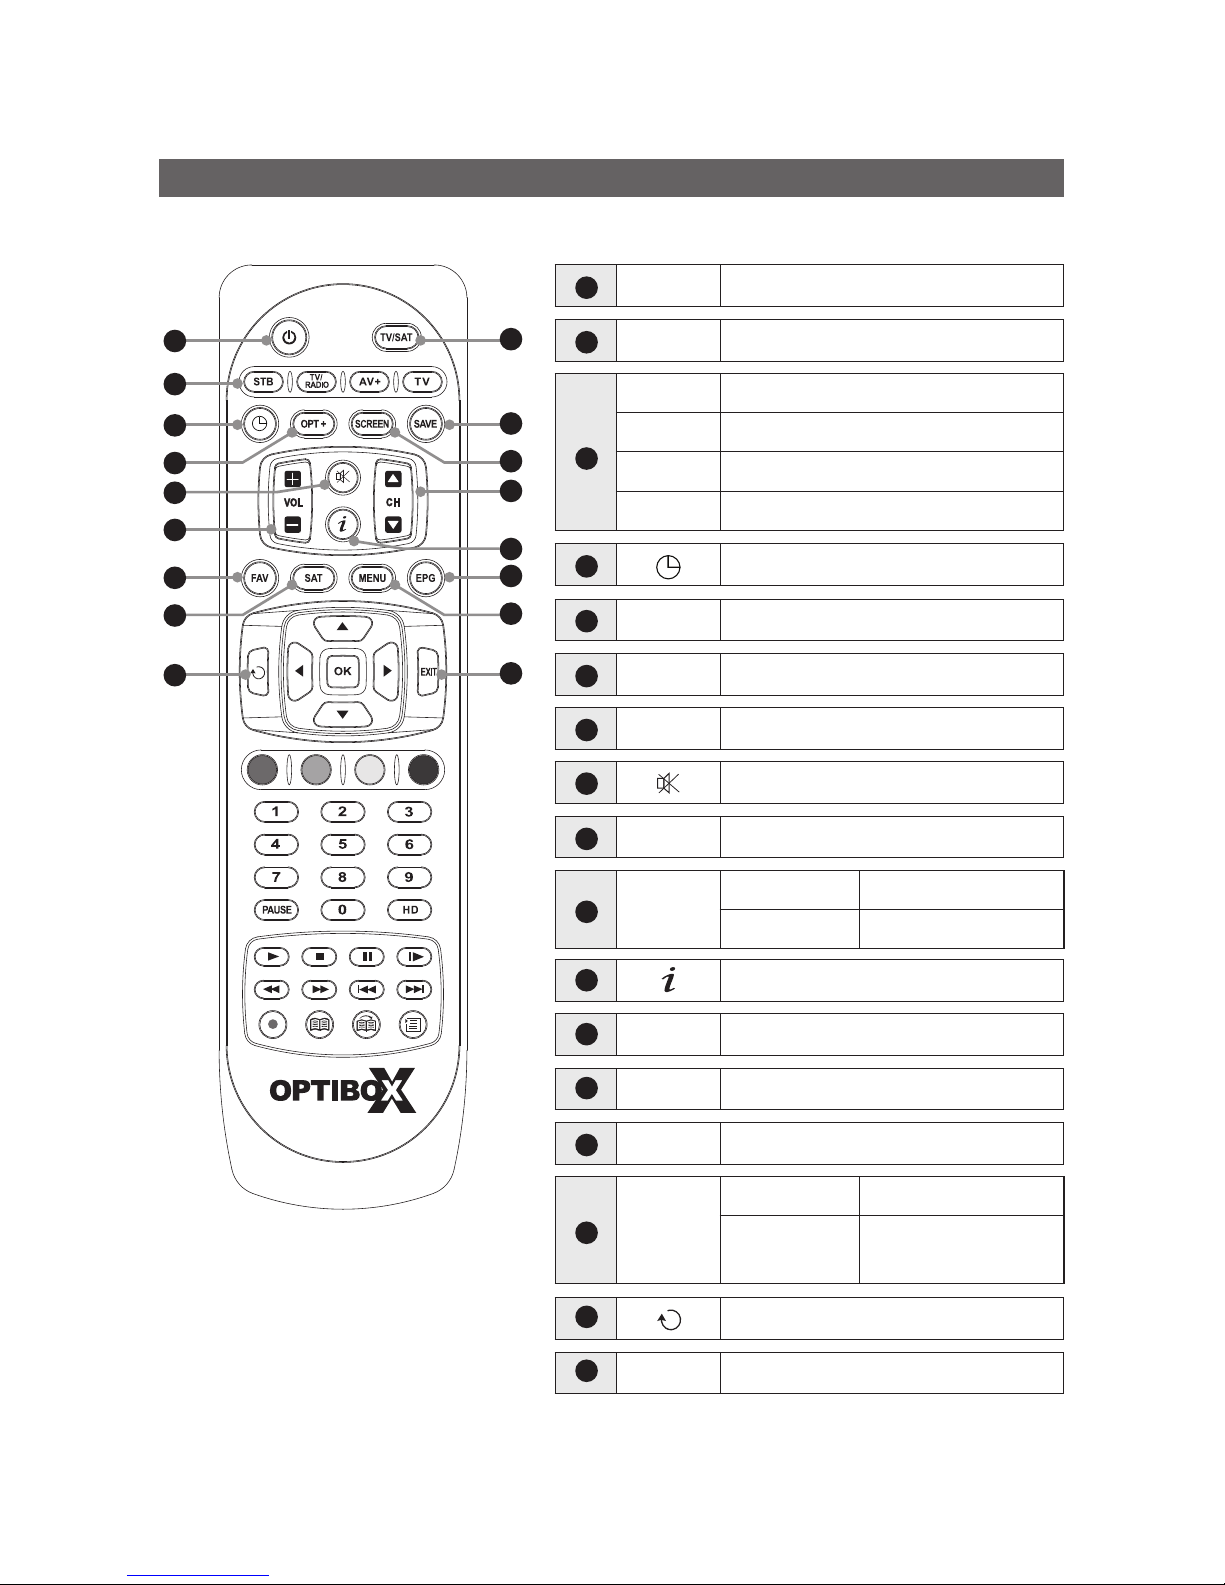
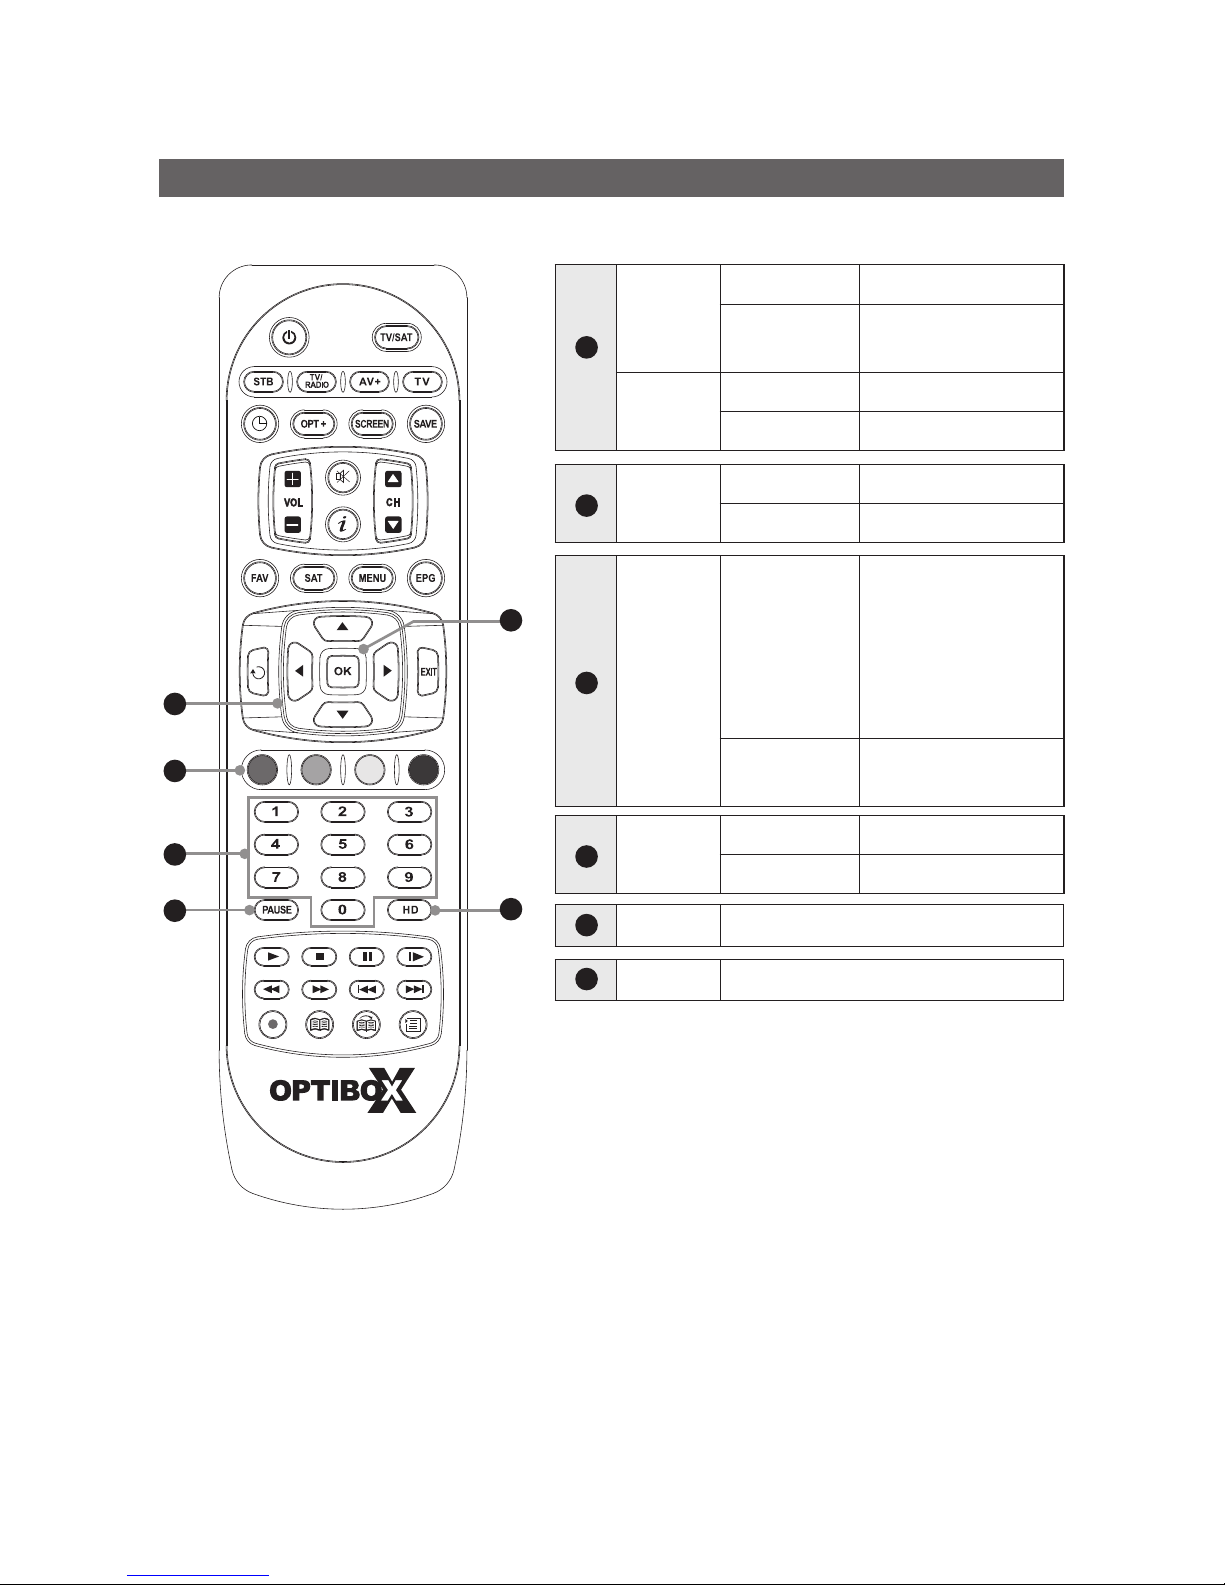
1.4 Remote Control Unit..................................................................................................................................................................... 7
1.5 Connecting Your Equipment..................................................................................................................... .................................... 10
2. Installation
2.1 Antenna Setup ............................................................................................................................................................................. 11
2.2 Motor Setup ................................................................................................................................................................................. 11
2.3 Auto Search .................................................................................................................................................................................. 12
2.4 Advanced Search.......................................................................................................................................................................... 13
2.5 Blind Search.................................................................................................................................................................................. 13
2.6 Fast Scan....................................................................................................................................................................................... 13
2.7 Terrestrial ...................................................................................................................................................................................... 14
3. Channel / Event
3.1 Channel Control............................................................................................................................................................................ 14
3.2 EventTimer................................................................................................................................................................................... 16
4. Menu Guide
4.1 Channel List.................................................................................................................................................................................. 17
4.2 Channel Guide.............................................................................................................................................................................. 18
4.3 Normal Mode ............................................................................................................................................................................... 18
4.4 System Setup ............................................................................................................................................................................... 20
4.5 Additional Function...................................................................................................................................................................... 23
4.6 Module..................................................................................................................... .................................................................... 24
4.7 STB Status..................................................................................................................................................................................... 25
5. eSATA PVR Guide
5.1 PVR Setup..................................................................................................................................................................................... 26
5.2 Media Setup................................................................................................................................................................................. 26
5.3 File Browser.................................................................................................................................................................................. 27
5.4 Instant Recording......................................................................................................................................................................... 28
5.5 Time Shift...................................................................................................................................................................................... 28
5.6 Trick Play....................................................................................................................................................................................... 29
5.7 Play Navigation ............................................................................................................................................................................ 29
5.8 Getting Ready............................................................................................................................................................................... 30
5.9 Recording ..................................................................................................................................................................................... 31
5.10 Play Back .................................................................................................................................................................................... 31
6. Appendix.
6.1 Troubleshooting............................................................................................................................................................................ 33
6.2 Remote ControlTV Setting........................................................................................................................................................... 34
6.3 Specication................................................................................................................................................................................. 38

5
1. Getting Start
1.1 Package Contents
1.2 Front Panel
Make sure that the following accessories are supplied with your receiver.
Remote Control Unit AAA Batteries (2 EA) User’s manual
Normal Mode Change to the next channel.
Menu Mode Move to the upper item.
Normal Mode Change to the previous channel.
Menu Mode Move to the lower item.
Normal Mode Volume up.
Change item Change item.
Normal Mode Volume down.
Change item Change item.
Menu Normal Mode Display the Main Menu.
Menu Mode Go to the sub menu.
Display window Displays the current state such as channel, time, and massage.
POWER Turn on & o the power.
Exit Return from menu.
Smartcard Slot Insert a Smartcard.

6
1.3 Rear Panel
LNB IN Connect satellite antenna.
ANT IN ConnectTV antenna or CATV cable.
LNB OUT Connect to the other satellite receivers.
LOOP OUT Connect TV.
VCR SCART Connect VCR.
TV SCART Connect TV.
A/V(OUT) ConnectTV (Left/Right)
YUV(OUT) ConnectTV throughY/Pb/Pr.
HDMI Connect TV through HDMI.
S/PDIF ConnectTV Digital Amplier (Optical).
Wireless InternalWireless Module(Option).
eSATA Support SATA hard disk for PVR.
ETHERNET Connect TV LAN cable.
USB Connect USB memory.
RS-232C Connect PC for software upgrade.
WLAN Wireless LAN(Option).
POWER Supply 100-240V~, 50/60Hz, MAX 35W.
POWER SWITCH Switch Power ON/OFF.
3
4
5
6
7
8
9
10
11
12
13
14
15
16
17
18
13 5 11 12 16 17 18
24 6 7 8 9 10 13 14 15
1
2

7
1.4 Remote Control Unit
12
3
45
12 14
16 17
9
11
810
67
13 15
Power Power On/O.
TV/SAT SwitchTV or SAT mode.
STB Select STB.
TV/RADIO SwitchTV/Radio mode.
AV+ Digital Audio, Teletext, Subtitle menu.
TV SelectTV.
Sleep timer.
OPT+ Show additional function menu.
SCREEN Set screen format.
SAVE Save current volume & channel.
VOL Adjust the volume.
Mute the sound.
CH Normal mode Change channel.
Menu mode Move menu item.
MENU
Normal mode Show the main menu.
Menu mode Return to the previous
menu.
Show the current channel information.
FAV Show Favorite Channel List.
SAT Selects satellite.
EPG Show the Electronic Program Guide.
Go back to previous channel.
EXIT Return to the previous menu.
3
4
6
7
5
8
9
10
14
11
12
13
15
16
17
1
2

8
1.4 Remote Control Unit
18
22
21
20
23
19
VOL
Normal mode Adjust the volume.
Menu mode Change the left/right
item
CH Normal mode Change channel.
Menu mode Move menu item.
OK Normal mode Show the channel list.
Menu mode Execute the select item.
Color Key
Normal mode
Additional Menu
Red - Fine tune menu.
Yellow - Congure
Diseqc1.2 / Positioner.
Green - Additional
Menu.
Menu mode Selected function
according to the Menu.
Numeric
buttons
Normal mode Select channel.
Menu mode Directnumeric key entry.
PAUSE Pause screen.
HD Sort HD channel only.
20
18
19
21
22
23

9
PLAY
Change to normal speed in trick mode.
Show play navigation bar in normal speed.
STOP
Stop le playback and watch live channel in
time-shift or playback.
Stop recording.
PAUSE
Pause or resume play.
SFWD(Slow forward play)
Change to slow speed forward play.
Speed:
½x, ¼x, ⅛x.
FREV(Fast reverse play)
Change to fast speed reverse play.
Speed: -x2, -x4,-x8, -x16, -x32, -x64.
FFWD(Fast forward play)
Change to fast speed forward play.
Speed: x2, x4, x8, x16, x32, x64.
Go to start position.
Go to end position.
RECORD
Record current channel.
BOOKMARK
Set Bookmark in time-shift or playback.
BOOKMARK JUMP
Jump to bookmark.
BROWSER
Show File List.
24
24
1.4 Remote Control Unit

10
1.5 Connecting Your Equipment
Connect related equipments to STB as below.
1.5.1 Connect TV with RCA cable
Note
When you connect STB toTV by using SCART, please t the CLAMP FILTER near SCART jack.
1.5.2 Connect TV/VCR with SCART / HDMI cable
1.5.3 Connect TV/VCR with YUV/Terrestrial cable install
Satellite Dish
Satellite Dish
Satellite Dish
Terrestrial Antenna
Terrestrial Antenna
Terrestrial Antenna
TV/VCR
TV
TV
VCR
Dieses Handbuch passt für folgende Modelle
1
Inhaltsverzeichnis
Andere Optibox Empfänger Handbücher


