Pipeline P-DR1W-48 Bedienungsanleitung

OWNER’S MANUAL
P-DR1W-48 | P-DR1W-60
SHOWER ENCLOSURES
P001
IT IS MANDATORY TO HAVE A WALL STUD ON EACH SIDE OF THE
SHOWER UNIT TO SECURELY FASTEN THE RAIL TO THE WALLS.
06.10
2 PEOPLE REQUIRED

2
PANNEAU FIXE /FIXED PANEL
1
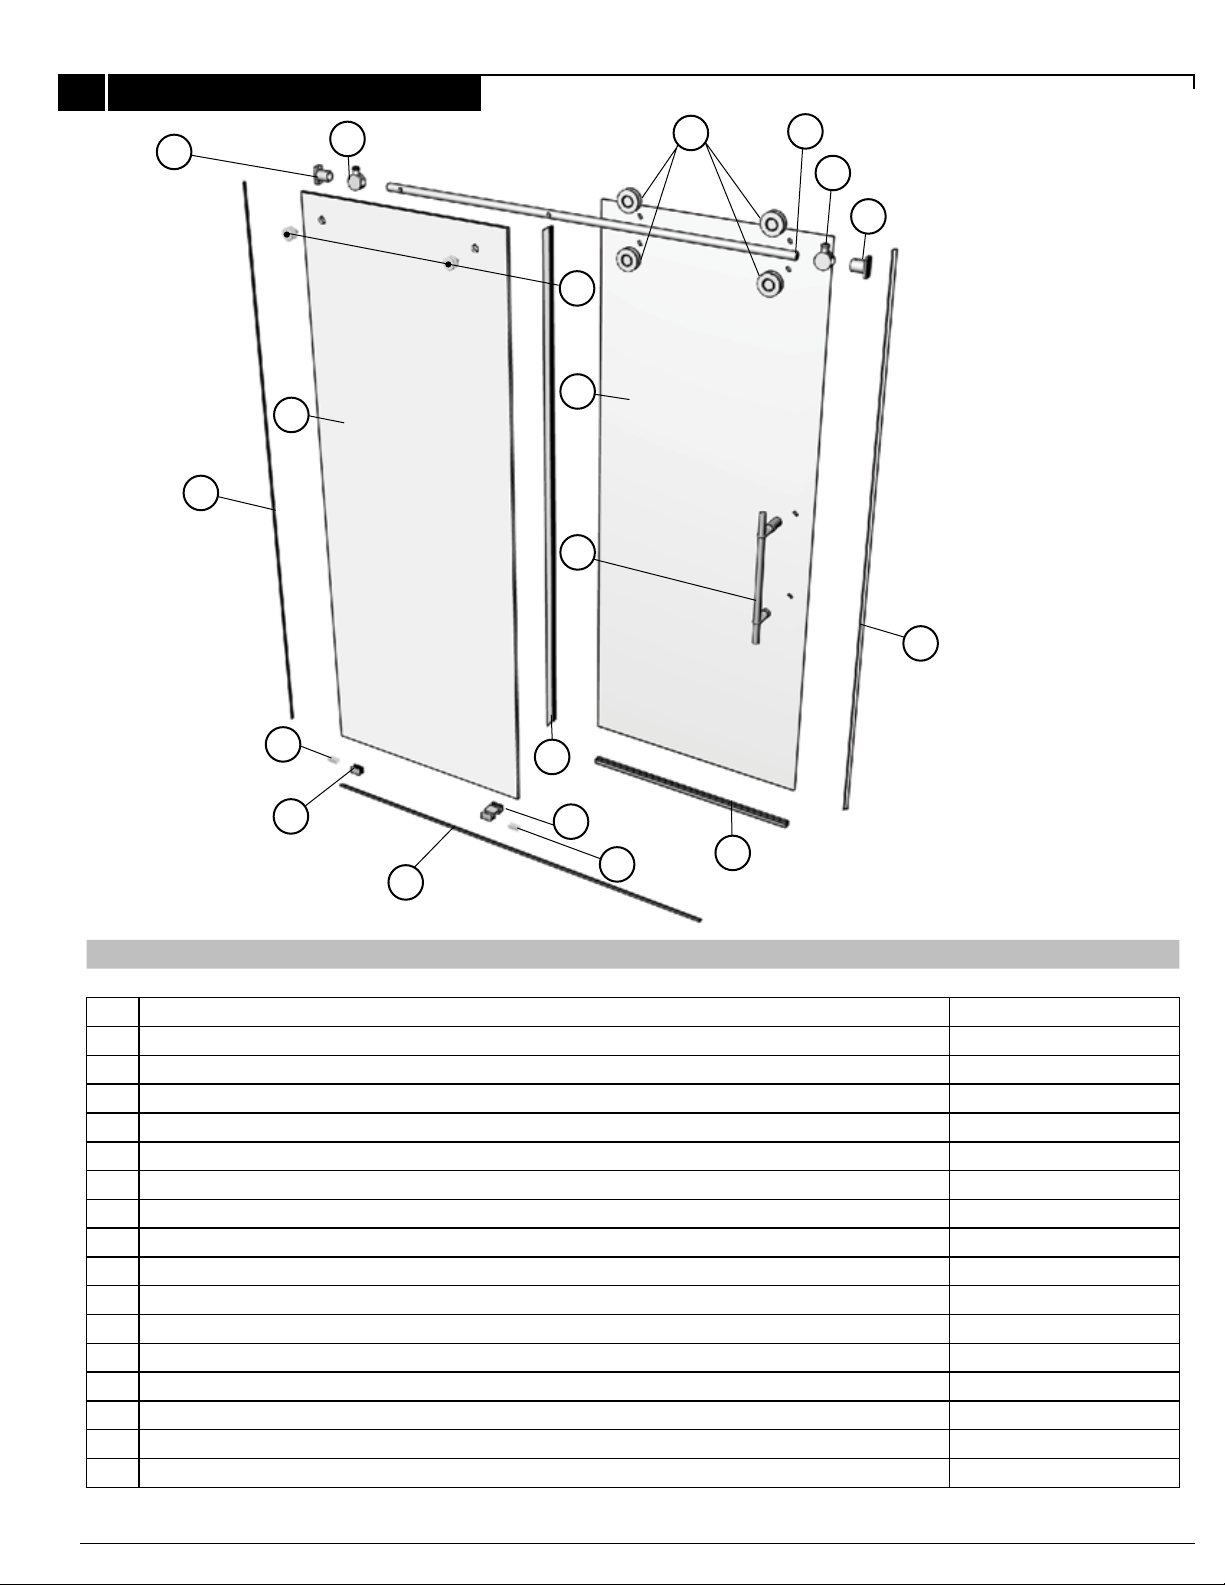
PARTS LISTING ........................................................ 3
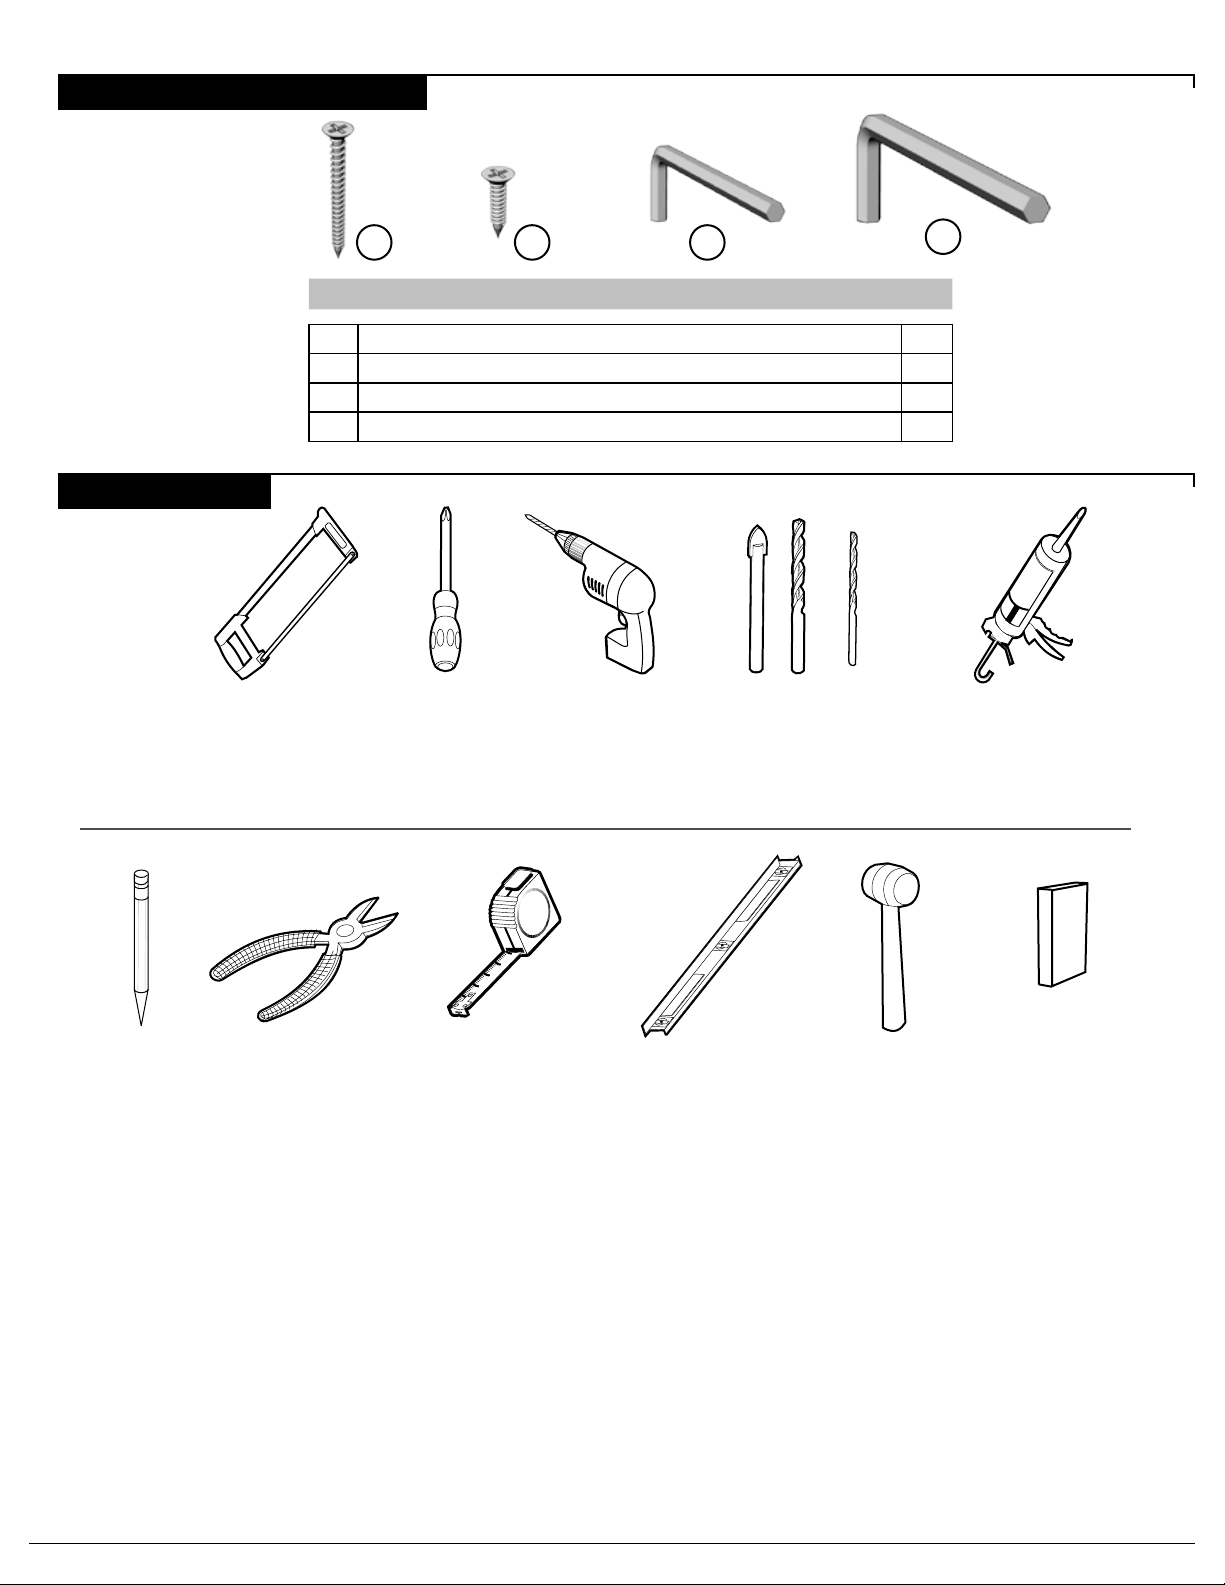
PROVIDED HARDWARE ............................................... 4
GLASS PANEL DIMENSIONS .......................................... 4
REQUIRED TOOLS AND MATERIALS ................................. 4
GASKET INSTALLATION............................................... 5
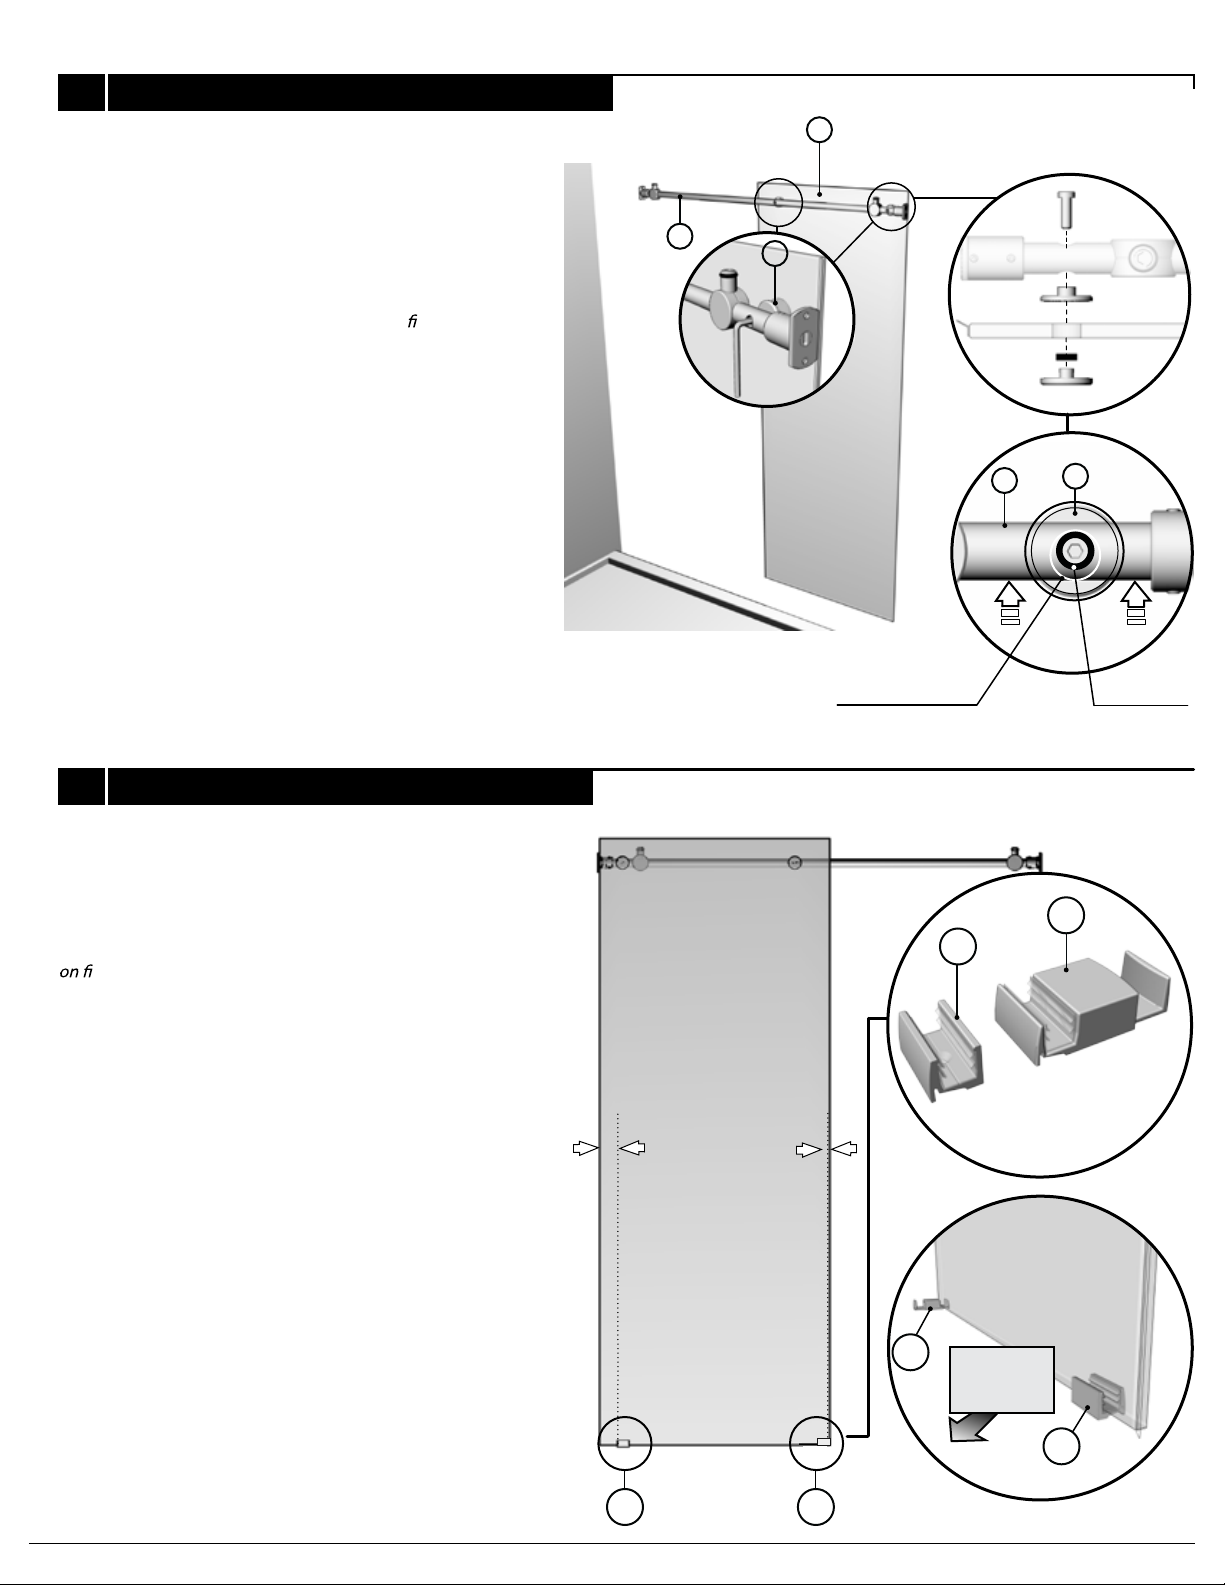
RUNNING RAIL. ....................................................... 6
GLASS HOLDERS ...................................................... 7
GLASS CLIPS........................................................... 7
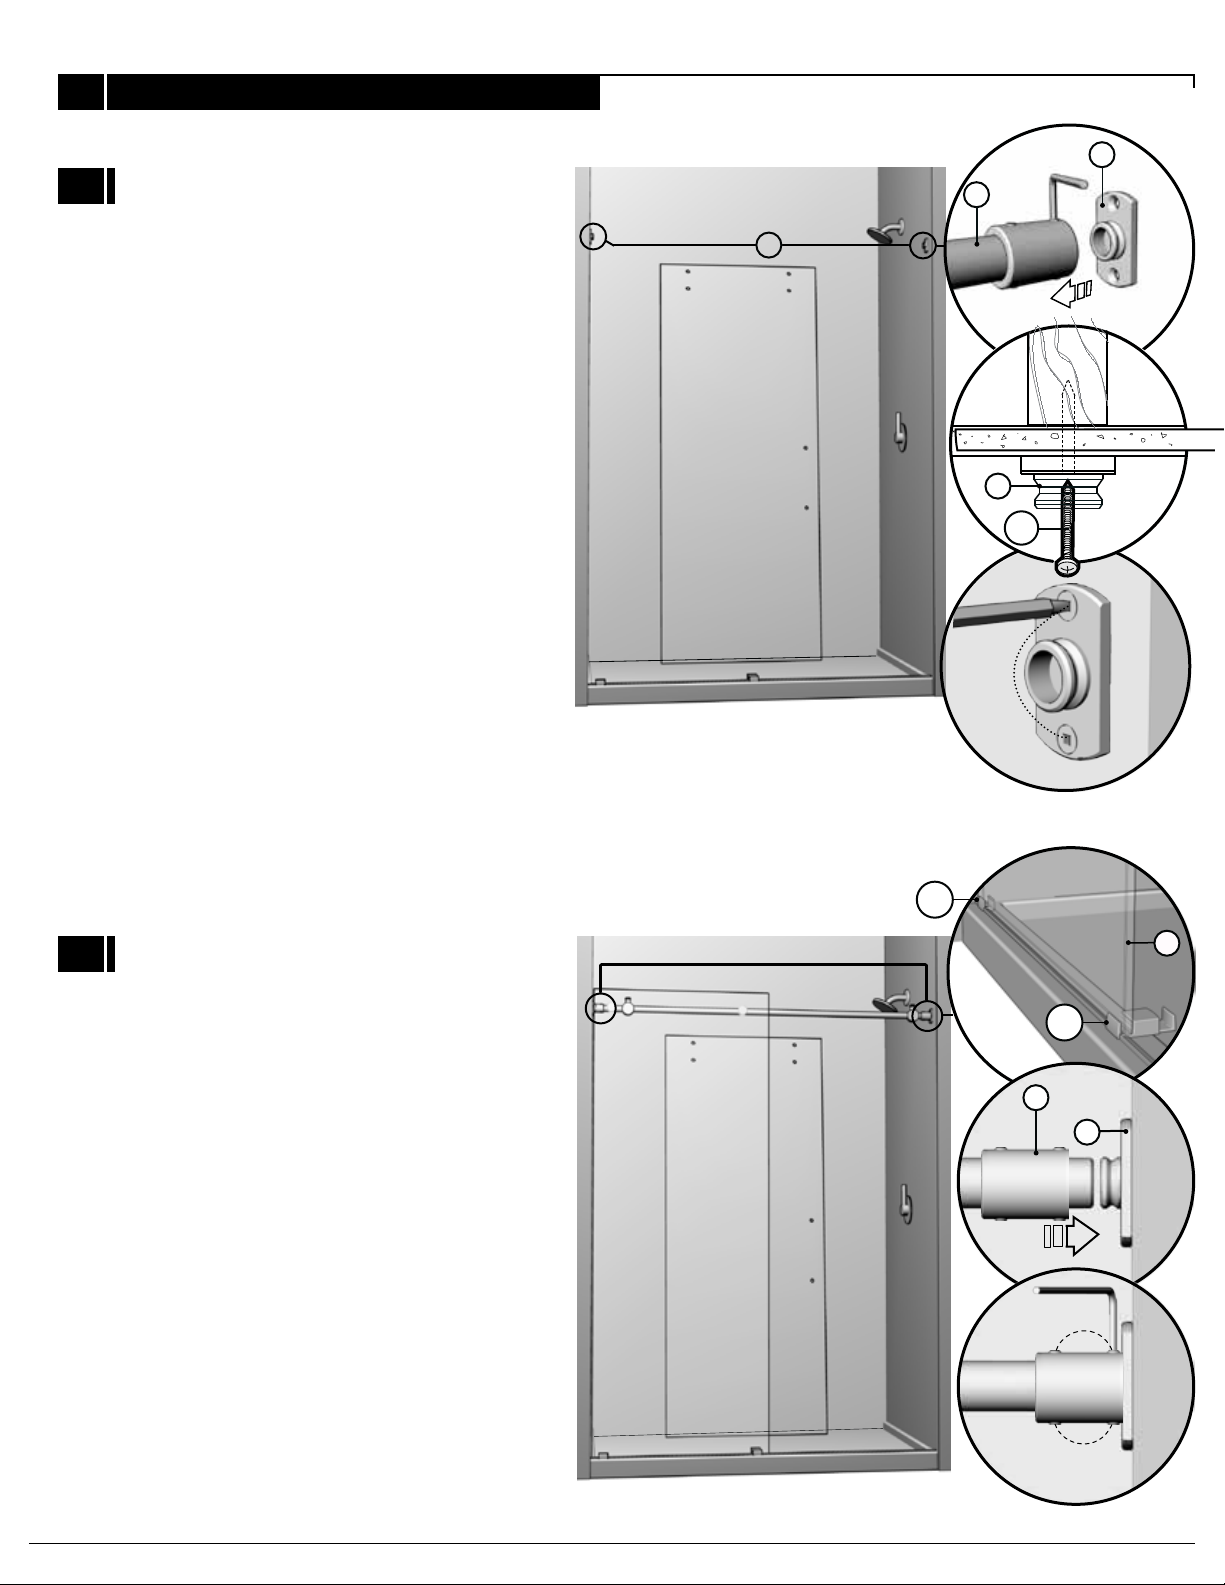
FIXED PANEL PLACEMENT ........................................... 8
FIXED PANEL PLACEMENT (CONTINUED) .......................... 9
THRESHOLD ........................................................... 9
WALL BRACKETS ..................................................... 10
SLIDING DOOR ....................................................... 11
SLIDING DOOR (CONTINUED) ...................................... 12
STRAIGHT HANDLE .................................................. 12
GASKETS INSTALLATION.............................................13
STOPPERS............................................................. 14
SILICONE.............................................................. 14
-Read this manual carefully and completely before
proceeding.
-tcudorP are subject to change without no-
tice. Use the installation instructions supplied with the
product.
● WATERPROOFING
-No sealant is required inside the shower.
-All models are equipped with transparent sealing gaskets.
-For models with wall jambs, if your shower door is to be
installed over ceramic tiles, the tiles should lay completely
under the wall jambs.
● MAINTENANCE
-Never use scouring powder pads or sharp instruments on
metal pieces or glass panels.
-An occasional wiping down with a mild soap diluted in water
is all that is needed to keep the panels and aluminum parts
looking new.
-We recommend wiping the glass panels with a squeegee after
each use.
● SAFETY
-It is recommended that you wear safety glasses at all times
during the installation.
-At all times, 2 people are required for this installation.
TABLE OF CONTENTS
GENERAL INSTRUCTIONS

3
1PARTS LISTING
2
5
2
1
3
3
4
6
7
8
10
12
11
14
13
15
9
16
17
ITEM PARTS QTY
1RUNNING RAIL 1
2WALL BRACKET 2
3STOPPERS 2
4GLASS HOLDERS 2
5TWIN ROLLERS 2 PAIRS
6SLIDING DOOR PANEL 1
7FIXED PANEL 1
8STRAIGHT HANDLE 1
9GASKET (DOOR) 1
10 GASKET (FIXED PANEL) 1
11 BOTTOM GLASS CLIP 1
12 GASKET (GLASS CLIP) 2
13 BOTTOM GUIDE 1
14 GASKET (BOTTOM GUIDE) 1
15 THRESHOLD 1
16 DOOR PANEL SIDE GASKET 1
17 DOOR PANEL BOTTOM GASKET 1

4
TOOLS
HARDWARE
PENCIL
DRILL SILICONESCREWDRIVERS
CUTTING PLIER LEVELTAPE MEASURE
18 19 20
If the shower panels are to be assembled on ceramic tiles, use a 1/4˝drill bit for ceramic tiles.
1/4˝&1/8˝DRILL BITS
*
ITEM HARDWARE QTY
18 #12-3 SELF-THREADING SCREW 4
19 #6-1 SELF-THREADING SCREW 2
20 HEX KEY 3mm 1
21 HEX KEY 6mm (7/32˝) 1
HACKSAW
21
MALLET BLOCK

5
GASKET INSTALLATION
1
1B
1A
Place door panel (6) inside tub to simplify following
installation procedures. Ensure placing the panel
onto a cushioned surface, such as a towel or card
board, to prevent damage either to the panel or
the tub.
Using the cardboard packaging box as platform,
install bottom door gasket (17) onto door panel
(6) using a block and a mallet. Notice the gasket
orientation.
1B
Thoroughly clean the edge of the xed panel (7).
Split the door gasket (9) in two and apply the
smaller half of the gasket on the edge of the xed
panel.
7
6
17
6
1A
INTERIOR
SHOWER SIDE
INTERIOR
SHOWER SIDE
10

6
RUNNING RAIL
2
2A
2B
1
Position the stoppers (3) on the running rail (1) as
illustrated. Secure them temporarily in place.
-
Position the wall brackets (2) on the running rail (1)
as illustrated. Secure them temporarily in place.
1
3
2

7
4GLASS CLIPS
3GLASS HOLDERS
11
Ensure that the running rail (1) is at the highest pos-
sible position in reference to the holes of the xed
panel (7).
1 1/2”
(38 mm)
13
1
7
4
11
13
INTERIOR
SHOWER SIDE
11
13
Position the bottom glass clip and bottom guide
xed panel as illustrated.
4
1
WASHER
GLASS HOLE
FLUSH WITH
GLASS
Insert bottom gaskets (12) in the bottom glass
clips (11) and (13).
Fasten the running rail (1) to the xed panel (7)
with the glass holders (4).
Secure them temporarily in place.

8
5FIXED PANEL PLACEMEMENT
5B
Position the xed panel assembly (7) on thresh-
old of base (B) as shown .
Adjust the xed panel (7), by way of the running
rail (1), so as to force the gasket (10) against the
wall.
Ensure that the running rail (1) is level and that
the xed panel (7) is square. If a horizontal cor-
rection is required, adjust and level the glass
fasteners (4).
5A
1
7
1/2” max (12.7mm)
10
The bottom guide (13) can hang o the threshold
(B) as long as it can be well-fastened.
INTERIOR
SHOWER SIDE
90°
90°
90°
B
7
B
13
4
1
7
6

9
6
stekcarbllawehtrofsnoitacolwercsehtkraM
(2) on the walls on both sides of shower as well
as the placement of the bottom glass clips
(11) (13).
CONTINUED
5
THRESHOLD
5C
Remove the xed panel assembly so as to allow
placement of the threshold (15) onto the base.
Ensure that a bead of silicone (S) is applied to
the underside of the threshold before installing.
Secure glass clips (11) (13) with self-drilling
screws (19).
6A
6B
15
S
15
6A
11 13
2
19
13
6B
11
13
11 19

10
1
2
Mark the screw locations on the walls on both
sides of shower. Remove the running rail (1)
sllawniselohllirD.)2(stekcarbllawehtmorf
until wall stud is reached with a drill bit intended
for ceramic tiles.
Fasten the wall brackets (2) with #12-3 (18).
Insert xed panel (7) back, ensuring that it’s
placed in the bottom glass clips (11) (13).
Slide expander (E) over wall bracket (2) and fas-
ten set screws
7WALL BRACKETS
2
WALL STUD
2
7A
7B
18
7
2
E
11
13
Dieses Handbuch passt für folgende Modelle
1
Inhaltsverzeichnis


