W6 Wertarbeit EU-7 Bedienungsanleitung

1
W6 EU-7 sewing machine embroidery table
1

Instruction manual
2

Product name W6 EU-7 embroidery table
Publisher W6 Wertarbeit Projektierungs- und
Handelsgesellschaft mbH
redenbecker Straße 13 / D-30974 Wennigsen
Email: [email protected]
www.w6-wertarbeit.de
This document is protected by copyright. All rights reserved. The
document may not, in whole or in part, be copied, reproduced,
translated or reduced to an electronic medium of machine-
readable form without the explicit permission of W6 Wertarbeit
Projektierungs- und Handelsgesellschaft mbH.
Preamble Thank you very much for buying a W6 product.
We have included a comprehensive manual, so
that you can easily learn how to operate the
machine. It will help you to get to know your
machine quickly. Please register your machine
on the website at
www.w6-wertarbeit.de by selecting Service /
Guarantee Registration. W6 WERTAR EIT also
offers the following options on its website for
free. Please access our website using www.w6-
wertarbeit.de and under Service select:
•A tutorial video specifically for the W6 EU-7
embroidery table
•Maintenance, tips and tricks for the W6EU-
7 embroidery table
The W6 sewing ideas on the W6 website
support you with creative sewing projects.
Please take a look at the website.
3

Please read the manual and the safety notes
carefully, before operating the
machine.
W6 tip This manual is revised from time to time. You
can find the latest version under Service / Help /
Your machine type / Downloads.
Subscribe to our W6 newsletter. We keep you
up-to-date and you can take part in our special
weekly promotions.
Enjoy your new sewing machine.
W6 WERTAR EIT
The company head office is based in a
deconsecrated church.
4

ut now have fun discovering your new
W6 Wertarbeit EU-7 embroidery unit.
WARNIN
When using the embroidery unit, the basic safety
instructions must always be observed. efore using this
machine, read all the instructions through carefully.
Danger
Follow the instructions below to reduce the risk of
electric shock: Do not leave the machine unattended
when it is connected to the mains power. Disconnect the
machine and the embroidery unit after use and always
disconnect them from the mains power before cleaning.
Please take note of the following points when handling the
machine:
•If you are pregnant, let someone help you when
assembling and moving the machine.
•When unpacking, make sure that you choose a secure
surface to unpack the machine safely.
•Keep animals and objects away from the area around the
sewing machine.
•Always operate the machine on a sturdy, clean and level
surface.
•Keep children away from the machine.
•Replace defective or damaged machine parts
immediately. Only use original parts!
•Change the needles regularly. Worn or damaged needles
pose a hazard.
5

•Spare parts and tools must comply with the technical
requirements laid down by the manufacturer! This is
always guaranteed with original spare parts.
•Observe the deadlines for recurring maintenance work.
•Only rectify faults when the machine is switched off.
Unplug the power plug too.
•Never change, dismantle or bypass safety devices.
•Never deactivate safety equipment.
•Never make structural changes to the machine.
•Never operate the machine outdoors where it is exposed
to the elements.
•In the event of a malfunction, switch the machine off
immediately.
•W6 WERTAR EIT offers frequent sewers an annual
inspection, at the owner’s expense, after a year. Normal
use indicates that an inspection should be performed
every two to four years.
6

Contents
W6 EU-7 embroidery unit....................................................10
Main embroidery unit..........................................................10
Attaching the embroidery foot.............................................12
Attaching the adapter..........................................................14
Attaching the embroidery unit.............................................15
Dismantling the embroidery unit.........................................24
Setting up the embroidery unit............................................26
A. Edit screen..................................................................26
. Embroidery pattern selection button...........................26
C. Font selection button...................................................27
D. Embroidery arm positioning button.............................27
E. asic settings button...................................................27
e-i. Sound.....................................................................27
e-ii. Contrast adjustment (brightness adjustment).......27
e-iii. Calibration button..................................................28
e-iv. Changing the embroidery unit’s language............28
e-v. Optimising the stitch density..................................28
F. Delete button................................................................28
G. US button..................................................................28
H. ackup button.............................................................28
Setting up the embroidery frame........................................29
Clamping the fabric..........................................................31
Using the template...........................................................33
Attaching the embroidery frame......................................34
Dismantling the embroidery frame..................................35
Selecting embroidery patterns............................................35
Setting the embroidery pattern...........................................38
A. Frame size...................................................................38
. Embroidery pattern preview........................................38
C. Edit button...................................................................38
D. Delete button...............................................................38
E. utton for frame size and frame stop position............39
F. Enlarge button..............................................................39
7

G. Save to US stick.......................................................39
H. Resize button..............................................................39
I. Rotate button................................................................40
J. Mirror / Positioning button............................................40
The settings have been completed.................................41
Pattern table........................................................................43
Overview of patterns (letters)..............................................53
Error messages...................................................................54
Selecting letters...................................................................56
Saving letter combinations and colours..............................59
A. Checking the selected letters......................................59
A. Editing the selected letters..........................................59
C. Deleting letters............................................................59
D. Changing colours........................................................61
E. Saving selected letters................................................61
F. Recalling saved letters.................................................62
G. Deleting saved letters.................................................62
H. After you have selected the letters..............................64
Adjusting the letters............................................................64
A. Resize button..............................................................65
. Rotation / Direction / Arc button..................................65
C. Mirror and Positioning button......................................66
Changing letter spacing................................................67
Checking the start position...........................................68
Embroidering patterns.........................................................68
The Start screen contains the following information:......69
Starting the embroidery process:....................................70
Positioning letters................................................................73
Saving embroidery files on the US stick...........................75
Importing embroidery files from the US stick...................76
Tips for embroidery.............................................................80
When the upper thread breaks or is used up..................80
When the bobbin thread on the W6 plastic bobbin is used
up.....................................................................................81
If the power fails during embroidery................................82
Adjusting the thread tension...............................................83
8

A. Correct thread tension.................................................83
. Upper thread too tight.................................................83
C. Upper thread too loose...............................................83
EU Declaration of Conformity.............................................84
9
W6 EU-7 embroidery unit
The embroidery unit automatically recognises which W6 sewing
machine it is connected to. If you connect a W6 N 5000 Exklusive
or a W6 N 8000 Exklusive to this embroidery unit, the maximum
size of the embroidery frame increases from 130 mm x 200 mm
to 150 mm x 250 mm. You can only select the extra large
embroidery files if you connect one of the two sewing machines
mentioned above to this embroidery unit.
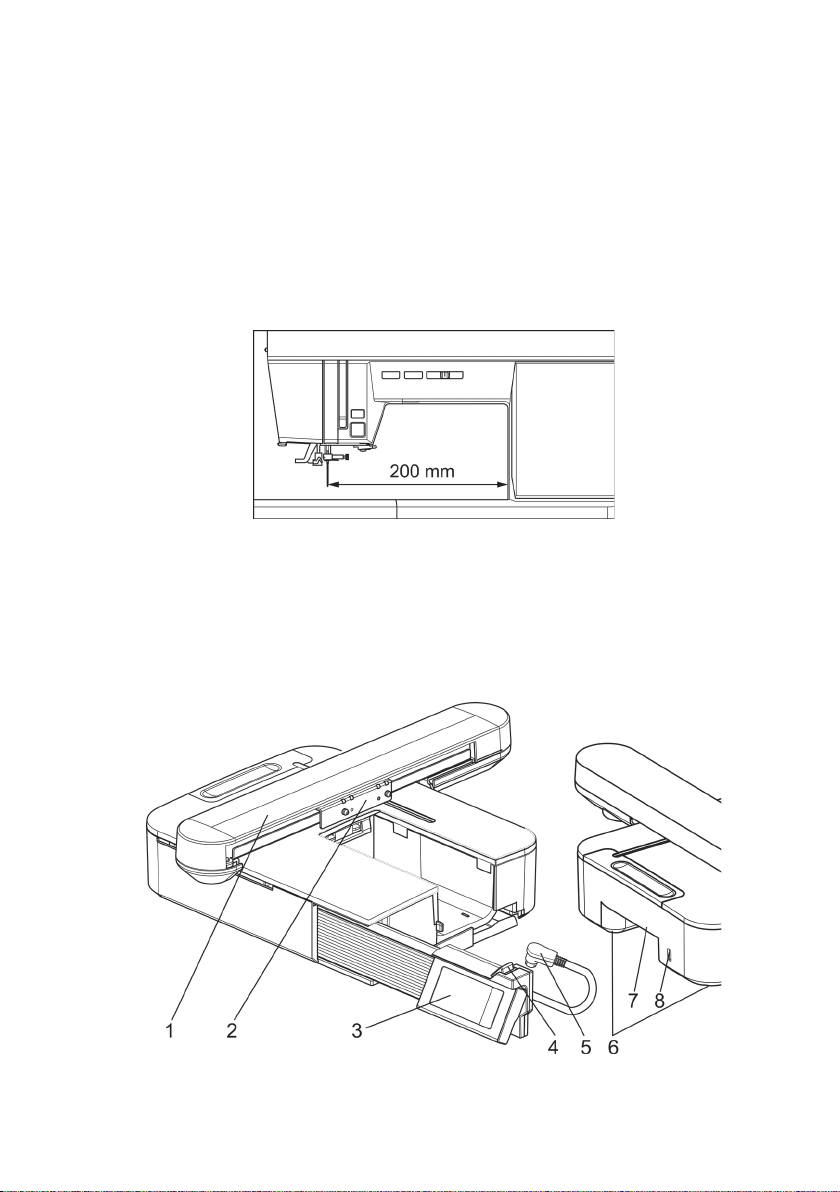
Main embroidery unit
1. Embroidery arm 5. Connection cable
2. Embroidery frame support 6. Adjustable feet
3. Touchscreen 7. Release lever for
4. Rail to position embroidery unit
the display 8. US connection
10
Inhaltsverzeichnis
Andere W6 Nähmaschine Handbücher

W6
W6 N 707D free-arm Bedienungsanleitung

W6
W6 N 8000 Bedienungsanleitung

W6
W6 N 9500C QPL Bedienungsanleitung

W6
W6 N 2000 Exklusive Bedienungsanleitung

W6
W6 N 1615 Bedienungsanleitung

W6
W6 N 8000 Exklusive Bedienungsanleitung

W6
W6 N 1235-61 Bedienungsanleitung

W6
W6 WERTARBEIT N 656D Free Arm Bedienungsanleitung

W6
W6 N 5000 Exklusive Bedienungsanleitung

W6
W6 W6 N 454D Bedienungsanleitung


