
wink haus AV2 Bedienungsanleitung

Winkhaus AV2 / AV2 E Automatic
Locking System
Fabrication and Installation Manual
Timber and Composite doors

Winkhaus AV2 / E Manual 2
1
2
3
4
5
6
7
This security door locking system complies with the requirements and directives established
and stipulated by the Council on the Harmonization of Legal Regulations of Member States
regarding Electromagnetic Compatibility (89/336/EEC).
The manufacturer shall hereby certify the conformity of this product and
document such by the CE marking (see Appendix).
Winkhaus STV GmbH & Co. KG
Berkeser Straße 6
D-98617 Meiningen
Germany
Tel.:+49(0)36 93/9 50-0
Fax:+49(0)36 93/9 50-1 34
www.winkhaus.de
The following information and graphic images provided correspond to the current status of the
development and manufacture of this product.
For the purpose of customer satisfaction and operational reliability of the electronic automatic
locking system, we reserve the right to make changes to this product.
All information and specifications given in this operating manual have been compiled and
reviewed with utmost care.
Due to the nature of technical advances made, amendments to legal regulations and other
compulsory changes we do not Guarantee for the accuracy and completeness of the contents’
statements.
We always do appreciate suggestions or comments.
The electronic automatic locking system can be easily installed, if these operating instructions
and the door specifications indicated have been followed.
© Winkhaus STV GmbH & Co. KG. All rights reserved. Last revised: 10/2006

Winkhaus AV2 / E Manual 3
General
information
Fabrication
Procedures
Installation
Procedures
Operating
Instructions
Routine
Maintenance
Troubleshooting
Guides
Sash
Routing Details
Frame
Routing Details
1
2
3
4
5
6
7
Table of Contents
1 Fabrication Procedures Page 4
1.1 Sash & Frame Preparation Page 4
1.2 Hardware Installation Page 4
1.3 Fabrication Final checks and adjustments Page 5
2 Installation Procedures Page 6
2.1 Installation Set Up Page 6
2.2 Glazing Page 6
2.3 General Door Set up Page 7
2.4 Installation checks and adjustments Page 7
3 Operating Instructions Page 8
4 Routine Maintenance Page 9
5 Troubleshooting Guides Page 10
5.1 AV2 Locking System (automatic/manual) Page 10
5.2 AV2 E Locking System (Electromechanical) Page 11
6 Frame Routing Details Page 12
6.1 F24 AV2 Keeps: Full Length Page 12
6.2 F24 AV2 Keeps: Single Pocket Page 13
6.3 F24 AV2 Keeps: One piece full length rounded end Page 14
7 Sash Routing Details Page 15
7.1 AV2 & AV2 E 20mm Face Plate Page 15
7.2 AV2 & AV2 E 20mm Rounded End Face Plate Page 16
7.3 AV2 & AV2 E 16mm Face Plate Page 17

Winkhaus AV2 / E Manual 4
1. Fabricator Manufacturing Procedure
1.1 Sash and Frame Preparation
Marking Out:
Mark out the hook housings, lock gear box and keep details either from the lock set itself or
from the dimensioned drawing of the lock set.
Please refer to drawings 7.1, 7.2 or 7.3 on pages 15 - 17
Routing:
Carry out all routing for sash and frame hardware, prior to fabrication.
Completely remove all burrs and debris, prior to hardware installation.
Machining details:
Accurate machining and routing is essential for the AV2 / AV2-E locking mechanism.
Please refer to pages 12 or 17
1.2 Hardware installation
Lock
Position lock in Euro groove by assembling handle set and cylinder to sash, and secure lock
to Euro groove with suitable fixing screws.
Installing door leaf into outer frame;
I. Hang the door ensuring that a 4mm airgap is achieved, particularly to the lock to
frame meeting stiles. But do not allow the door to fully close until the keeps have
been fitted.
II. Fit centre keep and individual keep pockets (centre line on lock faceplate should align
with the lower edge of the centre latch strike).
Please refer to drawings 6.1, 6.2 and 6.3 on pages 12 - 14.
III. Or, if full length keeps are being used, position centre keep, and butt the two extension
keeps to it. Ensure that the frame is prepared to receive the striker plates for the two
frame hook latches. These should end up flush with the inside edge of the outer
frame.
IV. Close/refit door sash
1
2
3
4
5
6
7

Winkhaus AV2 / E Manual 5
General
information
Fabrication
Procedures
Installation
Procedures
Operating
Instructions
Routine
Maintenance
Troubleshooting
Guides
Sash
Routing Details
Frame
Routing Details
1
2
3
4
5
6
7
V. Stand door set vertical and check adjustments and operation.
VI. If machining and keep location is correct and therefore in the optimum position, keep
adjustments should only be necessary on site to assist/fine tune door set installation.
1.3 Fabrication final checks and adjustments
Such checks can only be done with the door vertical, as the lock is reliant on the free movement
of the gravity falling drive strip.
The latch keep, should be adjusted so that when the sash is firmly closed against the weather
seal and latched, the hooks fall and throw fully automatically.
Adjust the keeps to ensure the hooks are fully thrown.

Winkhaus AV2 / E Manual 6
2. Installation Procedure
2.1 Installation Set up
Plumb:
Check by using either a level or plumb line and a straight edge along both the lock and hinge
sides. These two uprights should be straight, plumb and parallel.
Parallel:
Check by measuring the horizontal dimension across the top and bottom of the frame which
should also measure the same.
Run up or Transit Blocks:
These should be removed during installation so as not to interfere with the natural slamming
action of the door leaf.
Sash to Frame Trueness:
It is essential that the sash closes true to the outer frame, and thereby ensuring that the hooks
fire simultaneously and that a level of weather performance is achieved.
This can be checked/adjusted by firstly opening the sash, then manually firing the hooks both
top and bottom, by depressing the hook latches.
Then by closing the door sash too, checking that the top and bottom hook touch the outer frame
at the same time. If one hook touches and the other not, then the outer frame fixings should be
removed, the frame adjusted true to the sash and re-fixed so that they do.
2.2 Glazing, if applicable
Toeing and Heeling:
Ensure that the door is correctly toe and heeled so as to transmit the dead weight of the leaf back
to the hinge side and eliminate the chance of the leaf sagging in the future.
Packing Opposite Hooks:
To achieve maximum security be sure to pack the glass adjacent to the locking points both lock
and hinge side.
1
2
3
4
5
6
7

Winkhaus AV2 / E Manual 7
General
information
Fabrication
Procedures
Installation
Procedures
Operating
Instructions
Routine
Maintenance
Troubleshooting
Guides
Sash
Routing Details
Frame
Routing Details
1
2
3
4
5
6
7
2.3 General Door Set up
Centre lines:
Sash to frame relationship of Lock to Centre Latch and hook keeps.
Please refer to drawings 6.1, 6.2 and 6.3 on pages 12 - 14
(Ensure that the datum line of the lock (located underneath the latch bolt) corresponds with the
bottom edge of the latch bolt strike.)
Air Gap:
• On square edge doors:
Ensure that the gap between sash and frame, specifically on the Lock stile side, is parallel 4mm
optimum, (with a tolerance of + 0, to – 1mm), and that the head also has a parallel air gap.
Please see diagram above.
• On rebated doors:
Open the door sash slightly so as to visually check that the clearance in between the sash and
the edge of the outer frame/hook latch strike is 4mm optimum, (with a tolerance of + 0, to –
1mm).
Also, by drawing pencil lines around each of the corners of the leaf and adjacent to the locking
points, ensure that the cover is consistent and within tolerance (check this dimension with the
door supplier/manufacturer).
Cover:
The amount by which the outer frame is over lapped by the door leaf and should be consistent
all round the leaf, specifically on the lock stile side.
2.4 Installation checks and Adjustments:
The latch keep, should be adjusted so that when the sash is firmly closed against the weather
seal and latched, the hooks fall and throw fully.
The hook keep, should be adjusted so that when latched, the hooks are not quite touching the
compression face of the hook adjuster plates. This can be checked by firstly ensuring that the
hooks are fully thrown, and in fresh air, and then trying to force the sash open at both the hook
positions.
If correctly adjusted the sash should not be able to be deflected in such a way, so as to not have
contact with the weather seal.
Measure air gap
from this position.
Use glass packer

Winkhaus AV2 / E Manual 8
1
2
3
4
5
6
7
1. To Lock door just ‘slamshut’ (It is not necessary to
lift the handle lever to lock the door as the hooks
throw automatically).
2. Additional security can be achieved by turning the
thumbturn or key. This throws an additional deadbolt
and prevents the hooks being retracted from the
outside if an outside lever has been fitted.*
3. From the inside to open the door pull lever down. This
retracts the hooks and the sprung latch. (If the
deadbolt has not been thrown).*
Outside
4. From the outside access can only be gained via the
key. Turning the key retracts the hooks and the deadbolt
(if thrown).*
Fixed Pad
Inside
Latch
Thumbturn
* AV2/AV2 E also available WITHOUT deadbolt.

Winkhaus AV2 / E Manual 9
General
information
Fabrication
Procedures
Installation
Procedures
Operating
Instructions
Routine
Maintenance
Troubleshooting
Guides
Sash
Routing Details
Frame
Routing Details
1
2
3
4
5
6
7
3. Operating instructions
4. Routine Maintenance
Regular maintenance reduces costly remedial calls that you may have to attend to during the
course of a year, therefore ensure that the end user is aware of the need to regularly clean and
lubricate the locking mechanism and associated components. This can be done by using a light
machine oil or silicon spray via the hook, dead bolt and latch apertures, at least twice a year or
as the local environment requires.
Winkhaus AV2 / E Manual 10
1
2
3
4
5
6
7
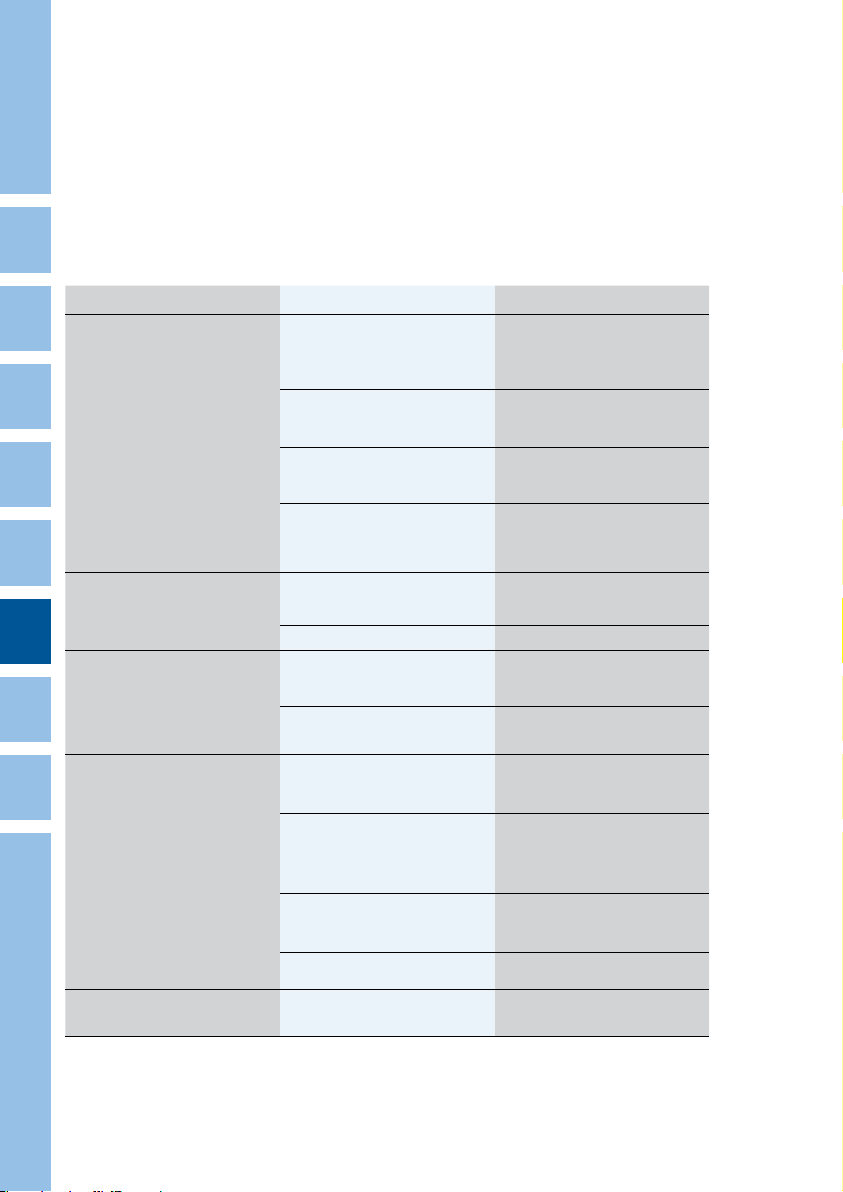
5. Trouble Shooting Guides
5.1 AV2 Locking System (Automatic/Manual)
Symptom Fault Remedial action rqd
Neither hook throws Keep position incorrect Reposition keeps
Incorrect Air gap Adjust air gap to 4mm, - 1mm, + 0
Keep incorrectly adjusted Adjust keeps
(see installation guide)
Drive strip jammed in open position Ensure full free movement of drive
strip
Check that fore end fixing screws, are
applied square and are not fouling the
drive strip
Only one of the hooks throw Frame not installed true to Sash Adjust installation (see installation
guide).
Incorrect Air gap Adjust air gap to 4mm, - 1mm, + 0
Latch bolt does not throw fully Drive strip travel restricted downwards Remove lock and check/adjust drive
strip prep.
Cylinder cam in wrong position Check cylinder cam is in the
conventional 5 or 7 o’clock position.
The door is stiff to open by key Latch and hook keep not adjusted
correctly
See installation guide and keep
adjustments
Drive strip travel restricted or fouled Check that fore end fixing screws, are
applied square and are not fouling the
drive strip
Drive strip free travel hindered Check prep and clear of foreign
material.
Incorrect handle/cylinder prep Correct offending prep/fixing
The hooks do not retract fully Drive strip travel restricted upwards Remove lock and check/adjust drive
strip prep.
Dieses Handbuch passt für folgende Modelle
1
Inhaltsverzeichnis
Andere wink haus Türöffnungssystem Handbücher


