
YOSUDA YB007R Bedienungsanleitung

YB007R
Installation and Operation Manual of
Spinning Bike
Please read this manual before installing and using spinning. In
accordance with the principle of sustainable development, the product may be
updated when necessary, and no notice will be given at that time. In case of
any discrepancy between the specification and the product, the actual product
shall prevail.

Catalog
Customer Service…………………………………………...................0
Safety Attentions & Warning Descriptions…………………………1
Product Profile…………………………………………......................3
Installation Instructions …………………………….……………….5
Maintenance………………………………………….........................11
Sports Advice & Guideline……………………………………….….15
1
Customer Service
If you have any questions or concerns, please feel free to contact us.
●Email address: [email protected]
●www.yosudabikes.com
Contact Us Assembly Guide
●You can also search "YOSUDA exercise bike" on YouTube to get an
assembly video.

1
Safety Attentions & Warning Descriptions
Please properly keep this instruction book, so that you can refer to it.
1. Before starting any exercise program, you should consult your physician to determine if
you have any medical or physical conditions that could put your health and safety at risk or
prevent you from using the equipment properly. Your physician’s advice is essential if you
are taking medication that affects your heart rate, blood pressure, or cholesterol level.
2. Please make sure that you have carefully read this manual before installing or using this
instrument. Only properly install, maintain and use this instruction, can the safety and
efficient use can be achieved. Please make sure that all the users of this instrument are all
informed the various warnings and precautions.
3. Please know all kinds of signals from your body. Warnings: Improper or excessive
sports activities will harm your health. Once you feel pain, cardiac congestion, irregular
heartbeat, shortness of breath, collapse, dizziness or any discomfort, please stop
exercising right immediately, and please consult the doctor before you plan to continue to
exercise.
4. Please take care of your babies and keep them away from this instrument. This
instrument is only applicable to adults.
5. Please place this instrument on the hard, horizontal floor with a protective layer or carpet.
In order to ensure use safety, please keep at least 0.5 meters of free space around.
6. Before excise, please check all the screws, nuts and other hardware have been
completely installed firmly.
7. Warnings:this equipment can only be used safely only under the condition of
regular inspection to the wear/destructive parts.
8. Warnings: Place the instrument on stable and completely flat floor for installation.
Please use it according to the instruction. On the progress of installation or checking the
instrument, if damaged component are found, or abnormal sound is heard during usage,
please stop using it immediately. Please do not use the equipment until the relevant
problems are solved.

2
9. Please wear proper sport suits during the exercise, please don’t wear loose clothes, to
avoid getting involved in any movable parts.
10. This instrument has already pass through the relevant test of ASTM, it is
applicable to the household appliance. Maximum user weight limit is 330 lbs.
11. When lifting up or moving this instrument, please operate carefully to avoid hurting your
back. Please use the correct lifting methods, if necessary, please ask assistance.
12. All the movable parts are needed to be maintained regularly (such as crank, flywheel
etc). Please check them carefully before use it, if some parts are found loosen or damaged,
please repair or replace them immediately, it can’t be used until it restore to the good
condition.
13. Please pay special attention to the wearable parts.
14. As this training instrument is equipped with flywheel inertial system, foot, ankle,
leg and knee injuries may occur during exercise. Please remember to press the
breaker lever. If you want to stop the movement, first press the brake knob to stop
the crank.
15. Warnings: Please make sure that the adjustment knob is always on locking
condition.
16. When you don’t use this instrument, please rotate the resistance clockwise and
fine-tune the knob to the end to lock the crank and flywheel.
3
Product Profile
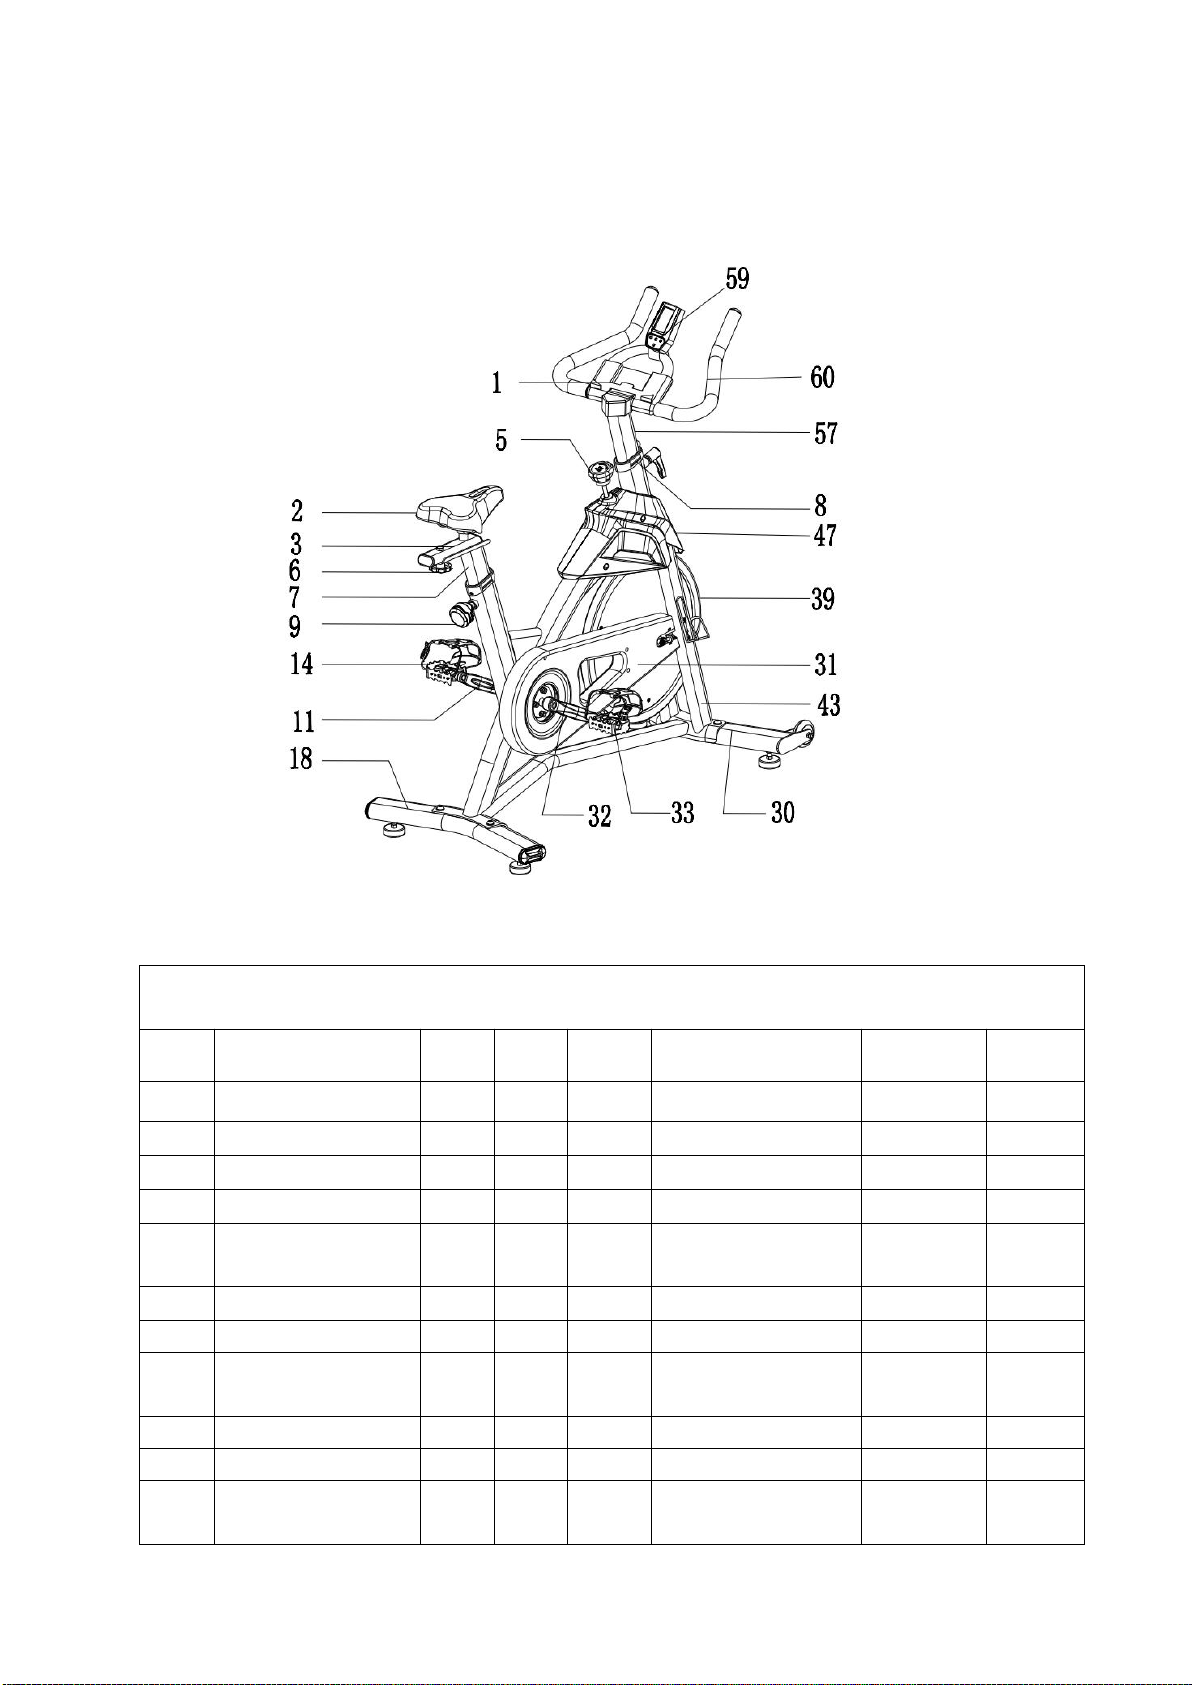
Main configure list
S/N
Name
Qty
S/N
Name
Qty
S/N
Name
1
IPAD Holder
piece
1
30
Front Stabilizer
piece
1
2
Seat
piece
1
31
Belt Cover
piece
1
3
Seat Slider
set
1
32
Right Crank
piece
1
5
Brake Knob
piece
1
33
Right Pedal
piece
1
6
Plum Blossom
Knob
piece
1
39
Flywheel
piece
1
7
Seat Post
set
1
43
Main Frame
piece
1
8
Inner Bush
piece
1
47
Flywheel Cover
set
1
9
Adjustment Pull
Pin
piece
1
57
Handlebar Post
set
1
11
Left Crank
piece
1
59
Monitor
piece
1
14
Left Pedal
set
1
60
Handlebar
set
1
18
Rear Stabilizer
piece
1
70
Washer φ10
*φ20*t3
set
1

4
Tools &Screws
5
Installation Instructions
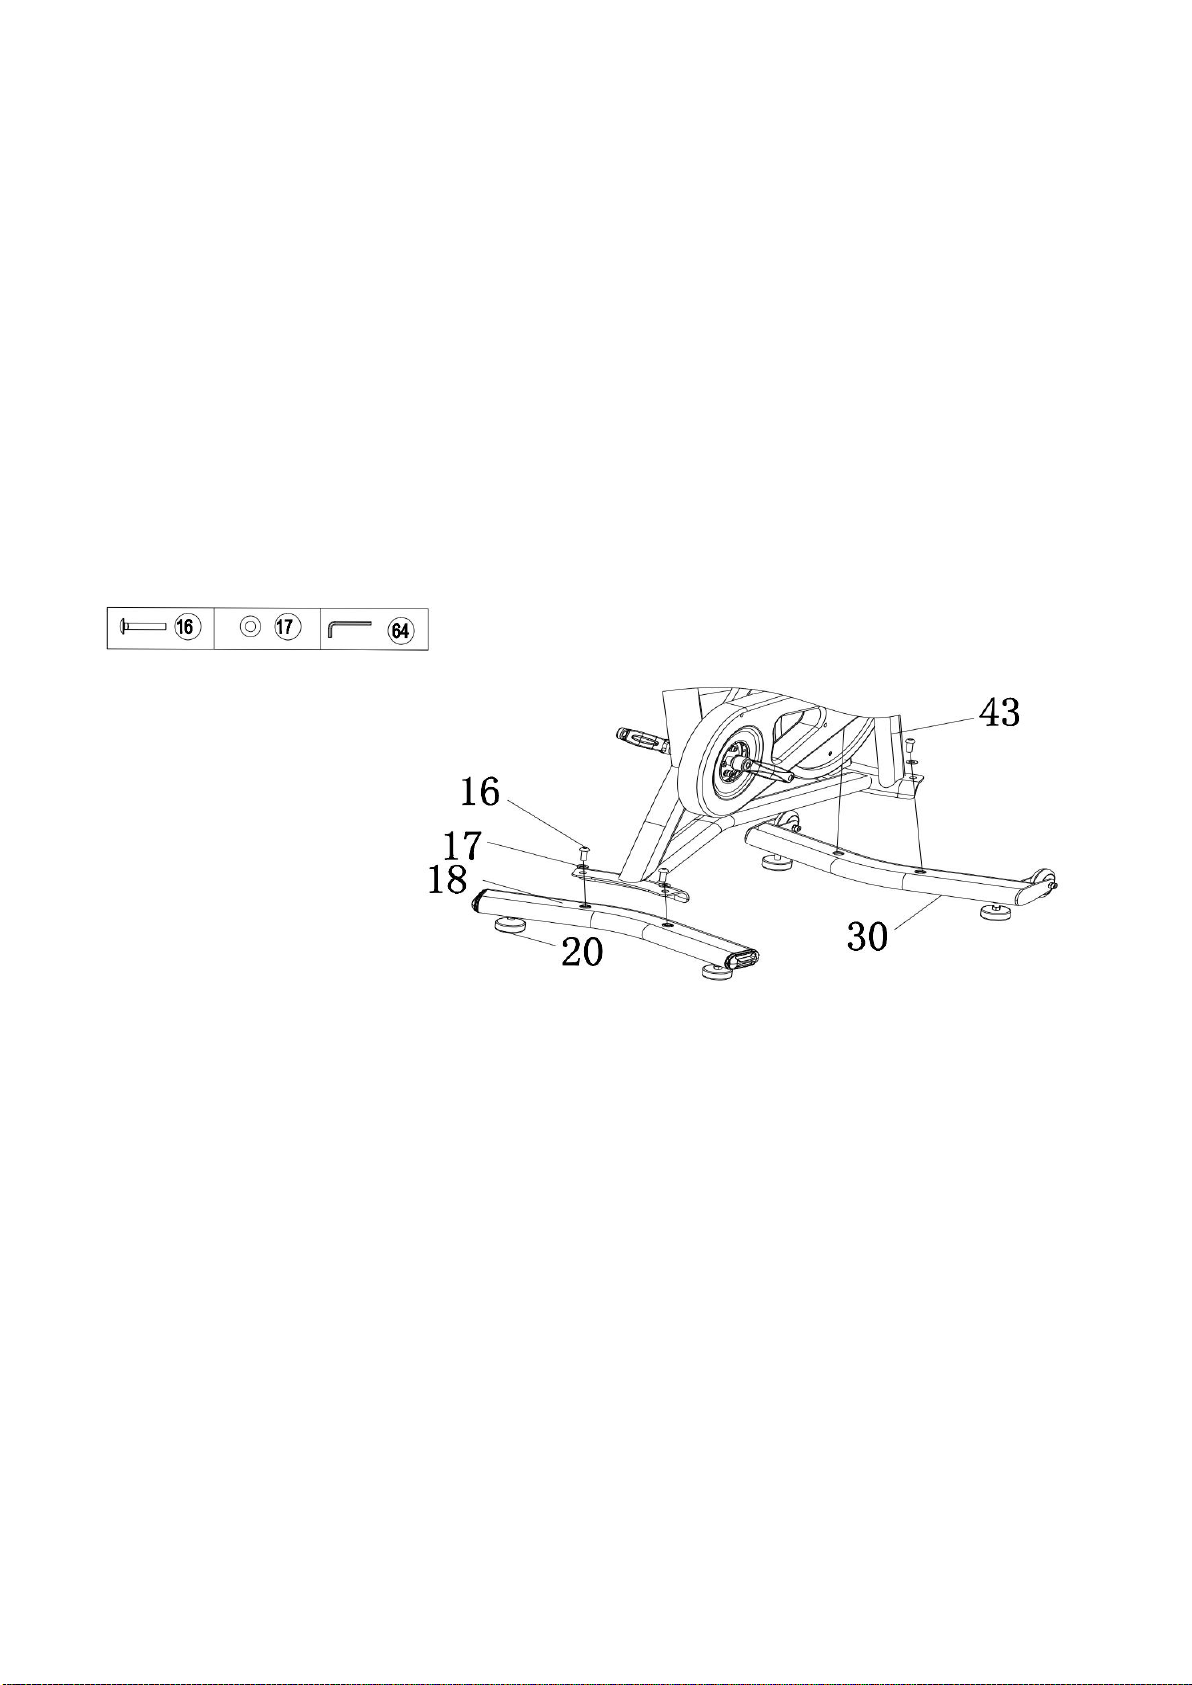
Step1: Install the Front and Rear Stabilizer
Required parts:
#18-Rear Stabilizer #30-Front Stabilizer #16-Bolts 4Pcs
#17-Washer 4Pcs #43-Main Frame #64-Inner Hexagon Spanner
1. Attach the #18-Rear Stabilizer and #30-Front Stabilizer to the #43-Main Frame.
2. Put the #17-Washers into the #16-Bolts, tighten and secure with #64-Inner Hexagon
Spanner.
Step2: Install the Left and Right Pedal
Required parts:
#14-Left Pedal #11-Left Crank #32-Right Crank
#33-Right Pedal #65-Allen Wrench
Note: The Pedals are marked "L" and "R" for Left and Right.Be sure to attach Pedals on the
proper side of the Bike. Orientation is based from a seated position on the bike.
1. Turn the Brake Knob CLOCKWISE as tightly as you can with your hand.
2. Align the #14-Left Pedal with the #11-Left Crank at 90°. Turn the pedal bolt on the #14-Left
Pedal COUNTER-CLOCKWISE as tightly as you can with your hand. Then use #65- Allen
Wrench to tighten and secure.

6
3. Align the #33-Right Pedal with the #32-Right Crank at 90°. Turn the pedal bolt on the #33-
Right Crank CLOCKWISE as tightly as you can with your hand. Then use #65- Allen Wrench
to tighten and secure.
Step 3: Install the Adjustable Seat Post
Required parts:
#7 - Seat post #9 - Adjustment Pull Pin 1PC
1.The #9- Adjustment Pull Pin holds the seat at the correct height. The pull pin aligns the
height with a hole in the #7 - Seat post.
2.Unscrew #9 - Adjustment Pull Pin counter-clockwise until you can pull on it and the seat
tube is clear to insert #7 - Seat post.
3.Insert #7 - Seat post into the seat tube of #43 - Frame while pulling the #9 - Adjustment
Pull Pin to allow it in.
4.Adjust the seat height to a suitable location and release the pin into the closest notch hole
and screw down clockwise to tighten.

7
Step 4: Install the Seat
Required parts:
#2- Seat #3- Seat Slider #6- Plum blossom knob
#65- Allen Wrench #70-Washer
1. Unscrew the #6- Plum Blossom Knob on the #3- Seat Slider, put #3- Seat Slider on the
#7-Seat Post.
2. Adjust the #3- Seat Slider to the desired position, put the #70-Washer to #6- Plum
Blossom Knob, re-insert and tighten #6- Plum blossom knob to secure the slider in place.
3.Place the #2- Seat on the #3- Seat Slider. Use #65- Allen Wrench to clockwise tighten the
nuts on both sides of the #2- Seat.
NOTE: Before you fully tighten the seat, you can adjust the front of the seat higher or lower
to meet your needs.
Inhaltsverzeichnis
Andere YOSUDA Heimtrainer Handbücher


Beliebte Heimtrainer Handbücher anderer Marken


Stamina
Stamina 1310 Bedienungsanleitung

American Fitness
American Fitness SPR-BK1072A Bedienungsanleitung

Cateye
Cateye CS-1000 (CYCLO SIMULATOR) Bedienungsanleitung

BH FITNESS
BH FITNESS H9158H Bedienerhandbuch

Body Sculpture
Body Sculpture BC-7220G Bedienungsanleitung

Cateye
Cateye EC-2300 Bedienungsanleitung


