eFlux FREERIDE X2 HUB Bedienungsanleitung

INTRODUCTION
E-SCOOTER ELEKTRO-ROLLER
(Photo and equipment variations)
FREERIDE X2 HUB Manual
FREERIDE X2 HUB

Content:
1. Foreword
2. Notes
3. Preliminary legal observations
3.1. Road transport (EEC STREET models only)
3.2. Driving licence
3.3. Helmets
3.4. EEC Document (European Certificates of Conformity)
3.5. Walking and cycling paths
4. Safety
5. Package content
6. First
6.1 Instructions for unlocking the scooter
6.2 Instructions for mount handlebar
7. Commissioning
7.1. Connect battery and controller
7.2. Mount seat
7.3 Mount licence plate and plate light
7.4. Fold
7.5 Sidebar
7.6 Ignition
7.7 Horn / Light / Mirror
8. Battery
8.1. Fuse
8.2. Battery capacity / Type
8.3. Use of batteries
8.4. Charging device
8.5. Charging
8.6. Maintenance and instructions for charging batteries
9. Tacho
10. Starting and driving
11. Brakes
12. Tyres and wheels
13. Guarantee conditions
14: Accessories and parts
15. Error Search
16. Instructions for care
17. Technical data
18. Maintenance manual
18.1. Adjust brake system
19. Service
1

1. PREPARATION
2. NOTE
3. Preliminary legal observations
Congratulations!
You've acquired one of the most popular e -scooters. The most innovative and thoughtful e -scooter of his
generation. In order to enjoy driving for a long time, take your time and read this manual carefully before
you start driving.
The manufacturer is constantly working on the further development of its models. Please understand that
changes in the scope of delivery in form, equipment and technology are therefore possible at any time.
Therefore, no claims can be derived from the information, pictures and descriptions of these instructions.
Important
Please read the instructions carefully before using the device.
Symbols used
Important information for your safety is specially marked. Please follow these instructions to avoid injuries
and damage to your FREERIDE X2 HUB:
Warning
Warn of health hazards and indicate possible injury hazards.
NOTE
Indicates possible hazard to FREERIDE X2 HUB or other objects. Non -compliance may lead to the
conclusion of guarantees
NOTE
Highlights tips and information for you.
3.1. Road transport (EEC STREET models only)
To operate this vehicle you need a driving licence and an insurance number. An EU Operating Licence
(EEC) is attached to the roller.
With this paper you can purchase a license plate at any insurance.
3.2. Driving licence
Model: FREERIDE X2 HUB / 45KMH
Persons of 16 -year -old age with moped or car license.
3.3. Helmets
Due to its maximum speed of approximately 45 km /h, the FREERIDE X2 HUB may only be driven with
a helmet.
2

4. Safety
5. Package content
3.4. EEC Document (European Certificates of Conformity)
For the approval of your FREERIDE X2 HUB, use the attached DIN A4 sheet (European Certificate of
Conformity EEC). This makes the scooter acceptable throughout Europe. EEC approval requires the
fixed seat for driving in public transport. The holding in a standing position is not permitted. FREERIDE
X2 HUB may only be driven by one person.
3.5. Walking and cycling paths
The use on public bicycles and pedestrians is not permitted unless this is shown separately.
The improper use can lead to serious injuries. The driver can minimise this risk by using different safety
standards, such as: wearing a helmet, goggles, gloves, elbow and knee protectors and appropriate
footwear.
Do not use the scooter on smooth, oily or unpasteurised surfaces. Do not drive under the influence of
alcohol and /or drugs.
Avoid uneven substrates, impact holes, cracks in the pavement and other obstacles. If wet, note the
increased risk of slipping and falling.
The device should not be used by persons with reduced vision, balance, coordination, reflexes, muscle
and bone strength and estimation.
It should not be used by people who cannot or do not want to take responsibility for their actions.The
driver assumes all risks associated with the use of the vehicle.
Your scooter comes with below accessories:
1.Instructions
2.Tool kits
3.Fuse
4.Licence plate
5.Charger
6.COC certificate
3

6. First(you can see we add picture/note with logo)6.1. Instructions for unlocking the scooter
To open the scooter,pull out safe PIN firstly(a is the safe pin in picture ①) and then press the handle
to open down with one hand (see arrow b and c), while gently press the handlebars up with the other
hand. Picture ②is the unfolded scooter, please make sure you insert the safe PIN(d in picture ②)
6.2. Instructions for mount handlebar
1. Place the alloy clamp onto correct position as picture.①, then tighten all M8X25 scews.
2. Place the handlebar to clamp bottom and attach clamp cap as picture②, adjust correct angle and
tighten all screws M8X20.
3. Open holder of the display as picture ③onto handlebar, adjust correct position and tighten all screws
on the holder.
NOTE
Push the handlebars gently into the vertical position until you feel that the mechanism is pressed, make
sure that insert safe PIN.
After the handlebar is fixed, the QUICK -CONNECT connectors for accelerator, light /horn switch, brake
handles, lamp,ignition and display must be connected.
Note the correct polarity and fit accuracy of the connectors.
4
12
a
d
b
c
1 2 3

7.Commissioning
5
7.1. Connect battery and controller
Now insert the BATTERY PACK into the battery compartment by tapping the tread surface upwards, and
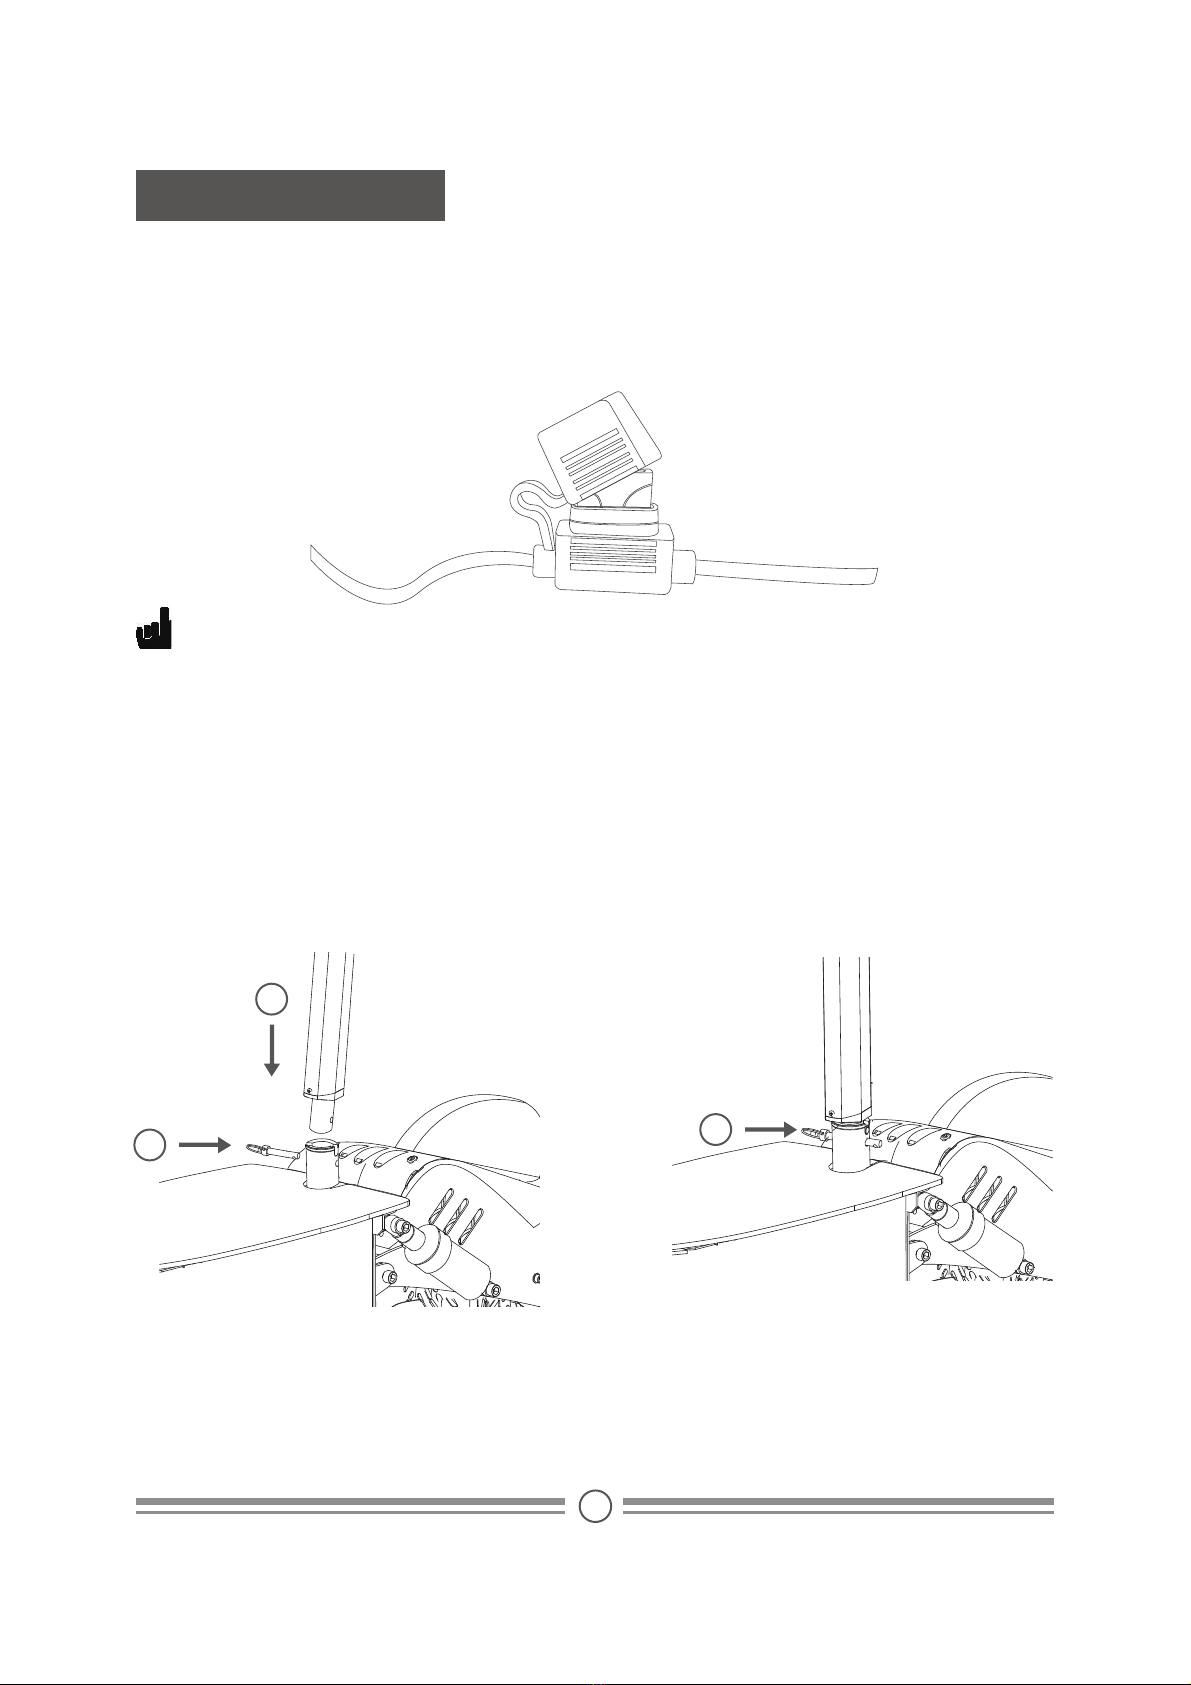
connecting the plug XT90 and XT60 to the controller device. Please disconnect the battery plug while you
replace or take out fuse. Please make sure the fuse insert the end of safe valve, or it may cause the
broken of fuse and safety valve after short driving.
7.2. Mount seat
Insert the seat post to bottom tube as ①. Dont forget put seat safe PIN as ②, safe PIN.was insert as ③NOTE
XT90 for rear motor controller, XT60 for front motor controller.
3
2
1

6
Place seat onto uper seat post and tighten screws .
In order to allow comfortable, fatigue -free and thus safe driving, the saddle height should be adjusted to
the height of the body. The toes must still be able to touch the ground. Release quick lever, determine
saddle height and clamp. The clamping force can be adjusted by adjusting the nut to the quick lever.
Warning
An unscrewed quick -release lever can be opened again.
This could allow the saddle to slide down during the ride.
Heavy falls can be the result.
7.3. Mount licence plate and plate light
Find licence plate and screws for fixing, tighten two screws (see arrow a) as follow picture shows. You will
find the light for licence plate on rear fork of scooter, then stick the light on plate.(see arrow b, the position
that stick plate light)
b
a

7.4. Fold
The seat must be removed before folding.
Make sure the ignition lock is on AUS.
After using the scooter, you can fold it for easier storage or transport. To do this, pull out safe PIN
firstly(safe PIN is on position of ①), and then face both sides of the scooter. Use your left hand to push
the hand post,(position ③) with your right hand simply pull the lever (position ②)back to collapse and
gently push the handlebars down, making sure you do not hurt yourself. Turn the handlebars over until
you feel the mechanism is pressed. In order to make scooter locked as foldable, make sure insert safe
PIN at position ④.
7.5. Sidebar
Attention in the case of unplugged main stands, the current is completely interrupted by a safety switch.
(as picture ①)This is for your safety and is mandatory for road traffic authorisation.
The roller can therefore only be driven with a high -tilted sidebar.
NOTE
The E -scooter can't drive until the sidebar is up as picture ②. Picture ①shows the situation of power-off
protection when sidebar touch floor.
7
2
1
4
3
12

7.6. Ignition
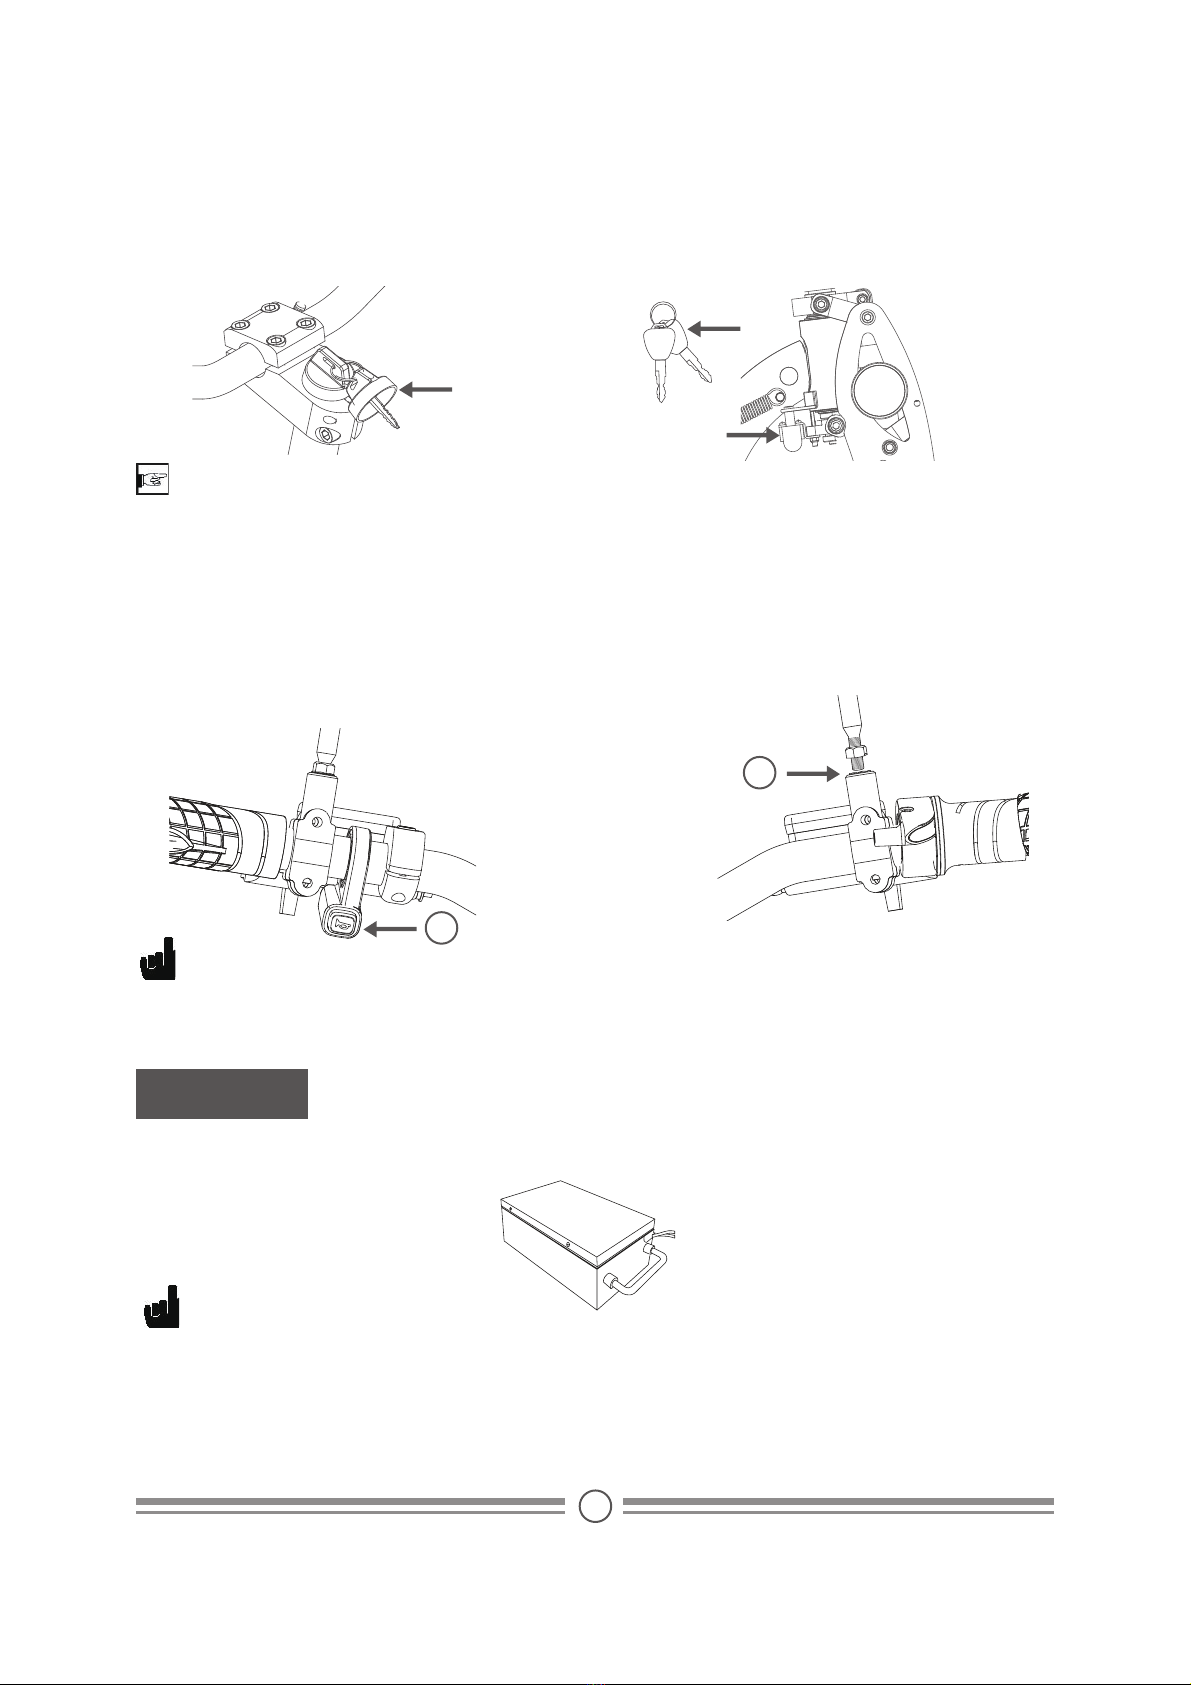
The delivery includes four keys.(two keys for ignition, two keys for steering lock)
Place the ignition key on position "1" so that the scooter is ready for use. Arrow a shows ignition key,
arrow b shows key for steering lock, arrow c shows position of steering lock.
7.7. Horn / Light / Mirror
The front and rear lights is power on when open ignition key
You'll find the Horn button on the left of handle bar.
You will find mirror holder on the left and right of brake level, fixing left and right mirror onto correct
position.
NOTE
Remember to take out key of steering lock whether steering lock is open or close, otherwise keys will be
easy lost.
8. Battery
8
NOTE
EEC street models without lights button, front and rear light must keep long bright status while ignition
key is power on as new EEC transport rules.
The EEC STREET models are equiped Lithium batteries with water-proof box.
NOTE
Important information that you should read before starting operations and which we strongly recommend:
-The batteries are charged to approximately 50% in the new state.
-The battery develops its maximum power after about five charging cycles.
- Turn off power firstly when mount or remove batteries
2
1
a
b
c

9
NOTE
-The battery and charger of FREERIDE X2 HUB are matched. Therefore, never charge the batteries with
a charger other than the supplied charger.
-The maximum battery life is achieved by charging them at ambient temperature between +10 degrees
and max. +30 degrees.
-The batteries can warm up when they are under heavy pressure. Please note room temperature before
loading.
NOTE
As a consumer, you are legally obliged to return used batteries and batteries to designated collection
points. You can drop your spent batteries and batteries at the public collection points in your municipality
or anywhere where batteries and batteries of that type are sold. Batteries and batteries don't belong in
in the trash.
8.1. Fuse
The battery system is protected by a plug -in fuse. Replacement fuses can be found in the supplied
toolbox if required. On the fuse you will find the specification printed.
8.2. Battery Capacity / Type
FREERIDE X2 HUB: 60V 20Ah Lithium batteries.
Use only the high quality original batteries of the same quality. If you need replacement batteries,
please contact your dealer.
8.3. Use of batteries
New batteries must always be fully charged the first five times. The more you charge your batteries, the
better. They save batteries if they are not discharged below 20% residual capacity. Never charge batter-
ies at minus degrees -let the batteries at minus degrees warm up to room temperature before charging
them. This considerably prolongs the service life.
8.4. Charging device
In order to prevent risks of injury, you must only charge the supplied and installed battery with the
charger.
Other batteries could explode if charged. The use of accessories or batteries that are not sold or recom-
mended by us may lead to fire risk, electric shock or other serious injuries.
In any case, avoid operating the charger in a humid or wet environment. Avoid any water entering the
device. If there is any liquid, disconnect the charger immediately from the mains and have it checked by
the specialist.
The device should be safe and level. Always disconnect the device from the mains if not in use. Never
pull on the cable, as this avoids cable damage and the risk of electrocution.
Never operate the charger with damaged cable or plug or with damage to the plastic housing. Do not
dismantle or open the charger yourself under any circumstances. Any manipulation or incorrect assembly
may result in an electric shock or fire.

Beliebte Roller Handbücher anderer Marken

First Choice Mobility
First Choice Mobility Roma Medical Corella S741 Bedienungsanleitung

Carrera
Carrera impel Bedienungsanleitung

Afikim
Afikim Superlight SL-3 Bedienungsanleitung

CareCo
CareCo ZOOM Bedienungsanleitung

Douglas
Douglas Vespa G.S. Bedienungsanleitung

Gazelle
Gazelle with BOSCH System Bedienungsanleitung