
German pool WVC-21DC Bedienungsanleitung
P.1
360° Multi-Oscillation Fan RHS-126
Please read these instructions and warranty information carefully
before use and keep them handy for future reference.
Online Warranty Registration
USER MANUAL
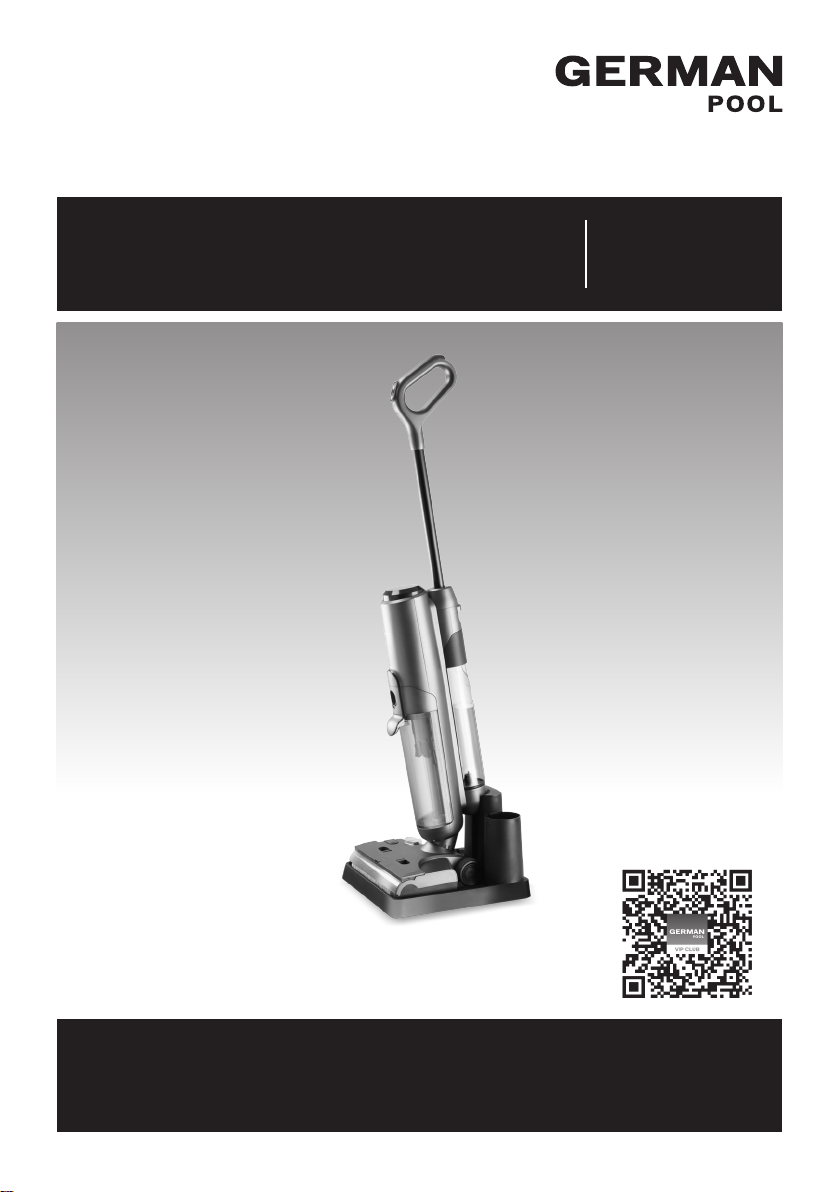
Cordless Wet & Dry Vacuum Cleaner WVC-21DC

P.2
請即進行保用登記﹗
有關保用條款細則,請看本說明書最後一頁。
Please register your warranty information now!
For Warranty Terms & Conditions,
please refer to the last page of this user manual.

P.3
Table of Contents
Warnings & Safety Precautions
Product Structure
Operation Instructions
Cleaning & Maintenance
Troubleshooting
Technical Specication
Warranty Terms & Conditions
04
07
08
12
13
15
27

P.4
Warnings & Safety Precautions
WARNING!
Read all instructions carefully before using this product.
• This product is for domestic indoor use only. If this product is used for any commercial, industrial,
rental or other purposes, product warranty will be VOIDED.
• This product is not intended for use by children or persons with reduced physical, sensory
or mental capabilities, or lack of experience and knowledge, unless they have been given
supervision or instruction concerning use of this product by an adult responsible for their safety.
• Mind your children and DO NOT let children play with this product.
• Cleaning and user maintenance shall not be made by children without supervision.
• Check the voltage indicated on the rating label before using this product.
• If the supply cord is damaged, it must be replaced by the manufacturer, its service agent or
similarly qualied persons in order to avoid hazards.
• Unplug this product from the power source before cleaning and maintenance.
• Contact German Pool authorized service technician for repair or maintenance of this product.
1. Before using this product, please read this user manual thoroughly, and assemble this product
according to the instructions in this manual. Please keep this manual for future reference.
2. Should you transfer this product to another person, please attach this manual for their use. Using
this product in any way other than that instructed in this manual may lead to product damage or
personal injury.
3. This product is only for indoor use in a domestic household, hotel, school or vehicle. DO NOT use
outdoor or in an industrial environment.
4. DO NOT let children or persons with reduced physical, mental or sensory capabilities use or
operate this product.
5. DO NOT let children play with this product; children should be supervised and kept away from this
product when it is being used.
6. To avoid injuries, DO NOT touch the plug or use this product with wet hands.
7. Regularly inspect to make sure the nozzle is free of obstructions; if nozzle is blocked, remove
blockage immediately to avoid diminishing in suction power and performance of this product.
8. Keep the air passage and operating parts of this product away from long hair, loose clothing,
nger or other body parts. DO NOT direct the vacuum tube, roller brush or accessories towards the
eye, ear or mouth.
9. When using this product, if you detect power leakage, motor overheating, abnormal noises,
abnormal odors, or if you nd that the product is overly hot or there is a lack of suction power,
stop using this product immediately and contact German Pool Customer Service & Repair Centre
for inspection.
10. When charging this product, use only the charging adaptor that comes with this product. Using
generic adaptors may damage the battery or cause an extreme thermic effect.
11. If this product will not be used for a prolonged period of time, please run the Self Clean Mode
then turn off the power and unplug the product from the socket.

P.5
12. The main body and the oor brush of this product contain electrical parts, DO NOT rinse or
immerse in water.
13. Make sure to turn off the product before changing the roller brush.
14. In case of product malfunction, DO NOT repair this product by yourself. Contact German Pool
Customer Service & Repair Centre for assistance.
15. All technical and other information reected in this product manual are obtained by our company
or designated testing organizations, and German Pool reserves the right of nal interpretation.
Scope Of Use Of This Product
1. This product is suitable for using on smooth and level hard oors including waxed ooring, stone
ooring, vinyl ooring, marble ooring, granite ooring, terrazzo ooring, hardwood ooring,
laminate ooring, bamboo ooring, marley ooring, ceramic tile, etc. in an indoor environment.
Optimal results may not be achieved when this product is used on uneven surfaces.
2. DO NOT use this product near ammable or explodable objects or surfaces, as it may lead to re
hazards or explosion.
3. DO NOT use this product near an operating replace or heater, as it may lead to deformation of
the product casing.
4. DO NOT use this product to vacuum hot substances (such as an unextinguished cigarette butt,
match, hot ash, etc.), ne particles (such as limestone, cement, sawdust, plaster, ash, powder,
etc.), dangerous substances (such as solvent, descaling agent, etc.), chemical substances
(such as acidic substance, cleaning agent, etc.) and other substances with uncertain physical
properties.
5. DO NOT use this product to vacuum cleanser, kerosene, gasoline, alcohol, paint, perfume, etc. as
these liquids may catch re or explode.
6. DO NOT use this product to vacuum sharp items (such as glass fragment, small toy, pin, paper
clip, rock, plaster, large clump of paper, etc.) as they may cause blockage and product damage.
7. DO NOT use this product to vacuum any burning or smoking substance such as unextinguished
ash, cigarette butt or match.
8. Heavily greased substance, thick and sticky substance or strong staining substances (such as
shoe polish, paint, and dye) are all outside this product’s scope of use.
About This Product
1. DO NOT disassemble this product’s sealed parts. This product does not contain parts that users
can repair by themselves. DO NOT attempt to retrot this product as it may lead to danger.
2. Using with a voltage that does not correspond to the specication of this product will damage the
motor and may even lead to personal injury.
3. The correct rated voltage is indicated on the rating label of this product.
4. Be extra careful when cleaning the stairs.
5. To clean this product, wipe with a dry cloth. DO NOT use chemical solvents such as gasoline,
alcohol, benzene etc. to clean this product as it will cause the casing to crack.
Warnings & Safety Precautions

P.6
6. DO NOT place this product on the table top or other high places to prevent it from falling onto the
oor.
7. To prevent dirty water entering the motor, DO NOT shake this product up and down or bump it
violently against hard surfaces.
8. To prevent dirty water entering the motor, DO NOT lift or transfer this product when the motor is
running, and DO NOT tilt this product sideways or lay it at.
9. To prevent tripping over this product, place it against the wall in its vertical position when it is not
in use.
10. If the dirty water tank or clean water tank is not tted in properly, please t them in properly
according to the “Installation Instructions” section of this user manual.
11. DO NOT allow the main body of this product to get wet, otherwise it may cause the product to
short circuit and lead to re or electrical shock or discoloration or the product.
About Cleaning Solutions
1. If too much cleaning solution is added into the clean water tank, it will generate a vast amount of
foam which may seep into the motor and cause danger.
2. Cleaning solution must be formulated according to the instructions on the cleanser product label.
It is recommended to use only cleaning solutions approved by the manufacturer of this product,
and the cleanser should not contain acidic or alkaline solution or substances harmful to the
environment.
3. The cleaning solution must be kept out of reach of children. If cleaning agent accidentally gets
into the eyes, rinse thoroughly with clean water. If accidentally swallowed, seek medical attention
immediately.
4. Please follow your local environmental regulations when discarding dirty water or cleaning
solution.
Warnings & Safety Precautions
P.7
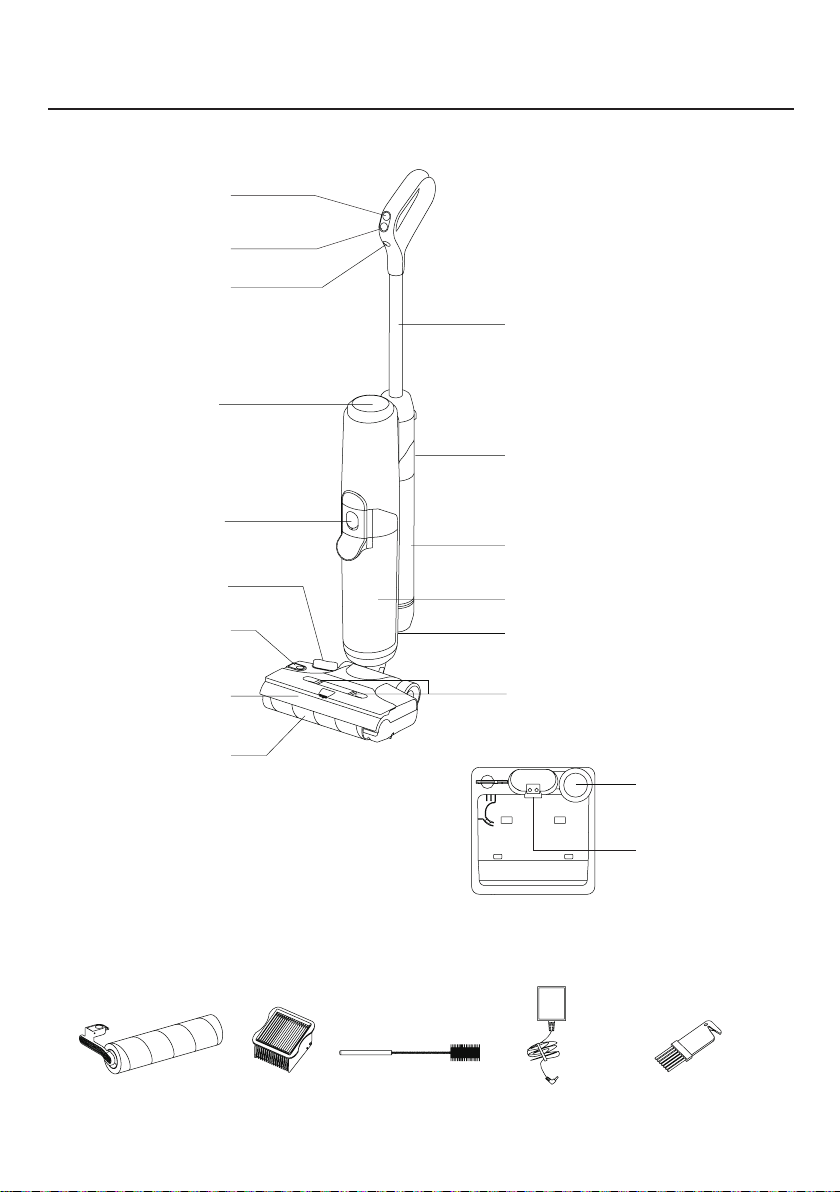
Product Structure
Main Body
Accessories
On/Off Button
Handle
LED Display
Dirty Water Tank
Release Button
Floor/Carpet
Mode Button
Roller Brush
Release Button
Roller Brush Cover
Roller Brush
Clean Water Tank
Release Button
Clean Water Tank
Dirty Water Tank
Charging Port
Roller Brush
Drying Tube
Charging Port
Roller Brush Cover
Release Button
Low/High Suction
Mode Button
Self Clean Button
Roller Brush HEPA Filter Lint Brush & Detangle
Cutter
Cleaning Brush Power Adaptor
Docking Station

P.8
Operation Instructions
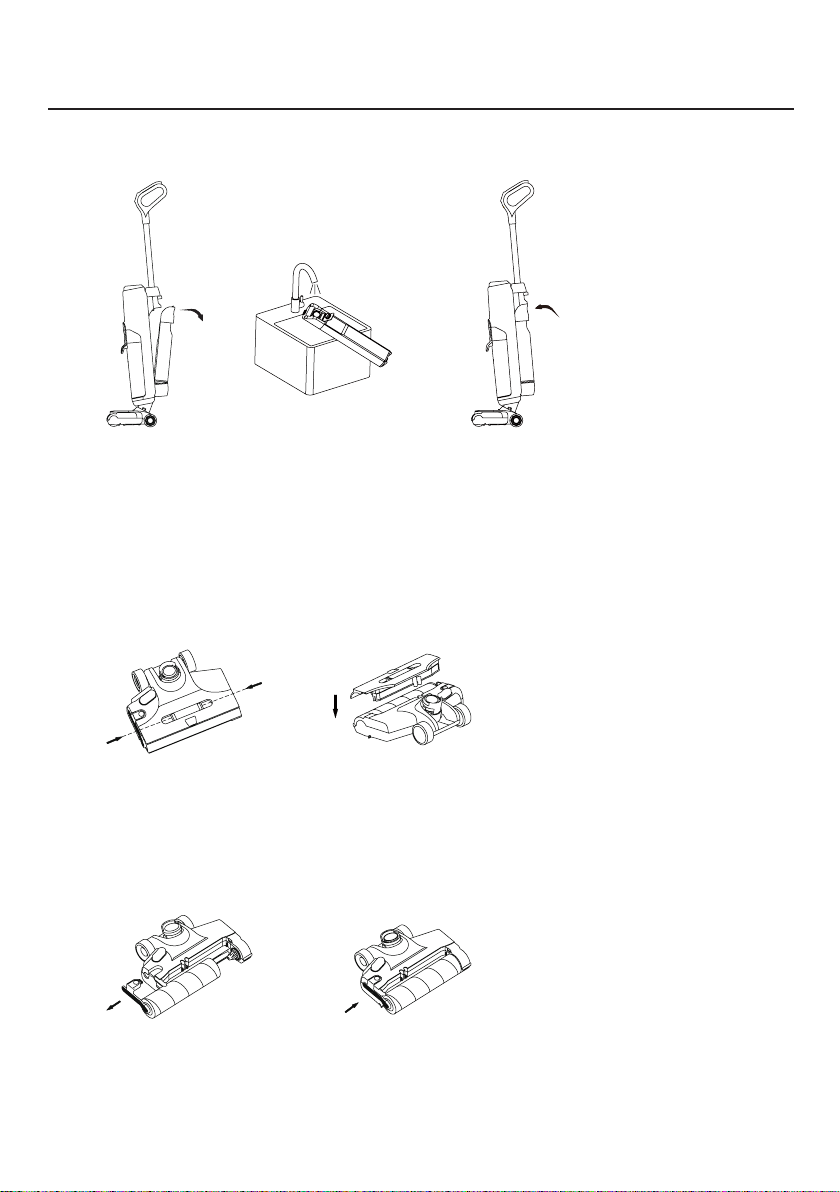
Attaching/Detaching The Handle
Attaching the handle: (Diagram 1) Line the end of the handle with the slot on the main body, insert it
vertically downwards until you hear a click and the handle is locked in place.
Detaching the handle: (Diagram 2) Push a small hard object into the release hole, and pull the handle
vertically upwards.
Attaching/Detaching The Dirty Water Tank
Detaching the dirty water tank: (Diagram 3) Hold the handle of the dirty water tank, press the release
button and gently pull out the tank.
Pouring out the dirty water: (Diagram 4) Take out the HEPA lter and the water tank lid in order, pour
out the water, then replace the lid and HEPA lter.
Attaching the dirty water tank: (Diagram 5) Line the bottom of the dirty water tank with the slot on the
main body, gently push in the water tank until you hear a click and the tank is locked in place.
Release Hole
Diagram 1
Diagram 3 Diagram 5
Diagram 2
Diagram 4
HEPA Filter
Water Tank Lid
P.9
Operation Instructions
Attaching/Detaching The Clean Water Tank
Detaching the clean water tank: (Diagram 6) Hold the handle of the clean water tank, press the
release button and gently pull out the tank.
Adding water to the clean water tank: (Diagram 7) Take out the clean water tank, ip open the tank lid,
rell with clean water and close the lid.
Attaching the clean water tank: (Diagram 8) Line the bottom of the clean water tank with the slot on
the main body, gently push in the water tank until you hear a click and the tank is locked in place.
Attaching/Detaching The Roller Brush Cover
Detaching the roller brush cover: (Diagram 9) Press both sides of the roller brush cover release button
inwards, and vertically lift up the cover.
Attaching the roller brush cover: (Diagram 10) Line the roller brush cover with the slot on the main
body, and vertically press down until you hear a click and the cover is locked in place.
Attaching/Detaching The Roller Brush
Detaching the roller brush: (Diagram 11) Detach the roller brush cover, press the roller brush release
button and horizontally pull out the roller brush.
Attaching the roller brush: (Diagram 12) Detach the roller brush cover, insert the roller brush
horizontally into the slot until you hear a click and the roller brush is locked in place.
Diagram 6 Diagram 7 Diagram 8
Diagram 9
Diagram 11
Diagram 10
Diagram12
P.10
Operation Instructions
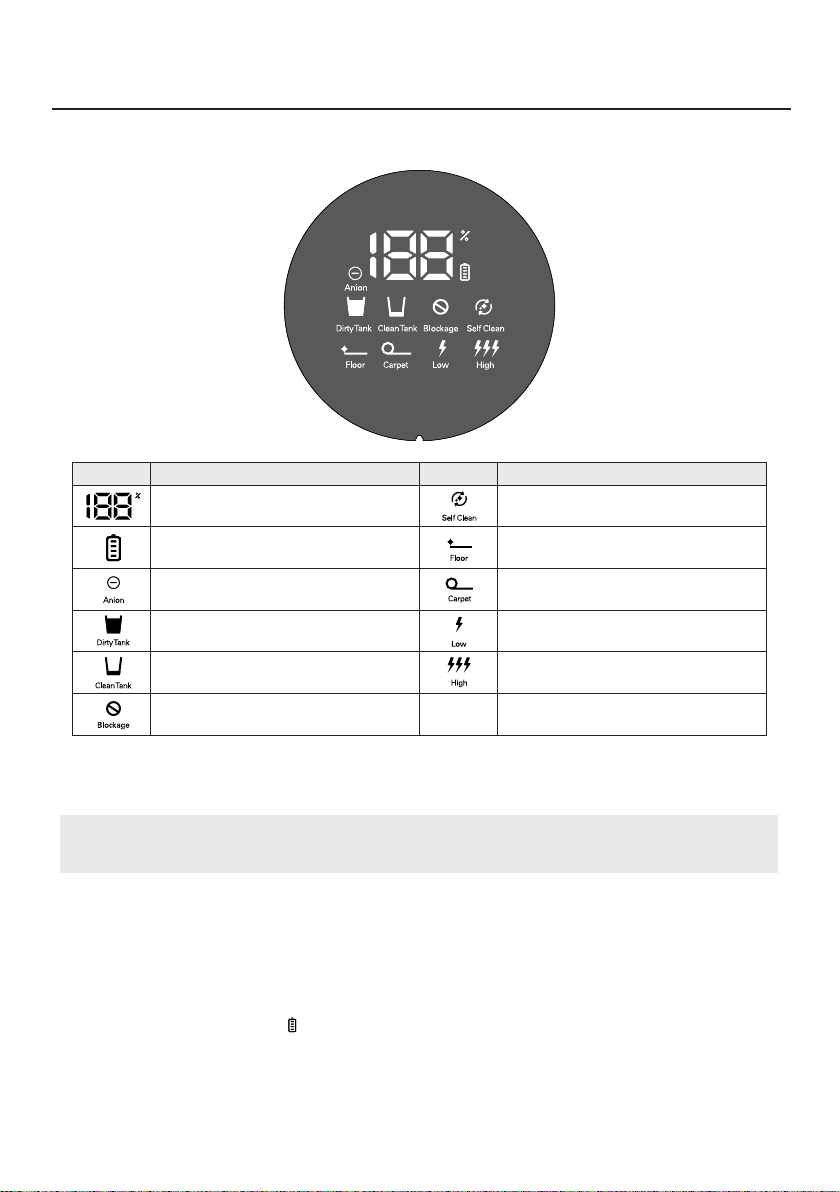
Icon Description DescriptionIcon
Battery Power Percentage Self Clean Indicator Light
Charging Indicator Light Floor Mode Indicator Light
Anion Indicator Light Carpet Mode Indicator Light
Dirty Water Tank Full Indicator Light Low Suction Mode
Clean Water Tank Empty Indicator
Light High Suction Mode
Roller Brush Indicator Light
Charging The Battery
Note:
The product must be fully charged before using for the rst time.
1. Plug the docking station to the power source (power adaptor interface is located on the back of
the docking station).
2. Place the product on the docking station. Make sure the charging port on the back of the product
sits properly on the docking station’s charging port .
3. When the product is charging, the LED display will show the current battery power percentage,
and the charging indicator will blink in blue.
Control Panel
Inhaltsverzeichnis
Andere German pool Staubsauger Handbücher


Beliebte Staubsauger Handbücher anderer Marken

Bissell
Bissell LittleGreen Proheat 1425 Series Bedienungsanleitung

Panasonic
Panasonic MC-YL637S147-AE Bedienungsanleitung

NEFF
NEFF N17XH10 0 Series Bedienungsanleitung

LG
LG A9 Series Bedienungsanleitung

Oreck
Oreck Cordless Captura BK51700 Series Bedienungsanleitung

Kogan
Kogan KAVACROBVWA Bedienungsanleitung


