
GoFit Platinum GFELP01 Bedienungsanleitung
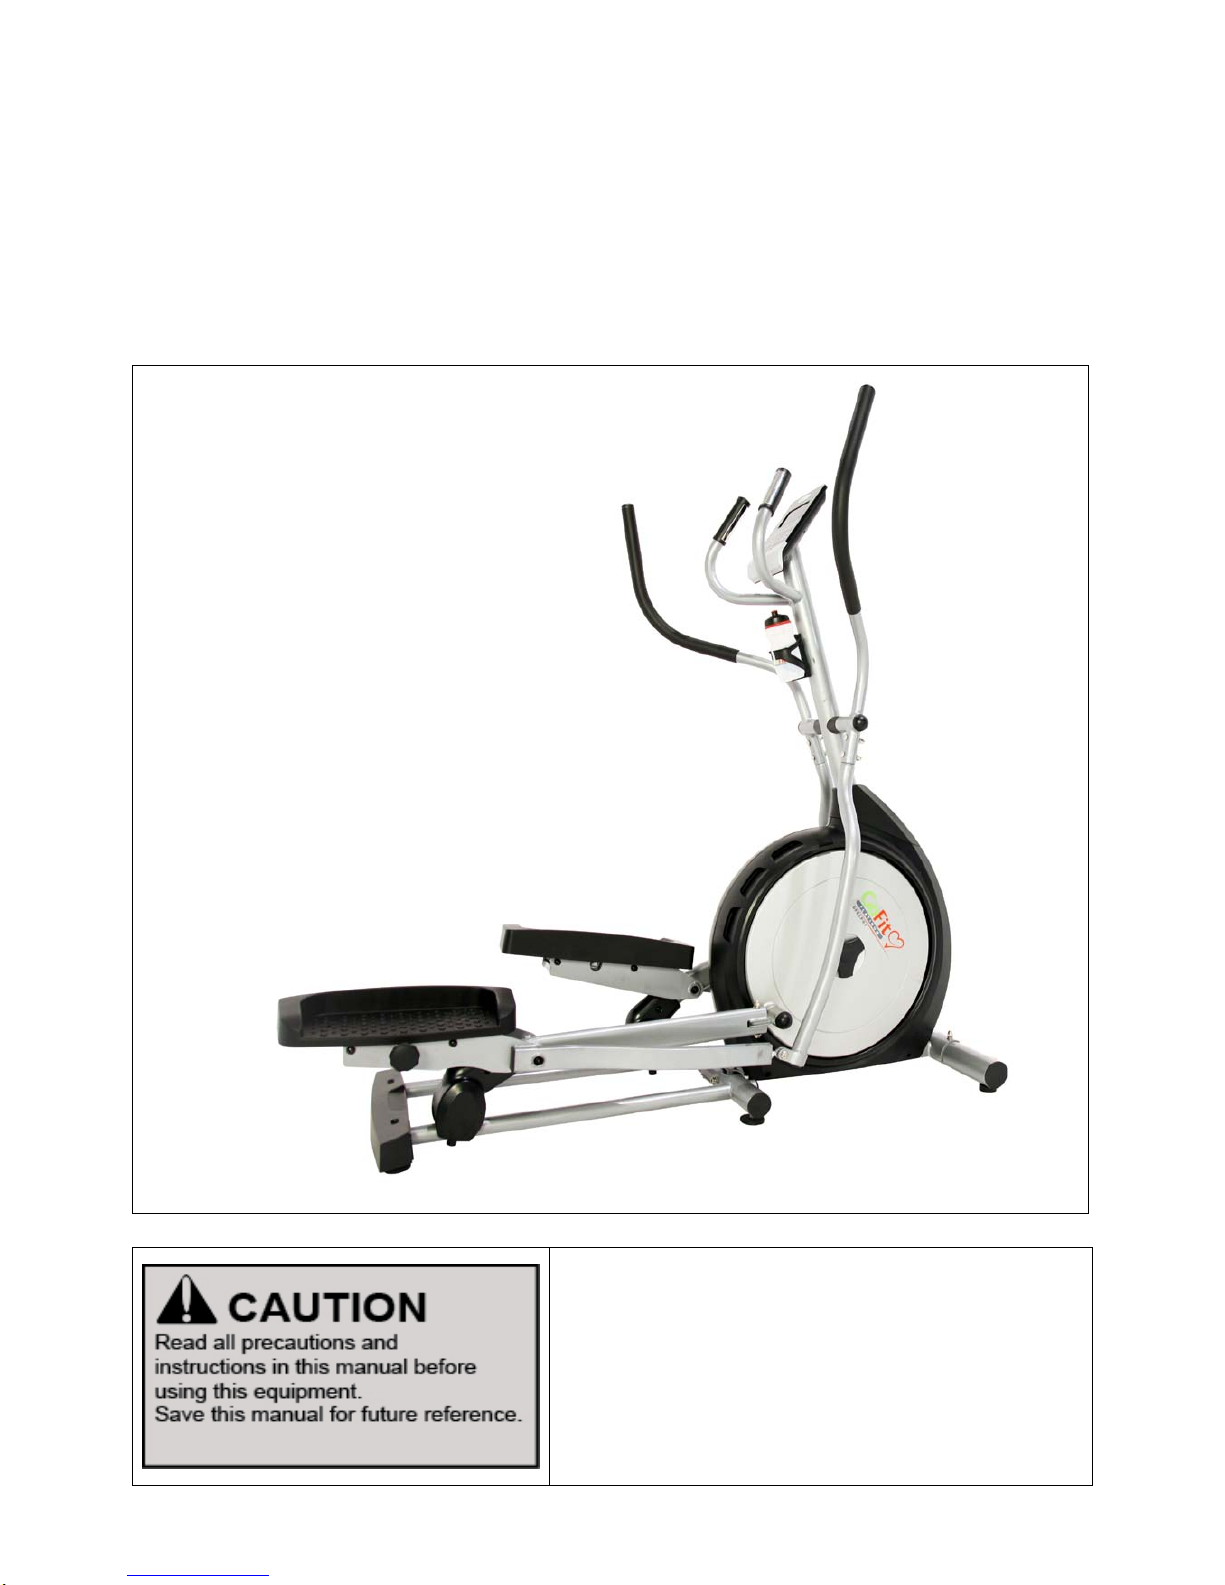
GoFit Platinum Cross Trainer
GFELP01
GoFit Platinum Pty Ltd
Phone 1800 446 348 fax 1300 446 348
www.gofit.com.au


IMPORTANT PRECAUTIONS
When using an electrical appliance, the basic following precautions should always be followed:
Read all instructions before using this equipment
DANGER – To reduce the risk of electric shock:
Always unplug this appliance from the electrical outlet immediately after using and before cleaning.
WARNING– To reduce the risk of burns, fire, electric shock, or injury to persons:
1) An appliance should never be left unattended when plugged in.
Unplug from outlet when not in use and before adding or removing parts.
2) Do not operate under a blanket or pillow.
Excessive heating can occur and cause fire, electric shock, or injury.
3) Close supervision is necessary when this appliance is used by, or near children and disabled persons.
4) Use this appliance only for its intended use as described in this manual.
Do not use attachments not recommended by the manufacturer.
5) Never operate this appliance if it has a damaged cord or plug, if it is not working properly, if it
has been dropped or damaged, or dropped into water.
In this case, return the appliance to GoFit Platinum for inspection.
6) Do not carry this appliance by supply cord or use cord as a handle.
7) Keep the cord away from heated surfaces.
8) Never operate the appliance with the air openings blocked.
Ensure air openings are always free of debris.
9) Never drop or insert any object into any opening.
10) Do not use outdoors.
11) Do not operate where aerosol (spray) products are being used or where oxygen is being
administered.
12) To disconnect, turn all controls to the off position, then remove plug from outlet.
13) Do not use this machine with an extension cord.

SAFETY INSTRUCTIONS
Before you start training on your fitness equipment, please read the instructions carefully.
This exerciser is made for home use only and is tested up to a maximum body weight of 110 kg.
Do not use this Cross Trainer in any commercial, rental, or institutional setting.
Follow the steps of the assembly instructions carefully.
Use only the original parts as delivered.
Before the assembly, ensure the delivery is complete by checking the included parts list.
For assembly, use only suitable tools and ask for assistance if necessary.
Place the exerciser on a flat, stable base, and non-slippery surface. You will need levelling for an
uneven floor. Because of possible corrosion, the use of any exerciser in moist areas is not
recommended. Keep the GoFit Platinum Cross Trainer indoors, away from moisture and dust.
Do not put the GoFit Platinum Cross Trainer in a garage or covered patio, or near water.
Make sure before each use that you have enough space around the equipment (at least 1 meter)
so that you clear of potential obstructions ie. walls and surrounding furniture.
Check before the first training session and every 1-2 months to follow that all connecting
elements are tight fitting and in good condition.
WARNING: The safety level of this exerciser can be maintained only if it is examined regularly
for damage and wear.
Replace defective components immediately and keep the equipment out of use until repair.
For repairs, use only original spare parts and when in doubt, ask your dealer for advice.
Avoid the use of aggressive detergents when cleaning.
Ensure that training starts only after correct assembly and inspection. For all adjustable parts be
aware of the maximum positions to which they can be adjusted/tightened to.
This equipment is designed for adults. Please ensure that children (under 14) use the equipment only
under the supervision of an adult. Important: Keep unsupervised children away from the equipment.
Ensure that those present are aware of possible hazards, eg. movable parts during training.
Only one person is permitted to use this equipment at the same time.
Do not use this exerciser while eating, drinking, or smoking.
DANGER:
Always unplug the power cord immediately after use, before cleaning the exerciser and before
performing the maintenance and adjustment procedures described in this manual.
Never leave the equipment unattended while it is running.
Please follow the advice for correct training as detailed in training instructions.
If you experience any sickness, pain or other symptoms, stop exercising immediately.
Pregnant woman should have their exercise program consulted and approved by their doctor.
WARNING: Before beginning this or any exercise program, consult your
physician. This is especially important for persons over the age of 35 or
persons with pre-existing health problems. Read all instructions before using.
All data displayed are approximate guidance and cannot be used in any medical application.
SAVE THESE INSTRUCTIONS
2
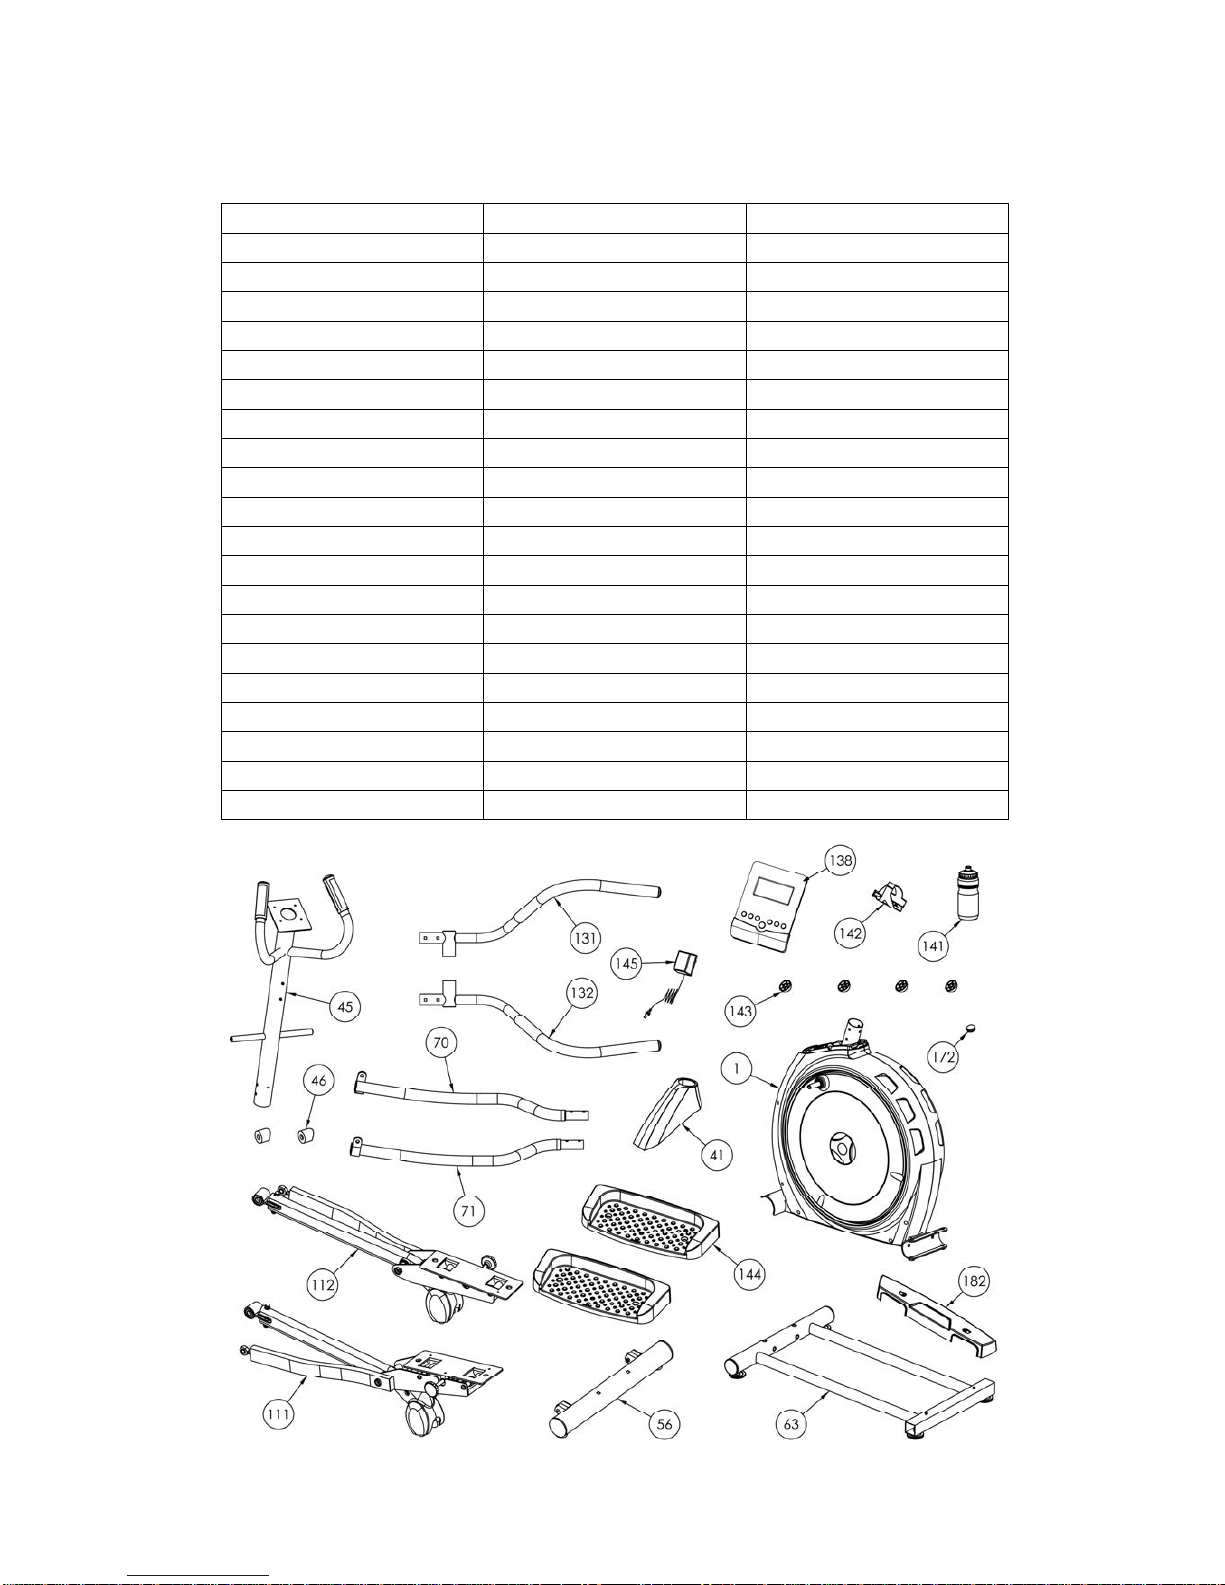
PRE-ASSEMBLY CHECK LIST
ITEM# DESCRIPTION QTY
1. Frame 1
41. Upper Frame Cover 1
45. Upright 1
46. Cover 2
56. Front Stabilizer 1
63. Rear Stabilizer 1
70. Left Rocker 1
71. Right Rocker 1
111. Pedal Assembl
y
(
L
)
1
112. Pedal Assembl
y(
R
)
1
131. Left Handrail 1
132. Right Handrail 1
138. Computer 1
141. Bottle 1
142. Bottle Holder 1
143. Screw Cove
r
4
144. Pedal 2
145. Adapter 1
172. Lubricant 1
182. Rear Stabilizer Cover 1
3
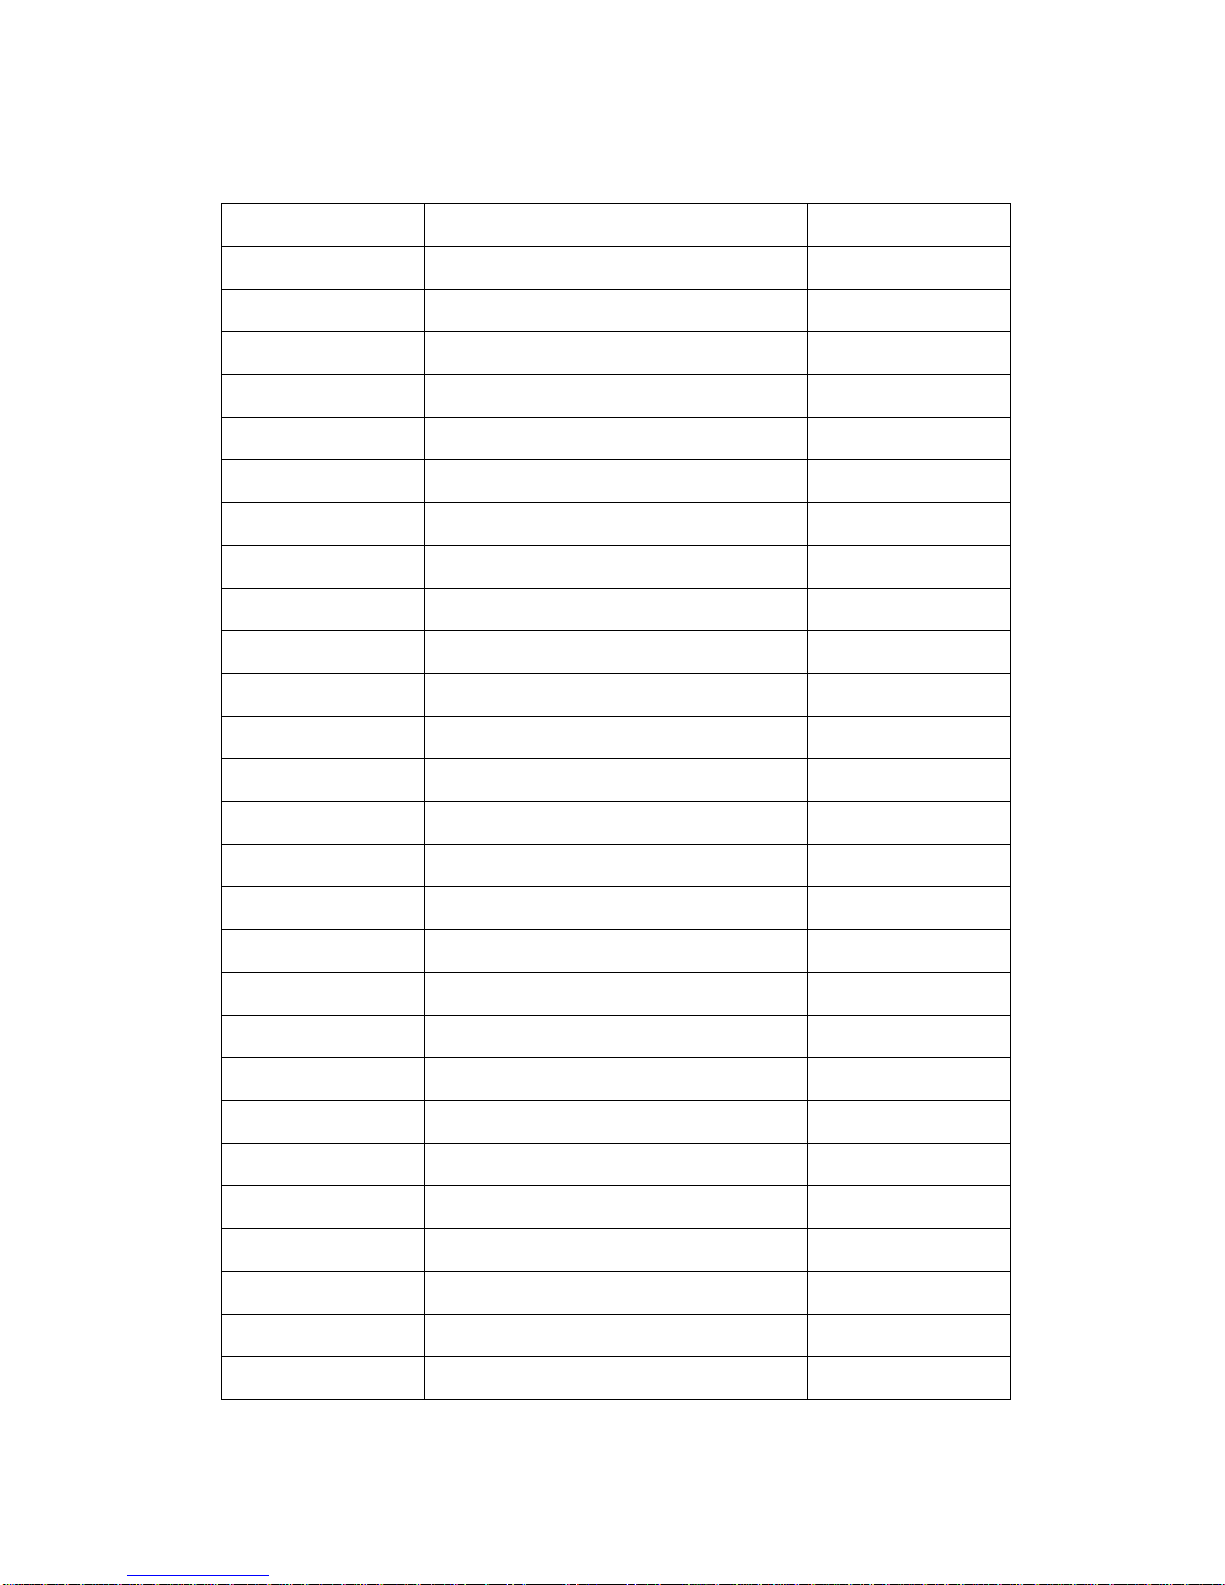
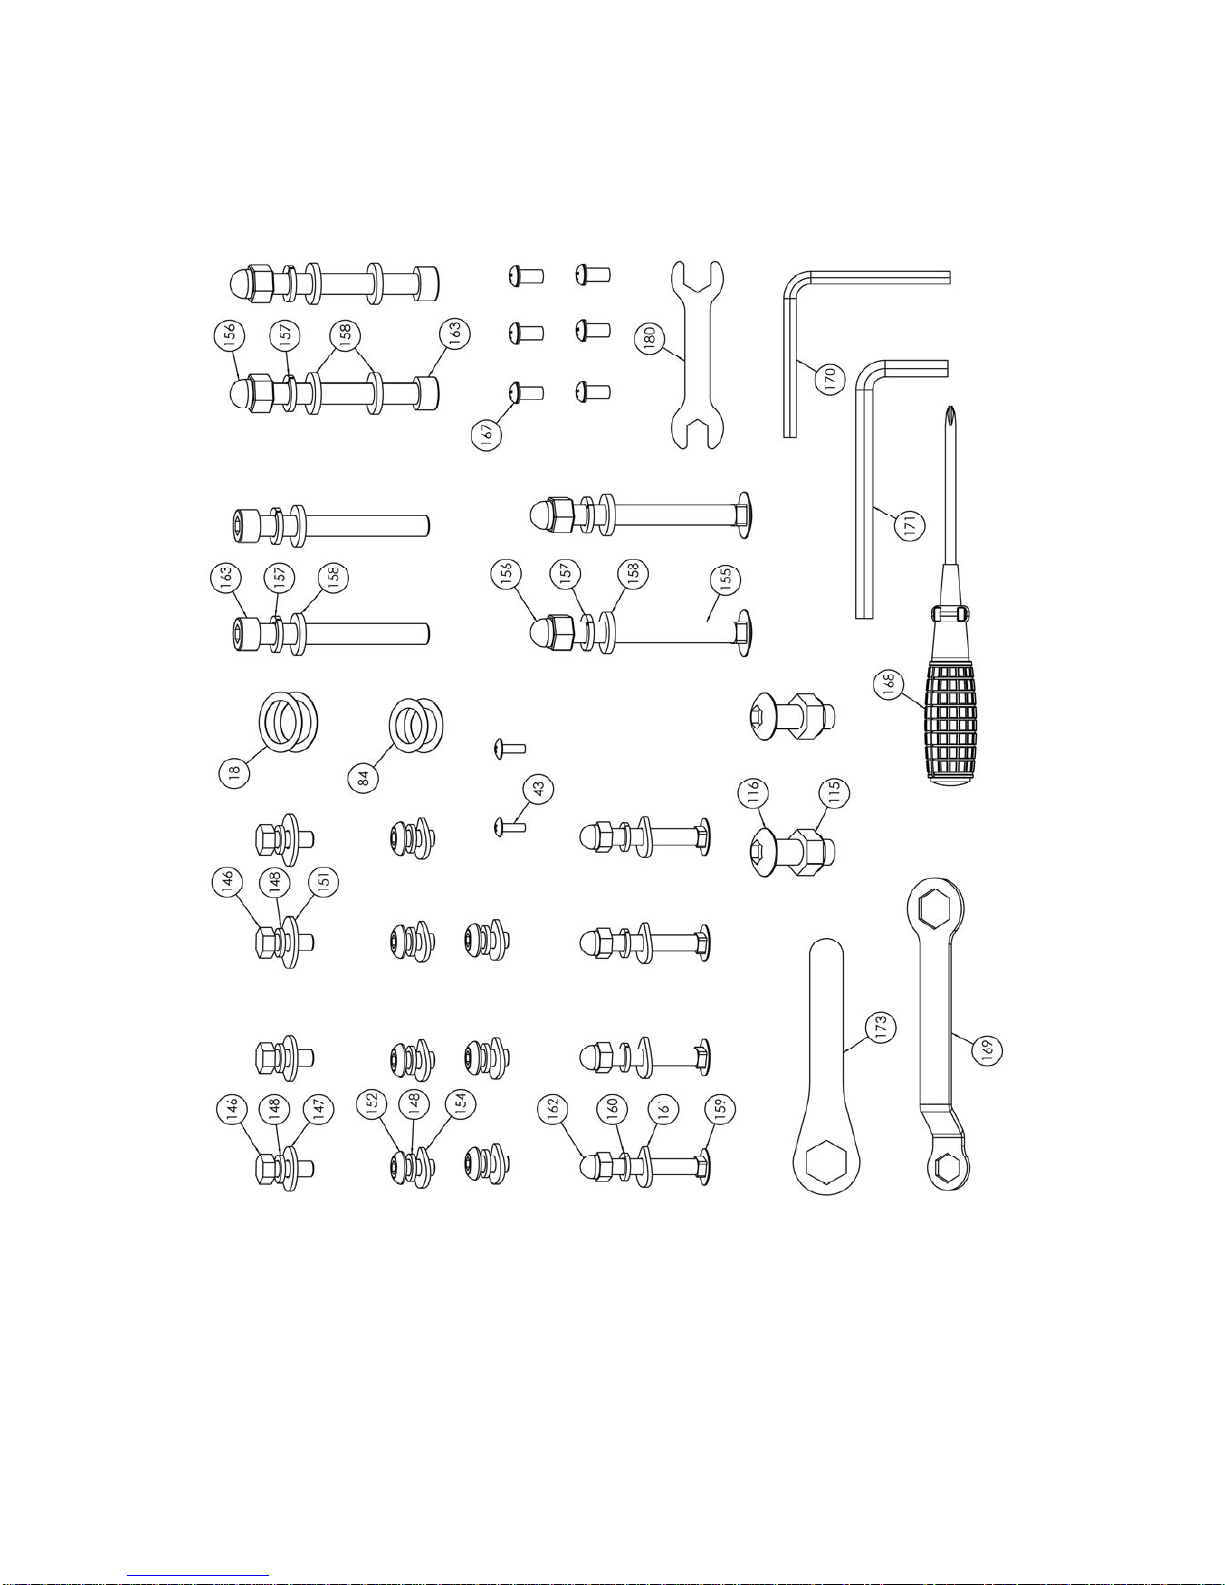
PRE-ASSEMBLY CONTINUED
ITEM# DESCRIPTION QTY
18. Wave Washer Ø29xØ21x0.35t 2
43. Truss Philips Screw M4x12 2
84. Wave Washer Ø17.5xØ26x0.3t 2
115. Nylon Nut M12 2
116. Truss Hex Screw M12X35 2
146. Allen Bolt M8x20 4
147. Washer Ø22xØ9x2t 2
148. Spring Washer M8x2.0t BK 11
151. Washer Ø25xØ9x2.0t 2
152. Truss Hex Screw M8x15 7
154. Arc Washer BK 7
155. Truss Carriage Screw M10x95 2
156. Acorn Nut M10 4
157. Spring Washer M10x3.0t 6
158. Washer Ø20xØ10.2x3t 8
159. Truss Carriage Screw M8x50 4
160. Spring Washer M8x2.0t Nickel Plating 4
161. Arc Washer Nickel Plating 4
162. Acorn Nut M8 4
163. Hex Screw M10x85 4
167. Round Head Philips Screw M6x12 6
168. Screwdriver 1
169. Lug Wrench (13, 17 sides) 1
170. Hex Wrench 6mm 1
171. Hex Wrench 8mm 1
173. Lug Wrench (19 sides) 1
180. Open Spanner (10, 13 sides) 1
4
Assembly Screws
5
ASSEMBLY INSTRUCTIONS
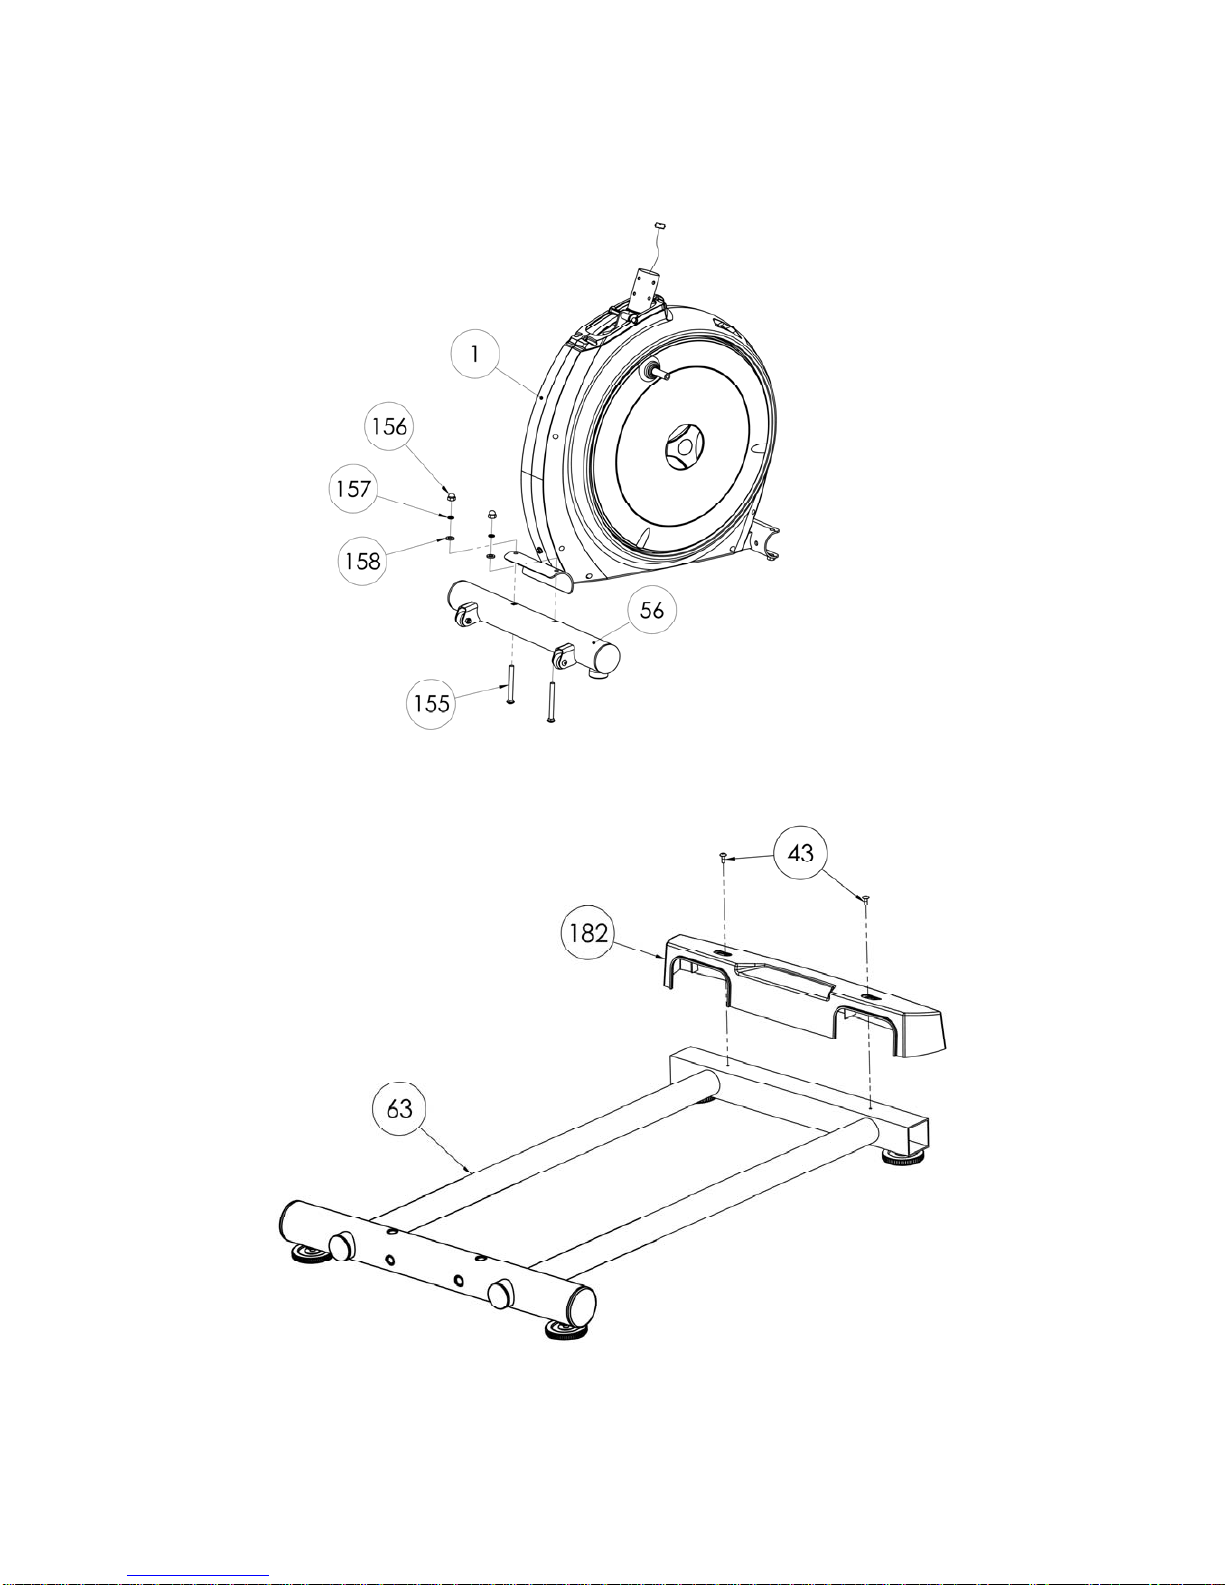
1. Assemble Front Stabilizer (#56) to Frame (#1) with Screw (#155), Washers (#157,158)
and Acorn Nut (#156).
2. Assemble Rear Stabilizer Cover (#182) to Rear Stabilizer (#63) with Screw (#43).
6
ASSEMBLY INSTRUCTIONS
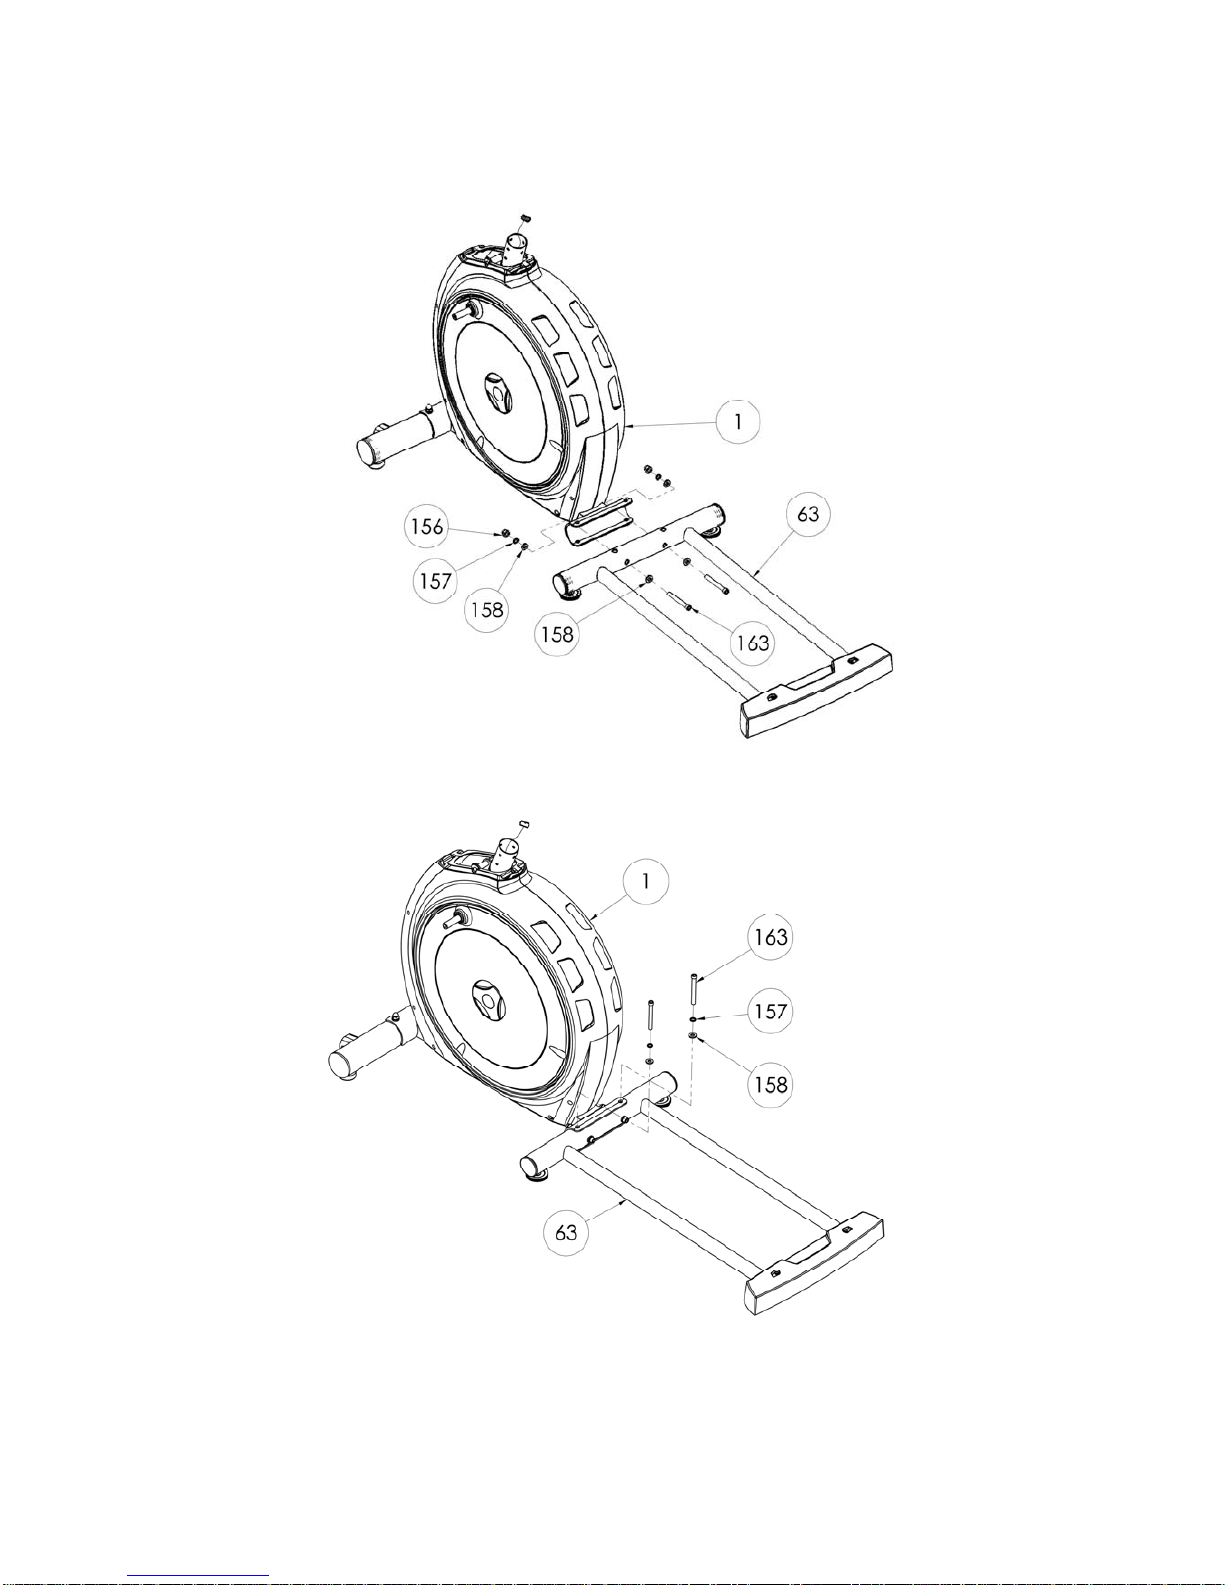
3. Assemble Rear Stabilizer (#63) to Frame (#1) with Screw (#163), Washers (#157,158)
and Acorn Nut (#156). Don't tighten the screws first.
4. Tighten Rear Stabilizer (#63) and Frame (#1) with Screw (#163) and Washers (#157,
158) and then tighten screws in step 3. When using, daub some Lubricate (#172) onto orbit
of Rear Stabilizer.
7
ASSEMBLY INSTRUCTIONS
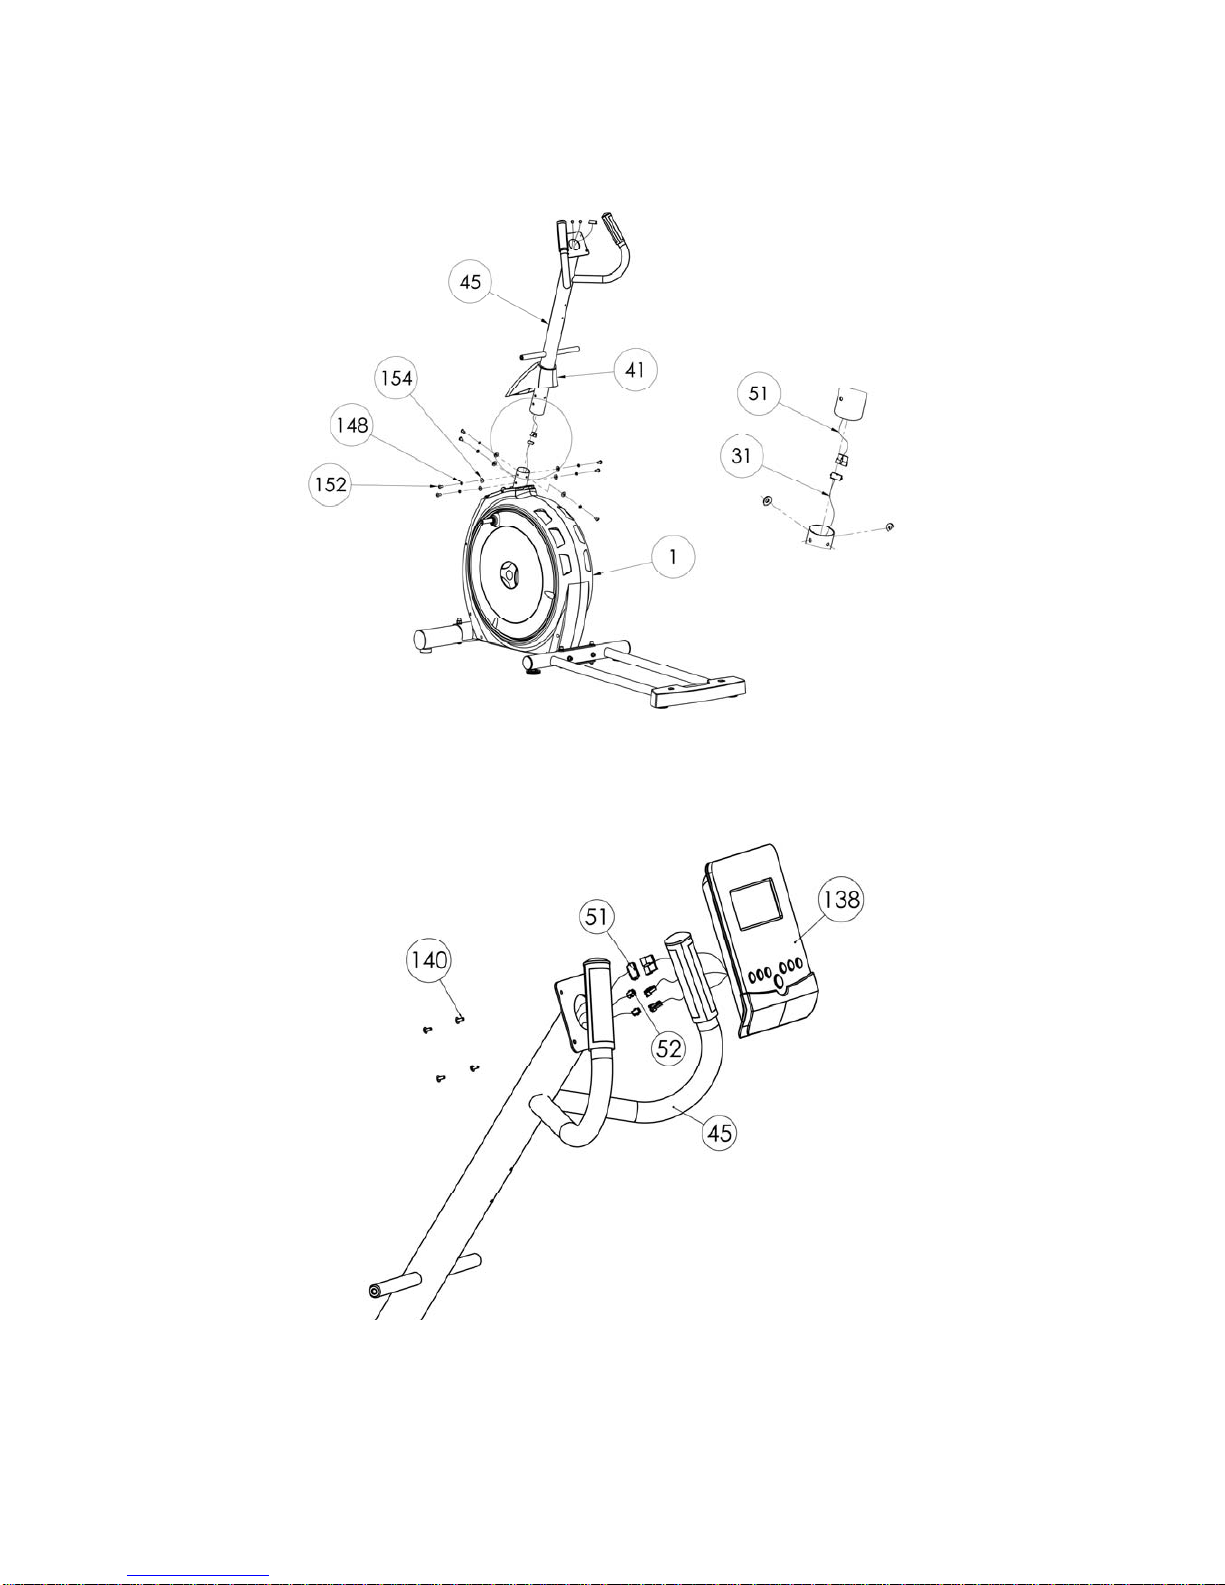
5. Set Upper Frame Cover (#41) on Upright (#45) and connect Upper Controller Wire (#51)
with Middle Controller Wire (#31). Attach Upright to Frame (#1) with Screw (#152) and
Washers (#148, 154).
6.Insert Upper Control Wire (#51) into back tie-in of the Computer (#138). Connect Hand
Pulse Wire(52) and Wires of the computer and fix the computer to the upright (45) with
screw(140)
Inhaltsverzeichnis
Beliebte Ellipsentrainer Handbücher anderer Marken

Weslo
Weslo Momentum 4.0 Elliptical Bedienungs- und Wartungshandbuch

Progear Fitness
Progear Fitness Air elliptical pro 1307 Bedienungsanleitung

Torque Fitness
Torque Fitness XPLLP Bedienungsanleitung

Octane Fitness
Octane Fitness PRO3700C Bedienungsanleitung

Xterra
Xterra FS5.8e Bedienungsanleitung

Bodyguard
Bodyguard E-40 Bedienungsanleitung

Bonn Germany
Bonn Germany Concept 2.2 Bedienungsanleitung

Precor
Precor Resolute RSL 620 Bedienungsanleitung

NordicTrack
NordicTrack E 9.2 Elliptical Bedienungsanleitung

Vision Fitness
Vision Fitness X6600iNetTV Bedienungsanleitung

Matrix
Matrix MX-A5x Bedienungsanleitung

SportsArt Fitness
SportsArt Fitness ECO-NATURAL Elite E874 Bedienungsanleitung


