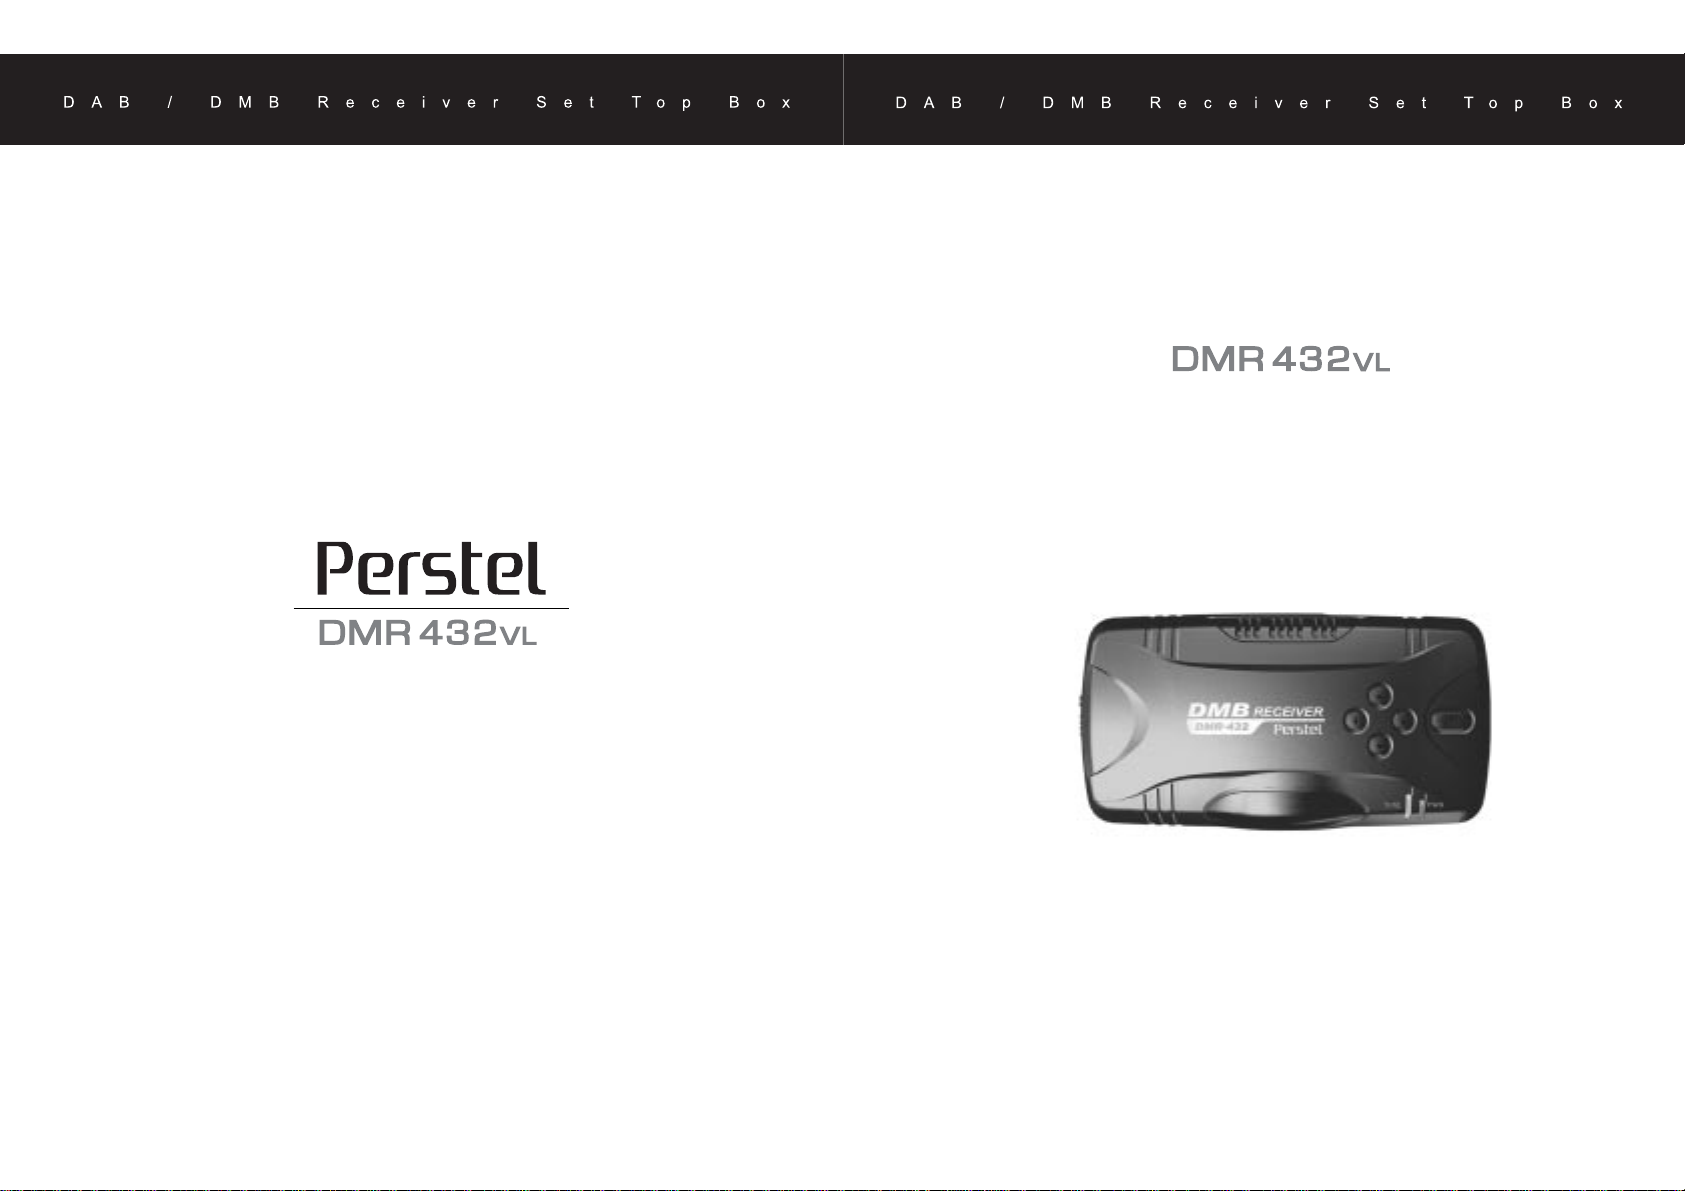
Perstel DMR 432VL Bedienungsanleitung

User's Manual
T-DMB Receiver
Thanks for purchase of Perstel DMB Receiver.
Please read User’s Manual before use.

Before use
Safety precautions 02
Safety precautions
Safety precautions
Before use
Safety precautions
01
Please read this User's Manual carefully for safe and convenient drive.
Manufacturer is not responsible for material, mental and/or physical damages when safety pre-
cautions stated herein are not kept.
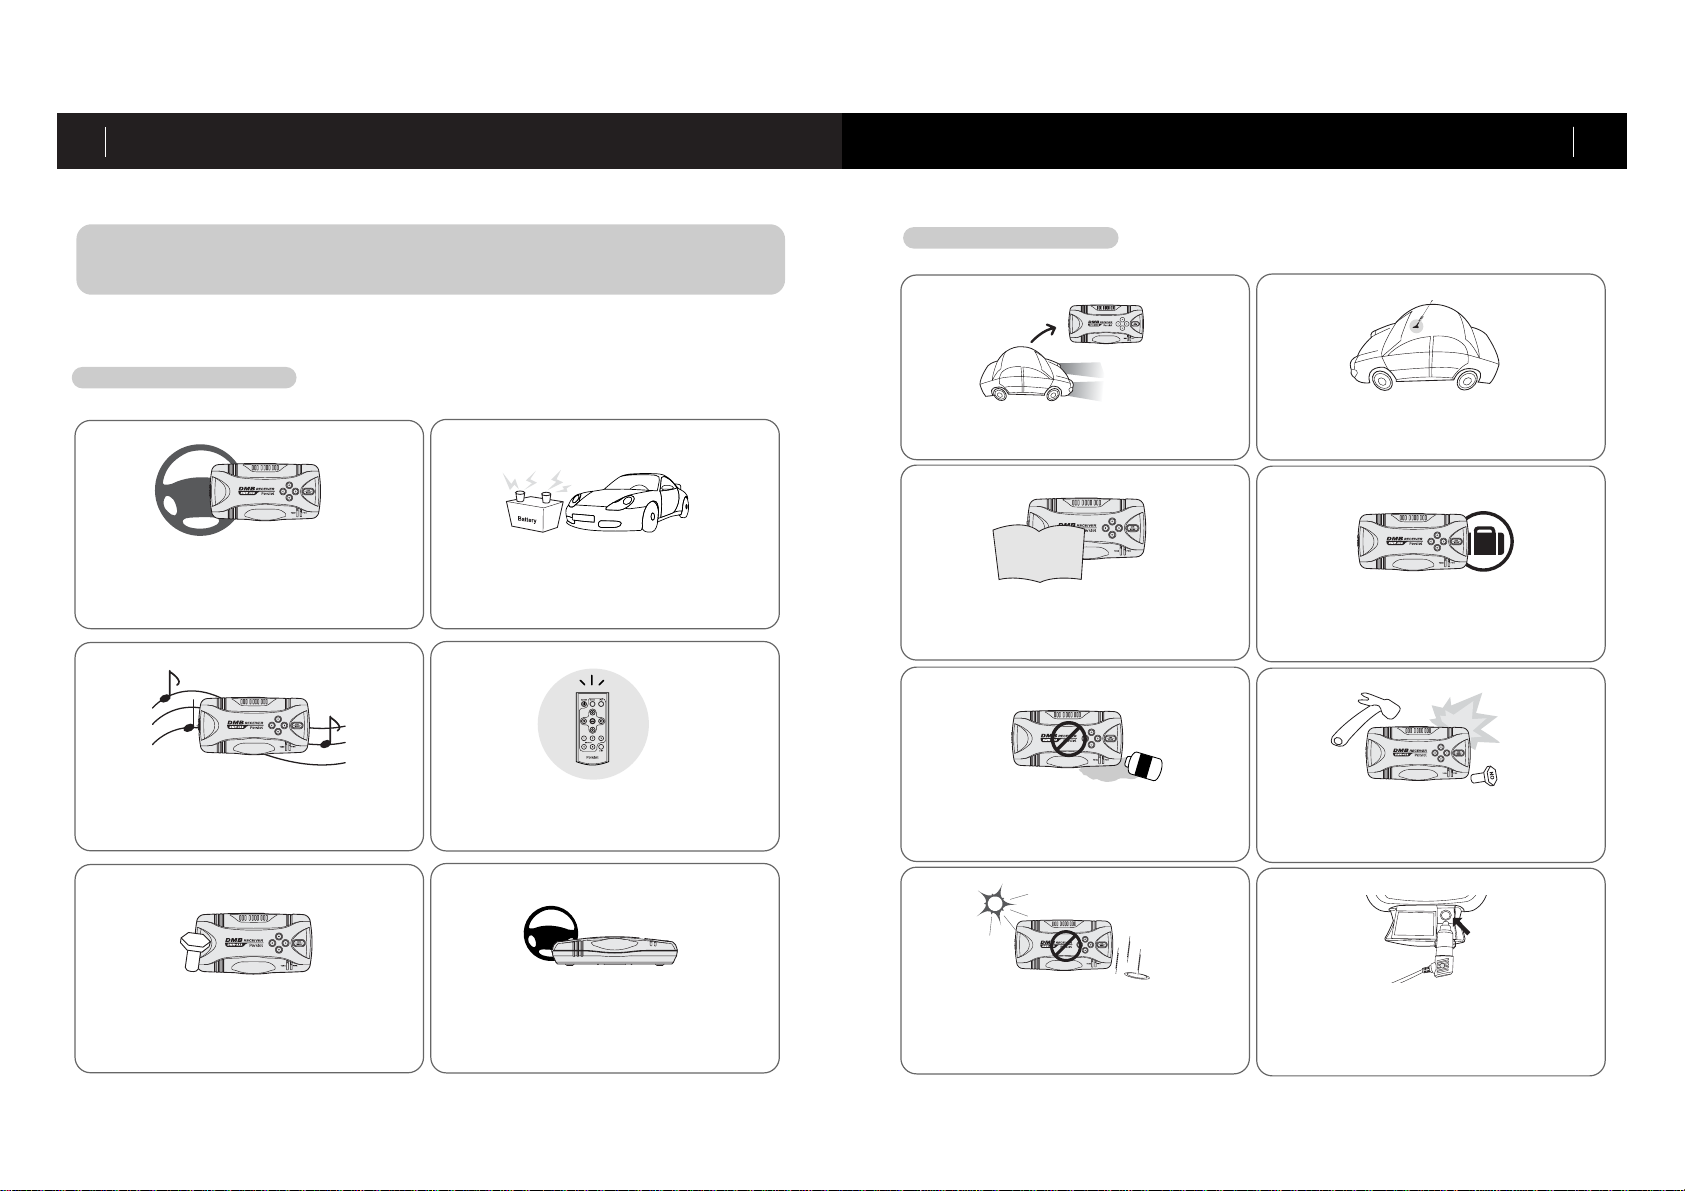
Please do not operate the product while
driving, or it may cause serious accident. Please do not use the product while
engine is not working, or vehicle battery
may be discharged.
Please do not too much raise volume
level, or it may take your attention away
while driving. Please keep the remote controller handy.
Please refer to installation chapter of this
manual, or consult with local dealer for
installation.
Stop the engine for installation. Please do
not block eyesight and/or airbag with the
product.
Do not turn on the product before turning
on the engine. Install the antenna at the center of loop for
best reception.
Do proper connection of cables, or it may
cause damage to the product.
Manual
Please clear the product with dry clothes. Do
not apply chemical or detergent.
Do not dismantle the product without prop-
er knowledge, or warranty will be void.
Please keep the product away from dirty
and dusty place, or it may cause malfunc-
tioning.
The product is packaged with 12V cigar
lighter charger. Please prepare 24V cigar
lighter charger to use in buses and/or
trucks.
The product is designed to best work at 5
~ 25C. Please maintain the temperature
for best use in deep summer and winter.

Package contents
Optional accessories
Images and color of product and
accessories are subject to
change without prior notice.
These accessories are sold separately.
Before use 04
Before use
Intellectual Property Rights
03
DMR432V Remote
controller User's manual
12V cigar lighter
charger Remote
sensor Antenna set
A/V cables
Wall adapter
(indoor 12V) 24V cigar lighter
charger
Quick guide
Intellectual Property Rights
PERSTEL holds intellectual property rights for those material used in this user's manual.
Any content or image is not allowed for copying, transforming without prior consent by
PERSTEL.
2005 PERSTEL INC. All Rights reserved.
Legal disclaimer
- Manufacturer, importer, or distributor is not liable for any contingent damage caused by
misuse of the product.
- Color, specification and contents are subject to change without prior notice.

Product installation Connection diagram
For safety reasons, it is highly recommended to consult installation work with local installation
shops or dealers. Installation charge has to be borne by users.
For safety reasons, it is highly recommended to keep the product underneath of driver's or
passenger's seat.
Far safety reasons, please turn off the engine for the entire installation procedure.
Before use
Connection diagram 06
Before use
Product installation
05
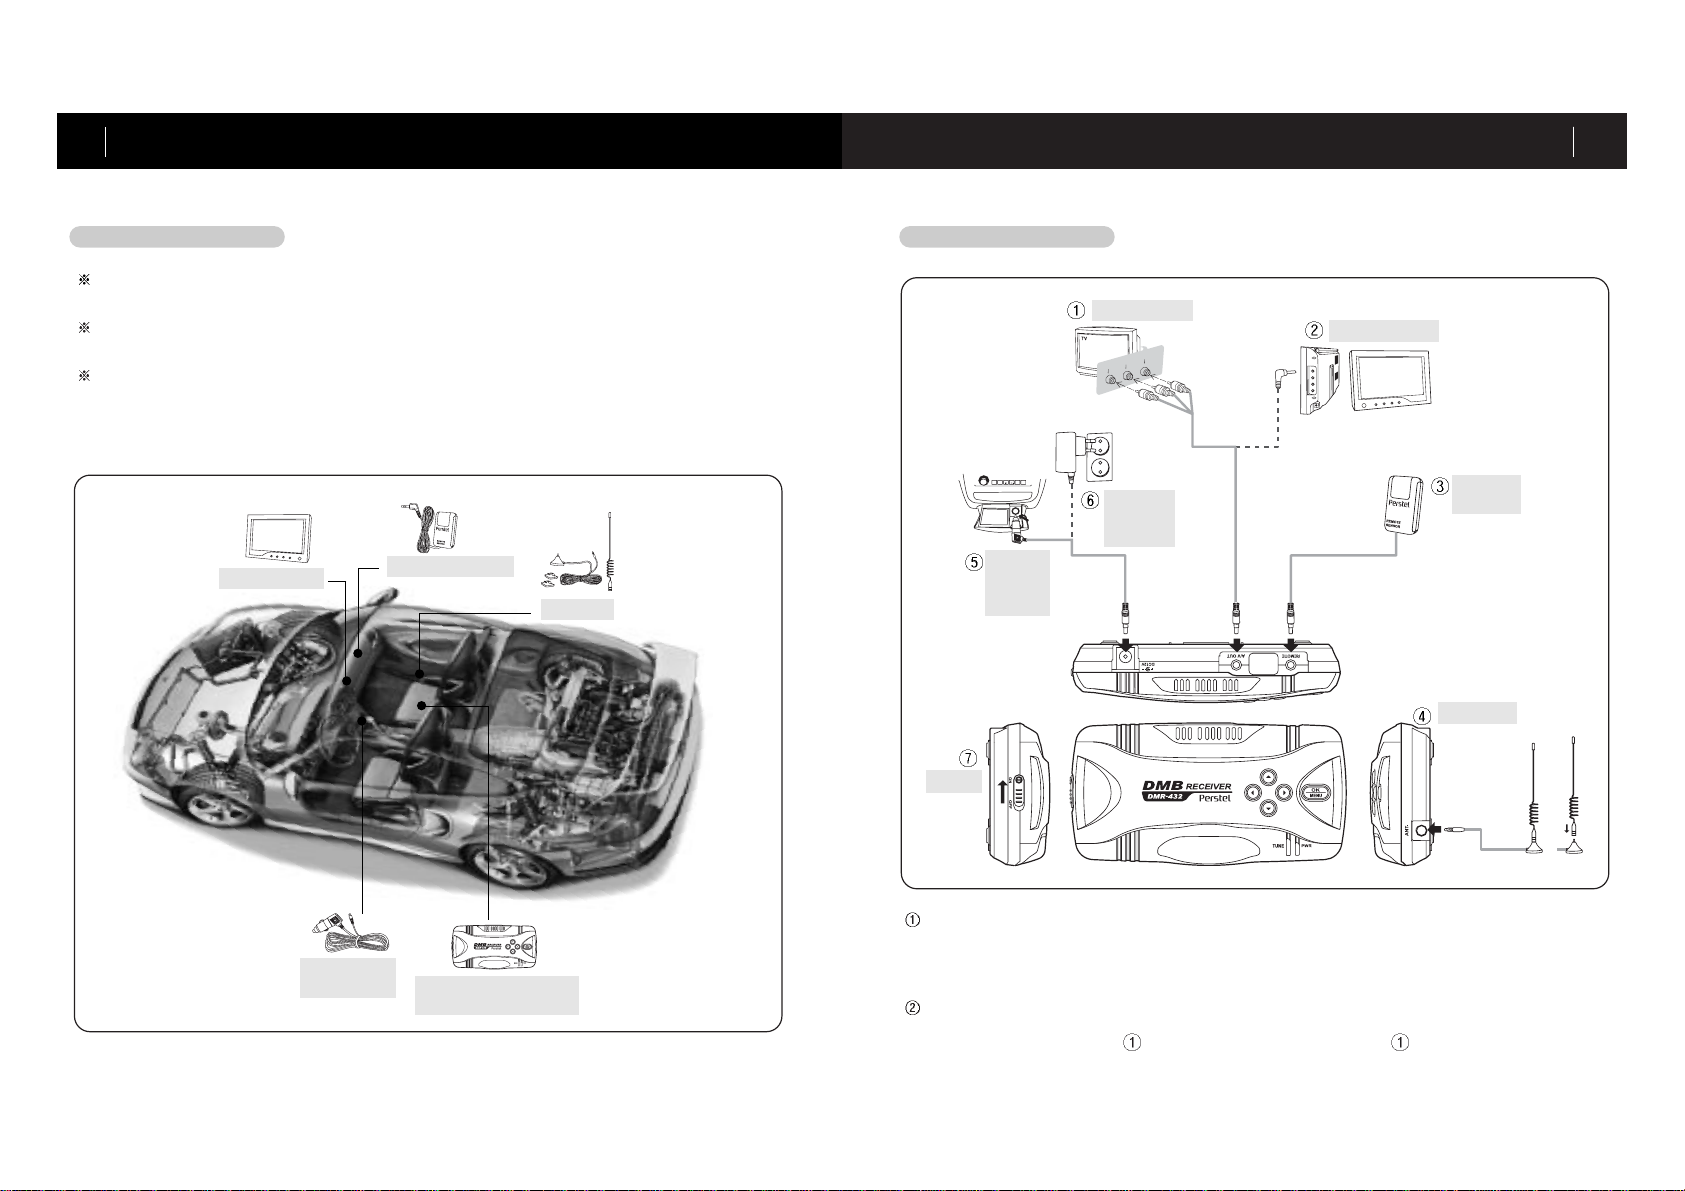
1. Best product position
Home TV set
Please make sure to follow RCA cable diagram to connect home TV set. A/V cables consist of Yellow (Video), While
(Audio-L) and Red (Audio-R).
Vehicle TV set
Please make sure to connect to AV1, AV2 or AV IN of vehicle TV set or monitor. If vehicle TV set or monitor
shows the same configuration as please refer to connection diagram of .
LCD monitor Remote sensor
Antenna
Cigar lighter
charger DMR432 (underneath
of passenger's seat)
PUSH
123456
D
D
FF RPT
Video
Audio(R)
Audio(L)
Vehicle TV set
Remote
sensor
Antenna
Cigar
lighter
charger
Power
Wall
adapter
(indoor)
Home TV set

Before use
Controls diagram 08
Controls diagram
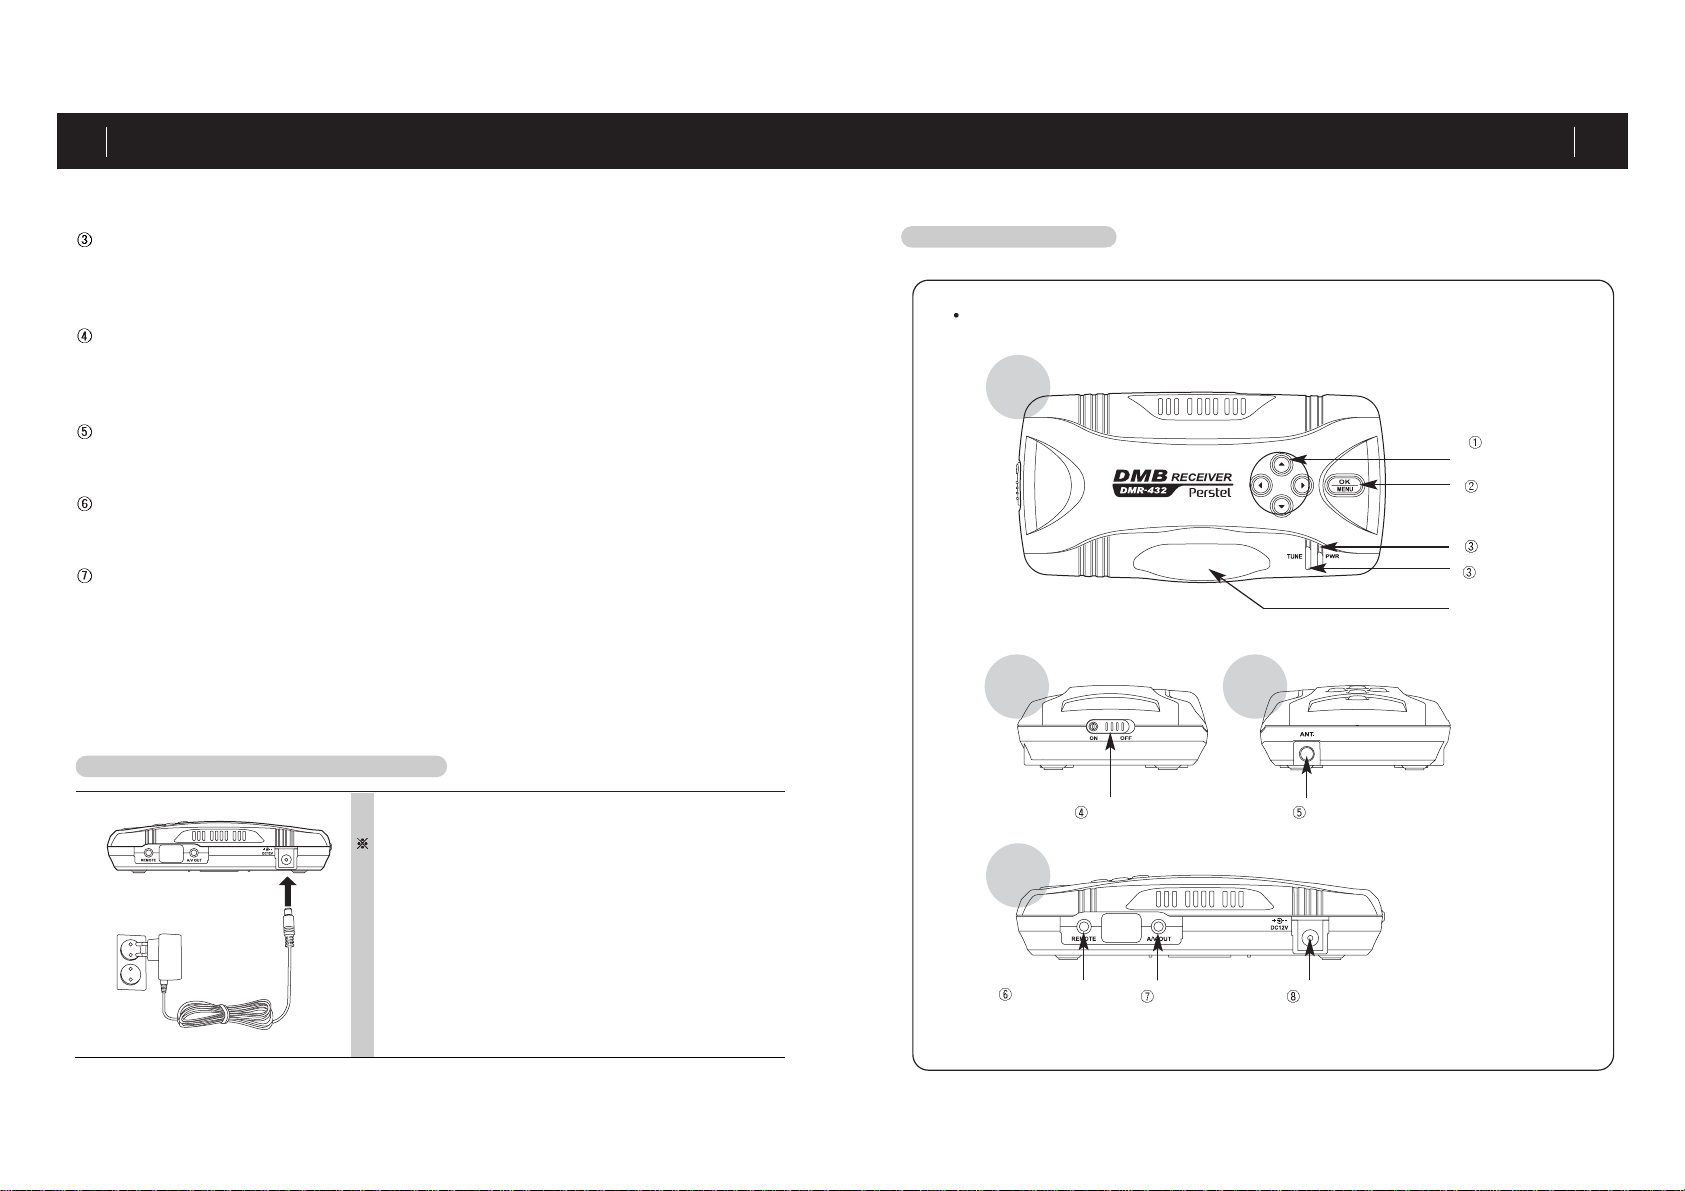
Power (Red)
Tune (Green)
Remote control
sensor
Navigation
Menu
Remote sensor
Power switch Antenna port
DMR432 unit
Power inA/V out
Top
Rear
Right
Before use
Option items
07
Option items (indoor 12V wall adapter)
Plug in indoor 12V wall adapter to DC12V connector of
DMR432.
Left
Remote sensor
For best interface with remote controller, post the remote sensor on dashboard or on front glass using
double adhesive tape.
Antenna set
Insert antenna connector in DMR432 antenna port till it clicks. And, for best signal reception, locate anten-
na magnet base at the center of car loop.
Cigar lighter charger
Connect cigar lighter charger with DMR432
Wall adapter (indoor 12V DC)
User wall adapter when DMR432 is used at home.
Power on
Connection is complete. Slide power switch to ON position following arrow on the diagram. It is recom-
mended to use remote controller for operation and control.

Before use
Remote controller 10
Before use
Controls diagram
09
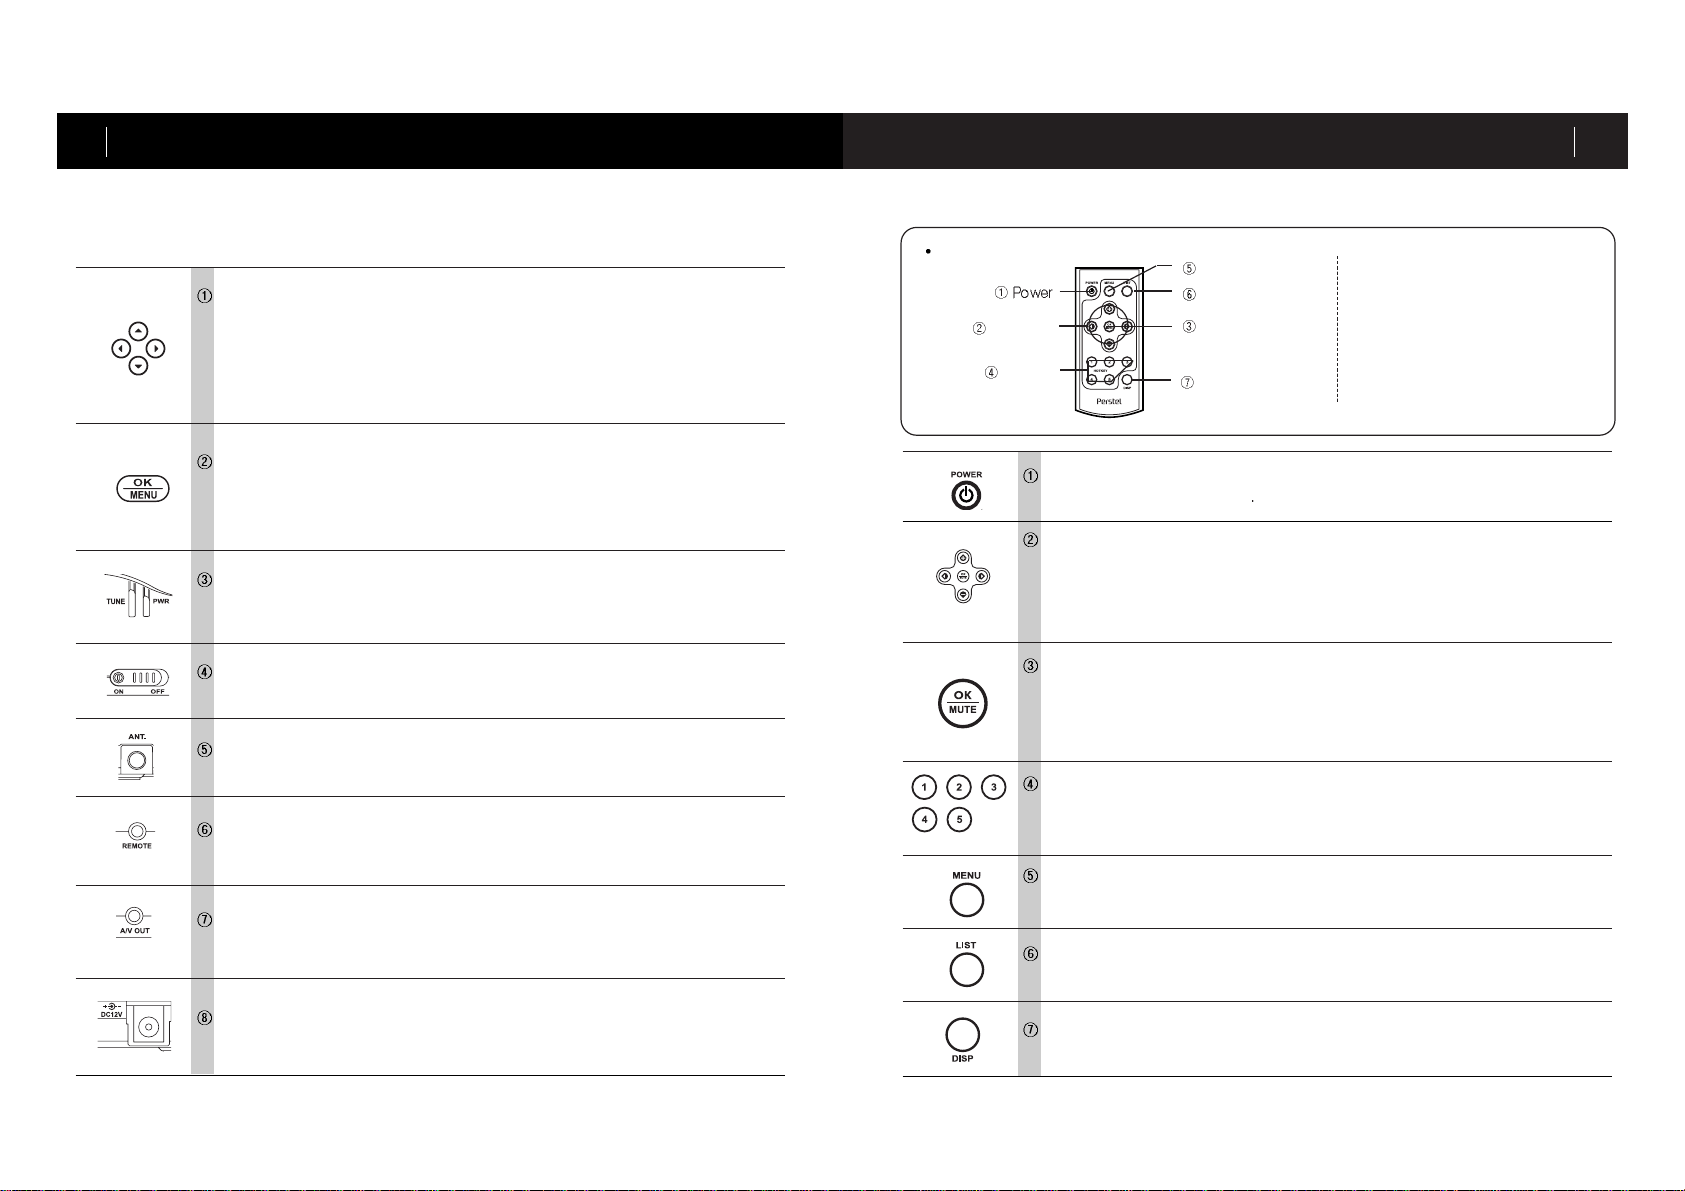
Navigation
Up/Down- For volume control, or scroll up and down the menu in menu
mode.
Left/Right - For service change while receiving signal, or entering or
escaping menu in menu mode.
Right - This button is used for confirming Select or Enter sub menu.
Menu/OK (Activation)
Enter the menu or escape the menu.
Activate or deactivate the unit when power is ON. (Press it and hold for more
than 3 seconds.)
LED
Tune LED - Green when service is tuned.
Power LED - Red when power is engaged.
Power switch
Turn on and off main power.
Antenna port
For connection of external antenna.
Remote sensor port
For connection of external remote sensor.
A/V out
For connection of external display and audio devices.
Power in
For connection of various power input. (12V/ 24V cigar lighter charger and 12V wall
adapter)
Functionality of DMR432 buttons Remote controller
List
Enter/ Mute
Menu
Display
Favorite
Navigation
Buttons of DMR432 main unit
do not provide full control. It is
recommended to use remote
controller for full control.
Power
Turn on and off of DMR432
Menu
Enter the menu or escape the menu.
List
Shows preset list or hides the list.
Display
Shows information of current service.
OK/ Mute
Menu mode- For confirming Selection.
Long key when receiving - Current service will be saved in preset list. (Press it
for more than 3 seconds.)
Short key when receiving -Audio will be muted.
Navigation
Up/Down - For volume control, or scroll up and down the menu in menu
mode.
Left/Right - For service change while receiving signal, or entering or
escaping menu in menu mode.
Favorites
Press to instantly access to saved favorite memories.
While receiving services, press it (1 ~ 5) and hold to store or overwrite favorite
memory.

LCD indicator
DMB mode
DAB mode
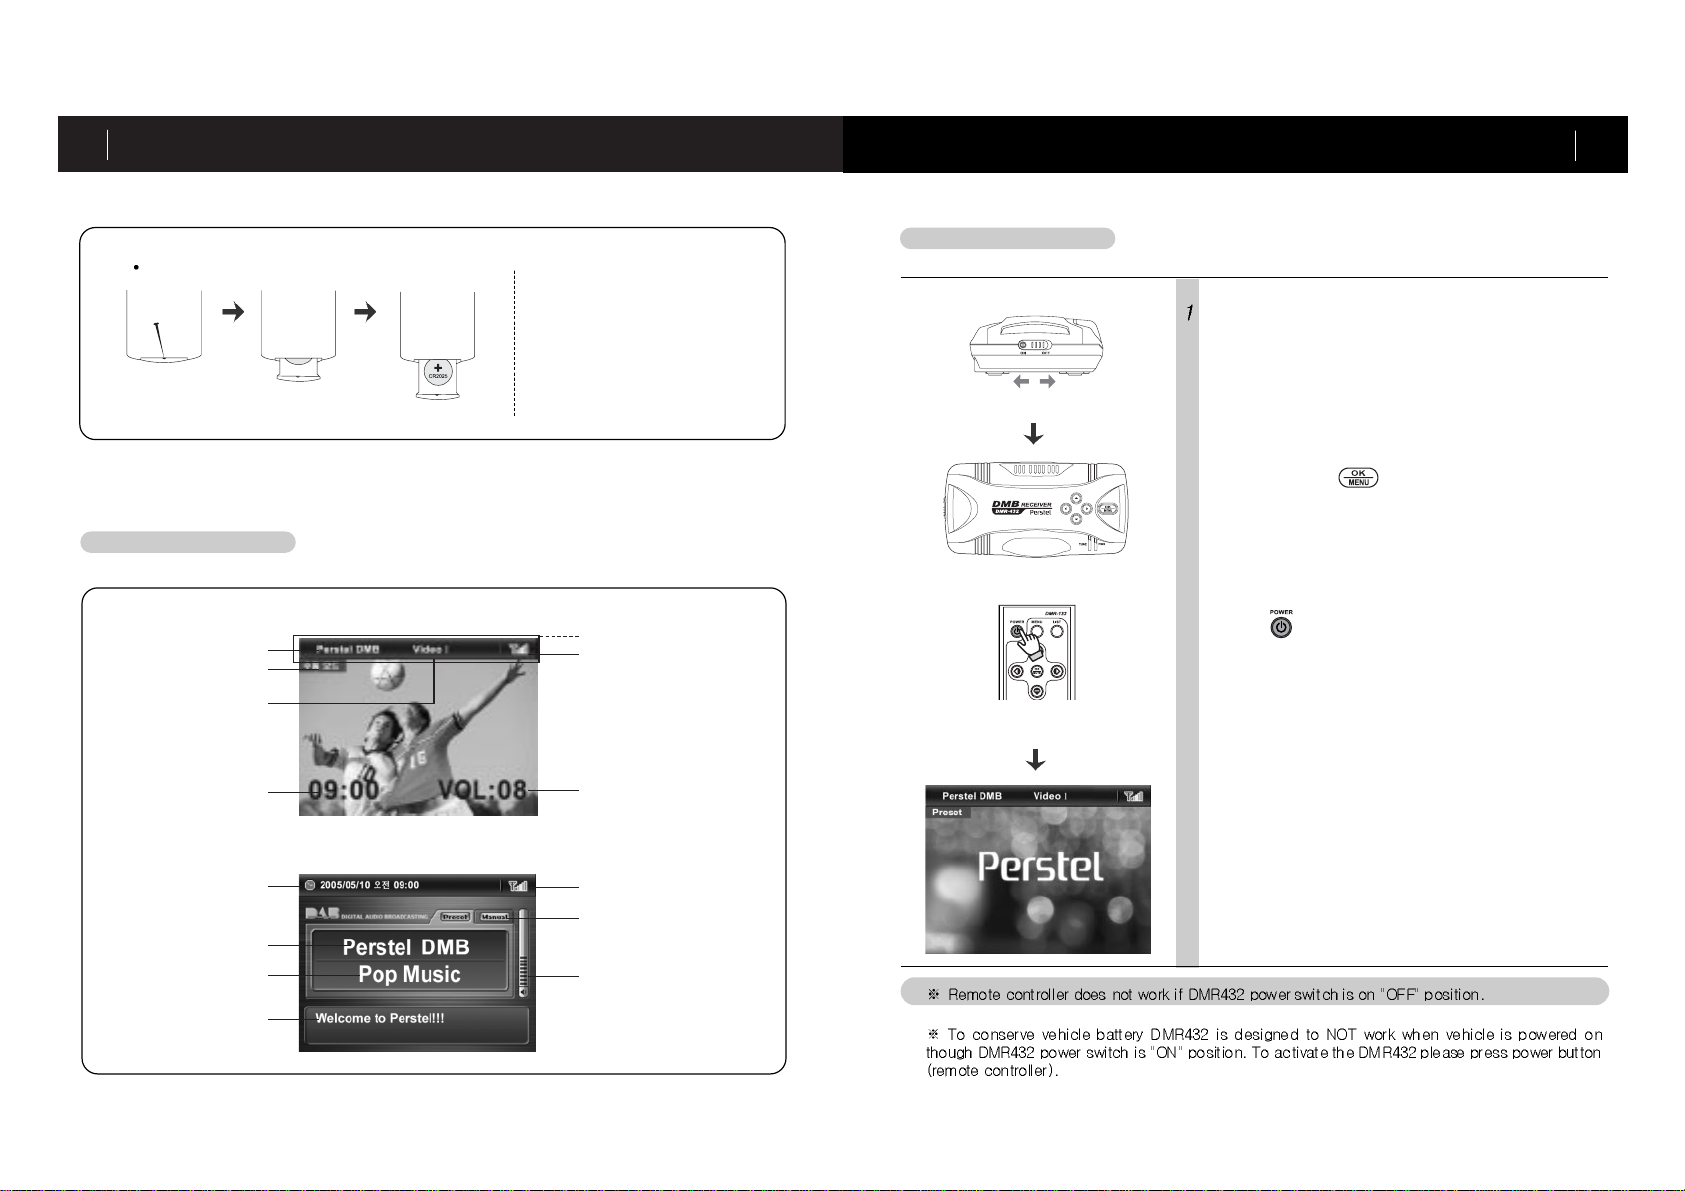
Open the battery compartment by
using tiny pin, and replace battery
following polarity indication. Slide
battery compartment back to origi-
nal position.
Signal strength
Information window
Ensemble
Service name
Tune mode
Current time
Current time
Ensemble name
Service name
DLS info
Signal strength
Tune mode
Volume level
Volume level
Battery replacement (Remote controller)
Before use
LCD indicator
11 Getting started
Power on 12
Power on
Power on Power off
Turn the power on using slide switch on the left side of the
product.
Press and hold button, and the DMR432 is activat-
ed, or
Press button to activate the DMR432.

Operation
Mute/ Unmute 14
Operation
Volume control
13
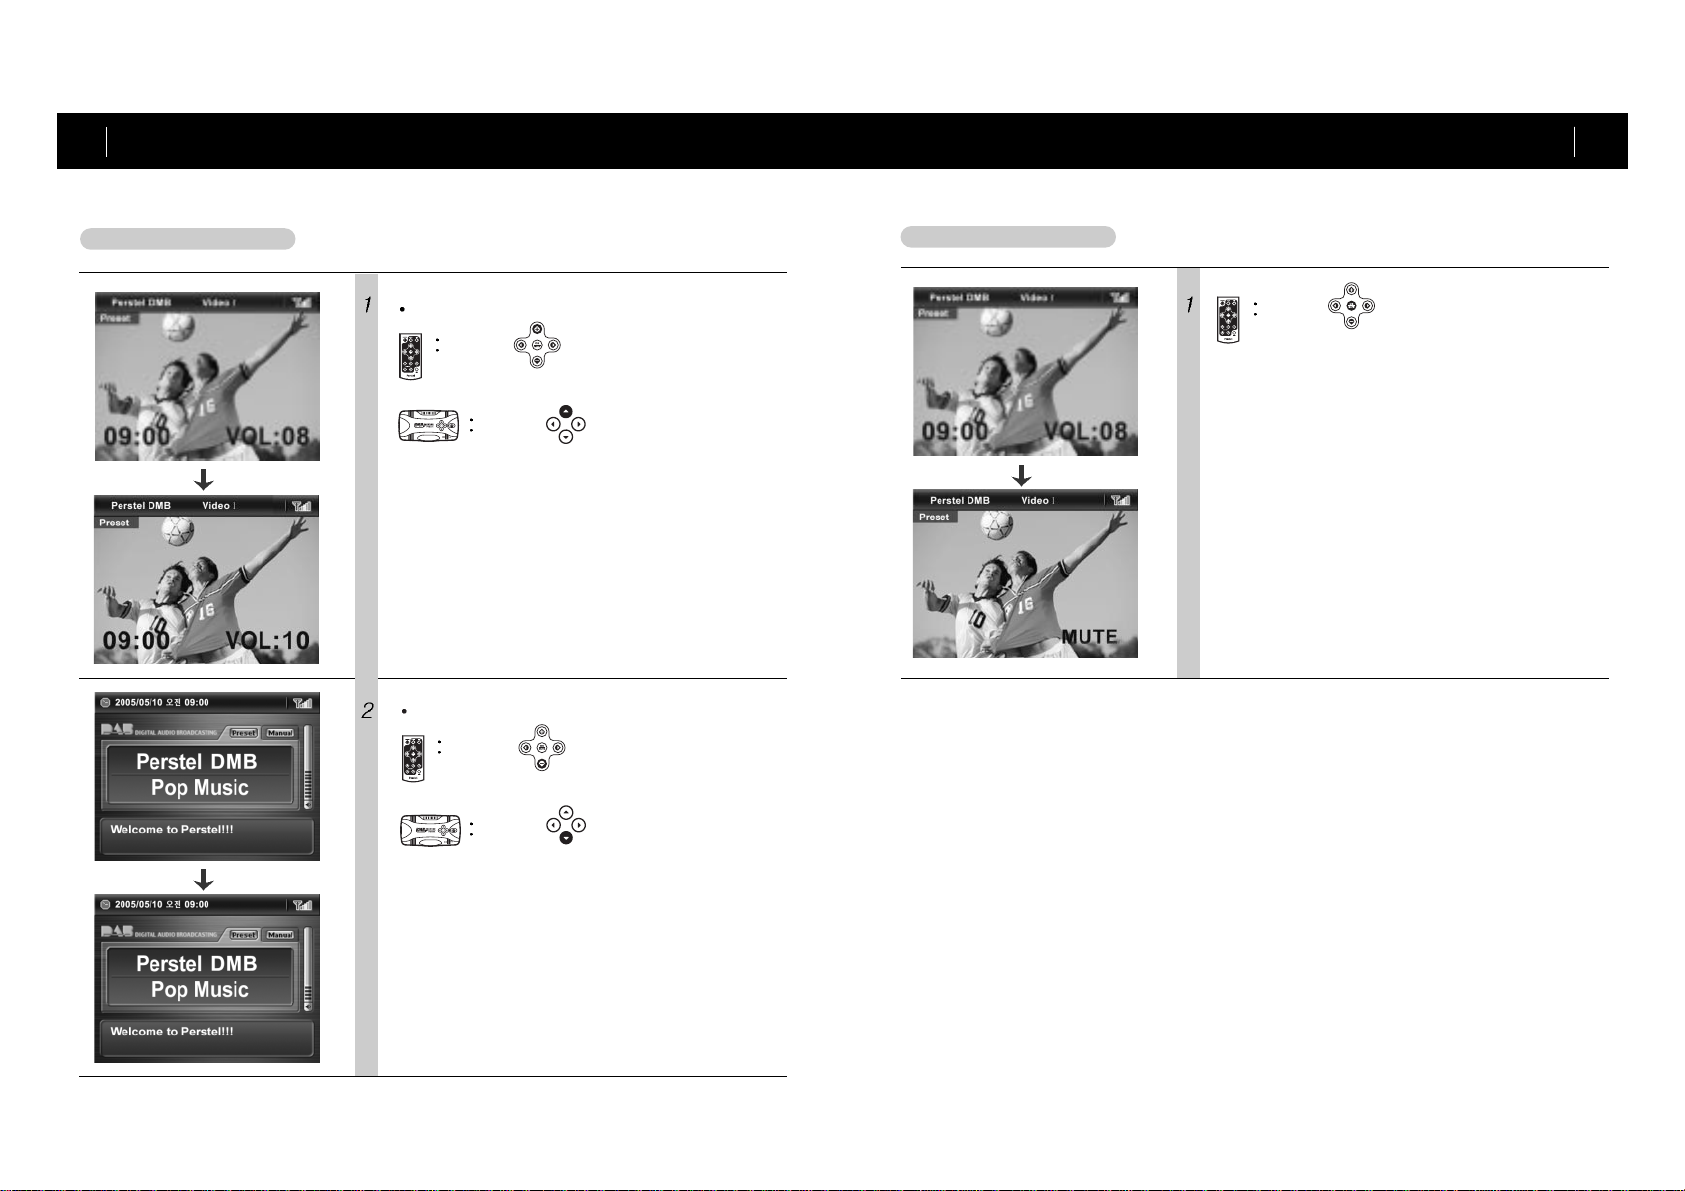
Mute/ Unmute
Press buttons shortly to mute
audio.
To unmute audio, press mute button
again, or adjust volume button.
Volume adjustment from remote controller
or from DMR432 works same way to
unmute audio.
Volume control
Press buttons to raise vol-
ume level.
DMB mode
DAB mode
Press buttons to lower vol-
ume level.
Press buttons to raise volume
level.
Press buttons to lower volume
level.

Operation
Preset tune mode 16
Operation
Search
15
When service scan completes, tune mode automati-
cally turns to Preset.
Service scan takes a while. Please be patient till it completes.
Services found from service scan are automatically stored in service list.
Service list will not be generated when no DMB service is available.
Press any key to stop service scan while in process.
Preset tune mode
Preset mode enables users to tune to DMB services out of service list generated from
service scan.
Preset list
Preset list
Tune Mode
Search
Setting Preset Mode
Preset list
Tune Mode Manual Mode
Preset Mode
Search
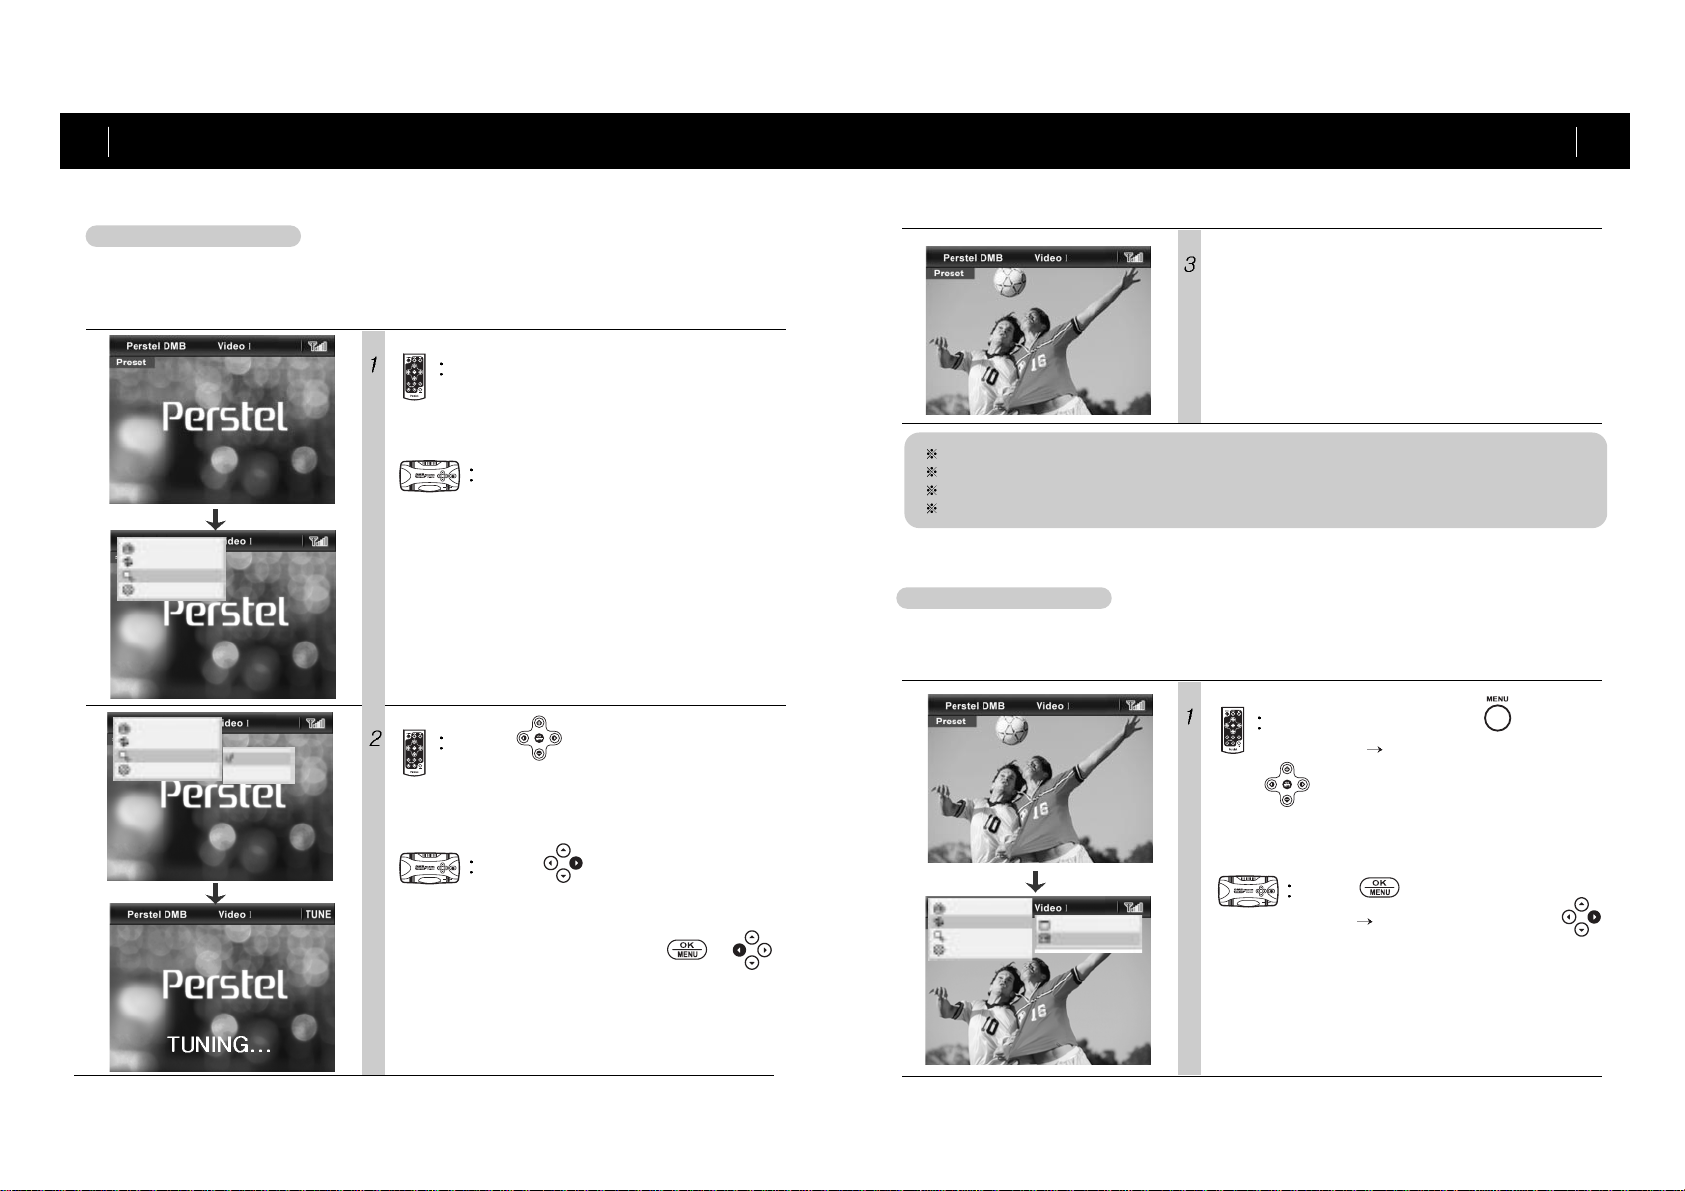
For the first time use, it is highly recommended to run a "Full Scan". Full Scan finds and saves DMB ser-
vices available at the location. To get better signal reception, place the DMR432 at wide open area.
Preset list
Tune Mode
Search
Setting Search Yes
Preset list
Tune Mode
Search
Setting Search Yes
Search Search Yes
No
Press menu button, and use up/down button to
move to [Search].
Press menu/OK button, and use up/down but-
ton to move to [Search].
Press button to enter sub-menu,
and select [Yes] to start service scan.
Press button to enter the sub-
menu, and select [Yes] to start service
scan.
To exit sub-menu, press or
button.
To change tuning mode, press , and move to
[Tune Mode] [Preset Mode] and press
to confirm selection.
Press , and move to [Tune
Mode] [Preset Mode] and press
to confirm the change.

Operation
Preset tune mode 18
Operation
Preset tune mode
17
Preset list
Tune Mode
Search
Setting
Tune Mode Preset Mode
No signal
No service
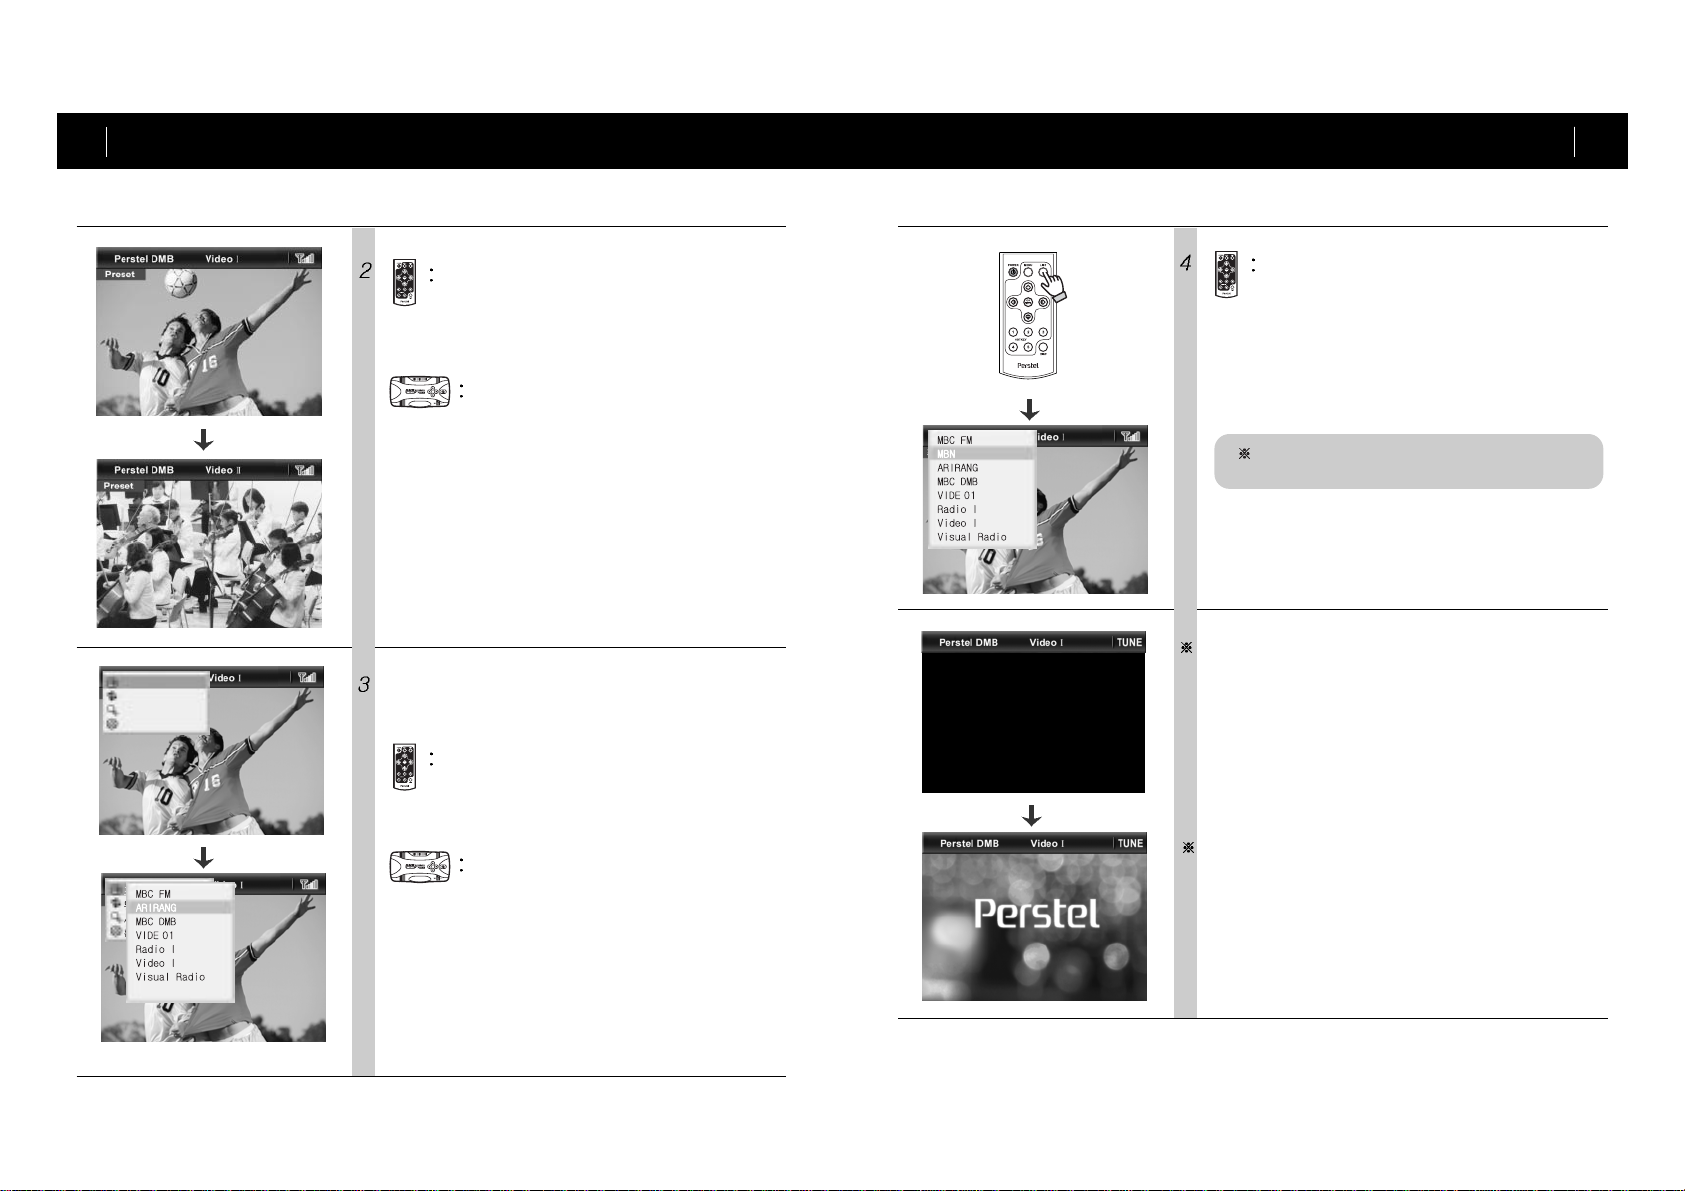
DMR432 tunes to other services if left or right
button is pressed while a service is being broad-
casted.
Press left or right button to change to
other service out of service list.
DMR432 tunes to other services if left or right
button is pressed while a service is being
broadcasted.
Press left or right button to change
to other service out of preset list.
Do the followings to tune to desired service out of ser-
vice list.
Press [LIST] button to bring up service list.
Scroll the list using up/ down button and press
[OK] button to confirm selection of desired ser-
vice.
This function works only when tune mode
is set at Preset.
If selected service is at very weak signal area and
therefore no reception is made, "No signal" message
will be displayed.
If selected service is at strong signal area but service
is temporarily out, "No signal" message will be dis-
played.
Inhaltsverzeichnis
Andere Perstel Empfänger Handbücher