Prolux Lite Bedienungsanleitung

Lite
Garage Vacuum
Instruction Manual

Congratulations on the purchase of your new Prolux Lite Wet/Dry Garage Vacuum!
The Prolux Lite Garage Vacuum is powerful, epen able, has a tool for nearly every
job an is light an compact enough to be store in nearly any Garage. It can
vacuum up irt, woo chips, saw ust, water, snow as well as blow, inflate, shampoo,
spray an wash. With its 30 foot hose it is esigne to keep your Garage, Shop or
Cars clean when you nee it. Please take the time to rea this owners manual an
get familiar with your new appliance!
2

Contents
Safety Instructions ----------------------------------------------------------------4
Vacuum Description & Parts -----------------------------------------------------5
Assembly Instructions/Mounting Instructions------------------------------------7
Operating Instructions ------------------------------------------------------------10
Using the Tools -------------------------------------------------------------------12
Maintenance ----------------------------------------------------------------------16
Trouble Shooting -----------------------------------------------------------------18
A itional Available Parts--------------------------------------------------------18
Technical Data -------------------------------------------------------------------19
Warranty Information ------------------------------------------------------------19
Congratulations on the purchase of your Prolux Wet Dry Garage Vacuum!
The Prolux Wet Dry is attractive, powerful an makes your life easier.
Powerful – 90 cubic feet-per-minute of air flow & 98.5 inches of water lift.
3-Year Factory Warranty
Vacuums up ry irt or water (can hol up to 2.1 Gallons of Water an 4
gallons of irt)
In icator tells you when irt bin nee s emptying or water change
Auto shut-off when full of water
A tool for nearly every job
Can be use to vacuum, blow, inflate, clean wet spills, or shampoo
Easily mounts on your wall for easy, out-of-the-way storage
3

Important Safeguards!
When using an electrical appliance, always follow basic precautions, including
the following:
REA ALL INSTRUCTIONS BEFORE USING THIS APPLIANCE
Warning:
To reduce the risk of fire, electric shock, or injury:
o not use outdoors
Close supervision is necessary when any appliance is used by or near
children.
o not allow cleaning system to be used as a toy or to run unattended at
any time.
o not allow any objects to be put into hose inlet.
o not pick up anything that is burning or smoking, such as cigarettes,
matches, or hot ashes.
o not use to pick up flammable or combustible liquids such as gasoline
or fine wood sanding or use in areas where they may be present.
Avoid picking up sharp objects.
o not use without filter in place. Empty dirt container and clean filter
frequently when picking up very fine materials such as powder.
o not put any objects into openings. o not use with any openings
blocked.
Keep free of dust, lint, hair, and anything that may reduce airflow.
o not pull or carry by cord, use cord as a handle, close a door on cord
or pull cord around sharp edges or corners. o not run appliance over
cord. Keep cord and appliance away from heated surfaces.
Always disconnect cord from electrical outlet before servicing the power
unit.
o not unplug by pulling on cord. To unplug, grasp the plug, not the
cord. Never handle plug or appliance with wet hands.
Turn off all controls before unplugging. Unplug cleaner when not in use.
o not use with damaged cord or plug. If appliance is not working as it
should, has been dropped, damaged, left outdoors, or dropped into
water, take it to a Professional Vacuum Service Center or Prolux
Authorized Vacuum Service ealer.
Use vacuum cleaner only for its intended use as described in this
owner’s manual. Use only attachments recommended by the
manufacturer. Other attachments may cause hazards.
This appliance is provided with double insulation. Use only identical
replacement parts. Servicing a double-insulated appliance requires
extreme care and knowledge of the system and should be done only by
qualified service personnel.
Keep hair, loose clothing, fingers, and all parts of body away from the
opening and moving parts.
4

Save these instructions!
WARNING
Operate cleaning system only at voltage specified on power unit.
This system is intended for residential use.
WARNING
To reduce the risk of electric shock, this appliance has a polarized plug (one
blade is wider than the other). This plug will fit in a polarized outlet only one
way. If the plug does not fit fully in the outlet, reverse the plug. If it still does
not fit, contact a qualified electrician to install the proper outlet. o not change
the plug in any way.
Vacuum escription & Parts
5
1. Control Panel
2. ON/OFF Switch & Power
Cor
3. Blower Hose Outlet
4. Suction Hose Outlet
5. Dirt Container Latches
6. Dirt Viewing Win ow
7. Carrying Han le
8. Mounting Area
9. Dirt Container

Included Accessories & Parts
A detailed description of how to use the above tools is listed on page number 9.
6
11. 32ft Flexible Wet/Dry Hose
12. Hose & Tools Hol er
13. Extension Wan s
15. Multi-Surface Floor Tool
16. Wet Pickup Squeegee Floor
Tool
17. Crevice Tool
18. Dusting Brush
19. Upholstery Tool
20. Extraction Shampooer Suction Tool
21. 3 Sizes of Detailing & Inflator Tools
22. Long Detailing Precision Blower Tool
23. Wall Mounting Bracket
24. Screws
25. Mini Hea with Spinning Brushroll
26. Su s Gun Sprayer Washer

Assembly Instructions
1. Remove the irt tank by pulling up on both han les to unlatch. Lift upper half of
unit to remove.
2. Remove all accessories an parts store in the bottom of the tank prior to use.
3. If the round funnel comes out of dirt tank, set back inside the dirt tank
before reassembling.
4. To reassemble, place the top of the unit on the dirt tank so the edges fit
together and latch the handles to secure the top and bottom of unit.
5. Mount to wall (see instructions below).
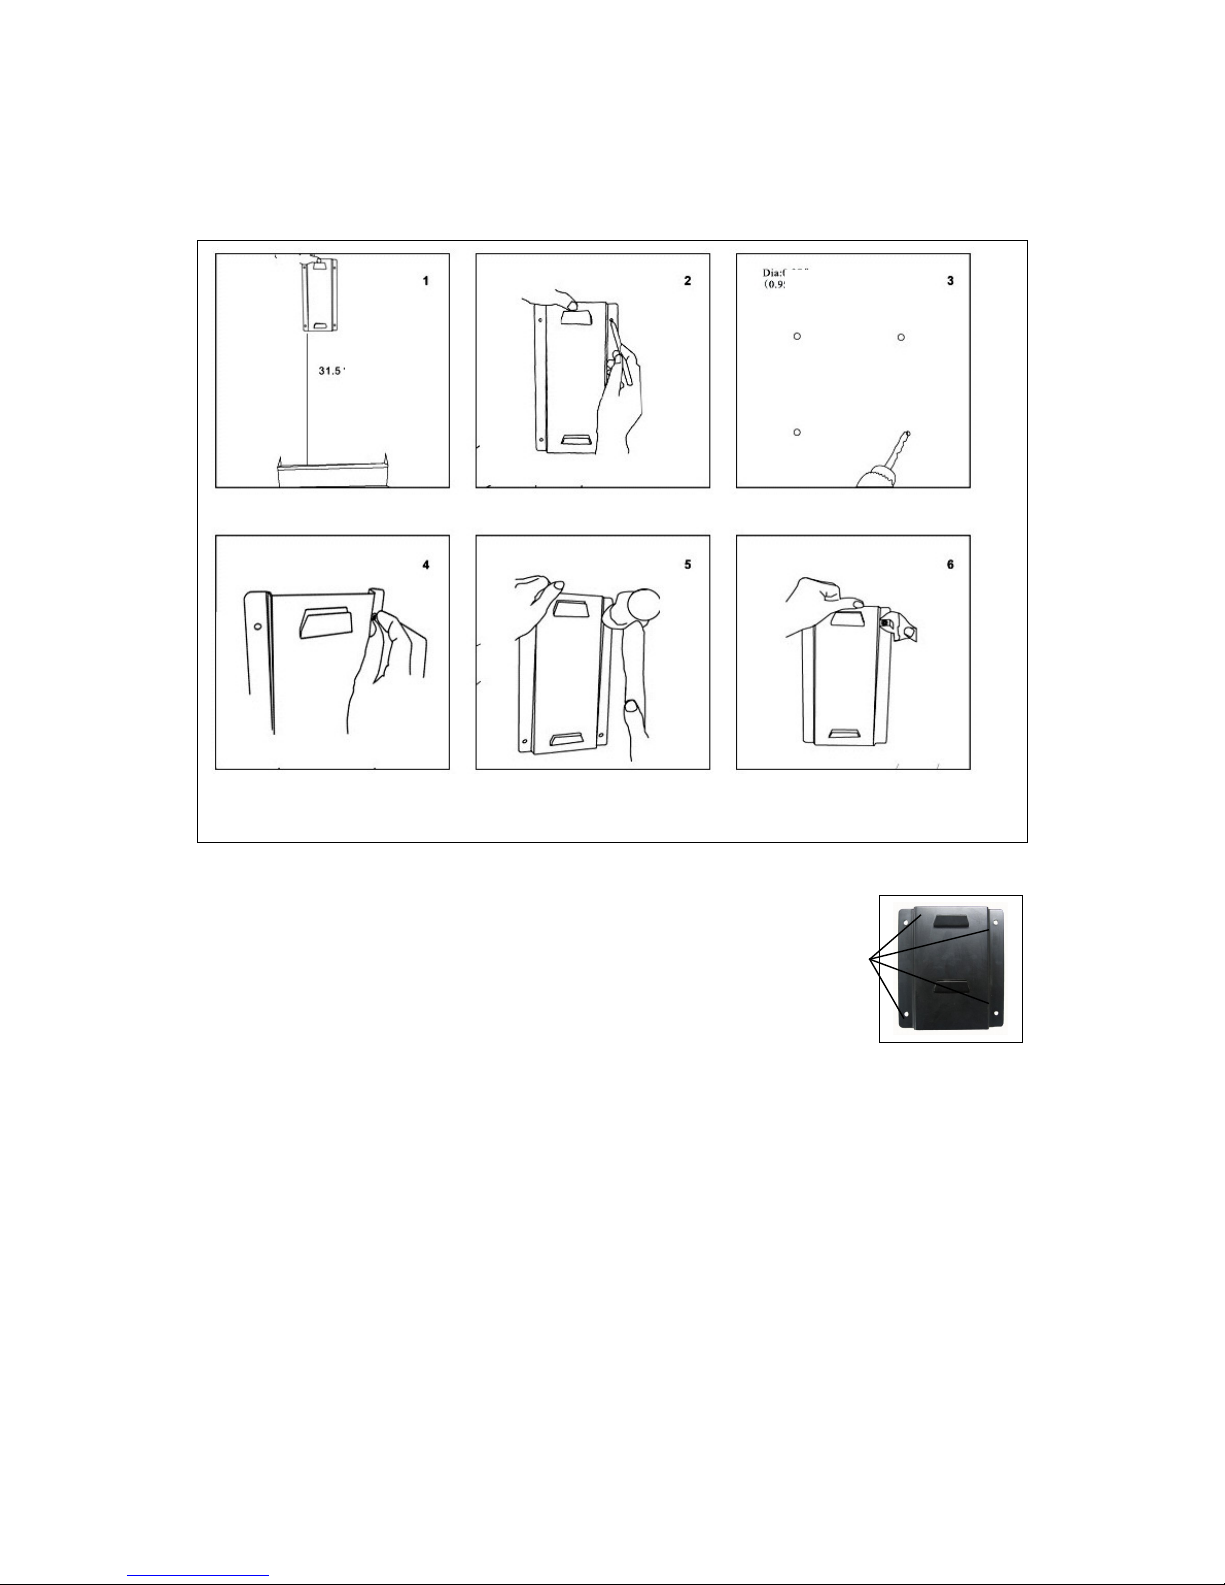
Mounting & Installation Instructions
Mounting on drywall or plaster wall with stud (fasteners
included)
1. Locate a stu in your ry wall an rill a 1/8” pilot hole.
2. Mount the bracket with a #10-16 x 1-3/4” screw.
3. Ensuring your bracket is aligne correctly with the stu , rill a secon pilot hole
using the next hole as a gui e. Securely fasten with a screw.
4. Repeat step 3 for remaining hole.
Note: mount near a wall outlet, making sure the cord provided will reach the
outlet.
5. Mount the vacuum unit by making sure the square hole on the vacuum (#8 on
Page 5) sli es over the bracket lip. Also see “Hanging the Unit” on Page 9
below.
See Mounting Images on the next page.
7
Mounting on concrete wall (fasteners included)
You will nee : (4) 3/8” x 2-1/4” concrete sleeve anchors. 4 holes
1. Drill a 3/8” x 1-3/4” hole with a masonry rill bit.
2. Insert a bolt an anchor sleeve into the hole.
3. Align the bracket over the hole an mark the remaining hole locations using the
(4) holes of the mounting bracket. Remove the bracket an rill remaining holes.
4. Mount the bracket starting at top corner hole, tightly securing sleeve anchor
with hex nut.
5. Repeat for three remaining holes.
6. Mount the unit by making sure the two square slots on backsi e of unit are
sitting on the two hooks on the mounting bracket.
8

Mounting the Hose & Tool Holder (fasteners included)
1. Determine esire location for hose hol er an screw supplie screw into
stu . (If mounting into rywall with no stu available, use supplie rywall
anchors.)
2. Attach the 4 screws in the backsi e of the Hose & Tool hol er in the 4 holes.
If you want to make the Hose & Tool Hol er removable from your wall make
the screws slightly loose an the Hose & Tool Hol er can unsnap from your
wall by pushing up on the Hose & Tool Hol er.
3. Hang hose on unit an attach 3 of your most use tools to the 2 places where
they snap in on the outsi e of the Hose & Tool Hol er. The rest of your tools
can be place insi e the unit.
Hanging the Unit
Hang your unit by putting the unit slots to the
mounting bracket. Mounting Bracket may look slightly
ifferent than what is shown in the picture.
Note: Make sure the unit fits securely on the
mounting bracket and won’t fall down.
9

Operating Instructions
Wet/dry vacuuming mode
1. Plug in unit an attach the hose connector into the air inlet. See picture ‘A’
below. Attach extension wan , if esire , to en of hose by pushing it firmly
into the hoses an firmly twisting. All hose an tool connections are attache
by friction fit metho (shoving together an twisting to the right for firm
connection).
Attach a itional wan s or tools as esire . Switch the power on an start
vacuuming.
Note: the power switch is locate on the top left si e of the vacuum.
To turn vacuum on, (I) press up.
To turn vacuum off, (O) press own.
2. If the mi le in icator turns green on the in icator screen, it in icates that the
appliance is powere on an working as it shoul .
3. If the re in icator light in icator is on, it means canister is full of irt or
clogge . Switch off immediately when the light turns red.
Solution:
① Empty the ust canister (See “Unit Cleaning” below)
② Clean the HEPA filter an cloth filter (See “Unit Cleaning” below) or check
for clogs in the hose.
It is suitable to clean the ust canister an the filter regularly (every 15 to 30
ays).
4. Left re light is the water full in icator. The unit stops sucking up when the
in icator turns re , meanwhile the motor will automatically turn the unit off. To
change simply unplug the unit an empty the water from the ust canister. (See
“Unit Cleaning” below) The unit will start again after replacing the ust canister.
10
A
Inhaltsverzeichnis
Andere Prolux Staubsauger Handbücher

Prolux
Prolux TerraVac Bedienungsanleitung

Prolux
Prolux X8 Lite Bedienungsanleitung

Prolux
Prolux 2.0-PRO Technisches Handbuch

Prolux
Prolux XC15J Technisches Handbuch

Prolux
Prolux Stealth Bedienungsanleitung

Prolux
Prolux 2.0-G Bedienungsanleitung

Prolux
Prolux AllVac Bedienungsanleitung

Prolux
Prolux Ion Bedienungsanleitung

Prolux
Prolux QX-90 Bedienungsanleitung

Prolux
Prolux 2.0-B Bedienungsanleitung


Beliebte Staubsauger Handbücher anderer Marken

Bissell
Bissell LittleGreen Proheat 1425 Series Bedienungsanleitung

Panasonic
Panasonic MC-YL637S147-AE Bedienungsanleitung

NEFF
NEFF N17XH10 0 Series Bedienungsanleitung

LG
LG A9 Series Bedienungsanleitung

Oreck
Oreck Cordless Captura BK51700 Series Bedienungsanleitung

Kogan
Kogan KAVACROBVWA Bedienungsanleitung


