Proxy Nano Inline Bedienungsanleitung

User Manual and Installation Guide
Proxy Mobile
Reader Nano Inline
& Mobile Reader
Nano Connect
www.proxy.com | [email protected]
Last updated: February 19, 2020

Table of Contents
Introduction 4
Mobile Reader Nano Inline 4
Functionality 4
Dimensions 4
Product Details (Nano Inline) 5
Mobile Reader Nano Connect 5
Functionality 5
Dimensions 6
Product Details (Nano Connect) 6
Installation Details 7
Parts List 7
Nano Inline 7
Nano Connect 7
Reader Specifications 7
Wiring Information 8
Mobile Reader Nano Inline 8
Mobile Reader Nano Connect 9
External Antenna Information 10
Antenna Installation 10
External Antenna Details 13
Reader Installation Details 13
Install Videos 13
Install Steps 13
Power Up and Testing 14
Recommended Infrastructure 14
Installation in a Turnstile, Elevator Panel, or Other Enclosure 14
Nano Inline Enclosed in Turnstile 15
Nano Connect Enclosed in Card Reader 16
Certifications 16
| 3 User Manual and Installation Guide: Mobile Reader Nano Inline & Mobile Reader Nano Connect
This document may have been updated since printing — for the latest, please visit https://proxy.com/s/nano-install

Introduction
The Proxy Mobile Reader Nano Inline and Mobile Reader Nano Connect boards are installed between a
controller and an access control reader. When users present their credential (card, key fob, fingerprint,
etc.) to the reader, the reader passes the Wiegand command to the controller. The access control
system then grants or denies access to the secure location.
The Nano Inline and Nano Connect are Bluetooth Low Energy (BLE) enabled. When users present their
phones enabled with the Proxy ID app, the Nanos communicate with the phone and pass the Wiegand
command to the controller. The access control system then grants or denies access to the secure
location.
Mobile Reader Nano Inline
Functionality
Nano Inline is a physical access control mobile credential reader, intended to be installed in locations
such as elevators and turnstiles. The reader is also capable of supporting pass through physical card
credentials when used in conjunction with a compatible physical card reader (not provided). The
reader can interface with an access control system equipped with a Wiegand interface. The reader
consists of the following main parts.
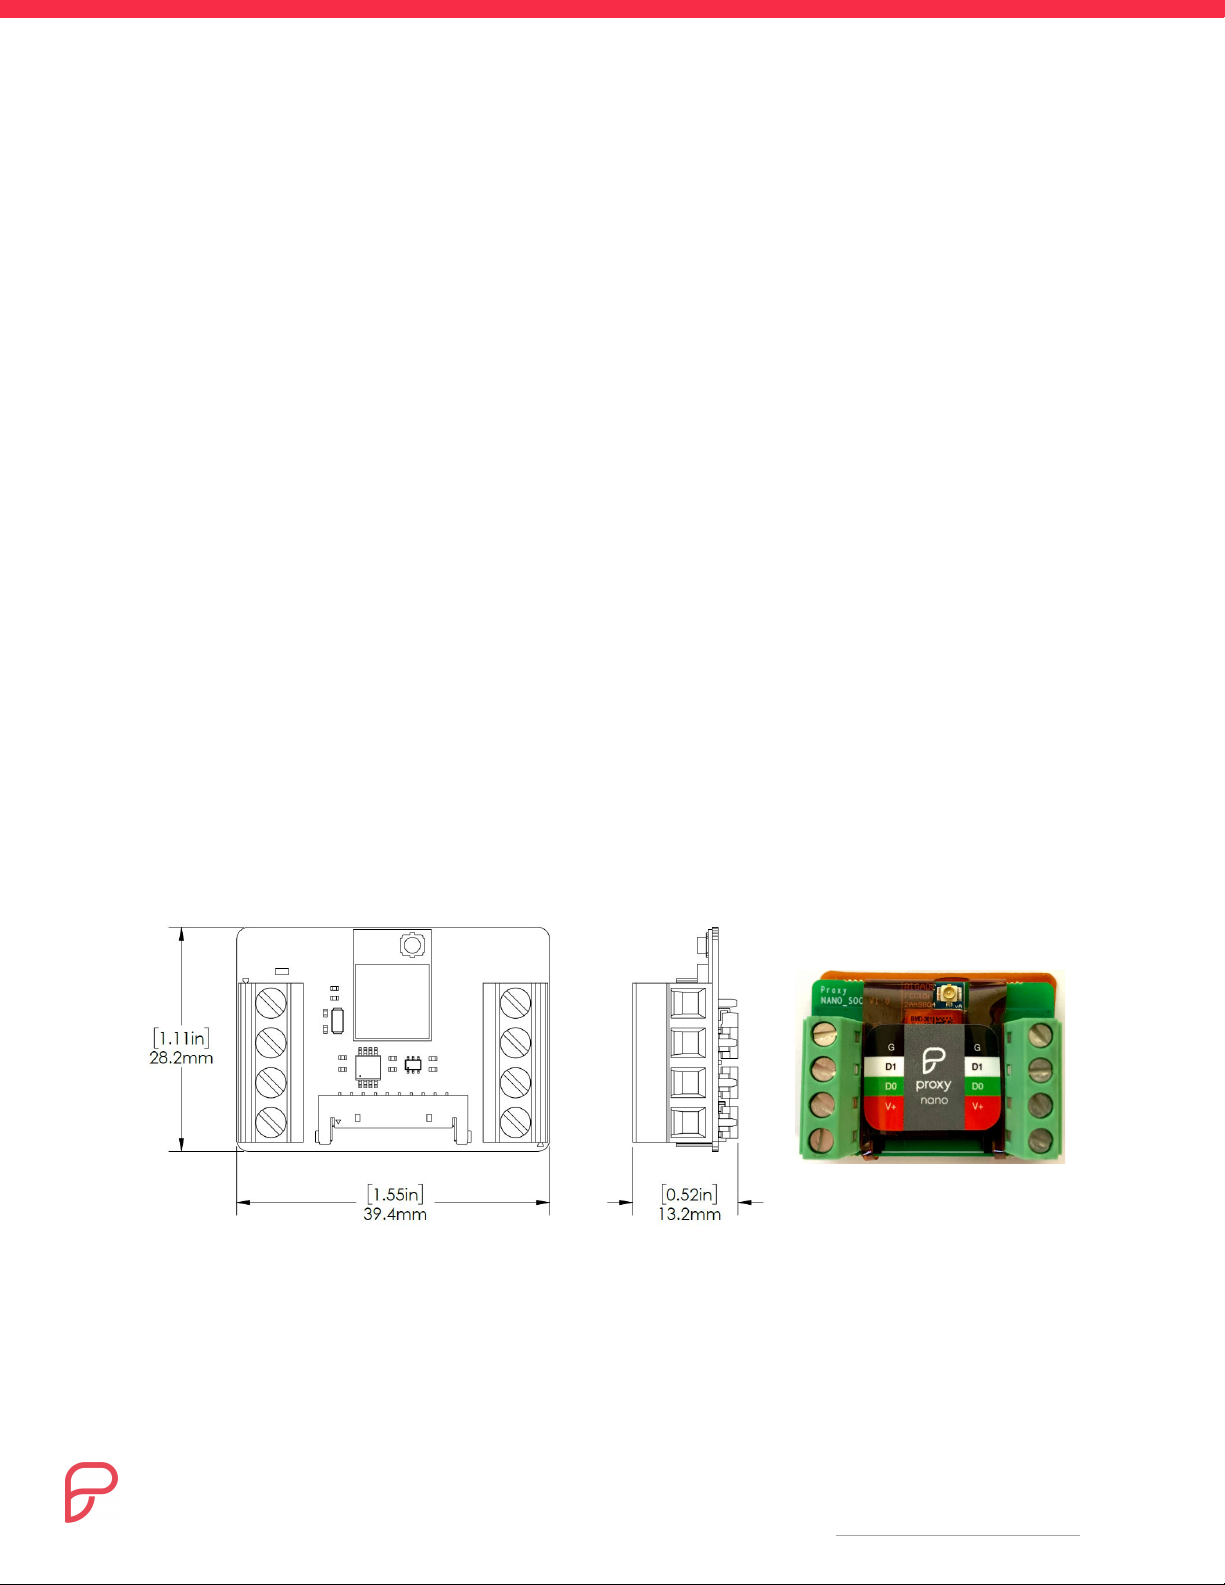
Dimensions
| 4 User Manual and Installation Guide: Mobile Reader Nano Inline & Mobile Reader Nano Connect
This document may have been updated since printing — for the latest, please visit https://proxy.com/s/nano-install
Product Details (Nano Inline)
Model Name: Mobile Reader Nano Inline
Device Type: Mobile Credential: Bluetooth Low Energy (BLE)
Type of Equipment: Unsealed controller board
Suitable for Indoor use only
Interface Type: Screw Terminal Block (4 Position x 2)
Operating Voltage Range: 5V - 24V DC (12V recommended)
Current Draw: 12 mA @ 12V
Power Consumption: 1.5W (Max)
Communication Protocol: Wiegand, Bluetooth Low Energy (BLE)
Credential Type: Bluetooth Low Energy (BLE):
Any bit format (standard or custom) up to 120 bits
Transmission Technology: Wiegand
Mobile Reader Nano Connect
Functionality
Nano Connect is a physical access control mobile credential reader, intended to be installed behind an
existing wall mounted card reader (not provided). The reader is also capable of supporting pass
through physical card credentials when used in conjunction with a compatible physical card reader.
The reader can interface with an access control system equipped with a Wiegand interface. The reader
consists of the following main parts.
| 5 User Manual and Installation Guide: Mobile Reader Nano Inline & Mobile Reader Nano Connect
This document may have been updated since printing — for the latest, please visit https://proxy.com/s/nano-install
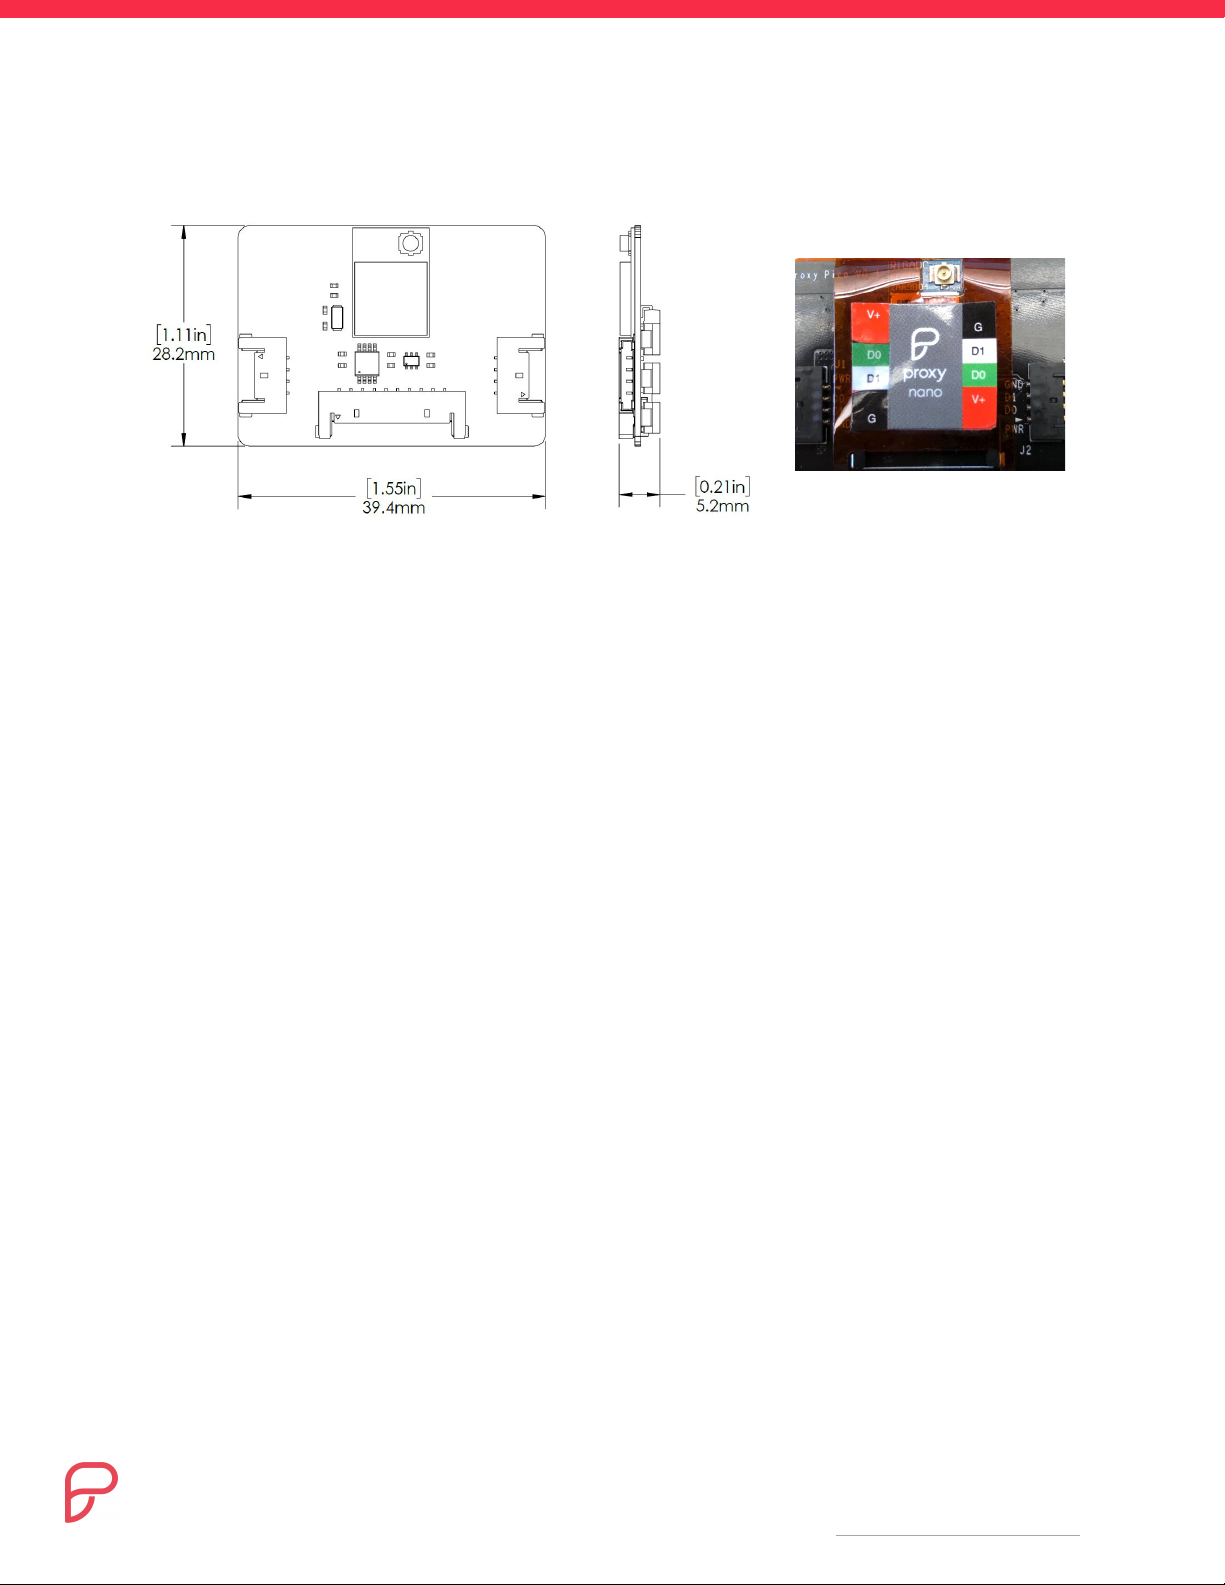
Dimensions
Product Details (Nano Connect)
Model Name: Mobile Reader Nano Connect
Device Type: Mobile Credential: 2.4GHz (Bluetooth Low Energy)
Type of Equipment: Unsealed controller board
Suitable for Indoor use only
Interface Type: Molex Connector, 4-pin, plug (x2)
Operating Voltage Range: 5V - 24V DC (12V recommended)
Current Draw: 12 mA @ 12V
Power Consumption: 1.5W (Max)
Communication Protocol: Wiegand, Bluetooth Low Energy (BLE)
Credential Type: Bluetooth Low Energy (BLE):
Any bit format (standard or custom) up to 120 bits
Transmission Technology: Wiegand
| 6 User Manual and Installation Guide: Mobile Reader Nano Inline & Mobile Reader Nano Connect
This document may have been updated since printing — for the latest, please visit https://proxy.com/s/nano-install

Installation Details
Wiring methods shall be in accordance with the National Electrical Code (ANSI/NFPA70), all local
codes, and the authorities having jurisdiction.
Parts List
Nano Inline
●Proxy Reader Nano Inline Board – x1
●Double-Sided Mounting Tape – x1
●Antenna 15cm 2.4GHz – x1
●Antenna 30cm 2.4GHz – x1
Nano Connect
●Proxy Reader Nano Connect Board – x1
●Double-Sided Mounting Tape – x1
●Antenna 10cm 2.4GHz – x1
●Molex Connector Wiring Harness – x2 (1 required, 1 optional)
Reader Specifications
Model / Version(s)
Operating
Voltage
Current
Rating
Operating Temperature
Nano Inline
5V - 24V DC
12 mA @ 12V
-35° to 66°C (-31° to 149°F)
5 to 95% RH (non-condensing)
Nano Connect
5V - 24V DC
12 mA @ 12V
-35° to 66°C (-31° to 149°F)
5 to 95% RH (non-condensing)
Do not operate at a voltage above 24V DC as it will damage the hardware
| 7 User Manual and Installation Guide: Mobile Reader Nano Inline & Mobile Reader Nano Connect
This document may have been updated since printing — for the latest, please visit https://proxy.com/s/nano-install
Wiring Information
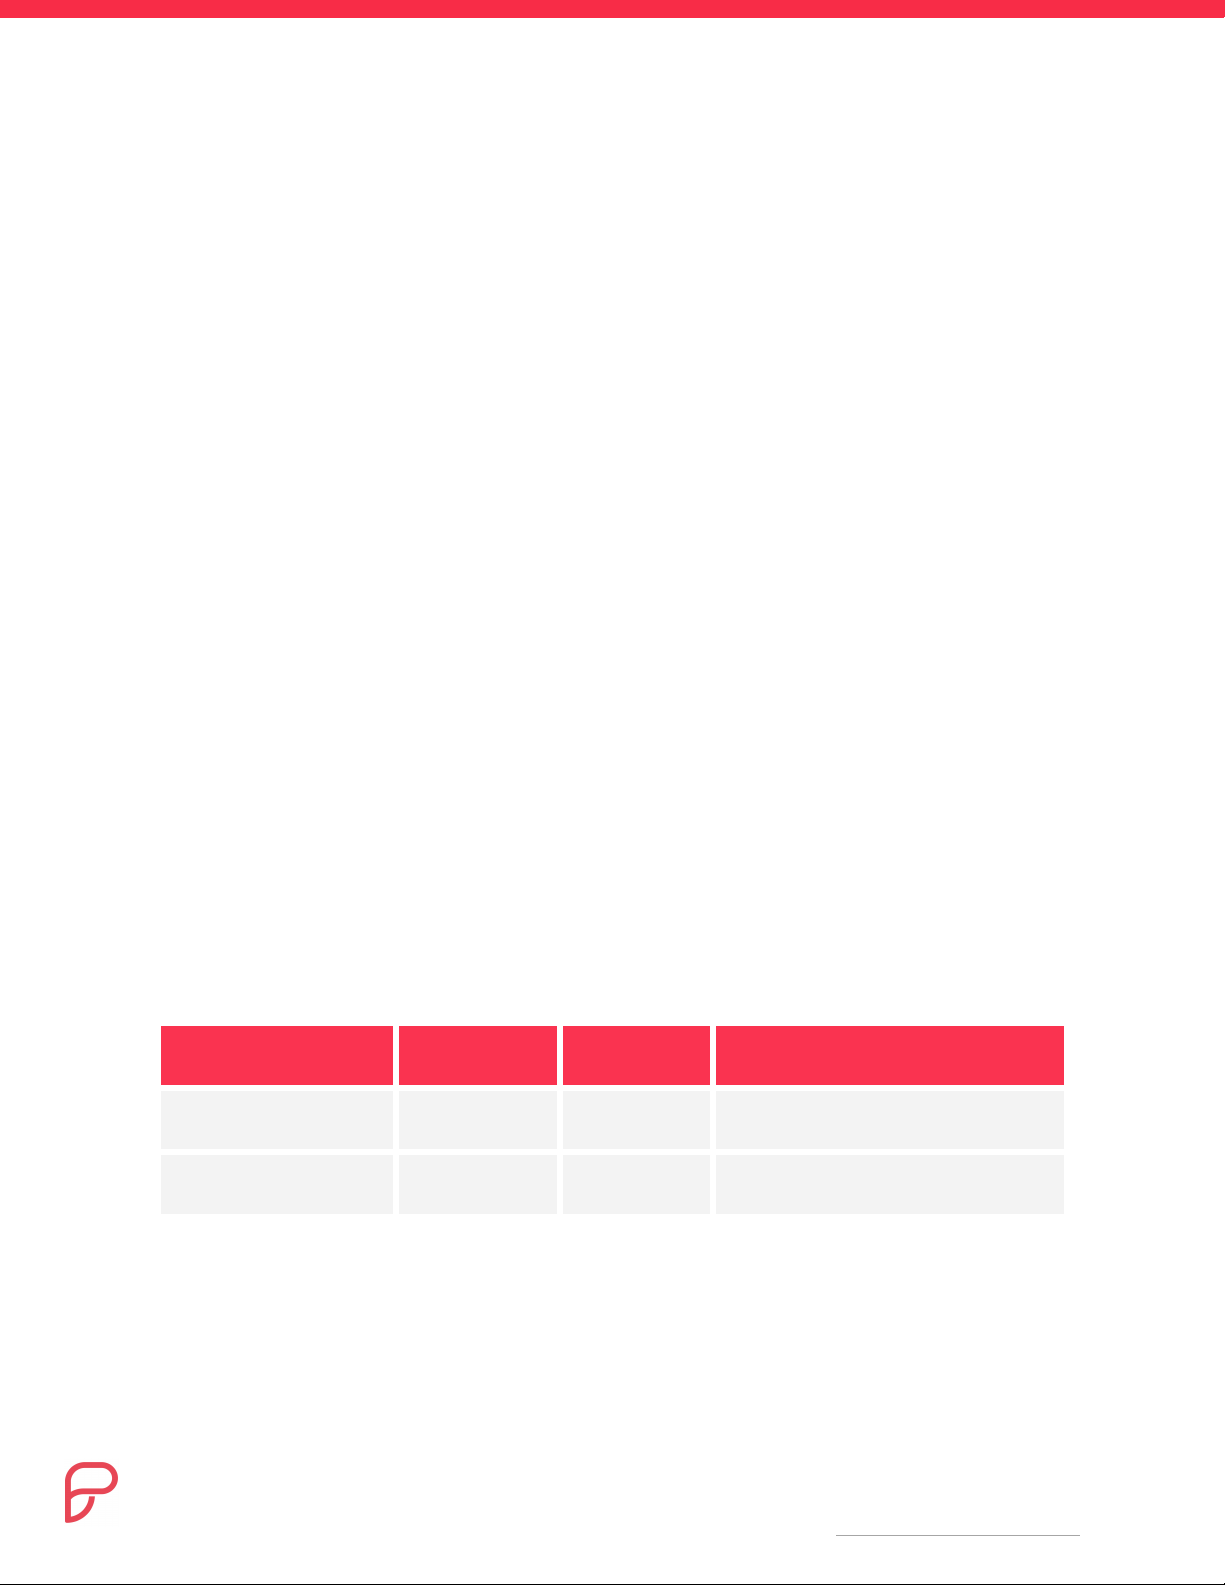
Mobile Reader Nano Inline
Input / Output
Colors
G (Ground)
D1 (Wiegand Data 1)
D0 (Wiegand Data 0)
V+ (DC+ Voltage)
1. Connect the Power (V+/GND) and Wiegand (D0/D1) lines from the reader to the terminal
block on one end of the Nano Inline.
2. Connect the Power (V+/GND) and Wiegand (D0/D1) lines from the controller to the terminal
block on the other end of the Nano Inline.
Note: There is no required orientation of the board. The reader output must be connected to one end of
the board and the controller input must be connected to the other.
| 8 User Manual and Installation Guide: Mobile Reader Nano Inline & Mobile Reader Nano Connect
This document may have been updated since printing — for the latest, please visit https://proxy.com/s/nano-install
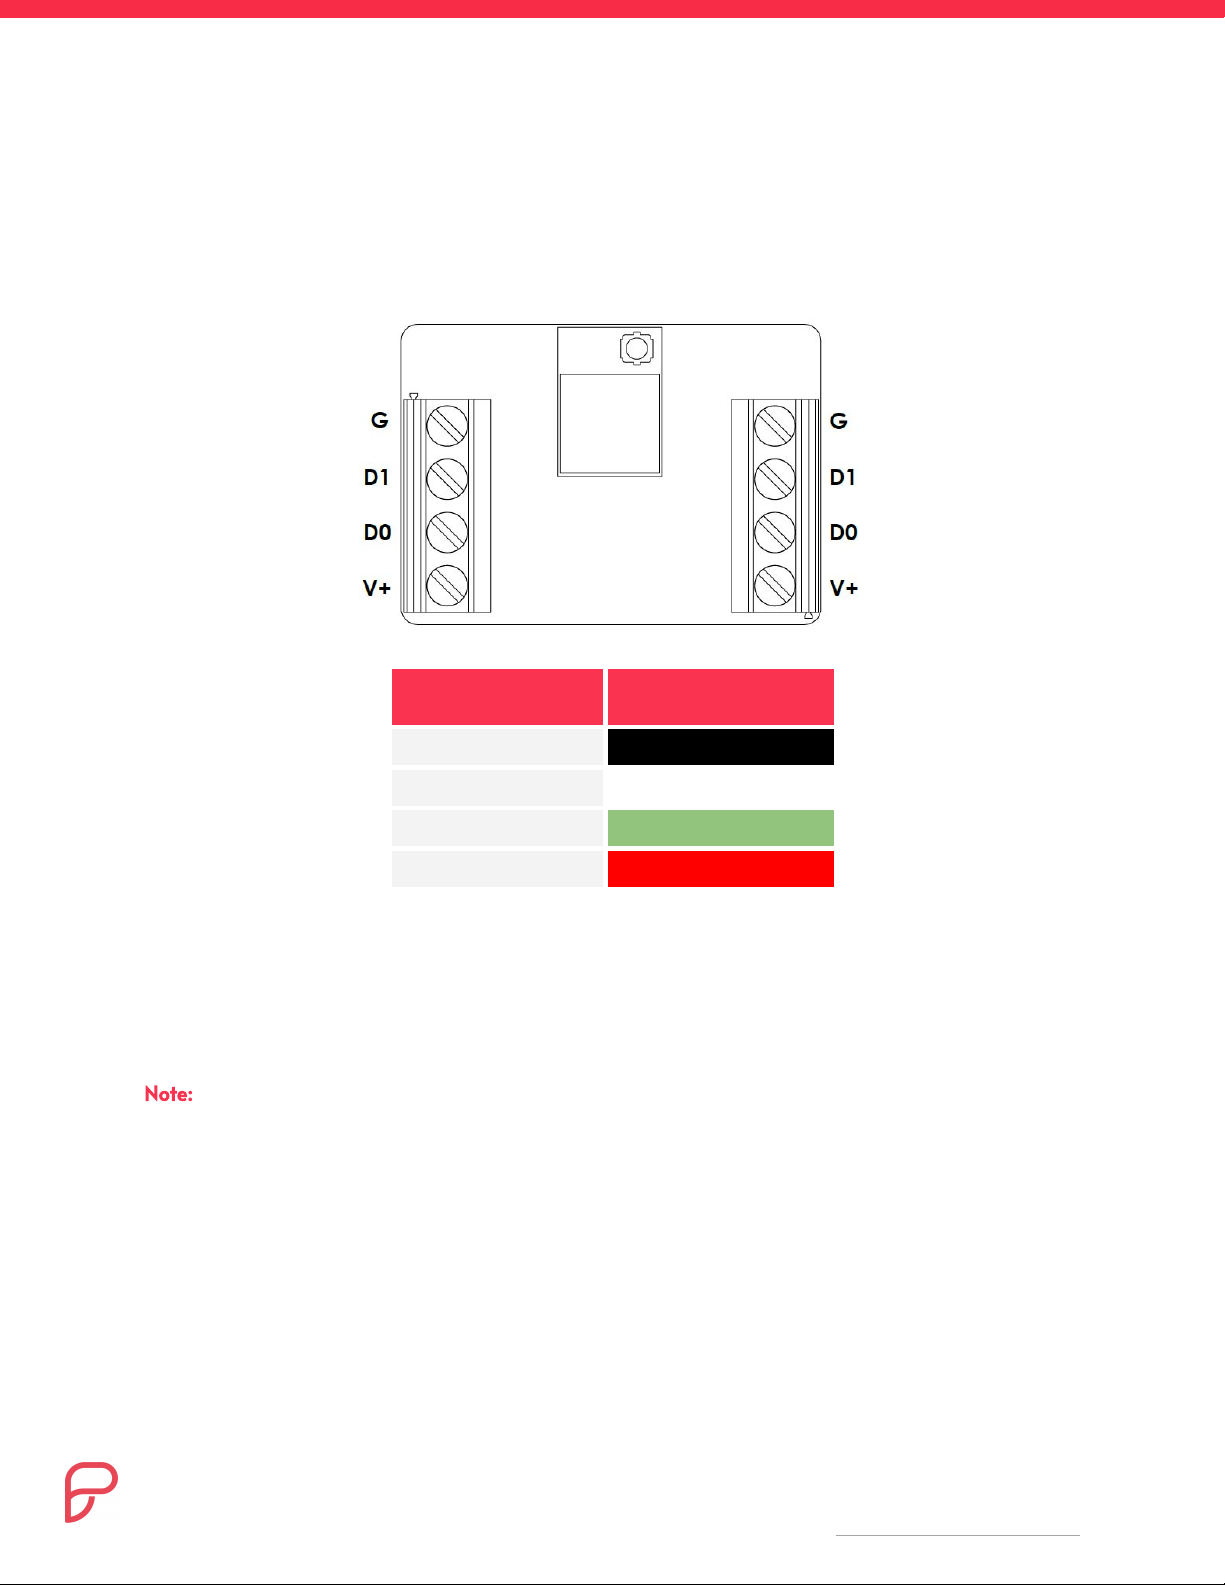
Mobile Reader Nano Connect
Input / Output
Colors
G (Ground)
D0 (Wiegand Data 0)
D1 (Wiegand Data 1)
V+ (DC+ Voltage)
1. Disconnect the Power (V+/GND) and Wiegand (D0/D1) lines from the existing reader and the
wiring to the controller.
2. Connect the Power (V+/GND) and Wiegand (D0/D1) lines from the provided Molex Wiring
Harness’ single ends to the existing reader and the wiring to the controller.
3. Connect the Molex Wiring Harness connector to the Nano Connect on either the left or right side
until it firmly clicks.
Note: Be careful when inserting the Molex Wiring Harness connector to the Nano Connect. The
connector is top-oriented.
| 9 User Manual and Installation Guide: Mobile Reader Nano Inline & Mobile Reader Nano Connect
This document may have been updated since printing — for the latest, please visit https://proxy.com/s/nano-install
External Antenna Information
Important:
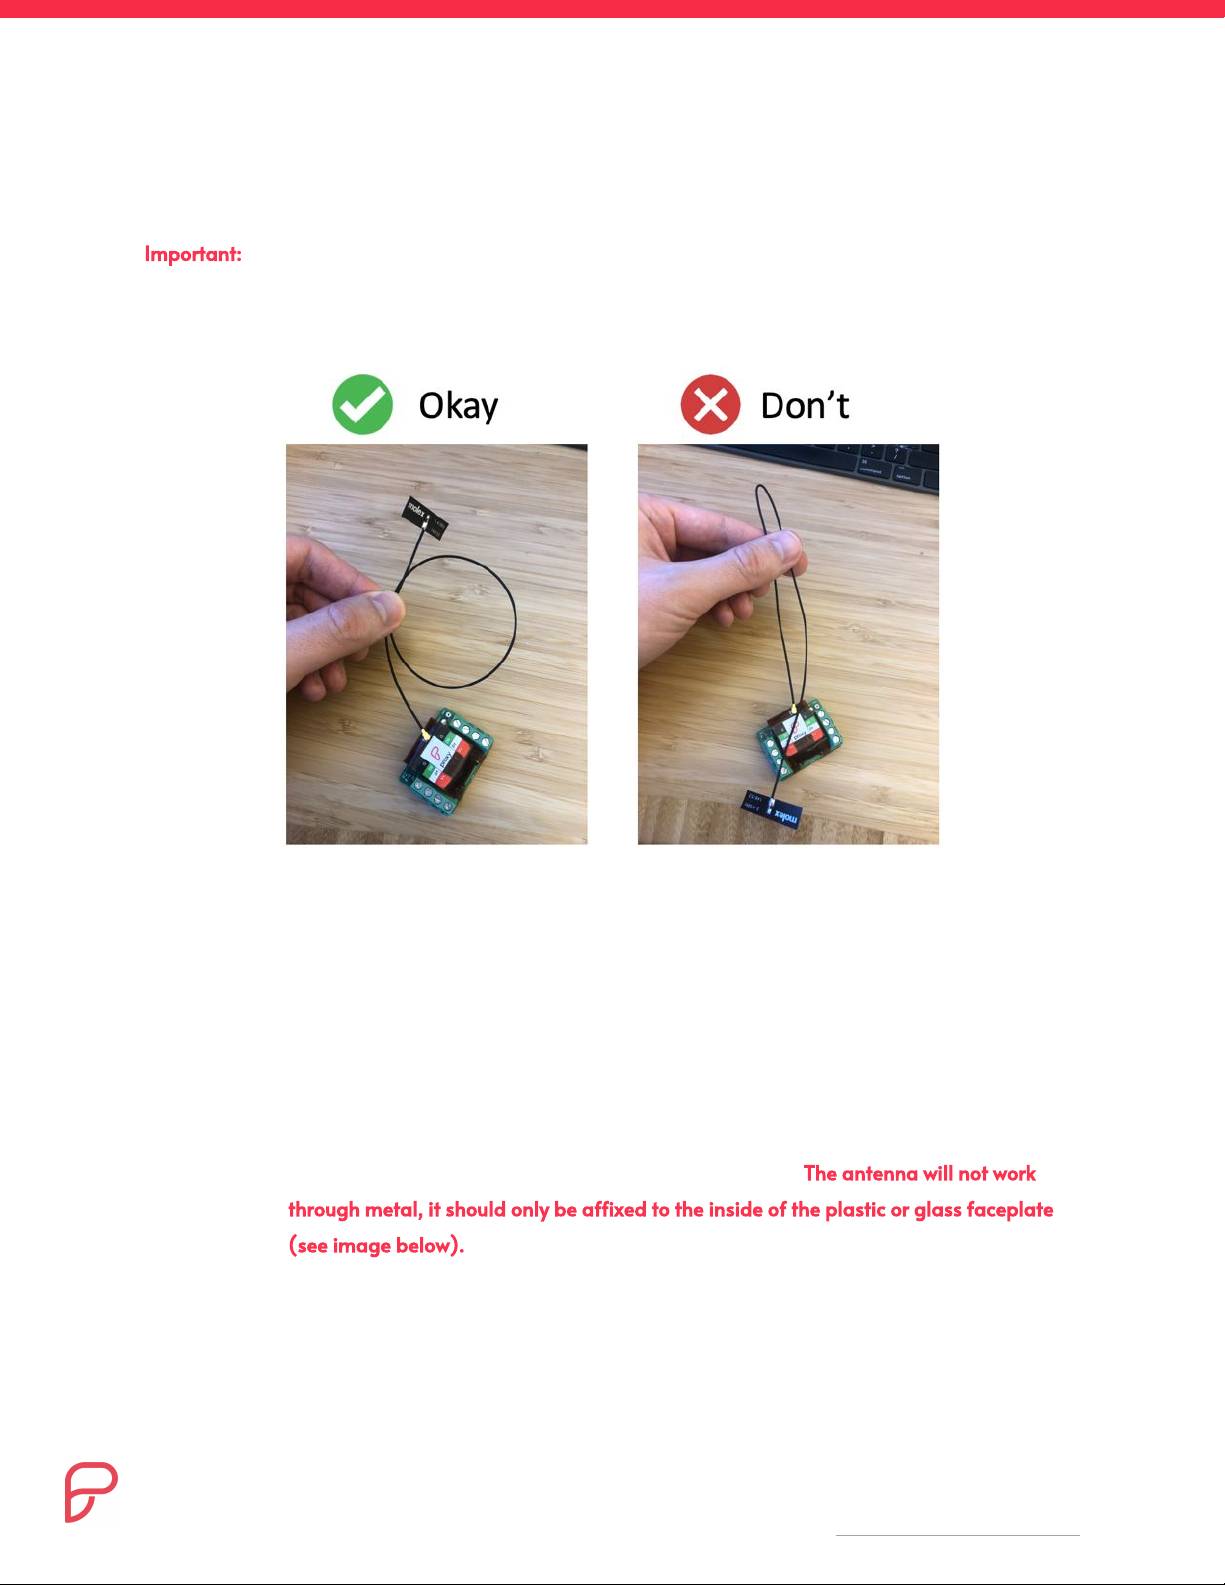
Do not kink or bend the antenna cable during installation as this will permanently damage the cable.
Instead, carefully loop any extra length of antenna cable.
Antenna Installation
1. Open the enclosure and remove the reader assembly
2. Locate the existing reader’s pigtail and identify the Power/GND and D0/D1 wires. The Nano
Inline and Nano Connect will connect to these wires. Do not connect them at this time.
3. Locate sufficient space to mount the Nano Inline or Nano Connect
a. For the Nano Inline, identify a location next to the existing reader that allows both the
existing physical card reader and the Nano Inline to fit into the turnstile cavity such
that the Nano Inline antenna can reach to the faceplate. The antenna will not work
through metal, it should only be affixed to the inside of the plastic or glass faceplate
(see image below).
b. For the Nano Connect, attach antenna behind the existing reader at the top edge of the
inner, wall-facing side of the reader (see image below).
| 10 User Manual and Installation Guide: Mobile Reader Nano Inline & Mobile Reader Nano Connect
This document may have been updated since printing — for the latest, please visit https://proxy.com/s/nano-install
Dieses Handbuch passt für folgende Modelle
1
Inhaltsverzeichnis