skals AMV1 Bedienungsanleitung
1
Manual
Weighing Machine
AMV1
A/S SKALS MASKINFABRIK
HOVEDGADEN 56
DK-8832 SKALS, DENMARK
Tel.: +45 87 25 62 00
Fax: +45 86 69 49 99
Email: [email protected]
http://www.skals.dk/

2
1Contents
1Contents........................................................................................................................2
2Introduction ...................................................................................................................3
3Safety ............................................................................................................................4
3.1Pictograms.......................................................................................................................... 4
4In general ......................................................................................................................5
4.1Feed belt............................................................................................................................. 6
4.2Vibration chutes.................................................................................................................. 6
4.3Weighing tank..................................................................................................................... 7
4.4Cross conveyor................................................................................................................... 8
4.5Sack platform...................................................................................................................... 9
4.6Operating panel .................................................................................................................. 9
5Operation ......................................................................................................................9
5.1Set-up ................................................................................................................................. 9
5.2Electrical connection........................................................................................................... 9
5.3Start-up............................................................................................................................. 10
6Control.........................................................................................................................11
6.1Homescreen ..................................................................................................................... 11
6.2Settings............................................................................................................................. 11
6.3Skals................................................................................................................................. 12
6.4Automatic operation settings ............................................................................................ 13
6.5Manual operation settings ................................................................................................ 17
6.6Emptying the machine ...................................................................................................... 18
7Service and maintenance............................................................................................18
7.1Bearings ........................................................................................................................... 18
7.2Gear.................................................................................................................................. 18
7.3Belt ................................................................................................................................... 18
7.4Vibration chutes................................................................................................................ 20
7.5Cleaning ........................................................................................................................... 21
8Transport.....................................................................................................................22
9Troubleshooting ..........................................................................................................23
9.1Fault described in display. ................................................................................................ 23

3
9.2Other faults. ...................................................................................................................... 24
10Spare parts list .........................................................................................................25
10.1Weighing tank................................................................................................................... 26
10.2Vibrator chute ................................................................................................................... 27
10.3Feed belt........................................................................................................................... 28
10.4Cross conveyor................................................................................................................. 29
11Diagrams..................................................................................................................31
12EU Declaration of Conformity...................................................................................32
2Introduction
Read this user manual thoroughly before using the machine.
The machine is use for weighing potatoes, onions, carrots and other similar products.
The machine can weight portion sizes from 1–50 kg.
The machine can weigh large portions up to 1000 kg.
The machine may be operated in a temperature range of -10 to +40 C°.
The information plate and CE label are positioned on the side of the machine, close to the
control panel.

4
3Safety
Any persons working in the close vicinity of the machine must not wear loose-fitting
clothing as this will be hazardous.
3.1 Pictograms
Two types of pictograms are positioned on the machine. Warnings and instructions.
Warnings
HAZARD - ROTATING PARTS.
Avoid touching or coming into contact with the machine's
moving parts. This applies to fingers and clothing, since this
can lead to mutilation.
CRUSH HAZARD.
Avoid touching or coming into contact with the machine's
moving parts. This applies to fingers and clothing, since this
can lead to mutilation.
Instructions
HOOK
Describes where the hook must be positioned when the machine is to be
lifted by a crane.
STRAP HERE
Describes where the machine shall be secured during transport.
FORKLIFT TRUCK
Describes where the forks must be positioned when lifting with a forklift
truck.
5
4In general
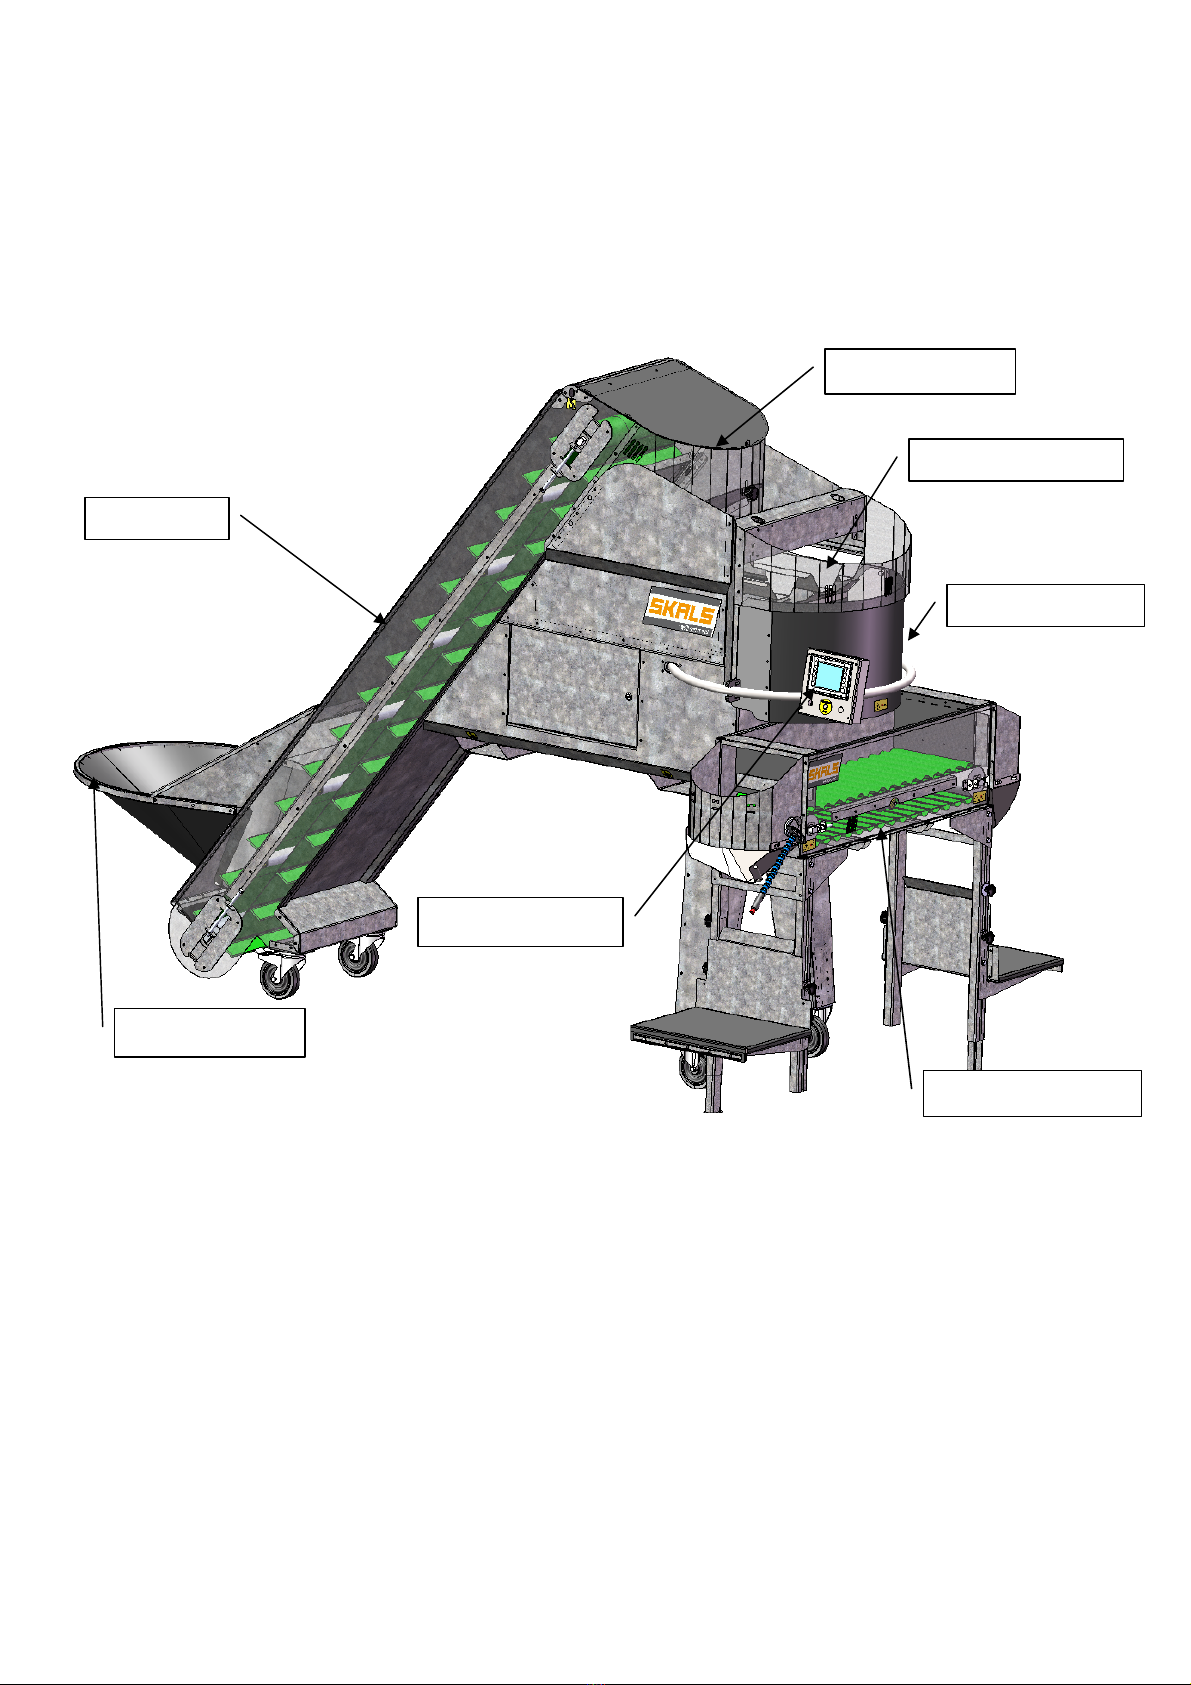
Description of machine
Buffer tank
Feed belt
Vibration chutes
Wei
g
hin
g
tank
Cross conveyor
Operating panel
Feed hopper

6
4.1 Feed belt
The feed belt transports the products from the feed hopper up to the buffer tank above the
vibration chutes. The buffer tank has two sensors that activate and deactivate the feed
belt.
To achieve optimal operation, it is important that the feed hopper is always filled
with products.
4.2 Vibration chutes
The machine is equipped with three vibration chutes, designed to fill and dose the
weighing tank.
All three of the vibration chutes switch on automatically when the weighing tank shall be
filled and only two of the chutes operate when dosing for the required weight.
Fill chute.
Dosing chute
Fill chute.

7
4.3 Weighing tank
The weighing tanks' volume capacity is 57 l.
The weighing tank must be checked regularly and if required, cleaned of any soil that has
accumulated.
During operation, the weighing tank must not be touched otherwise the weighing result will
not be correct.
8
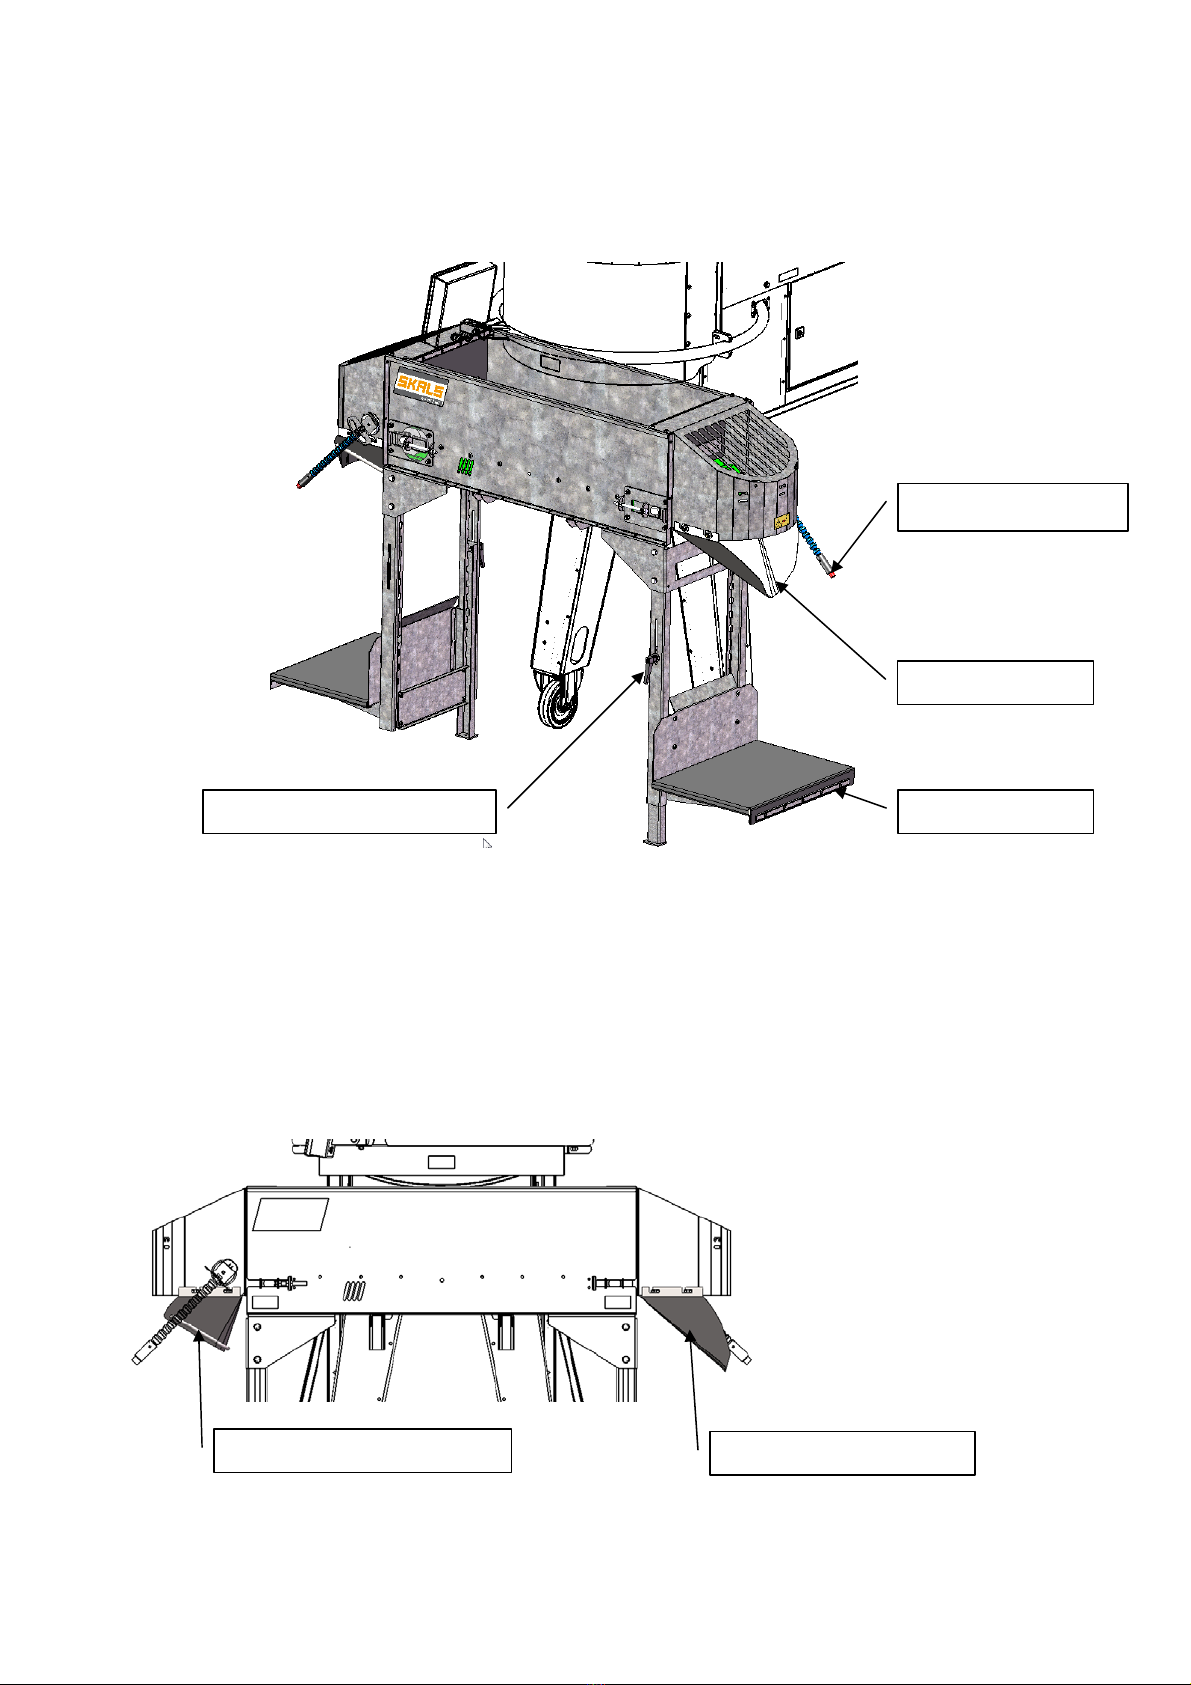
4.4 Cross conveyor
The cross conveyor allows the machine to be operated by two people at the same time.
When the operating sensor is activated on a specific side, the cross conveyor will transport
the next portion to that side.
NB: The machine 'remembers' an activation of the operating sensor, even though the
cross conveyor is not ready to deliver a portion!
The machine is supplied with four outlet hoppers as standard. Two hoppers for portion
sizes 1–9 kg and two hoppers for 10–50 kg.
Outlet hopper
Operation sensor
Sack platform
Handle for stabiliser leg
Outlet hopper 10–50 kg Outlet hopper 1–9 kg
9
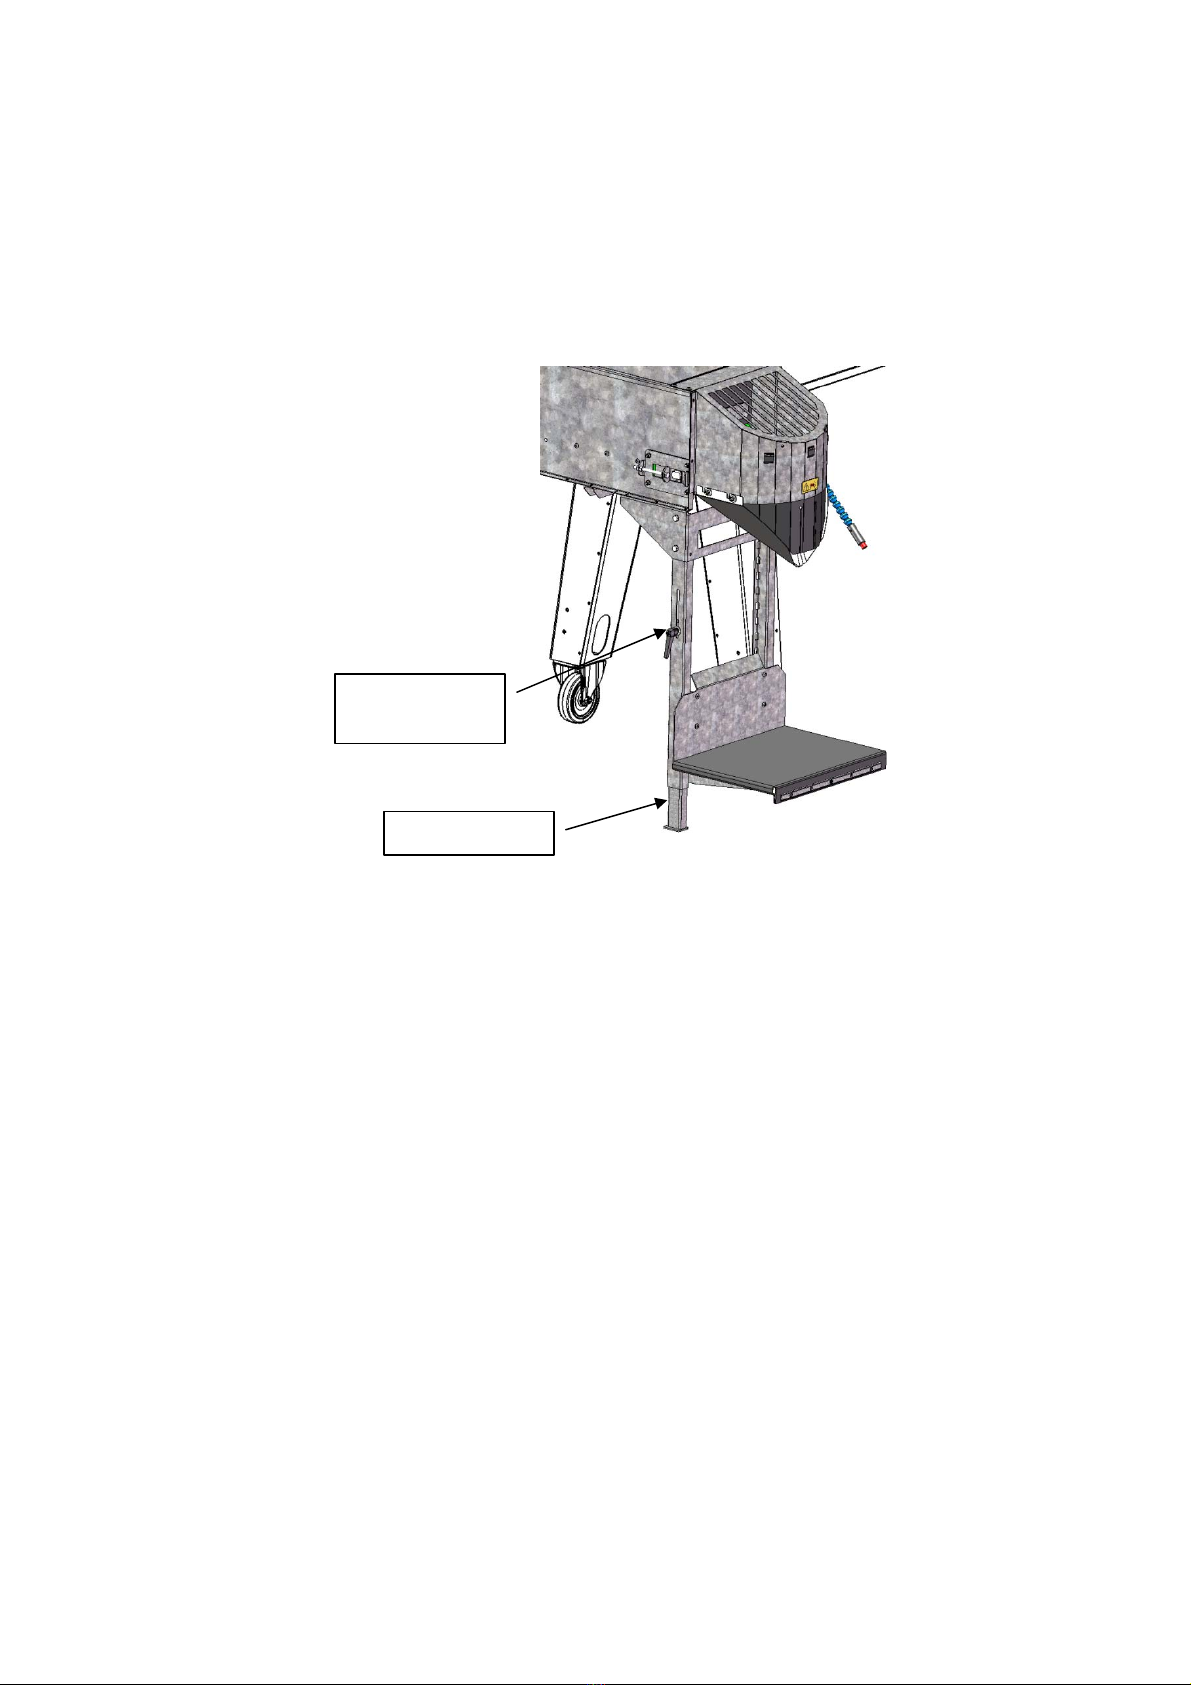
4.5 Sack platform
When the height of the sack platform shall be changed, loosen the two finger screws on
the platform and raised/lower the platform and then re-tighten the finger screws.
When weighing portions that weigh more than 10 kg, lower the stabiliser leg at the sack
platform until it supports on the level surface.
4.6 Operating panel
The operating panel consists of a touch display and a stop.
All of the machine's electrical functions are operated via the touch display.
5Operation
Before commissioning the machine, check it to ensure it has not been damaged during
transport.
Any defects must be reported to the dealer immediately.
5.1 Set-up
To ensure correct weighing, the machine must be placed on a stable and level surface.
5.2 Electrical connection
The electrical connection must comply with national applicable regulations.
1 Phase 230 V - N + PE
Stabiliser leg
Handle for
stabiliser le
g

10
5.3 Start-up
1. Enter the desired portion size and total number of portions that are to be weighed
using the operating panel.
2. Next, select the programme that is to be used (potatoes, carrots, onions or
optional).
3. Press the "Start" button on the display.
4. The operating sensor is activated.
NB: In the case of start-up after the portion size has been changed the machine may
initially weigh inaccurately. The machine will regulate this automatically after a few
weighings.
Inhaltsverzeichnis


