Sparkfun Electronics LilyPad ProtoSnap Plus Technisches Dokument

1/22/2018 LilyPad ProtoSnap Plus Hookup Guide - learn.sparkfun.com
https://learn.sparkfun.com/tutorials/lilypad-protosnap-plus-hookup-guide?_ga=2.234157401.659504291.1516640116-204410570.1509632255 1/23
Hardware Overview and Features
Don’t snap apart your LilyPad ProtoSnap Plus until you're ready to use the pieces in a project. If you leave
the pieces attached to the board, you'll be able to prototype and test your project before you start sewing.
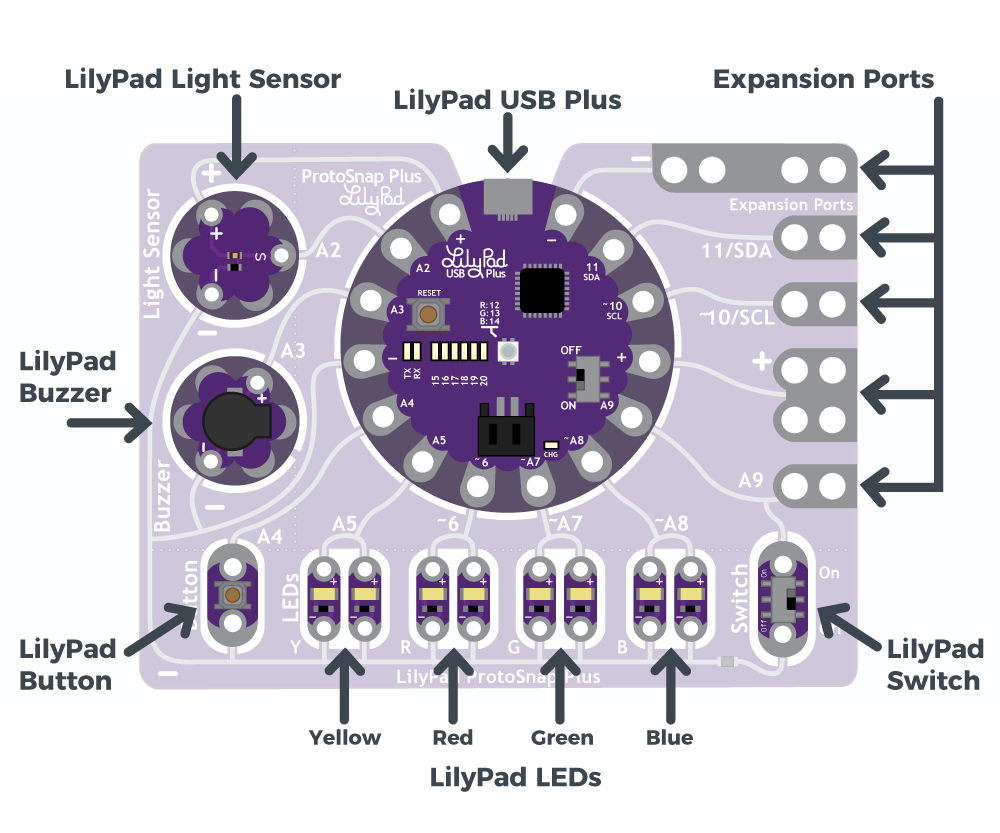
The LilyPad ProtoSnap Plus features twelve LilyPad components connected to a LilyPad microcontroller by
conductive pathways called traces. For reference, each component on the ProtoSnap has a nearby label with its
name and the number of the LilyPad USB Plus sew tab it is connected to.
LilyPad USB Plus
The LilyPad USB Plus is an Arduino-compatible microcontroller similar to the LilyPad Arduino USB - ATmega32U4
Board but with some additional features and three additional sew tabs. It is currently only available on the LilyPad
ProtoSnap Plus.

1/22/2018 LilyPad ProtoSnap Plus Hookup Guide - learn.sparkfun.com
https://learn.sparkfun.com/tutorials/lilypad-protosnap-plus-hookup-guide?_ga=2.234157401.659504291.1516640116-204410570.1509632255 2/23
Features:
USB port for connecting to a computer.
Two sets of power (+) and ground (-) sew tabs.
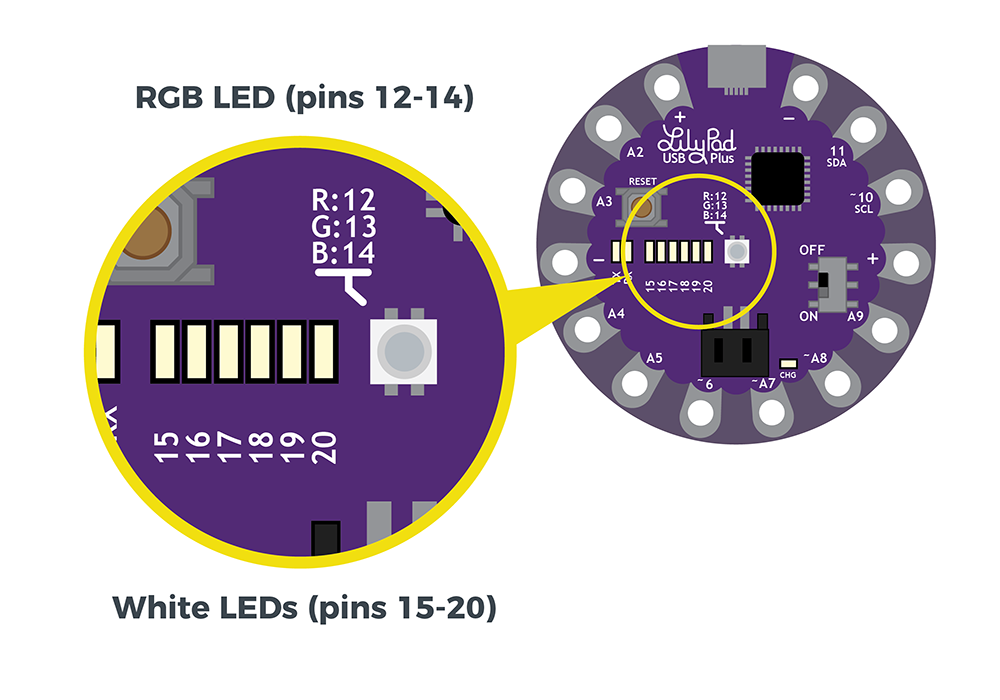
Built-in RGB LED attached to pins 12 (R), 13 (G), and 14 (B).
A row of six white LEDs attached to pins 15-20.
Charging circuit for single-cell (3.7V) Lithium-Polymer batteries.
Some of the sew tabs on the LilyPad USB Plus have special functionality:
An 'A' in front of the number denotes a tab that can function as an analog input. These sew tabs can read
sensors that output a varying voltage like the light sensor built into the ProtoSnap Plus.
A '~' symbol in front of the number indicates that tab supports PWM (Pulse Width Modulation) output.
These tabs can output an "analog" signal that can be used to vary the brightness on LEDs, etc.
Note: The "A" in front of analog sew tab numbers in your code is optional. However, do not include the "~"
symbol for PWM outputs. It is only provided to make it easy for you to check which pins can produce PWM
(analog) output and is not used in programming.
Below is a table that lists the components connected to the LilyPad USB Plus sew tabs.
LilyPad
Component
Connected
to LilyPad
USB Plus
Sew Tab
Description
LilyPad
Light
A2 LilyPad USB Plus receives ambient
light level input from light sensor.

1/22/2018 LilyPad ProtoSnap Plus Hookup Guide - learn.sparkfun.com
https://learn.sparkfun.com/tutorials/lilypad-protosnap-plus-hookup-guide?_ga=2.234157401.659504291.1516640116-204410570.1509632255 3/23
Sensor (S)
LilyPad
Buzzer (+)
A3 A buzzer that create tones controlled
by LilyPad USB Plus.
LilyPad
Button
A4 LilyPad USB Plus receives button
press input.
2x LilyPad Y
LEDs (+)
A5 A pair of yellow LEDs controlled by
LilyPad USB Plus.
2x LilyPad
R LEDs (+)
~6 A pair of red LEDs controlled by
LilyPad USB Plus.
2x LilyPad
G LEDs (+)
~A7 A pair of green LEDs controlled by
LilyPad USB Plus.
2x LilyPad B
LEDs (+)
~A8 A pair of blue LEDs controlled by
LilyPad USB Plus.
LilyPad
Switch
A9 LilyPad USB Plus receives switch
state (on/off) input to change modes.
Expansion
Port A9
A9 Clippable pads to connect another
LilyPad piece to. Shares connection
with the LilyPad Switch.
Expansion
Port (+)
(+) Clippable pads connected to LilyPad
USB Plus's power (+) sew tab.
Expansion
Port
~10/SCL
~10/SCL Clippable pads connected to LilyPad
USB Plus's sew tab 10. This can be
used to connect to a I2C clock pin.
Expansion
Port 11/SDA
11/SDA Clippable pads connected to LilyPad
USB Plus's sew tab 11. This can be
used to connect to a I2C data pin.
Expansion
Port (-)
(-) Clippable pads connected to LilyPad
USB Plus's ground (-) sew tab.
All
components
(-)
(-) All components share a common
ground connection back to the
LilyPad USB Plus.
Powering the LilyPad ProtoSnap Plus
The LilyPad ProtoSnap Plus can be powered in two ways:

1/22/2018 LilyPad ProtoSnap Plus Hookup Guide - learn.sparkfun.com
https://learn.sparkfun.com/tutorials/lilypad-protosnap-plus-hookup-guide?_ga=2.234157401.659504291.1516640116-204410570.1509632255 4/23
If you have a USB power source available (a computer, 5V USB wall adapter, USB battery pack, etc.), you can
run the board from a USB cable.
If you’d like your project to be more portable, you can easily attach a rechargable Lithium-polymer battery to
the board. See Technical Notessection for more information on batteries and charging.
Exploring the Sample Circuit
Don’t snap apart your LilyPad ProtoSnap Plus until you're ready to use the pieces in a project. If you leave
the pieces attached to the board, you'll be able to prototype and test your project before you start sewing.
The LilyPad ProtoSnap Plus ships with pre-loaded code that showcases all of the LilyPad pieces connected to it. To
power up the ProtoSnap Plus, connect it to your computer using a micro-B USB cable or attach an E-Textiles Battery.
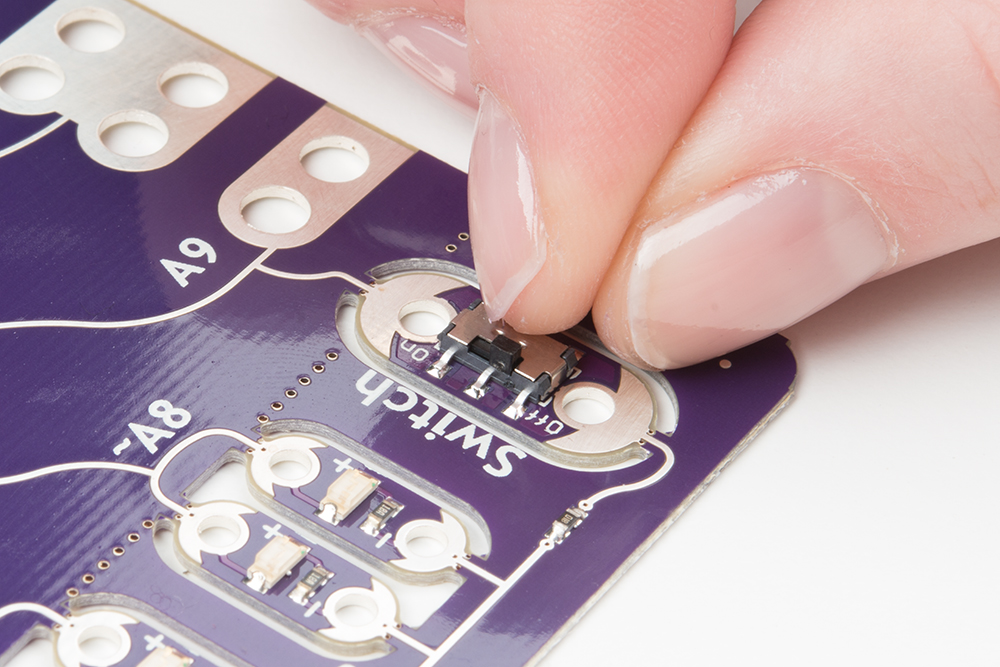
Then slide the switch on the right side of the LilyPad USB Plus to the ON position.
The board has two modes to choose from: when the LilyPad Slide Switch (the other switch at the bottom right of the
board) is turned OFF, all of the LEDs will turn on in sequence. When the LilyPad Slide Switch is turned ON, the white
LEDs on the LilyPad USB Plus will form a bar graph showing the ambient light level - move your hand over the Light
Sensor to see the level change. And if you press the LilyPad Button (at the bottom left of the board), you’ll be treated
to a short song.

1/22/2018 LilyPad ProtoSnap Plus Hookup Guide - learn.sparkfun.com
https://learn.sparkfun.com/tutorials/lilypad-protosnap-plus-hookup-guide?_ga=2.234157401.659504291.1516640116-204410570.1509632255 5/23
Continue to the Setting Up Arduino section for directions on installing the LilyPad USB Plus support for Arduino to
enable you to upload your own custom code.
Using the Expansion Ports
The LilyPad ProtoSnap Plus features five expansion ports connected to sew tabs on the LilyPad USB Plus. These
allow you to easily attach external components to the board, including LilyPad and non-LilyPad boards. The
expansion ports can accommodate alligator clips, IC clips, and other temporary attachment cables for testing and
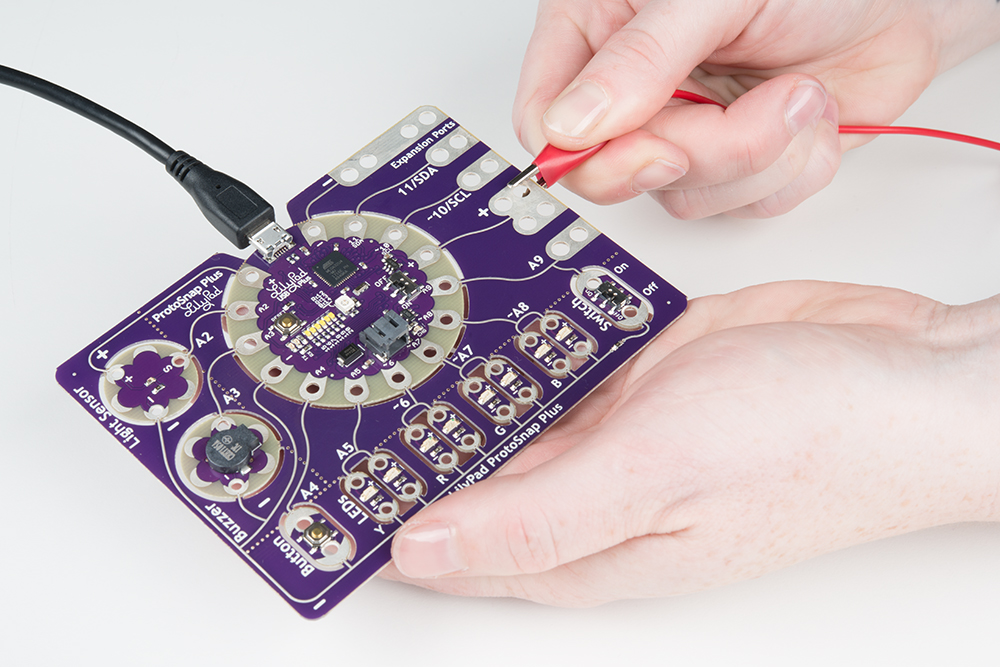
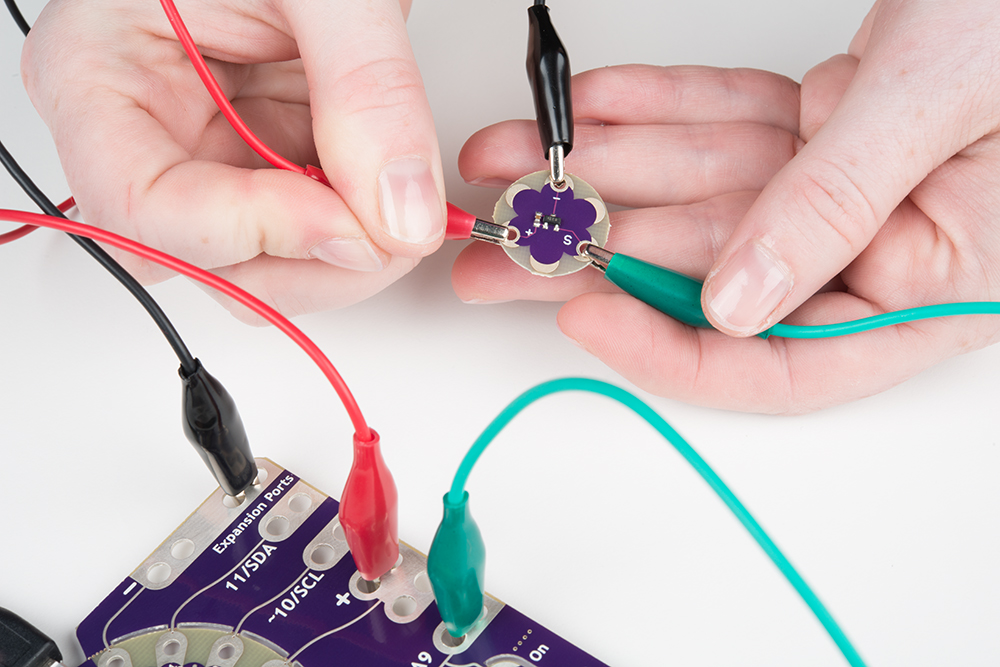
experimentation. Below are a few ways to connect an alligator cable to the sew tabs.
Alligator clip attached parallel to the expansion port.

1/22/2018 LilyPad ProtoSnap Plus Hookup Guide - learn.sparkfun.com
https://learn.sparkfun.com/tutorials/lilypad-protosnap-plus-hookup-guide?_ga=2.234157401.659504291.1516640116-204410570.1509632255 6/23
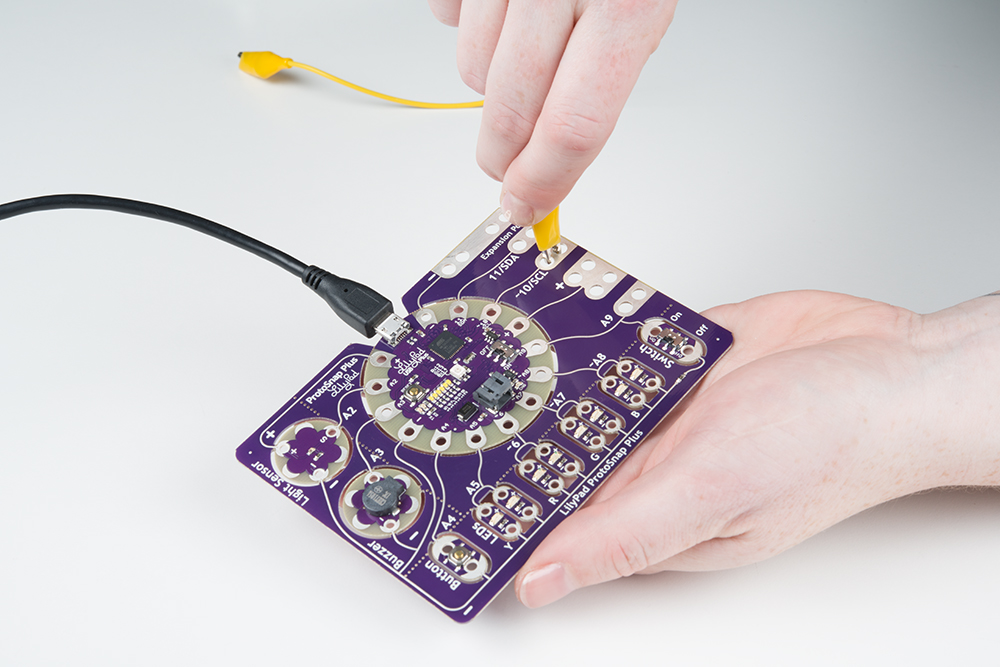
Alligator clip attached perpenticular to the expansion port.
A LilyPad temperature sensor attached to the LilyPad ProtoSnap Plus expansion ports for testing.
Using Expansion Port A9
You may have noticed that tab A9 is connected to both the LilyPad Slide Switch and an Expansion Port. You can only
use A9 for one of these connections; either the switch as an input or the expansion port as an input/output.

1/22/2018 LilyPad ProtoSnap Plus Hookup Guide - learn.sparkfun.com
https://learn.sparkfun.com/tutorials/lilypad-protosnap-plus-hookup-guide?_ga=2.234157401.659504291.1516640116-204410570.1509632255 7/23
If you’re using an external component or sensor on expansion port A9, move the slide switch to the OFF position to
keep the switch from interfering with your input or output signal.
Below is an image of the LilyPad temperature sensor attached to the LilyPad ProtoSnap Plus expansion ports for
testing.
For more information about about expansion port A9 in the Technical Notessection.
Setting Up Arduino

1/22/2018 LilyPad ProtoSnap Plus Hookup Guide - learn.sparkfun.com
https://learn.sparkfun.com/tutorials/lilypad-protosnap-plus-hookup-guide?_ga=2.234157401.659504291.1516640116-204410570.1509632255 8/23
COPY CODE
Note: The LilyPad ProtoSnap Plus and the LilyPad USB Plus requires Arduino version 1.8 or higher. If this is
your first time using Arduino, you can install it by following our Installing the Arduino IDE tutorial. Otherwise,
please make sure to install (or update to) the latest version of Arduino and verify that you are connected to the
internet to download the LilyPad USB Plus software add-ons.
Now that you’ve explored the board’s features, it’s time to upload some code! When you first install Arduino, it knows
how to program a number of “standard” Arduino-compatible boards. Since the LilyPad USB Plus is a newer LilyPad
microcontroller, you will need to manually add it to this list by following the steps below. You’ll only have to do this
once to add the board to Arduino.
Note for Linux Users: If you are installing the LilyPad ProtoSnap Plus in Linux, this document has some
specific
notes:https://github.com/sparkfun/LilyPad_ProtoSnap_Plus/blob/master/Documentation/LinuxInstallation.md.
1. Add SparkFun Boards to Arduino’s Preferences
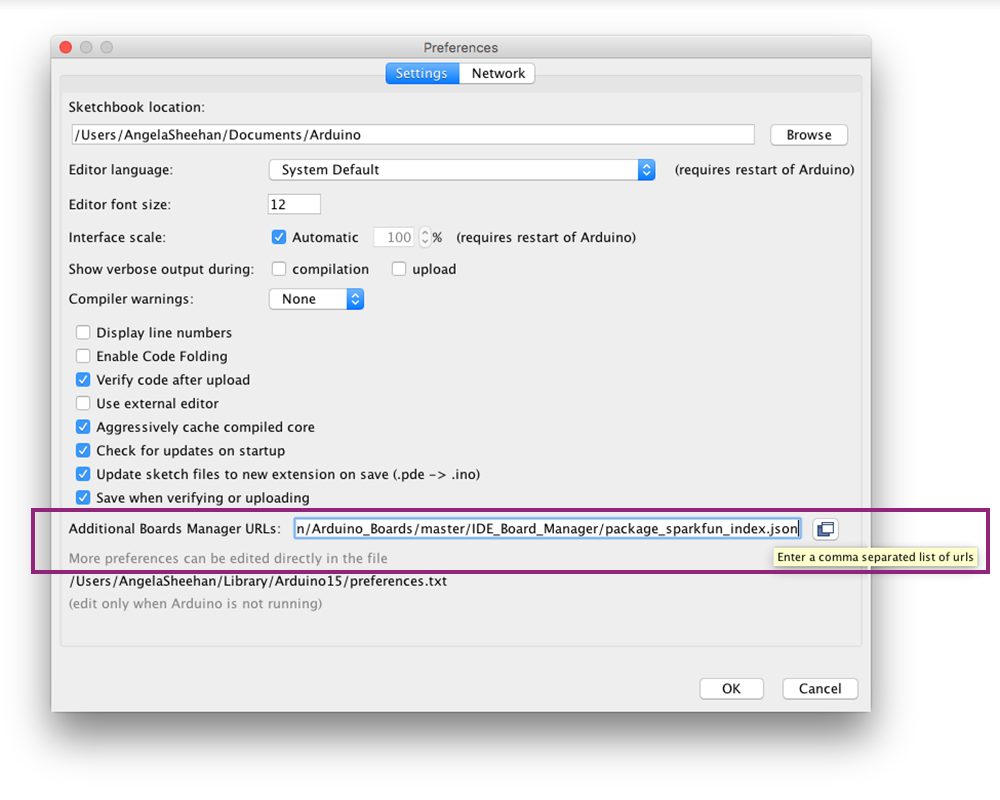
Start the Arduino IDE software (version 1.8 or higher) and open the Preferences window by
choosing File > Preferences from the menu.
Now copy the below text and paste it into the “Additional Boards Manager URLs” text box:
https://raw.githubusercontent.com/sparkfun/Arduino_Boards/master/IDE_Board_Manager/pac
kage_sparkfun_index.json

1/22/2018 LilyPad ProtoSnap Plus Hookup Guide - learn.sparkfun.com
https://learn.sparkfun.com/tutorials/lilypad-protosnap-plus-hookup-guide?_ga=2.234157401.659504291.1516640116-204410570.1509632255 9/23
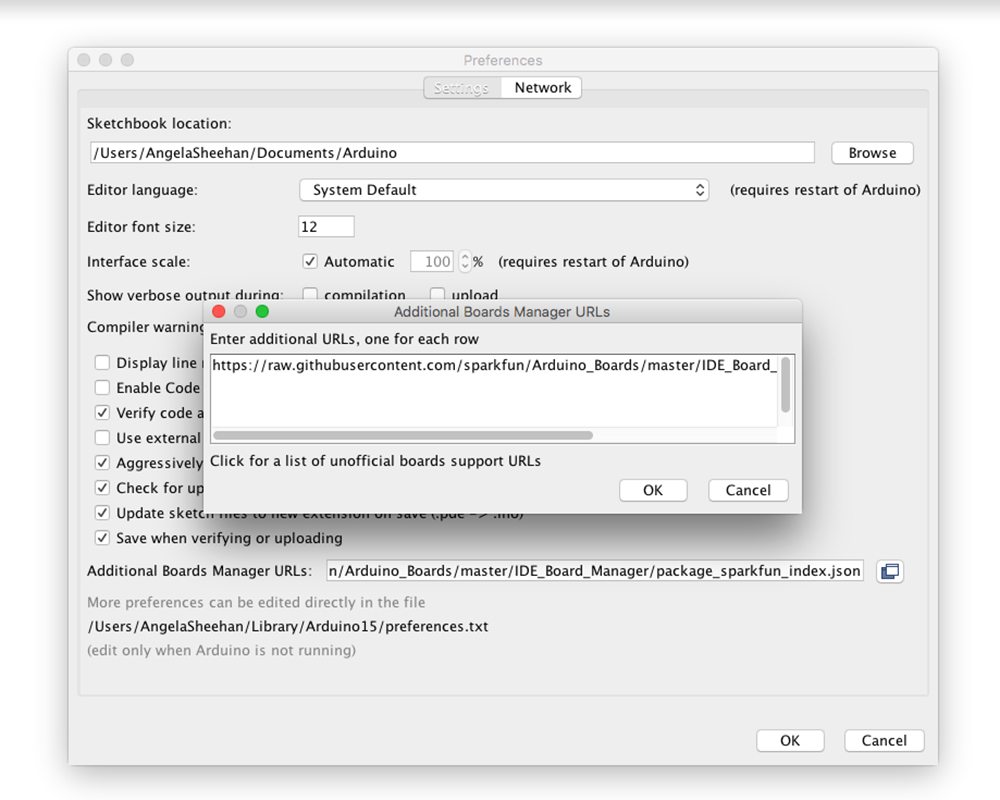
No room? If there is already a URL in the box, click the button to the right of the box. This will open a window
allowing you to paste the URL onto a new line.
When you’re done, click the “OK” button.
2. Install SparkFun AVR Boards
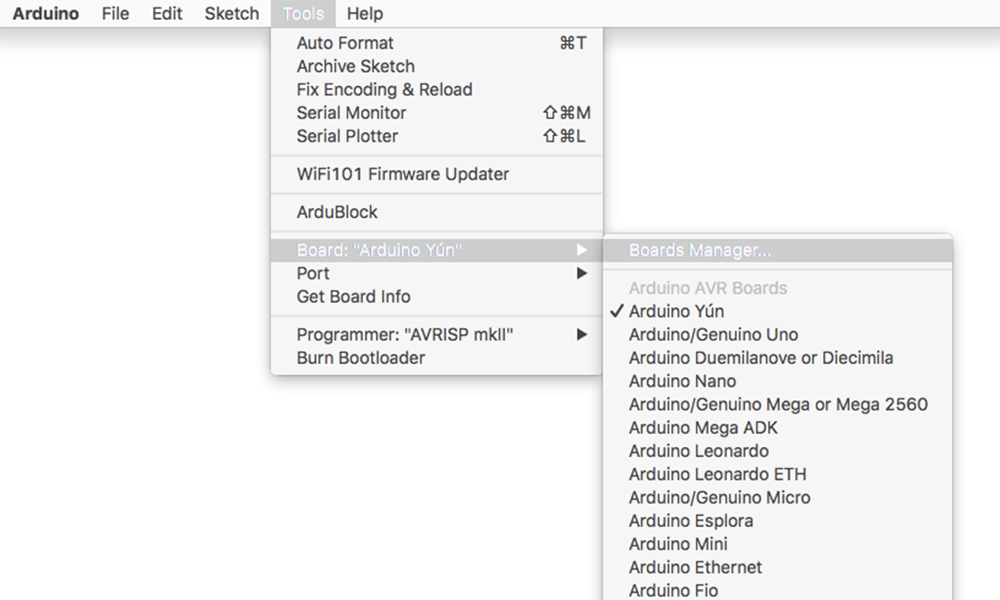
Next, you’ll add the LilyPad USB Plus through Arduino’s Boards Manager Menu. Open the Boards Manager by
choosing Tools > Board > Boards Manager…(The Boards Manager option is at the very top of the list of boards;
you may need to scroll up to see it.)

1/22/2018 LilyPad ProtoSnap Plus Hookup Guide - learn.sparkfun.com
https://learn.sparkfun.com/tutorials/lilypad-protosnap-plus-hookup-guide?_ga=2.234157401.659504291.1516640116-204410570.1509632255 10/23
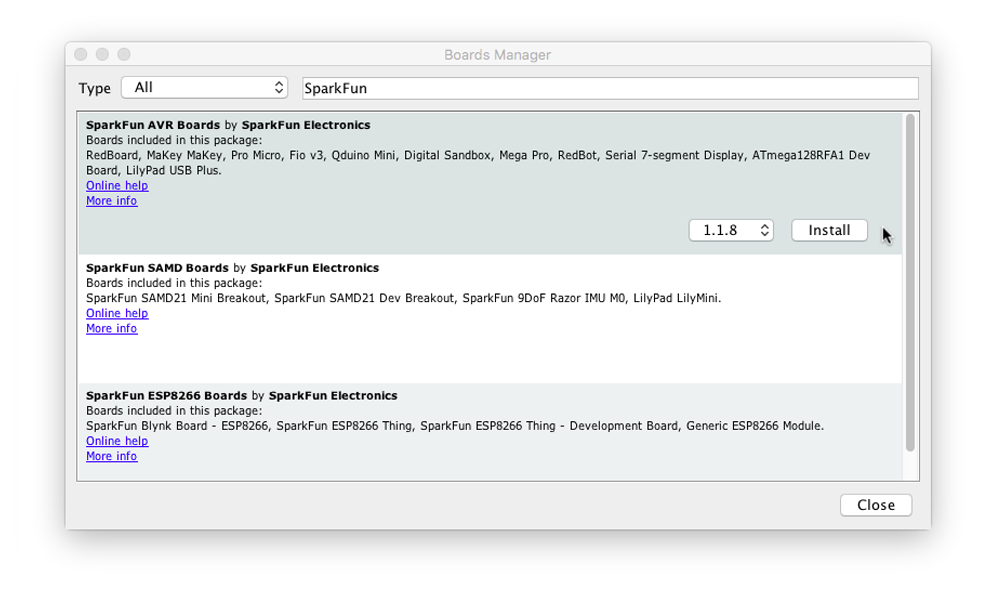
When the Boards Manager window opens, it will present a long list of options. Type “sparkfun” (without quotes) into
the “Filter your search” box at the top of the window. This will shrink the list down to SparkFun’s options.
You should see several entries. Look for the one labeled SparkFun AVR Boards by SparkFun Electronics.
Troubleshooting: If you don't see a SparkFun entry, it may mean that the URL you pasted into the Additional
Boards Manager section of Arduino's preferences did not load correctly in Step #1, or you're not connected to
the internet. Double check that the entire link was copied into the Additional Boards Manager URLs, and that
you're connected to the internet. You might also try closing and restarting the Arduino software to refresh the
preferences.
Click anywhere in the SparkFun AVR Boards box. A version number and an “Install” button will appear. Click the
install button. This will download and install the extension. If you have already installed the SparkFun AVR Boards
Inhaltsverzeichnis
Andere Sparkfun Electronics Andere Handbücher


