sparklike Handheld 3.0 Bedienungsanleitung

SPARKLIKE
HANDHELD™3.0
FAST INSTRUCTION MANUAL
Table of Contents
1. FAST INSTRUCTION MANUAL
2. KURZHANDBUCH
3. MANUAL DE INSTRUCCIONES RAPIDO
4. INSTRUKCJA OBSŁUGI
5. 快速操作手册
6. 빠른 사용 설명서
7. 早わかりマニュアル
Sparklike technology since 2000

SPARKLIKE
HANDHELD™3.0
FAST INSTRUCTION MANUAL
Table of Contents
1. Delivered with the device
2. How does it work
3. How to use and starting up for
the first time
4. How to use encoder button
5. Factors to consider when
measuring
6. Installing the software
7. Installing the USB drivers
8. How to connect to your
computer
9. Using the screen
10. How to create a log file
11. How to erase the last logged
file
12. How to turn off the log mode
13. Enabling the connection with
your computer
14. Information display
15. Inverting the colors of the display
16. Technical specification
Sparklike technology since 2000

3
WARNING
▶ The instrument uses high voltage, therefore
the device should NEVER be used near
computers nor other sensitive electronic
devices.
▶ Persons with heart conditions or who use
pacemakers should not use this device.
▶ The high voltage discharge should never
be directed at humans or at animals either
directly or through a conductive material such
as wires or metal structures.
▶ The Sparkilike Handheld™ should NEVER be
used to measure any flammable substances
nor be used in any flammable environment.
Also make sure that the insulating glass unit
does not contain any flammable substances.
(Such as Isopropanol, Alcohol, Acentone, Xylen,
Thinner)
▶ The device should never be used in wet or in
humid conditions.
▶ Never use the instrument while standing on
unsteady surfaces.
▶ The device is a precision measuring
instrument and should be handled
accordingly. Please, handle the device with
care.
▶ Always turn off the power when instrument is
not in use.
▶ Keep fingers and other body parts clear of
the high voltage area when using the device.
Do not keep the device connected to your
computer nor other electronic devices while
performing measurements.
▶ Do not open the Sparklike Handheld casing.
In such case calibration is void and no safety
guarantee can be granted.
▶ Do not use any other battery charger than
charger provided by the manufacturer.
▶ Do not use any other power source for the
Sparklike Handheld than the battery provided
with the device.
1. . DELIVERED WITH THE DEVICE
1. Sparklike Handheld™ device
2. Neck strap
3. Setup Guide
4. Calibration certificate
5. Battery
6. USB Cable
7. Battery charger and power cord
8. Protective cap
9. Protective hard case
Software, Drivers and Instruction manuals can be
downloaded at sparklike.com/handheld
Delivered with the device
4
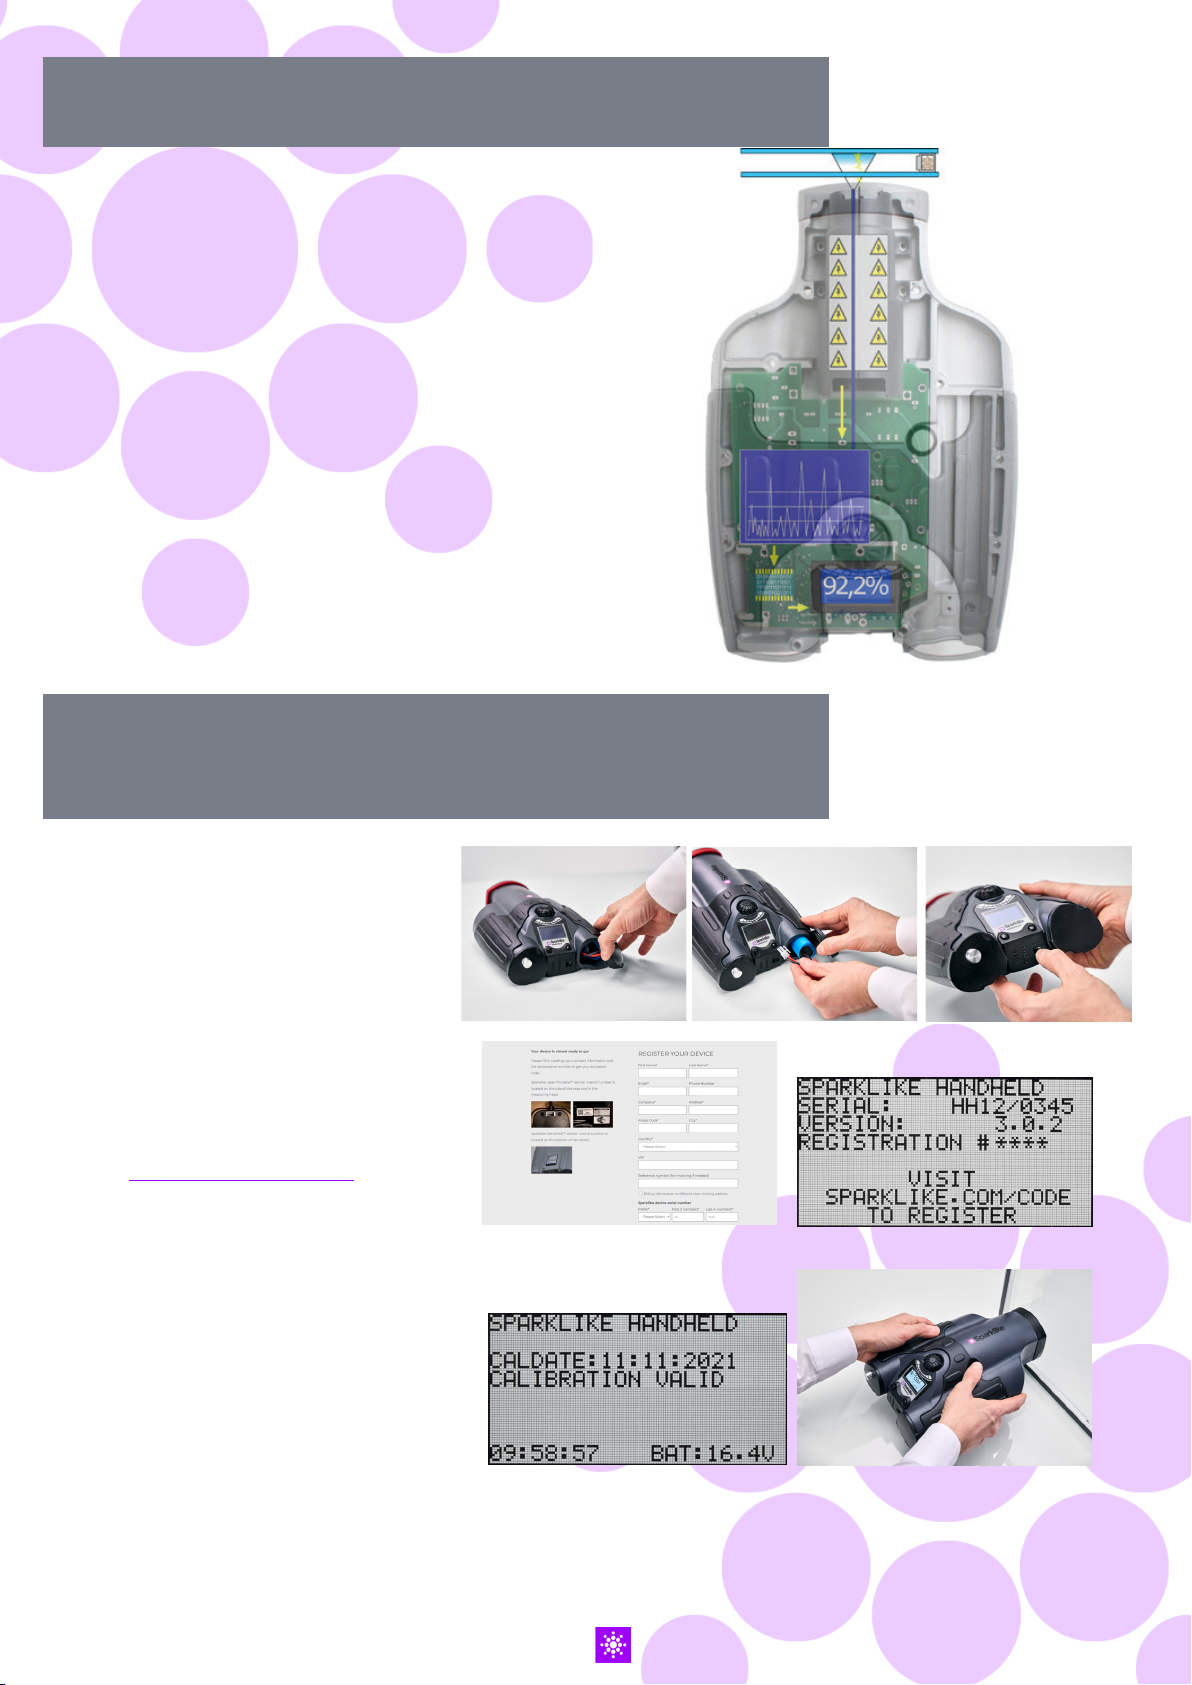
2. HOW DOES IT WORK
A high voltage spark (1) is ignited
inside the IG unit (A). This high
voltage spark causes the argon atom
to emit light to a spectrometer (2).
A microprocessor (3) interprets the
information of the spectrometer and
calculates the argon concentration
on the display (4).
A
1.
3.
2.
4.
3. HOW TO USE AND STARTING UP
FOR THE FIRST TIME
1. Open the battery hatch
2. Insert the battery
3. Connect it to the battery socket
4. Turn on the device from the
ON/OFF switch
5. Register your device to activate
the device at
sparklike.com/register
to receive an activation code to
your e-mail
6. Input the activation code
7. Device settings will show on the
screen
8. The device is ready for use
NOTE: Read all the warnings before the
device is taken into use.
1. 2. 3. 4.
5. 6.
8.
7.

5
4. HOW TO USE ENCODER BUTTON
Press down to:
1. Enter MENU
2. Confirm a selection
Turn to:
3. Scroll in the MENU
4. Name a log file
5. FACTORS TO CONSIDER WHEN MEASURING
Factors affecting the optics:
▶ Coloured glass
▶ Tinted glass (minimal effect)
▶ Strong background light measurement
(against the sun or other source)
▶ Dirt on the glass (minimal effect)
▶ Dirt on the front optical fibre
▶ Mistreated front optical fibre or electrode
Factors making it easier for the spark to
“jump“:
▶ High argon fills
▶ Thin glass (6mm or less)
▶ Thin air space (20mm or less)
▶ Metallic or other conductor on surface 3, such
as low-e coating
▶ Metallic spacer bar
Factors affecting the spark:
▶ Thick glass (over 6 mm)
▶ Plastic films on glass 1 (laminated glass,
coatings, etc.)
▶ Metallic films on glass 1
▶ Metallic components in glass 1
▶ Low Argon fill (less than 90%)
▶ Wide spacer (over 15mm)
▶ Electrode is not in contact with the glass
surface
▶ Sparklike Handheld is not evenly pressed
against the glass
▶ Non-metallic spacers
Correct conditions:
▶ Stable dark background light
▶ The device NOT moved during measurement

6
6. INSTALLING THE SOFTWARE
Download the software from
sparklike.com/handheld Install wizard start up
Select language for the
installation
Select directory where
software files are to be
installed
Select the name of the start
up folder
Select additional tasks
Installation completed
NOTE: The appearance
of the Windows will
vary according to your
computer.

7
7. INSTALLING THE USB DRIVERS
Handheld™ drivers should install automatically in couple of minutes, when you connect
Handheld to a PC with Windows10+ and internet connection. If you have older Windows
version, you can download the driver from Sparklike’s website:
If your PC asks the location of
the driver, give the unpacked
driver folder location
Download the driver
installation folder
Unpack the folder
Connect Handheld to
a PC with USB cable
If your PC doesn’t ask
about the driver, open
the Device Manager, and
select ‘Scan for hardware
changes’
Once you get the new
connection to the Device
Manager’s list, right click
the connection, and select
‘Update Driver Software’
Follow the installer
instructions

8
8. HOW TO CONNECT TO YOUR COMPUTER
The software for Sparklike Handheld™ can be
downloaded at sparklike.com/handheld
Please make sure that all needed software and
drivers are installed before attempting to connect
Sparklike Handheld™ with your computer.
1. Connect the provided USB cable to the USB
socket in Sparklike Handheld™. Connect the
provided USB cable to your computer.
2. Start up Sparklike Handheld™.
3. Enable the connection between your
computer and Sparklike Handheld from the
device by selecting “PC connection”.
4. Start the software.
5. Press the “Read Datalogs”
1.
2.
3.
4.
5.
Software window after
a successful download
Copies all log files to clipboard
Copies selected log files to
clipboard
Sparklike
Handheld
serial number
Downloaded
log files
Information
from selected
log file
Status of transfer
Syncs and
updates time
and date on
Sparklike
Handheld
Shows all
transfered
data
Retrieves all
logs from
Sparklike
Handheld

9
9. USING THE SCREEN
10. HOW TO CREATE A LOG FILE
1. When the ON/OFF button is switched ON,
Sparklike Handheld™ will perform a self test
where it checks itself for errors.
2. The screen will automatically change when
all is tested OK
3. The first fixed screen after start up is a device
information screen.
4. This screen will be important when
communicating with the manufacturer.
5. The information screen shows:
▶ Revision of the device
▶ Last calibration date
▶ Calibration status: “CALIBRATION VALID”,
“CALIBRATION SOON” or “CALIBRATION
EXPIRED”
▶ Current time
▶ Battery charge status
6. Device is now ready to use
7. When the button is pressed for the first time
after start up, the measurement result will show.
8. The current time and battery charge status can
be seen on the screen.
9. It will also indicate that the measurement has
not been logged. (see: How to create a log file)
1. From the main menu, scroll by turning the
encoder button, to the LOG ON/OFF menu.
2. Select this by pressing the encoder button
once.
3. The next screen shows that the logging is to
be started.
4. The device will suggest the following free log
name (number) available. If the suggested
number is OK, simply press the encoder
button to confirm.
5. By turning the encoder button the number
of the log file can be changed. One click will
increase or decrease the number with one.
6. When measuring a text is displayed showing
that the logging mode is on and it will also
display the log file number.

10
11. HOW TO ERASE THE LAST LOGGED FILE
Whenthelogmodeisonandameasurementhasbeen
taken but the operator feels that the measurement
was an error measurement, it is possible to erase this
measurement. This is done to prevent faulty log files
on your computer.
If the measurement is not satisfying:
1. From the main menu, scroll by turning the
encoder button, to the “CLEAR LOG”menu.
2. The log value will be deleted permanently.
Sparklike Handheld™ log data can be downloaded
to your computer. In order to do this, Sparklike
Handheld™has to open its communication port to
your computer This is performed before enabling the
connection from the computer.
12. HOW TO TURN OFF THE LOG MODE
1. From the main menu scroll, by turning the encoder
button, to the LOG ON/OFF menu.
2. Select this by pressing the encoder button once.
3. A screen will display that the log mode has been
turned off.
4. When measuring, a text is displayed that the
measurements have not been logged.
5. To create a new log file with a new name, repeat
procedure explained in chapter 10.
NOTE: When Sparklike Handheld™ is connected
to a computer and the log files have been
retrieved, the log memory will be deleted from
Sparklike Handheld™device. This is the only way
of emptying the memory and should be done
every now and then to prevent the memory from
overfilling.
Andere Handbücher für Handheld 3.0
3
Inhaltsverzeichnis
Sprachen:
Andere sparklike Messgerät Handbücher

sparklike
sparklike GasGlass Bedienungsanleitung

sparklike
sparklike Gasglass handheld Bedienungsanleitung

sparklike
sparklike GASGLASS HANDHELD V2 Bedienungsanleitung

sparklike
sparklike Laser Portable 2.0 Bedienungsanleitung

sparklike
sparklike Laser Portable 2.0 Bedienungsanleitung

sparklike
sparklike Handheld 3.0 Bedienungsanleitung

sparklike
sparklike Handheld 3.0 Bedienungsanleitung

sparklike
sparklike Laser Portable 2.1 Bedienungsanleitung

sparklike
sparklike Handheld 3.0 Bedienungsanleitung

sparklike
sparklike Laser Portable 2.1 Bedienungsanleitung


